Installing SD-WAN VPX Standard Edition AMI on AWS
The Citrix SD-WAN™ SE appliances bond multiple network paths in the single virtual path. The virtual paths are monitored so that critical application paths are always routed through optimal paths. This solution enables customers to deploy applications in the cloud and utilize multiple service provider networks for seamless delivery of applications to the end-users.
To create an SD-WAN SE-VPX on Amazon Web Services(AWS), you go through the same process as with creating any other instance, setting a few instance parameters to non-default settings.
Instantiating an SD-WAN Virtual Appliance (AMI) on AWS:
To install an SD-WAN virtual appliance in an AWS VPC, you need an AWS account. You can create an AWS account at http://aws.amazon.com/. SD-WAN is available as an Amazon Machine Image (AMI) in AWS Marketplace.
Note: Amazon makes frequent changes to its AWS pages, so the following instructions may not be up-to-date.
To instantiate an SD-WAN virtual appliance (AMI) on AWS:
- In a web browser, type http://aws.amazon.com/.
- Click My Account/Console, and then click My Account to open the Amazon Web Services Sign in page.
- Use your AWS account credentials to sign in. This takes you to the Amazon Web Services page.
Citrix SD-WAN SE appliances offer the following AWS service instances:
- VPC Dashboard - isolated portion of the AWS cloud populated by AWS objects, such as EC2 instances
- Enabled by creating a VPC in AWS. See the following configuration steps.
- EC2 Dashboard - elastic compute cloud, resizable virtual services / instances
- Enabled by creating NetScaler® SD-WAN AMI. See below for configuration steps.
- CIDR – Classless Inter-Domain Routing block, consisting of continuous IP address range, used to specify your VPC (cannot be larger than 16 regions).
SD-WAN web interface
- Configure Citrix® (formerly NetScaler SD-WAN) SD-WAN AMI
The following are the requirements and limitations for deploying SD-WAN SE-VPX AMI in AWS:
Minimum requirements
- AWS EC2 Instance Type: c4.2xlarge, c4.4xlarge, c5.xlarge, c5.2xlarge, c5.4xlarge, m4.2xlarge, m4.4xlarge, M5.2xlarge, m5.4xlarge
- Virtual CPU: 8
- RAM: 15 GB
- Storage: 160 GB
- Network Interfaces: minimum of 2 (one management, one for LAN/WAN)
- BYOL – bring-your-own-license and subscription
From 11.3 release onwards, Citrix SD-WAN has introduced support for the M5 and C5 instances. The newer AWS regions such as Hong Kong and Paris only support M5 and C5 instances.
The M5 and C5 instances have improved hardware performance and are designed for higher demanding workloads. The M5 and C5 instances deliver better price/performance than the M4 instances on a per-core basis.
NOTE
The M5 and C5 instances are supported from a fresh provision of 11.3 and higher version only. To keep using the M5 and C5 instances, you cannot downgrade from 11.3 version since the M5 and C5 instances are not supported on any firmware version prior to 11.3 release.
Limitations
-
AWS does not allow bridging of interface so Fail-to-Wire is not an option for configuring interface groups.
-
Instances provisioned with 10.2.4/11.2.1 versions, AMIs cannot change their instance type to M5/C5.
Citrix (formerly NetScaler SD-WAN) SD-WAN with AWS
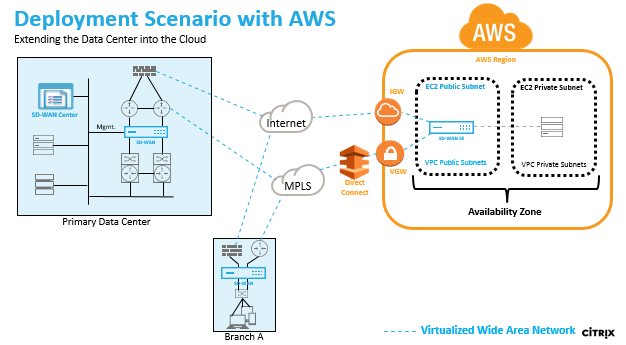
Deploying an AWS region with a specified Availability Zone. Within that Virtual Private Cloud (VPC) infrastructure, SD-WAN Standard Edition AMI (Amazon Machine Image) is deployed as the VPC Gateway.
- The VPC private has routes towards the VPC Gateway.
- SD-WAN instance has a route towards the AWS VGW (VPN Gateway) for direct connect and another route towards IGW (Internet Gateway) for internet connectivity.
- Connectivity between Data Center, Branch, and Cloud applying different transport modes utilizing multiple WAN paths simultaneously.
- Automatic Route Learning with OSPF and BGP.
- Single IPsec tunnel across multiple paths where security renegotiation is not required upon any link failure occurrences.
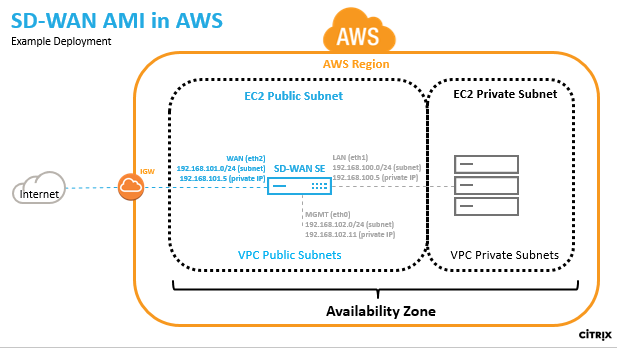
In AWS a subnet and IP address must be defined for each SD-WAN AMI interface. The number of interfaces utilized depends on the deployment use case. If the goal is to reliably access application resources that are on the LAN side of the VPX (inside the same Region), the VPX can be configured with three Ethernet interfaces; one for management on eth0, one for LAN on eth1, and one for WAN on eth2.
Alternatively, if the goal is to hair-pin traffic through the VPX to some other region or to the public internet, the VPX can be configured with two Ethernet interfaces; one for management on eth0, and a second for LAN/WAN on eth1.
SD-WAN SE AMI in AWS overview
- Create VPC in AWS using VPC Dashboard
To get started with the Amazon virtual private cloud you need to create a VPC, which is a virtual network dedicated to your AWS account.
- Define CIDR blocks/Subnets and assign to VPC - for identifying the device in the network. For example. 192.168.100.0/22 is selected for the VPC in the example network diagram encompassing the WAN, LAN, and Management subnets – 192.168.100.0 – 192.168.103.255) - 192.168.100.0/22
- Define an Internet Gateway for the VPC – for communicating with outside the cloud environment
- Define routing for each defined subnet - for communication between the subnets and Internet
- Define Network ACLs (Access Control List) - for controlling the inflow/outflow of the traffic from/to the subnet for security purposes
- Define Security Group - for controlling the inflow/outflow of the traffic from/to each instance of the network device
Create an Citrix SD-WAN AMI:
-
For more information,refer to the EBS best practices and Must-know best practices for Amazon EBS encryption
-
For defining Security groups the policy must look like the following:
- Outbound: Allow All traffic
- Inbound:
- SSH from all IP addresses / subnets from where management IP will be accessed.
- All traffic from your AWS VPCs (private IPs)
- All traffic from the WAN side public IPs of Citrix SD-WAN peer appliances hosted on prem or in cloud.
- Define the Network Interfaces for the EC2 instance
- Create Elastic IP addresses for the EC2 instance
- Define Security for the EC2 instance and network interfaces
Connect to the SD-WAN web interface:
- License
- Install identify using Local Change Management
Create a VPC in AWS - Virtual Private Cloud (VPC)
To create VPC:
-
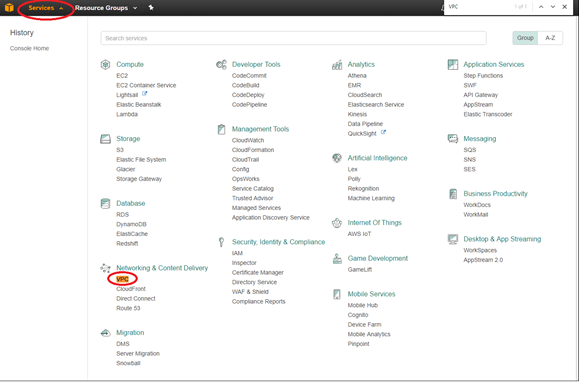
From the AWS management console tool bar, select Services > VPC (Networking & Content Delivery).
-
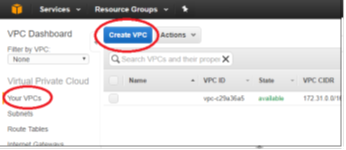
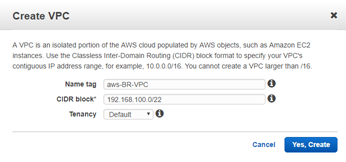
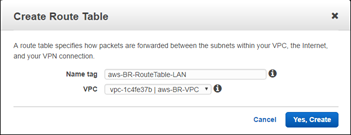
Select your VPCs, then click the Create VPC button.
-
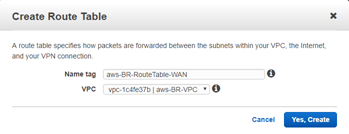
Add Name tag, CIDR block according to your network diagram and Tenancy = default, and click Yes, Create.
Define an internet gateway for the VPC
To define the Internet gateway for the VPC:
-
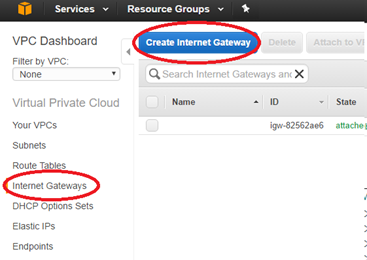
From the AWS management console, select Internet Gateways > Create Internet Gateway. The Internet Gateway traffic matching the 0.0.0.0/0 route can be configured in the route table. It is also required for external access to the SD-WAN AMI web interface for further configuration.
-
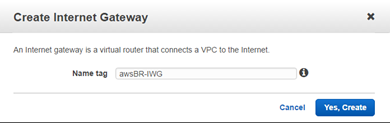
Give the IGW a Name tag, and click Yes, Create.
-
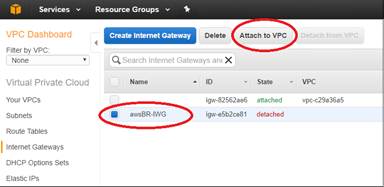
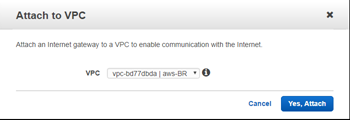
Select the newly created IGW and click Attach to VPC.
-
Select the previously created VPC and click Yes, Attach.
Define subnets for the VPC to differentiate mgmt, LAN, and WAN
To define subnets for VPC:
-
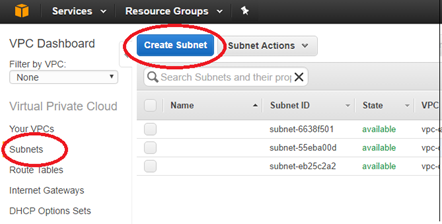
From the AWS management console, select Subnets > Create Subnets to create Mgmt, LAN, and WAN subnets. Use the defined subnets to distinguish between the LAN, WAN, and Mgmt subnets defined in the SD-WAN configuration.
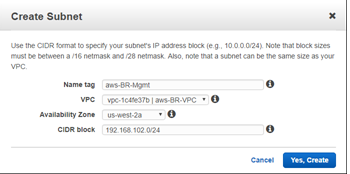
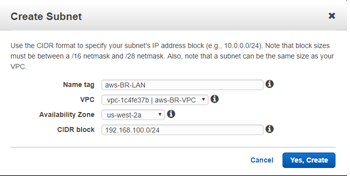
- Enter the details specific for the Mgmt subnet of the VPX, then create it using the Yes, Create button.
- Name tag: name to identify different subnets (Mgmt, LAN, or WAN)
- VPC: <the VPC previously created>
- Availability Zone: <set at discretion>
- CIDR block: subnet specific to the defined name (Mgmt, LAN, or WAN) that is a smaller subset of the CIDR previously defined
-
Repeat the process until you have created a subnet for the Mgmt, LAN, and WAN networks.
Define route tables for the management subnet
To define route tables:
-
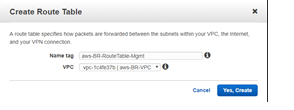
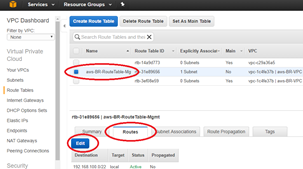
From the AWS management console, select Route Tables > Create Route Table to create route tables for the Mgmt, LAN, and WAN subnets.
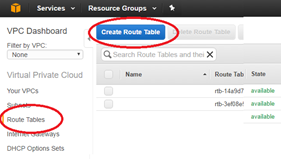
- Enter the detail for the Mgmt subnet
- Name tag: name to identify different subnets (Mgmt, LAN, or WAN)
- VPC: The previously created VPC
-
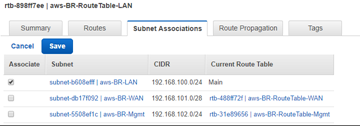
With the newly created route table still highlighted, select Subnet Association > Edit.
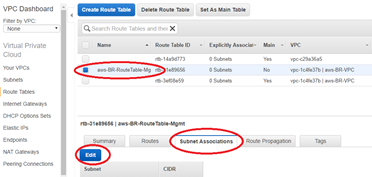
-
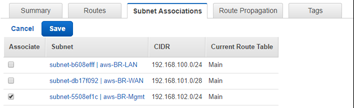
Make the association with the desired subnet, then click Save.
-
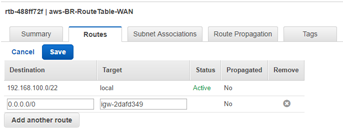
With the newly created route table still highlighted, select Routes > Edit.
-
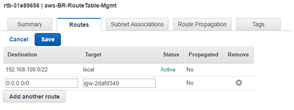
Click Add another route button (only required for the Mgmt, and WAN subnets), then Save.
- Destination: 0.0.0.0/0
- Target: The Internet Gateway (igw-xxxxxxx previously defined)
Note
AWS provides a global route table in the EC2 instance but the NetScaler SD-WAN AMI will use local route tables so that the user can control traffic forwarding to the Virtual Path.
Define route tables for the WAN subnet
To define route tables:
-
From the AWS management console, select Route Tables > Create Route Table to create route tables for the Mgmt, LAN, and WAN subnets.
-
Enter the details for the WAN subnet:
- Name tag: name to identify different subnets (Mgmt, LAN, or WAN)
- VPC: The previously created VPC
-
With the newly created route table still highlighted, select Subnet Association > Edit.
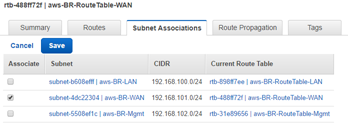
- Make the association with the desired subnet, then click Save.
- With the newly created route table still highlighted, select Routes > Edit.
-
Click Add another route button (only required for the Mgmt, and WAN subnets), then Save.
- Destination: 0.0.0.0/0
- Target: <The Internet Gateway> (igw-xxxxxxx previously defined)
Define route tables for the LAN subnet
To define route tables for the LAN subnet:
-
From the AWS management console, select Route Tables > Create Route Table to create route tables for the Mgmt, LAN, and WAN subnets.
-
Enter the details for the LAN subnet:
- Name tag: name to identify different subnets (Mgmt, LAN, or WAN)
- VPC: The previously created VPC
- With the newly created route table still highlighted, select Subnet Association > Edit.
-
Make the association with the desired subnet, then click Save.
Note
To route LAN side traffic through SD-WAN, associate the target destination as the SD-WAN LAN interface id in the SD-WAN LAN route table. The target for any destination can be set to interface id only after creating the instance and attaching network interfaces to that instance.
Create an SD-WAN SE AMI
To create the EC2 instance:
-
From the AWS management console tool bar, select Services > EC2 (Compute).
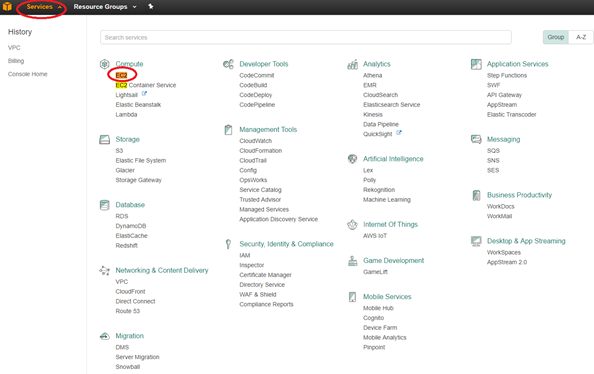
-
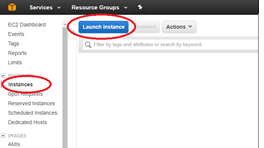
Select the EC2 dashboard tool bar, select Instances > Launch Instance.
-
Use the AWS Marketplace tab to search for the SD-WAN Amazon Machine Image (AMI) or use the My AMIs tab to locate an owned or shared SD-WAN AMI, locate Citrix NetScaler SD-WAN Standard Edition and then click Select.

- Confirm the selection with Continue.
-
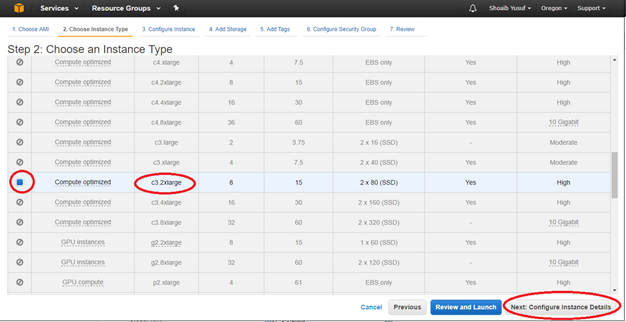
On the Choose Instance Type screen, select the EC2 Instance Type that was identified during preparation, then select Next: Configure Instance Details.
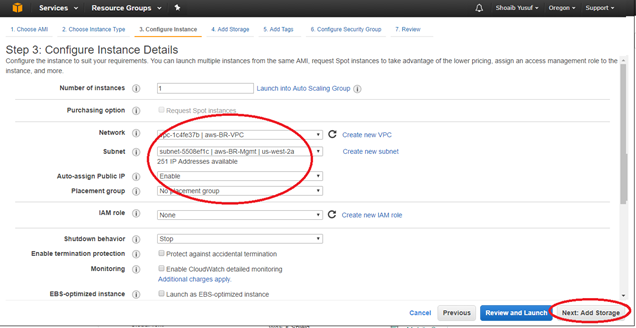
- Enter instance details (anything not specified must be left unset/default):
- Number of Instances: 1
- Network: select VPC previously created>
- Subnet: select Mgmt Subnet previously defined
- Auto-assigning Public IP: enabled
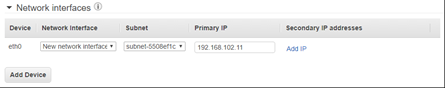
- Network interfaces > Primary IP: enter predefined Mgmt IP
-
Click Next: Add Storage
Note
Associate the EC2 instance with the Mgmt Subnet to associate the first EC2 interface (eth0) with the SD-WAN Mgmt interface. If eth0 is not associated with the SD-WAN Mgmt interface, connectivity is lost following a reboot.1.
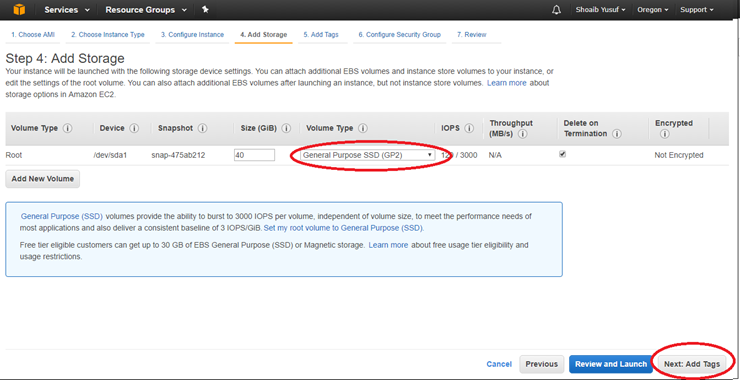
- Enter the following information for the Root Storage:
- Volume Type: General Purpose (SSD) GP2
-
Then select Next: Tag Instance
-
Give the EC2 instance a name by specifying a value for the default Name Tag. Optionally create other desired Tags.
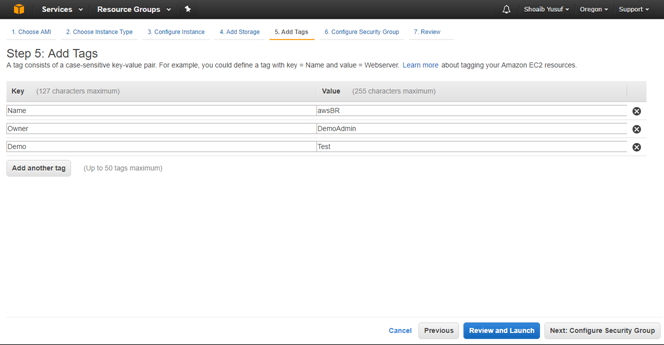
- Then select Next: Configure Security Group.
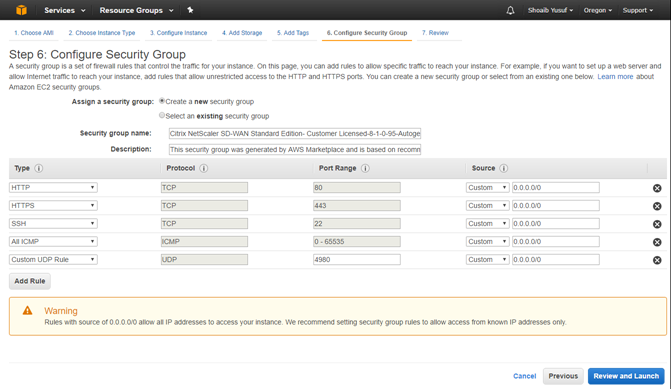
- Select an existing Security Group or create a Security Group:
- Default security group generated includes HTTP, HTTPS, SSH, and Click the Add Rule button to add two more:
- All ICMP with Source: Custom 0.0.0.0/0
- Custom UDP Rule with Port Range: 4980 and Source: custom <known IP addresses from partner SD-WAN>
-
Select Review and Launch.
- After complete with reviewing, select Launch.
-
In the Key Pair pop-up, either select an existing key pair or create a new key pair, then select Launch Instance.
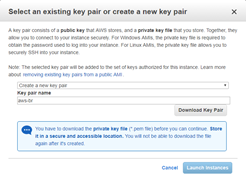
Important
If a new key pair is created, be sure to download and store it in a safe location.
-
Citrix SD-WAN SE AMI must now be launched successfully.

Note
A Security Group is a set of firewall rules that controls traffic for an EC2 Instance. Inbound and outbound rules can be edited during and after EC2 launch. Each EC2 Instance must have a Security Group assigned. Also, each Network Interface must have a Security Group assigned. Multiple Security Groups can be used to apply distinct sets of rules to individual Interfaces. The default Security Group added by AWS only allow traffic within a VPC.
The Security Group assigned to the NetScaler SD-WAN AMI and its interfaces must accept SSH, ICMP, HTTP, and HTTPS. The Security Group assigned to the WAN interface must also accept UDP on port 4980 (for Virtual Path support). Refer to AWS help for more detail on Security Group configuration information. Important
Wait two hours if provisioned from a new account and then retry
-
Navigate back to your AWS Console: EC2 Dashboard.
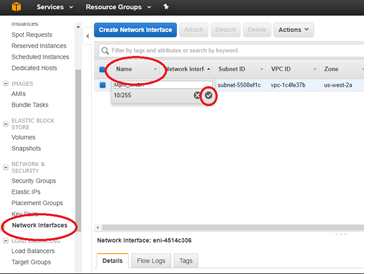
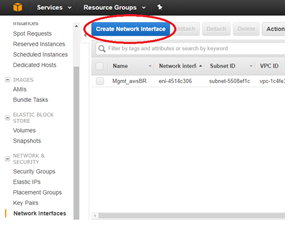
- From the tool bar, under Network & Security select Network Interfaces, highlight the Mgmt interface and Edit the Name tag to give the interface a useful name.
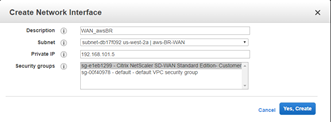
- Then click Create Network Interface to create the LAN interfaces:
- Description: <a user-defined description for the interface>
- Subnet: <the subnet previously defined for the interface>
- Private IP: <the private IP for the interface previously defined during preparation>
- Security Group: <the appropriate security group for the interface>
-
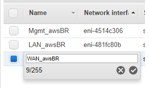
Repeat and click Create Network Interface to create the WAN interface.
-
Edit the Name tag for each new interface and give a useful name.
-
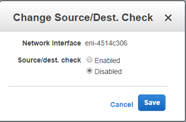
Highlight the Mgmt Interface and select Actions > Change Source/Dest. Check to disable Source/Dest. Check, then select Save.
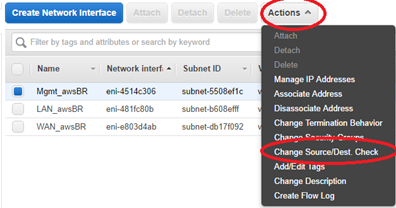
-
Repeat for LAN and WAN interfaces.
-
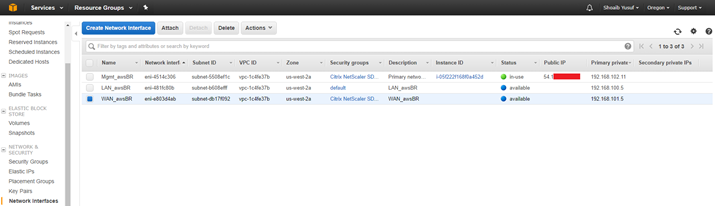
At this point all the Network Interfaces: Mgmt., LAN, and WAN each are configured with a Name, Primary private IP, and disabled for Source/Dest. Check attribute. Only the Mgmt. Network Interface has a Public IP associated with it.
Important
Disabling the Source/Dest. Check attribute enables the interface to handle network traffic that is not destined for the EC2 instance. As the NetScaler SD-WAN AMI acts as a go-between for network traffic, the Source/Dest. Check attribute must be disabled for proper operation.
The Private IPs defined for these Network Interfaces, ultimately, must match the IP addresses in your SD-WAN configuration. It can be necessary to define more than one Private IP for the WAN Network Interface if that interface is associated with more than one WAN Link IP in the SD-WAN configuration for this site node. This can be accomplished by defining Secondary Private IPs for the WAN Interface as needed.
-
From the EC2 Dashboard tool bar, select Instances.
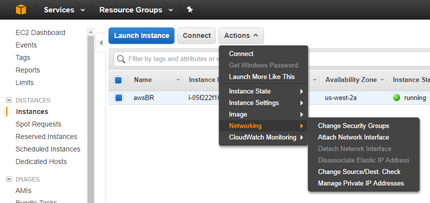
-
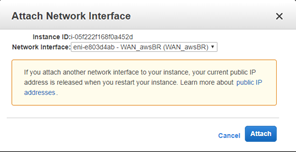
Highlight the newly created instance, then select Actions > Networking > Attach Network Interface.
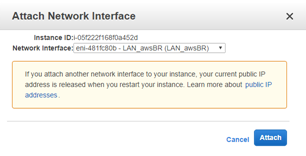
-
Attach first the LAN network interface and then the WAN network interface to the SD-WAN SE AMI.
Note
Attaching the Mgmt, LAN, and WAN in that order attaches to eth0, eth1, eth2 in the SD-WAN AMI. This aligns with the mapping of the provisioned AMI and ensures that interfaces are not reassigned incorrectly in the event of AMI reboot.
-
From the EC2 Dashboard tool bar, select Elastic IPs (EIP), then click Allocate new address.
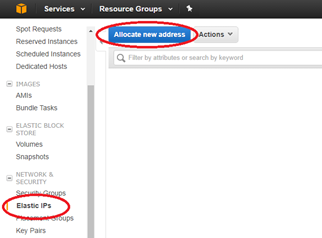
- Click Allocate to allocate a new IP address, then Close after the New address request succeeded.
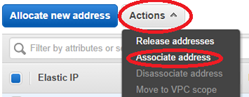
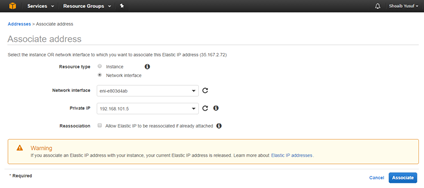
- Highlight the new EIP and select Action > Associate address to associate the EIP with the Mgmt. Interface, then click Associate.
- Resource type: <network interface>
- Network interface: <previously created Mgmt. Network Interface>
- Private IP: <previously defined private IP for Mgmt>
-
Repeat the process to associate another new EIP with the WAN interface.
Configure SD-WAN SE AMI - SD-WAN Web management interface
To configure SD-WAN SE AMI:
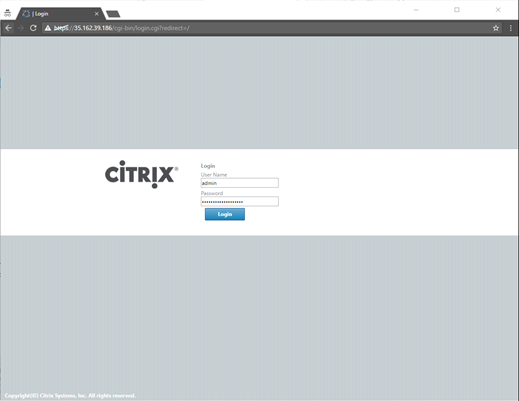
- At this point, you must be able to connect to the SD-WAN SE AMI’s management interface using a web browser.
- Enter the Elastic IP (EIP) associated with the Mgmt. Interface. You can create a security exception, if the security certificate is not recognized.
-
Log in to the SD-WAN SE AMI using the following credentials:
- User name: admin
- Password: <aws-instance-id> (example; i-00ab111abc2222abcd)
Note
If the Mgmt. Interface cannot be reached, check the following:
- Make sure the EIP is correctly associated with the Mgmt. interface
- Make sure the EIP responds to ping
- Makes sure the Mgmt. interface Route Table includes an Internet Gateway route (0.0.0.0/0)
- Make sure the Mgmt. interface Security Group is configured to allow HTTP/HTTPS/ICMP/SSH
Starting with release 9.1 SD-WAN AMI, users can also log in to the SD-WAN AMI console using ssh admin@<Mgmt. EIP>, assuming that the key pair for the EC2 Instance has been added to the user’s SSH key chain.
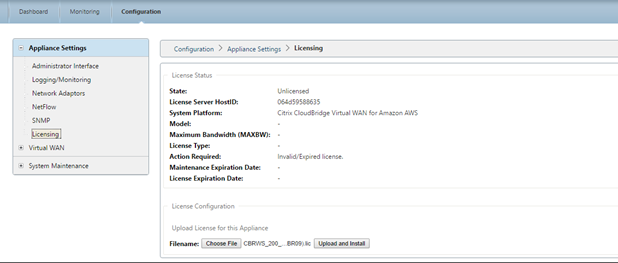
- For SD-WAN SE bring-your-own-license (BYOL) AMI, a software license must be installed:
- On the SD-WAN web interface, navigate to Configuration > Appliance Settings > Licensing
- From License Configuration: Upload License for this Appliance, select Choose File, browse and open the SD-WAN SE AWS license, then click Upload and Install
- After successful upload, License Status will indicate State: Licensed
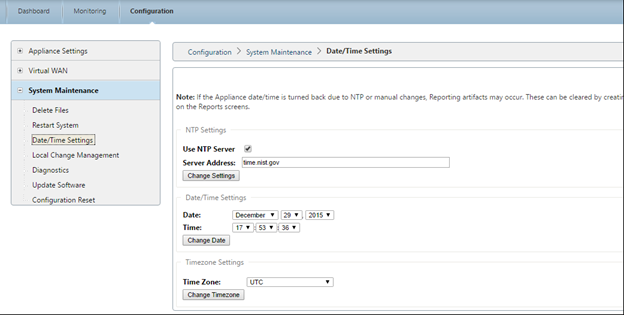
- Set the appropriate Data/Time for the new AMI:
- On the SD-WAN web interface, navigate to Configuration > System Maintenance > Date/Time Settings
- Set the correct date and time using NTP, Date/Time Setting, or Timezone
Note
The SD-WAN SE AMI Virtual WAN Service remains disabled until an appliance package (Software + Configuration) is installed on the AMI.
Add SD-WAN SE AMI to your SD-WAN environment
To add SD-WAN AMI to your SD-WAN environment:
- Navigate to your SD-WAN Center or Master Control Node for your SD-WAN environment.
- Add a new site node using the Configuration Editor:
- Add site: model VPX, Mode: client
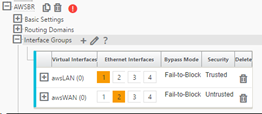
- Interface Groups: awsLAN = eth1, awsWAN = eth2 (untrusted)
- Virtual IP Address: 192.168.100.5 = awsLAN, 192.168.101.5 = awsWAN with awsLAN virtual IP address being configured, the SD-WAN advertises the LAN subnet of 192.168.100.5/24 as a local route to the SD-WAN Environment (refer to the Connections > <AWSnode > Routes). WAN Links:
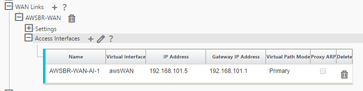
- AWSBR-WAN with Access Type Public Internet, Autodetect Public IP if client node or configure the EIC for WAN link if MCN node, Access Interfaces: awsWAN 192.168.101.5 with gateway 192.168.101.1 (#.#.#.1 is typically the AWS reserved gateway).
-
In the Configuration Editor validate the path association under Connections > DC > Virtual Paths > DC-AWS > Paths.
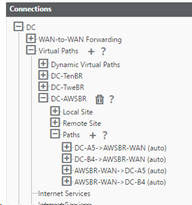
Note
The Virtual Path is used across the AMI WAN interface to push software and configuration updates to the SD-WAN AMI instead of via direct connection to the Mgmt. interface.
Private IP addresses must be defined on the EC2 WAN Network Interface for every WAN Link IP in the Configuration Editor. This can be accomplished by defining one or more Secondary Private IPs for the Network Interface as necessary.
Important
Recall the assigned mapping in the AWS EC2 dashboard assigning Mgmt. to eth0, LAN to eth1 and WAN as eth2
Amazon reservices the first four IP addresses and the last IP address in each subnet CIDR block and cannot be assigned to an instance. For example, in a subnet with CIDR block 192.168.100.0/24, the following five IP addresses are reserved:
- 192.168.100.0: Network address
- 192.168.100.1: Reserved by AWS for the VPC router
- 192.168.100.2: Reserved by AWS for the DNS server
- 192.168.100.3: Reserved by AWS for future use
- 192.168.100.255: Network broadcast address, which is not supported in a VPC
-
Save and Export the newly created SD-WAN configuration and export to the Change Management Inbox.

- Navigate to the MCN Change Management and run through the change management process to push the latest configuration to the SD-WAN environment informing all existing SD-WAN nodes of the newly added AWS node and the subnets (virtual interfaces) associated with it. Make sure to upload the software package specific to VPX in the Change Preparation step that matches the current software used by the existing SD-WAN environment.
- From the Change Management page, download the package generated specifically for the new AWS node using the active link.
- Navigate back to the SD-WAN SE AMI’s management interface using the assigned EIP for the Mgmt. interface.
- Navigate to Configuration > System Maintenance > Local Change Management.
- Click Choose File to browse and Upload the active AWS software/config package recently downloaded.
-
After successful Local Change Management, the web interface must auto-refresh with the latest installed software, with the Virtual WAN Service still disabled.
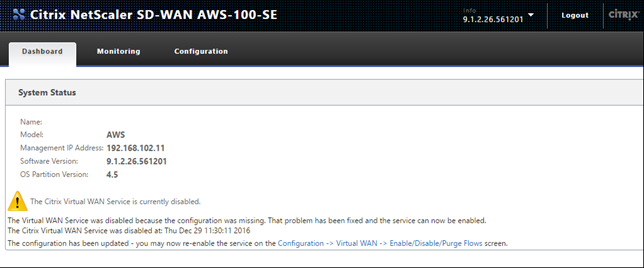
- On the SD-WAN SE AMI section, navigate to Configuration > Virtual WAN Enable/Disable/Purge Flows and enable the service using the Enable button.
-
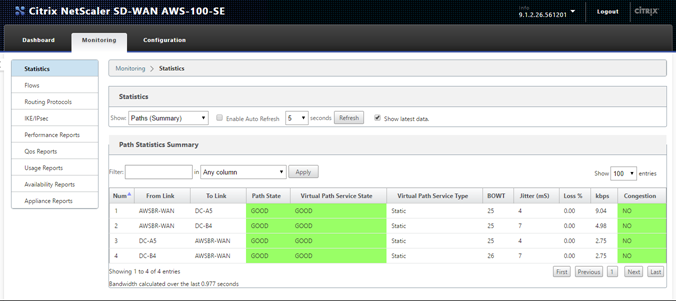
Upon successful connectivity on the WAN interface, the SD-WAN reports Good Path State on the Monitoring > Statistics > Paths page.
Troubleshooting
The correct private Internet Web Gateway (IWG) IP must be used in the SD-WAN Access Interface configuration
- If an incorrect IWG is used in the Configuration Editor to define the WAN Link for the AWS Site (Virtual IP Address and the correct Gateway) then Virtual Path fails to establish.
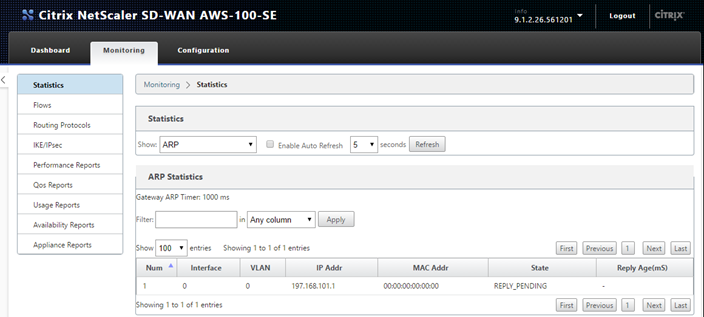
- A quick way to check if the IWG is incorrectly configured is to check the SD-WAN ARP table.
SD-WAN built in Packet Capture tool can help confirm proper packet flow
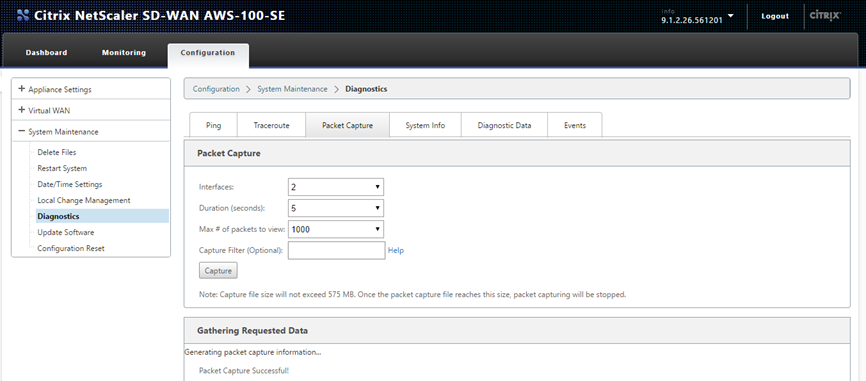
- Navigate to the Configuration > System Maintenance > Diagnostic page of the SD-WMA AMI.
- Select the Packet Capture tab, and set the following settings, then click Capture:
- Interfaces: To capture on eth2 which was associated with the WAN interface.
- The capture output on the webpage must show the UDP probe packets leaving the SD-WAN SE AMI with the WAN VIP / Private IP as the source, with a destination of the Static Public IPs used for the MCN, also the returning UDP packet with the source of the MCN Static Public IP and the destination of the local VIP/Private IP (which was NAT’d by the IWG).
Note
This can typically occur when an IP address is created outside of the CIDR block assigned to the VPC.
NOTE
From 10.2.6 and 11.0.3 release onwards, it is mandatory to change the default admin user account password while provisioning any SD-WAN appliance or deploying a new SD-WAN SE VPX. This change is enforced using both CLI and UI.
A system maintenance account - CBVWSSH, exists for development and debugging and has no external login permissions. The account can only be accessed through a regular administrative user’s CLI session.
In this article
- SD-WAN web interface
- Minimum requirements
- Limitations
- Citrix (formerly NetScaler SD-WAN) SD-WAN with AWS
- SD-WAN SE AMI in AWS overview
- Create a VPC in AWS - Virtual Private Cloud (VPC)
- Define an internet gateway for the VPC
- Define subnets for the VPC to differentiate mgmt, LAN, and WAN
- Define route tables for the management subnet
- Define route tables for the WAN subnet
- Define route tables for the LAN subnet
- Create an SD-WAN SE AMI
- Configure SD-WAN SE AMI - SD-WAN Web management interface
- Add SD-WAN SE AMI to your SD-WAN environment
- Troubleshooting