-
-
-
VMware ESX、Linux KVM、およびCitrix HypervisorでNetScaler ADC VPXのパフォーマンスを最適化する
-
-
NetScalerアプライアンスのアップグレードとダウングレード
-
-
-
-
-
-
-
-
-
-
-
-
This content has been machine translated dynamically.
Dieser Inhalt ist eine maschinelle Übersetzung, die dynamisch erstellt wurde. (Haftungsausschluss)
Cet article a été traduit automatiquement de manière dynamique. (Clause de non responsabilité)
Este artículo lo ha traducido una máquina de forma dinámica. (Aviso legal)
此内容已经过机器动态翻译。 放弃
このコンテンツは動的に機械翻訳されています。免責事項
이 콘텐츠는 동적으로 기계 번역되었습니다. 책임 부인
Este texto foi traduzido automaticamente. (Aviso legal)
Questo contenuto è stato tradotto dinamicamente con traduzione automatica.(Esclusione di responsabilità))
This article has been machine translated.
Dieser Artikel wurde maschinell übersetzt. (Haftungsausschluss)
Ce article a été traduit automatiquement. (Clause de non responsabilité)
Este artículo ha sido traducido automáticamente. (Aviso legal)
この記事は機械翻訳されています.免責事項
이 기사는 기계 번역되었습니다.책임 부인
Este artigo foi traduzido automaticamente.(Aviso legal)
这篇文章已经过机器翻译.放弃
Questo articolo è stato tradotto automaticamente.(Esclusione di responsabilità))
Translation failed!
負荷分散
負荷分散を構成するには、まずサービスを作成する必要があります。次に、仮想サーバーを作成して、サービスをその仮想サーバーにバインドします。デフォルトでは、NetScalerアプライアンスは各サービスに1つのモニターをバインドします。サービスをバインドしたら、すべての構成内容が正しいことを確認します。
注:構成を適用した後で、各エンティティがどのように実行されているかを示す統計情報を表示できます。統計ユーティリティ、または stat lb vserver <仮想サーバー名>コマンドを使用します。仮想サーバー名>
オプションで、サービスに重要度(Weight)を割り当てることができます。割り当てられた重要度に基づいてサービスが負荷分散されます。ただし、負荷分散機能の導入時には詳細な重要度を構成せずに、基本的なパーシステンス設定(特定サーバーへの接続の保持)と構成保護設定のみを行えます。
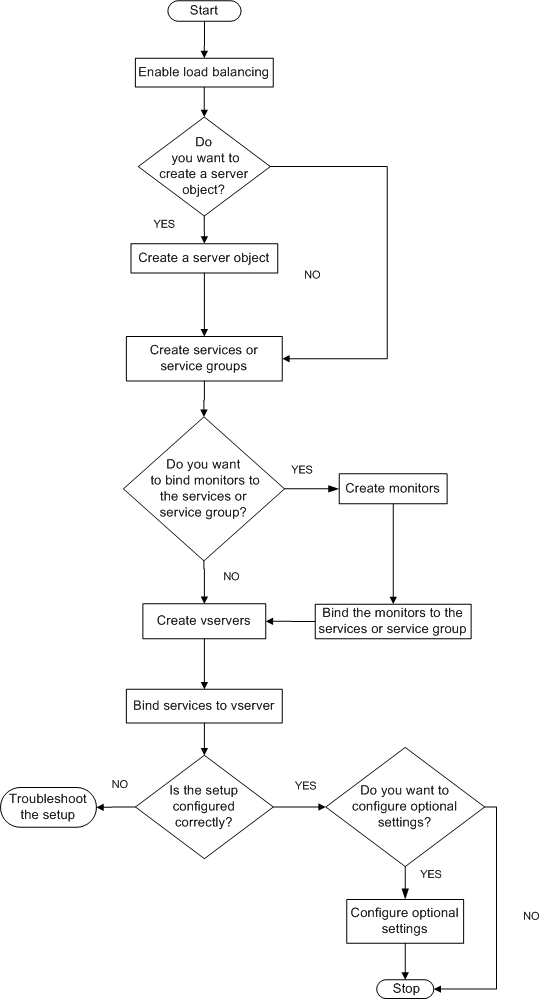
次のフローチャートは、一連の構成タスクを示しています。
図1:負荷分散を構成するための一連のタスク

負荷分散を有効にする
負荷分散を構成する前に、負荷分散機能が有効になっているか確認します。
CLIを使用して負荷分散を有効にするには
コマンドプロンプトで次のコマンドを入力し、負荷分散を有効にして構成を確認します。
- enable feature lb
-
show feature
例
``` pre codeblock
enable feature lb Done show feature
  Feature                  Acronym          Status
  -------                  -------          ------   1)  Web Logging              WL               OFF   2)  Surge Protection         SP               OFF   3)  Load Balancing           LB               ON   .   .   .   9)  SSL Offloading           SSL              ON   .   .   .  Done  <!--NeedCopy--> ```
GUIを使用して負荷分散を有効にするには
- ナビゲーションペインで、[System] を展開し、[Settings] をクリックします。
- 詳細ペインの[Modes and Features]で、[Change basic features]をクリックします。
- [Configure Basic Features]ダイアログボックスで、[Load Balancing]チェックボックスをオンにして[OK]をクリックします。
- 「Enable/Disable Feature(s)?」メッセージが表示されたら、[はい]をクリックします。
サービスと仮想サーバーの構成
負荷分散するサービスを特定したら、負荷分散の初回構成を実装できます。これを行うには、サービスオブジェクトと負荷分散仮想サーバーを作成して、それらをバインドします。
CLIを使用して初期負荷分散構成を実装するには
コマンドプロンプトで次のコマンドを入力し、初回構成を実装して確認します。
-
<add service \<名前\> \<IPアドレス\> \<サービスタイプ\> \<ポート\>
-
<add lb vserver \<仮想サーバー名\> \<サービスタイプ\> \[\<IPアドレス\> \<ポート\>\]
-
<bind lb vserver \<名前\> \<サービス名\>
-
<show service bindings \<サービス名\>
例
 > add service service-HTTP-1 10.102.29.5 HTTP 80
  Done
 > add lb vserver vserver-LB-1 HTTP 10.102.29.60 80
  Done
 > bind lb vserver vserver-LB-1 service-HTTP-1
  Done
 > show service bindings service-HTTP-1
    service-HTTP-1 (10.102.29.5:80) - State : DOWN

      1)      vserver-LB-1 (10.102.29.60:80) - State : DOWN
  Done
 <!--NeedCopy-->
GUIを使用して初期負荷分散構成を実装するには
- [Traffic Management][Load Balancing]の順に選択します。
- 詳細ペインの[Getting Started]で、[Load Balancing wizard]をクリックし、ウィザードの説明に従って基本的な負荷分散セットアップを作成します。
- ナビゲーションペインに戻り、[Load Balancing]を展開して、[Virtual Servers]をクリックします。
- 構成した仮想サーバーを選択し、ページの下部に表示されるパラメーターが正しく構成されていることを確認します。
- [開く] をクリックします。
- [Services]タブの各サービスで[Active]チェックボックスがオンになっていることを確認し、各サービスが仮想サーバーにバインドされていることを確認します。
共有
共有
This Preview product documentation is Cloud Software Group Confidential.
You agree to hold this documentation confidential pursuant to the terms of your Cloud Software Group Beta/Tech Preview Agreement.
The development, release and timing of any features or functionality described in the Preview documentation remains at our sole discretion and are subject to change without notice or consultation.
The documentation is for informational purposes only and is not a commitment, promise or legal obligation to deliver any material, code or functionality and should not be relied upon in making Cloud Software Group product purchase decisions.
If you do not agree, select I DO NOT AGREE to exit.