Enabling HDX™ Insight data collection
HDX Insight enables IT to deliver an exceptional user experience by providing unprecedented end-to-end visibility into the ICA traffic that passes through the NetScaler instances and is a part of NetScaler Console Analytics. HDX Insight delivers compelling and powerful business intelligence and failure analysis capabilities for the network, virtual desktops, applications, and application fabric. HDX Insight can both instantly triage on user issues, collects data about virtual desktop connections, and generates AppFlow records and presents them as visual reports.
The configuration to enable data collection in the NetScaler differs with the position of the appliance in the deployment topology.
Enabling data collection for monitoring NetScalers deployed in LAN user mode
External users who access Citrix Virtual App and Desktop applications must authenticate themselves on the NetScaler Gateway. Internal users, however, might not require to be redirected to the NetScaler Gateway. Also, in a transparent mode deployment, the administrator must manually apply the routing policies, so that the requests are redirected to the NetScaler appliance.
To overcome these challenges, and for LAN users to directly connect to Citrix Virtual App and Desktop applications, you can deploy the NetScaler appliance in a LAN user mode by configuring a cache redirection virtual server, which acts as a SOCKS proxy on the NetScaler Gateway appliance.
Note: NetScaler Console and NetScaler Gateway appliance reside in the same subnet.
To monitor NetScaler appliances deployed in this mode, first add the NetScaler appliance to the NetScaler Insight inventory, enable AppFlow, and then view the reports on the dashboard.
After you add the NetScaler appliance to the NetScaler Console inventory, you must enable AppFlow for data collection.
Note:
- On a NetScaler instance, you can navigate to Settings > AppFlow > Collectors, to check if the collector (that is, NetScaler Console) is up or not. NetScaler instance sends AppFlow records to NetScaler Console using NSIP. But the instance uses its SNIP to verify connectivity with NetScaler Console. So, ensure that the SNIP is configured on the instance.
- You cannot enable data collection on a NetScaler deployed in LAN User mode by using the NetScaler Console configuration utility.
- For detailed information about the commands and their usage, see Command Reference.
- For information on policy expressions, see Policies and Expressions.
To configure data collection on a NetScaler appliance by using the command line interface:
At the command prompt, do the following:
-
Log on to an appliance.
-
Add a forward proxy cache redirection virtual server with the proxy IP and port, and specify the service type as HDX.
add cr vserver <name> <servicetype> [<ipaddress> <port>] [-cacheType <cachetype>] [ - cltTimeout <secs>]
<!--NeedCopy-->
Example
add cr vserver cr1 HDX 10.12.2.2 443 –cacheType FORWARD –cltTimeout 180
<!--NeedCopy-->
Note: If you are accessing the LAN network by using a NetScaler Gateway appliance, add an action to be applied by a policy that matches the VPN traffic.
add vpn trafficAction <name> <qual> [-HDX ( ON or OFF )]

add vpn trafficPolicy <name> <rule> <action>
<!--NeedCopy-->
Example
add vpn trafficAction act1 tcp -HDX ON add vpn trafficPolicy pol1 "REQ.IP.DESTIP == 10.102.69.17" act1 <!--NeedCopy--> -
Add NetScaler Console as an AppFlow collector on the NetScaler appliance.
add appflow collector <name> -IPAddress <ip_addr>
<!--NeedCopy-->
Example:
add appflow collector MyInsight -IPAddress 192.168.1.101 <!--NeedCopy--> -
Create an AppFlow® action and associate the collector with the action.
add appflow action <name> -collectors <string>
<!--NeedCopy-->
Example:
add appflow action act -collectors MyInsight <!--NeedCopy--> -
Create an AppFlow policy to specify the rule for generating the traffic.
add appflow policy <policyname> <rule> <action>
<!--NeedCopy-->
Example:
add appflow policy pol true act <!--NeedCopy--> -
Bind the AppFlow policy to a global bind point.
bind appflow global <policyname> <priority> -type <type>
<!--NeedCopy-->
Example:
bind appflow global pol 1 -type ICA_REQ_DEFAULT
<!--NeedCopy-->
Note
The value of type must be ICA_REQ_OVERRIDE or ICA_REQ_DEFAULT to apply to ICA® traffic.
-
Set the value of the flowRecordInterval parameter for AppFlow to 60 seconds.
set appflow param -flowRecordInterval 60
<!--NeedCopy-->
Example:
set appflow param -flowRecordInterval 60 <!--NeedCopy--> -
Save the configuration. Type:
save ns config
Enabling data collection for NetScaler Gateway appliances deployed in single-hop mode
When you deploy NetScaler Gateway in single-hop mode, it is at the edge of the network. The Gateway instance provides proxy ICA connections to the desktop delivery infrastructure. Single-hop is the simplest and most common deployment. Single-hop mode provides security if an external user tries to access the internal network in an organization. In single-hop mode, users access the NetScaler appliances through a virtual private network (VPN).
To start collecting the reports, you must add the NetScaler Gateway appliance to the NetScaler Console inventory and enable AppFlow on NetScaler Console.
To enable the AppFlow feature from NetScaler Console:
-
In a web browser, type the IP address of the NetScaler Console (for example, http://192.168.100.1).
-
In User Name and Password, enter the administrator credentials.
-
Navigate to Infrastructure > Instances, and select the NetScaler instance you want to enable analytics.
-
From the Select Action list, select Configure Analytics.
-
Select the VPN virtual servers, and click Enable Analytics.
-
Select HDX Insight and then select ICA.
-
Click OK.
Note
when you enable AppFlow in single-hop mode, the following commands run in the background. These commands are explicitly specified here for troubleshooting purposes.
-  add appflow collector <name> -IPAddress <ip_addr>

-  add appflow action <name> -collectors <string>

-  set appflow param -flowRecordInterval <secs>

-  disable ns feature AppFlow

-  enable ns feature AppFlow

-  add appflow policy <name> <rule> <expression>

-  set appflow policy <name> -rule <expression>

-  bind vpn vserver <vsname> -policy <string> -type <type> -priority <positive_integer>

-  set vpn vserver <name> -appflowLog ENABLED

-  save ns config
<!--NeedCopy-->
EUEM virtual channel data is part of HDX Insight data that the NetScaler Console receives from Gateway instances. EUEM virtual channel provides the data about ICA RTT. If EUEM virtual channel is not enabled, the remaining HDX Insight data are still displayed on NetScaler Console.
Enabling data collection for NetScaler Gateway appliances deployed in double-hop mode
The NetScaler Gateway double-hop mode provides additional protection to an organization’s internal network because an attacker would need to penetrate multiple security zones or Demilitarized zones (DMZ) to reach the servers in the secure network. If you want to analyze the number of hops (NetScaler Gateway appliances) through which the ICA connections pass, and also the details about the latency on each TCP connection and how it fairs against the total ICA latency perceived by the client, you must install NetScaler Console so that the NetScaler Gateway appliances report these vital statistics.

The NetScaler Gateway in the first DMZ handles user connections and performs the security functions of an SSL VPN. This NetScaler Gateway encrypts user connections, determines how the users are authenticated, and controls access to the servers in the internal network.
The NetScaler Gateway in the second DMZ serves as a NetScaler Gateway proxy device. This NetScaler Gateway enables the ICA traffic to traverse the second DMZ to complete user connections to the server farm.
The NetScaler Console can be deployed either in the subnet belonging to the NetScaler Gateway appliance in the first DMZ or the subnet belonging to the NetScaler Gateway appliance second DMZ. In the above image, the NetScaler Console and NetScaler Gateway in the first DMZ are deployed in the same subnet.
In a double-hop mode, NetScaler Console collects TCP records from one appliance and ICA records from the other appliance. After you add the NetScaler Gateway appliances to the NetScaler Console inventory and enable data collection, each of the appliances exports the reports by keeping track of the hop count and connection chain ID.
For NetScaler Console to identify which appliance is exporting records, each appliance is specified with a hop count and each connection is specified with a connection chain ID. Hop count represents the number of NetScaler Gateway appliances through which the traffic flows from a client to the servers. The connection chain ID represents the end- to end connections between the client and server.
NetScaler Console uses the hop count and connection chain ID to co-relate the data from both the NetScaler Gateway appliances and generates the reports.
To monitor NetScaler Gateway appliances deployed in this mode, you must first add the NetScaler Gateway to NetScaler Console inventory, enable AppFlow on NetScaler Console, and then view the reports on the NetScaler Console dashboard.
Configure HDX Insight on virtual servers used for Optimal Gateway
Steps to configure HDX Insight on virtual servers used for Optimal Gateway:
-
Navigate to Infrastructure > Instances, and select the NetScaler instance you want to enable analytics.
-
From the Select Action list, select Configure Analytics.
-
Select the VPN virtual server configured for authentication, and click Enable Analytics.
-
Select HDX Insight and then select ICA.
-
Select other advanced options as required.
-
Click OK.
-
Repeat steps 3 through 6 on the other VPN virtual server.
Enable data collection on NetScaler Console
If you enable NetScaler Console to start collecting the ICA details from both the appliances, the details collected are redundant. That is both the appliances report the same metrics. To overcome this situation, you must enable AppFlow for ICA on one of the first NetScaler Gateway appliances, and then enable AppFlow for TCP on the second appliance. By doing so, one of the appliances exports ICA AppFlow records and the other appliance exports TCP AppFlow records. This also saves the processing time on parsing the ICA traffic.
To enable the AppFlow feature from NetScaler Console:
-
In a web browser, type the IP address of the NetScaler Console (for example, http://192.168.100.1).
-
In User Name and Password, enter the administrator credentials.
-
Navigate to Infrastructure > Instances, and select the NetScaler instance you want to enable analytics.
-
From the Select Action list, select Configure Analytics.
-
Select the VPN virtual servers, and click Enable Analytics.
-
Select HDX Insight and then select ICA or TCP for ICA traffic or TCP traffic respectively.
Note
If AppFlow logging is not enabled for the respective services or service groups on the NetScaler appliance, the NetScaler Console dashboard does not display the records, even if the Insight column shows Enabled.
-
Click OK.
Configuring NetScaler Gateway appliances to export data
After you install the NetScaler Gateway appliances, you must configure the following settings on the NetScaler Gateway appliances to export the reports to NetScaler Console:
-
Configure virtual servers of the NetScaler Gateway appliances in the first and second DMZ to communicate with each other.
-
Bind the NetScaler Gateway virtual server in the second DMZ to the NetScaler Gateway virtual server in the first DMZ.
-
Enable double hop on the NetScaler Gateway in the second DMZ.
-
Disable authentication on the NetScaler Gateway virtual server in the second DMZ.
-
Enable one of the NetScaler Gateway appliances to export ICA records
-
Enable the other NetScaler Gateway appliance to export TCP records:
-
Enable connection chaining on both the NetScaler Gateway appliances.
Configure NetScaler Gateway Using the Command Line Interface:
-
Configure the NetScaler Gateway virtual server in the first DMZ to communicate with the NetScaler Gateway virtual server in the second DMZ.
add vpn nextHopServer <name> <nextHopIP> <nextHopPort> [-secure (ON or OFF)] [-imgGifToPng] add vpn nextHopServer nh1 10.102.2.33 8443 –secure ON <!--NeedCopy--> -
Bind the NetScaler Gateway virtual server in the second DMZ to the NetScaler Gateway virtual server in the first DMZ. Run the following command on the NetScaler Gateway in the first DMZ:
bind vpn vserver <name> -nextHopServer <name> bind vpn vserver vs1 -nextHopServer nh1 <!--NeedCopy--> -
Enable double hop and AppFlow on the NetScaler Gateway in the second DMZ.
set vpn vserver <name> [- doubleHop ( ENABLED or DISABLED )] [- appflowLog ( ENABLED or DISABLED )] set vpn vserver vpnhop2 –doubleHop ENABLED –appFlowLog ENABLED <!--NeedCopy--> -
Disable authentication on the NetScaler Gateway virtual server in the second DMZ.
set vpn vserver <name> [-authentication (ON or OFF)] set vpn vserver vs -authentication OFF <!--NeedCopy--> -
Enable one of the NetScaler Gateway appliances to export TCP records.
bind vpn vserver <name> [-policy <string> -priority <positive_integer>] [-type <type>] bind vpn vserver vpn1 -policy appflowpol1 -priority 101 –type OTHERTCP_REQUEST <!--NeedCopy--> -
Enable the other NetScaler Gateway appliance to export ICA records:
bind vpn vserver <name> [-policy <string> -priority <positive_integer>] [-type <type>] bind vpn vserver vpn2 -policy appflowpol1 -priority 101 -type ICA_REQUEST <!--NeedCopy--> -
Enable connection chaining on both the NetScaler Gateway appliances:
set appFlow param [-connectionChaining (ENABLED or DISABLED)]

set appflow param -connectionChaining ENABLED
<!--NeedCopy-->
Configure NetScaler Gateway using Configuration Utility:
-
Configure the NetScaler Gateway in the first DMZ to communicate with the NetScaler Gateway in the second DMZ and bind the NetScaler Gateway in the second DMZ to the NetScaler Gateway in the first DMZ.
-
On the Configuration tab expand NetScaler Gateway and click Virtual Servers.
-
In the right pane, double-click the virtual server, and in the Advanced group, expand Published Applications.
-
Click Next Hop Server and bind a next hop server to the second NetScaler Gateway appliance.
-
-
Enable double hop on the NetScaler Gateway in the second DMZ.
-
On the Configuration tab expand NetScaler Gateway and click Virtual Servers.
-
In the right pane, double-click the virtual server, and in the Basic Settings group, click the edit icon.
-
Expand more, select Double Hop and click OK.
-
-
Disable authentication on the virtual server on the NetScaler Gateway in the second DMZ.
-
On the Configuration tab expand NetScaler Gateway and click Virtual Servers.
-
In the right pane, double-click the virtual server, and in the Basic Settings group, click the edit icon.
-
Expand More, and clear Enable Authentication.
-
-
Enable one of the NetScaler Gateway appliances to export TCP records.
-
On the Configuration tab expand NetScaler Gateway and click Virtual Servers.
-
In the right pane, double-click the virtual server, and in the Advanced group, expand Policies.
-
Click the + icon and from the Choose Policy list, select AppFlow, and from the Choose Type list, select Other TCP Request.
-
Click Continue.
-
Add a policy binding, and click Close.
-
-
Enable the other NetScaler Gateway appliance to export ICA records:
-
On the Configuration tab expand NetScaler Gateway and click Virtual Servers.
-
In the right pane, double-click the virtual server, and in the Advanced group, expand Policies.
-
Click the + icon and from the Choose Policy list, select AppFlow, and from theChoose Type list, select Other TCP Request.
-
Click Continue.
-
Add a policy binding, and click Close.
-
-
Enable connection chaining on both the NetScaler Gateway appliances.
-
On the Configuration tab, navigate to System > Appflow.
-
In the right Pane, in the Settings group, double-click Change Appflow Settings.
-
Select Connection Chaining and Click OK.
-
-
Configure the NetScaler Gateway in the first DMZ to communicate with the NetScaler Gateway in the second DMZ and bind the NetScaler Gateway in the second DMZ to the NetScaler Gateway in the first DMZ.
-
On the Configuration tab expand NetScaler Gateway and click Virtual Servers.
-
In the right pane, double-click the virtual server, and in the Advanced group, expand Published Applications.
-
Click Next Hop Server and bind a next hop server to the second NetScaler Gateway appliance.
-
-
Enable double hop on the NetScaler Gateway in the second DMZ.
-
On the Configuration tab expand NetScaler Gateway and click Virtual Servers.
-
In the right pane, double-click the virtual server, and in the Basic Settings group, click the edit icon.
-
Expand More, select Double Hop, and click OK.
-
-
Disable authentication on the virtual server on the NetScaler Gateway in the second DMZ.
-
On the Configuration tab expand NetScaler Gateway and click Virtual Servers.
-
In the right pane, double-click the virtual server, and in the Basic Settings group, click the edit icon.
-
Expand More, and clear Enable Authentication.
-
-
Enable one of the NetScaler Gateway appliances to export TCP records.
-
On the Configuration tab expand NetScaler Gateway and click Virtual Servers.
-
In the right pane, double-click the virtual server, and in the Advanced group, expand Policies.
-
Click the + icon and from the Choose Policy list, select AppFlow, and from the Choose Type list, select Other TCP Request.
-
Click Continue.
-
Add a policy binding, and click Close.
-
-
Enable the other NetScaler Gateway appliance to export ICA records.
-
On the Configuration tab expand NetScaler Gateway and click Virtual Servers.
-
In the right pane, double-click the virtual server, and in the Advanced group, expand Policies.
-
Click the + icon and from the Choose Policy list, select AppFlow, and from the Choose Type list, select Other TCP Request.
-
Click Continue.
-
Add a policy binding, and click Close.
-
-
Enable connection chaining on both the NetScaler Gateway appliances.
Enable data collection for monitoring NetScalers deployed in transparent mode
When a NetScaler is deployed in transparent mode the clients can access the servers directly, with no intervening virtual server. If a NetScaler appliance is deployed in transparent mode in a Citrix Virtual Apps and Desktop environment, the ICA traffic is not transmitted over a VPN.
After you add the NetScaler to the NetScaler Console inventory, you must enable AppFlow for data collection. Enabling data collection depends on the device and the mode. In that case, you have to add NetScaler Console as an AppFlow collector on each NetScaler appliance, and you must configure an AppFlow policy to collect all or specific ICA traffic that flows through the appliance.
Note
- You cannot enable data collection on a NetScaler deployed in transparent mode by using the NetScaler Console configuration utility.
- For detailed information about the commands and their usage, see Command Reference.
- For information on policy expressions, see Policies and Expressions.
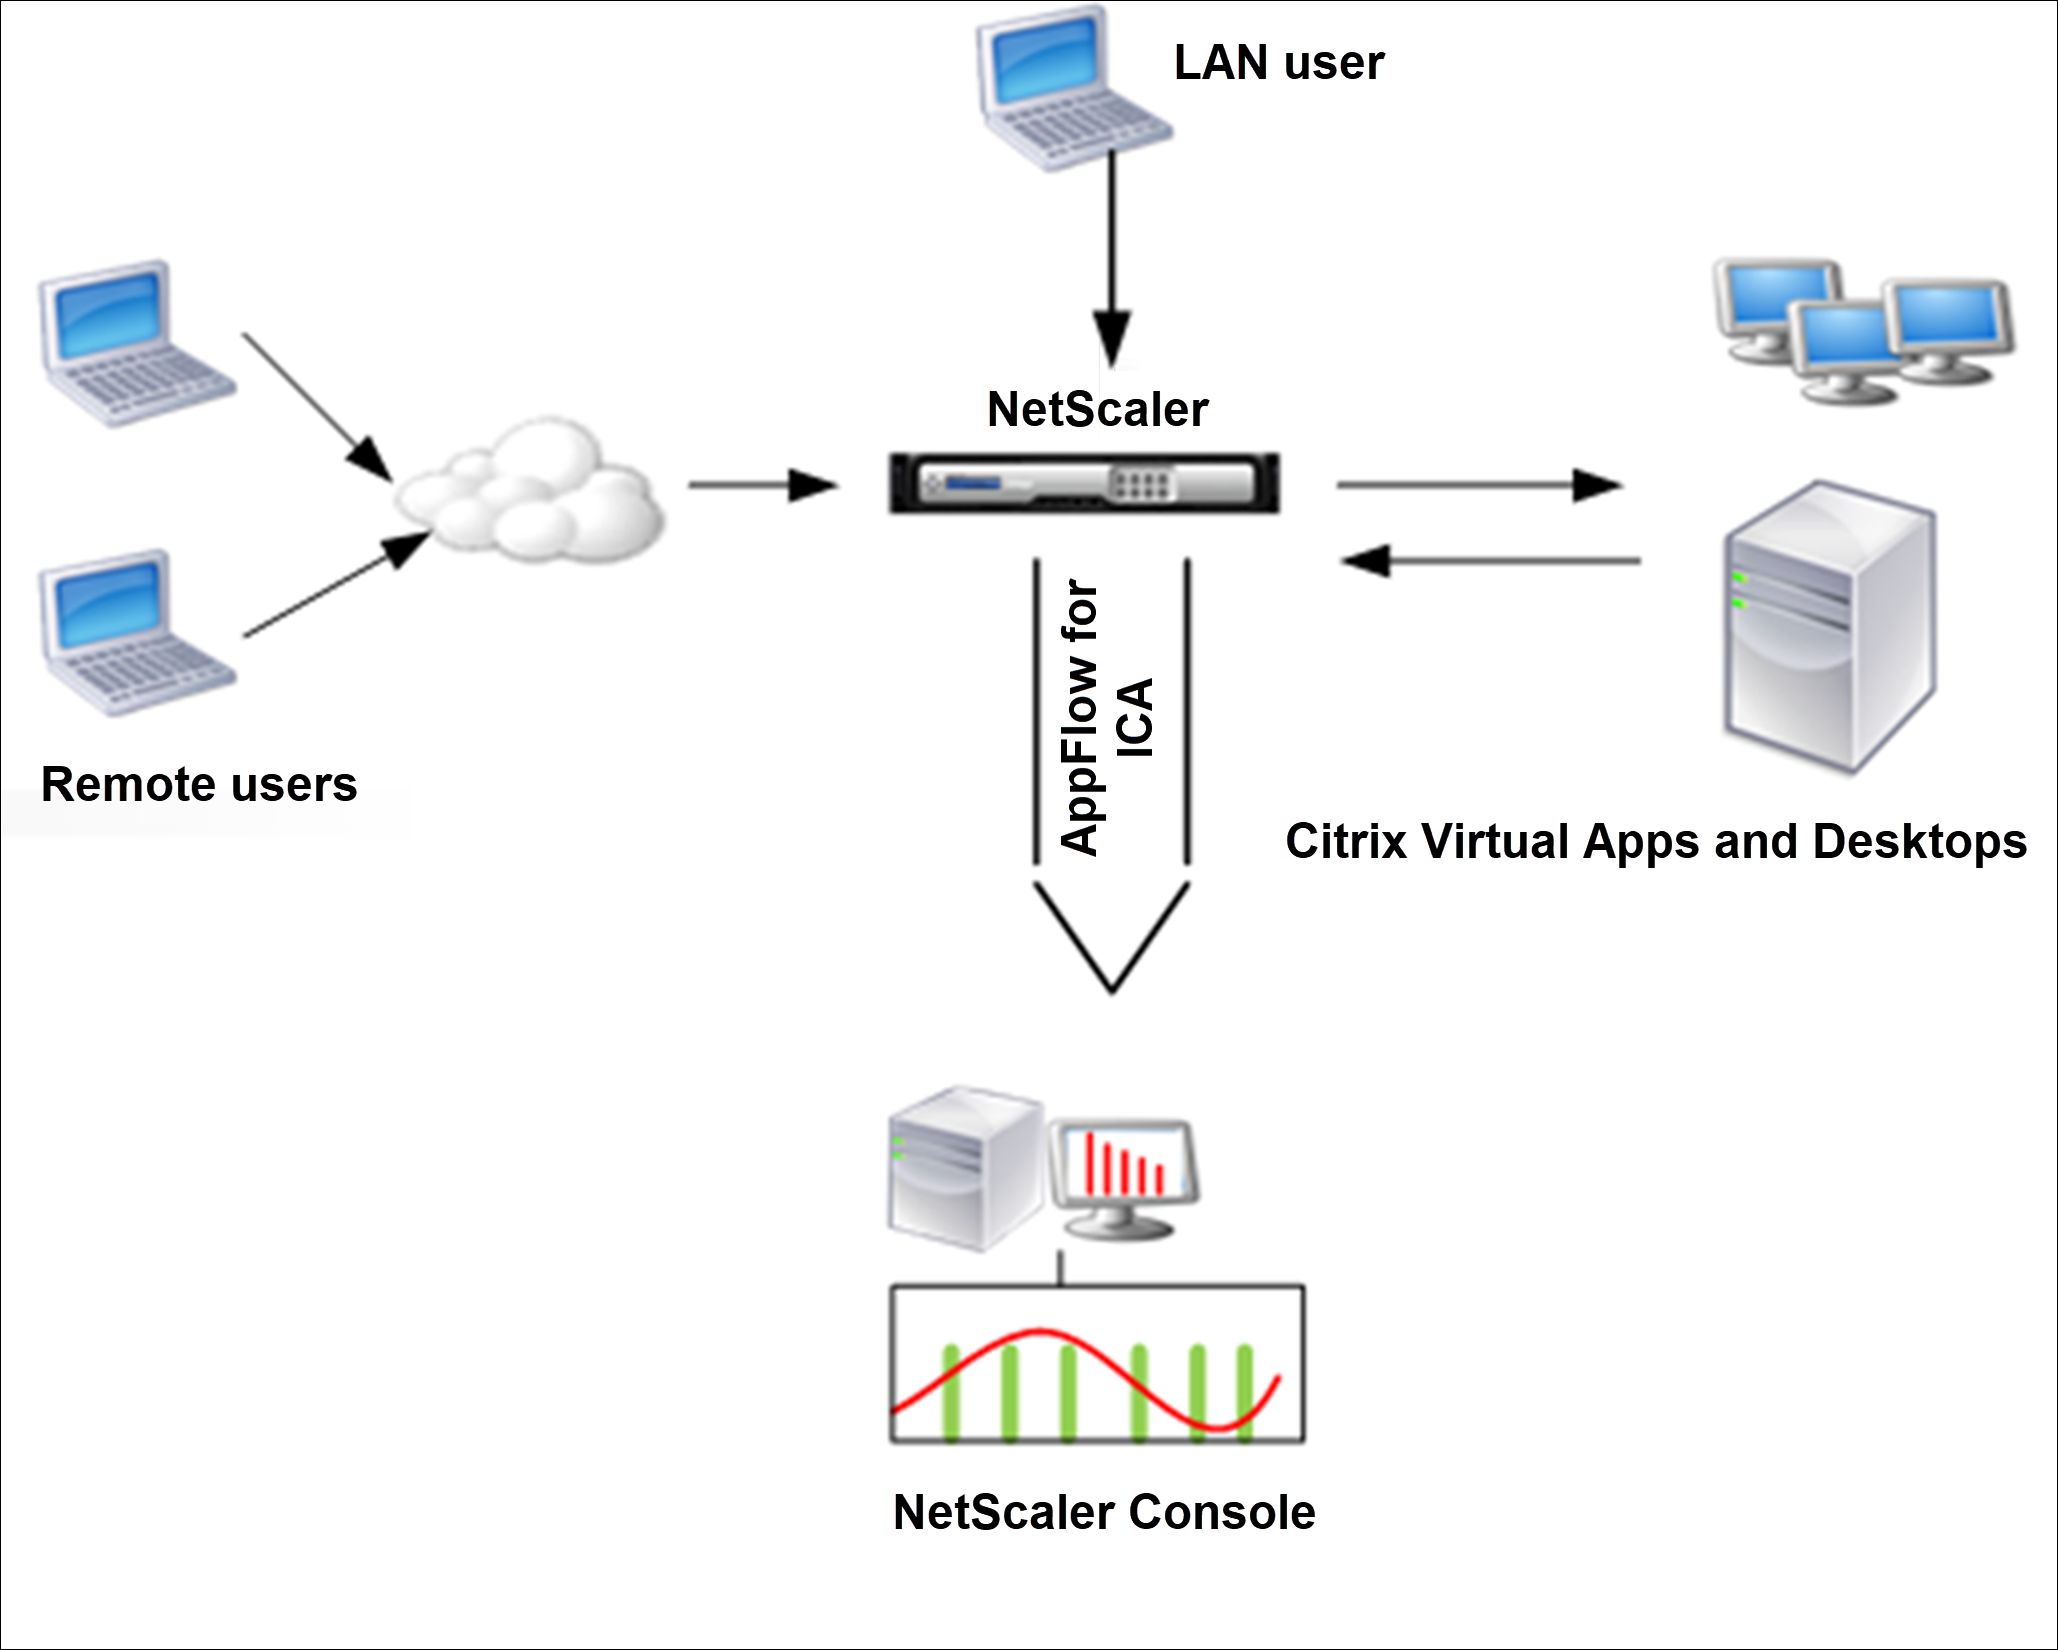
The following figure shows the network deployment of a NetScaler Console when a NetScaler is deployed in a transparent mode:

To configure data collection on a NetScaler appliance by using the command line interface:
At the command prompt, do the following:
-
Log on to an appliance.
-
Specify the ICA ports at which the NetScaler appliance listens for traffic.
set ns param --icaPorts <port>...
<!--NeedCopy-->
Example:
set ns param -icaPorts 2598 1494
<!--NeedCopy-->
Note
- You can specify up to 10 ports with this command.
- The default port number is 2598. You can modify the port number as required.
-
Add NetScaler Insight Center as an AppFlow collector on the NetScaler appliance.
add appflow collector <name> -IPAddress <ip_addr>
<!--NeedCopy-->
Example:
add appflow collector MyInsight -IPAddress 192.168.1.101
<!--NeedCopy-->
Note To view the AppFlow collectors configured on the NetScaler appliance, use the show appflow collector command.
-
Create an AppFlow action and associate the collector with the action.
add appflow action <name> -collectors <string> ...
<!--NeedCopy-->
Example:
add AppFlow action act-collectors MyInsight
-
Create an AppFlow policy to specify the rule for generating the traffic.
add appflow policy <policyname> <rule> <action>
<!--NeedCopy-->
Example:
add appflow policy pol true act <!--NeedCopy--> -
Bind the AppFlow policy to a global bind point.
bind appflow global <policyname> <priority> -type <type>
<!--NeedCopy-->
Example:
bind appflow global pol 1 -type ICA_REQ_DEFAULT
<!--NeedCopy-->
Note
The value of type must be ICA_REQ_OVERRIDE or ICA_REQ_DEFAULT to apply to ICA traffic.
-
Set the value of the flowRecordInterval parameter for AppFlow to 60 seconds.
set appflow param -flowRecordInterval 60
<!--NeedCopy-->
Example:
set appflow param -flowRecordInterval 60 <!--NeedCopy--> -
Save the configuration. Type:
save ns config
In this article
- Enabling data collection for monitoring NetScalers deployed in LAN user mode
- Enabling data collection for NetScaler Gateway appliances deployed in single-hop mode
- Enabling data collection for NetScaler Gateway appliances deployed in double-hop mode
- Configure HDX Insight on virtual servers used for Optimal Gateway
- Enable data collection for monitoring NetScalers deployed in transparent mode