-
-
-
-
Configure Access control lists
-
Use NetScaler Console log messages for managing and monitoring your infrastructure
-
-
Scenarios for Flexed or Pooled license expiry and connectivity issues behavior
-
Configure NetScaler Console as the Flexed or Pooled license server
This content has been machine translated dynamically.
Dieser Inhalt ist eine maschinelle Übersetzung, die dynamisch erstellt wurde. (Haftungsausschluss)
Cet article a été traduit automatiquement de manière dynamique. (Clause de non responsabilité)
Este artículo lo ha traducido una máquina de forma dinámica. (Aviso legal)
此内容已经过机器动态翻译。 放弃
このコンテンツは動的に機械翻訳されています。免責事項
이 콘텐츠는 동적으로 기계 번역되었습니다. 책임 부인
Este texto foi traduzido automaticamente. (Aviso legal)
Questo contenuto è stato tradotto dinamicamente con traduzione automatica.(Esclusione di responsabilità))
This article has been machine translated.
Dieser Artikel wurde maschinell übersetzt. (Haftungsausschluss)
Ce article a été traduit automatiquement. (Clause de non responsabilité)
Este artículo ha sido traducido automáticamente. (Aviso legal)
この記事は機械翻訳されています.免責事項
이 기사는 기계 번역되었습니다.책임 부인
Este artigo foi traduzido automaticamente.(Aviso legal)
这篇文章已经过机器翻译.放弃
Questo articolo è stato tradotto automaticamente.(Esclusione di responsabilità))
Translation failed!
Access control lists
An access control list (ACL) is a set of conditions that you can apply to a network appliance to filter IP traffic and secure your appliance from any unauthorized access.
You can configure ACL in NetScaler Console GUI to limit and control access to NetScaler Console. ACL on NetScaler Console is supported from 14.1-29.x build.
Usage guidelines
-
When you upgrade NetScaler Console to 14.1-29.x build, the ACL feature is disabled by default.
-
As an administrator, you can control only inbound packets through ACL on NetScaler Console.
-
Any configurations on NetScaler Console do not require any changes in the existing ACL configuration.
How to Configure an ACL
Configuring an ACL involves:
- Enable the ACL feature
- Create an ACL rule
- Enable the ACL rule
Enable the ACL feature
-
Log on to NetScaler Console GUI and navigate to Settings > Access Control List (ACL)
-
By using the toggle button, turn on the ACL feature.

Create an ACL rule
-
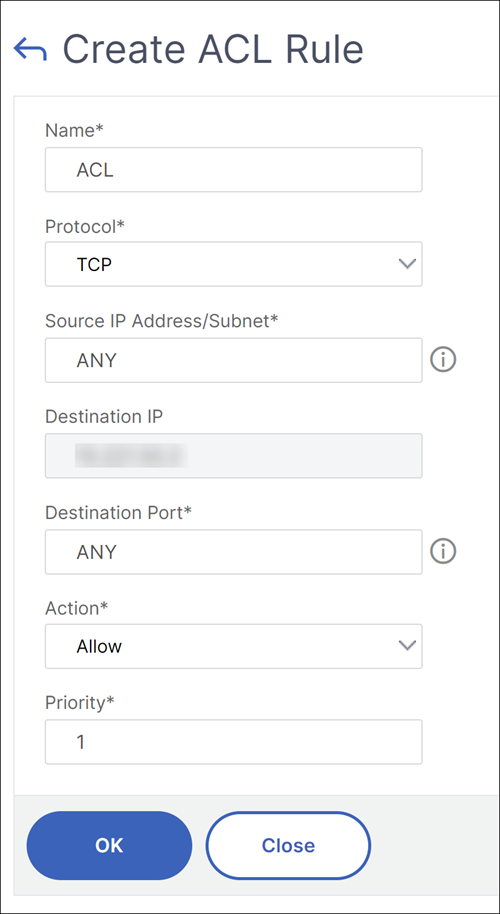
On the ACL page, click Create Rule.
-
In the Create Rule window, add the details listed in the following table:
Options Description Name Specify a name of your choice. Protocol Select a protocol from the menu. By default, TCP is selected. You can select ANY to allow all protocols. Source IP Address/Subnet Specify the source IP address or source subnet to which the rule applies. Select ANY if the rule must be applied to all incoming traffic. Destination IP The NetScaler Console IP address is autopopulated as the destination IP. This field cannot be edited. Destination port Specify the destination port to which the rule applies. Select ANY if the rule applies to all destination ports. Action Select the action for the rule, which is Allow or Deny. Priority Assign priority to specify the order in which the rule is to be evaluated. Priority numbers determine the order in which ACL rules are matched against an incoming packet. A lower priority number has a higher priority. For example, priority number 1 has a higher priority than priority number 2. If none of the rules match with the incoming packet, then the packet is blocked. -
Click OK to create the rule.
After the rule is created, it is in the disabled state. To make the rule effective, you must enable the rule.
Note:
To enable a rule, the ACL feature must be enabled. If the feature is disabled, and you attempt to enable an ACL rule, a message “ACL is not running” appears.
Enable an ACL rule
-
Hover your mouse over the rule that you want to enable and click the circle with three dots.
-
From the menu, select Enable.
-
Alternatively, select the radio button for that rule and click the Enable tab.
-
At the prompt, click Yes to confirm.
Other actions for ACL rules
You can apply the following actions to the ACL rules:
-
Disable an ACL rule
-
Edit an ACL rule
-
Delete an ACL rule
-
Renumber the priority of ACL rules
Disable an ACL rule
-
Hover the mouse over the rule that you want to disable and select the circle with three dots.
-
Click Disable from the list.
-
Alternatively, select the radio button for that rule and click the Disable button.
-
Click Yes to confirm.
Note:
When you disable a rule, the rule no longer applies to incoming traffic. However, the rule configuration remains under ACL settings.
Edit an ACL rule
-
Hover the mouse over the rule that you want to edit and select the circle with three dots.
-
Click Edit Rule from the list.
-
Alternatively, select the radio button for that rule and click the Edit Rule button.
-
Make the edits and click OK.
Note:
You can edit a rule in both enabled and disabled state. If you edit a rule that is already enabled, the edits get applied immediately. For a rule in the disabled state, the edits get applied when you enable the rule.
Delete an ACL rule
-
Ensure that the rule is in the disabled state. You cannot delete a rule in the enabled state.
-
Hover the mouse over the rule that you want to delete and select the circle with three dots.
-
Click Delete Rule from the list.
-
Alternatively, select the radio button for that rule and click the Delete Rule button.
-
Click Yes to confirm.
Renumber priorities of ACL rules
-
Hover the mouse over the rule that you want to renumber the priorities for and select the circle with three dots. Click Renumber Priority from the list.
-
Alternatively, select the radio button for that rule and from the Select Action list, select Renumber Priority.
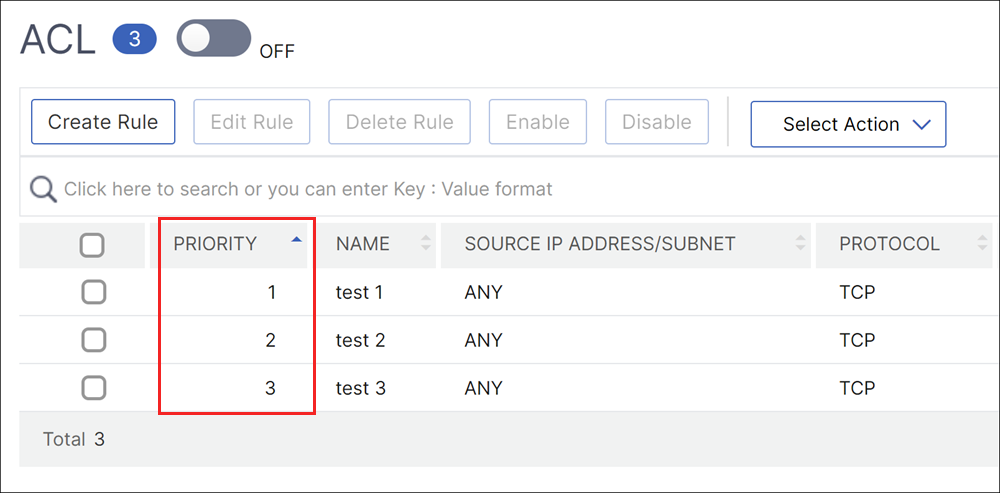
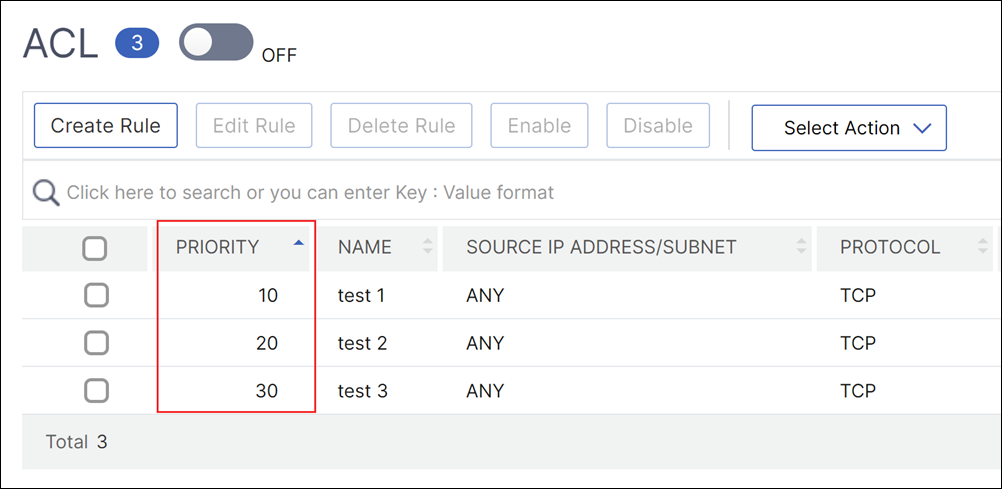
NetScaler® automatically assigns new priority numbers, which are multiples of 10, to all the existing rules.
Edit the rules to assign priority numbers according to your requirement. See the “To edit an ACL rule” section for more information about how to edit a rule.
Example for existing priority numbers:
Example for the renumbered priority by NetScaler Console:
Troubleshooting
If ACL rules are improperly set up, all user accounts can be denied access. If you inadvertently lose all network access to NetScaler Console because of improper ACL setup, follow these steps to gain access:
-
Log on to NetScaler Console by using an SSH client.
-
Run the command
pfctl –d. -
Log on to NetScaler Console GUI and reconfigure the ACL accordingly.
Share
Share
This Preview product documentation is Cloud Software Group Confidential.
You agree to hold this documentation confidential pursuant to the terms of your Cloud Software Group Beta/Tech Preview Agreement.
The development, release and timing of any features or functionality described in the Preview documentation remains at our sole discretion and are subject to change without notice or consultation.
The documentation is for informational purposes only and is not a commitment, promise or legal obligation to deliver any material, code or functionality and should not be relied upon in making Cloud Software Group product purchase decisions.
If you do not agree, select I DO NOT AGREE to exit.