-
-
-
-
Scenarios for Flexed or Pooled license expiry and connectivity issues behavior
-
Configure NetScaler Console as the Flexed or Pooled license server
This content has been machine translated dynamically.
Dieser Inhalt ist eine maschinelle Übersetzung, die dynamisch erstellt wurde. (Haftungsausschluss)
Cet article a été traduit automatiquement de manière dynamique. (Clause de non responsabilité)
Este artículo lo ha traducido una máquina de forma dinámica. (Aviso legal)
此内容已经过机器动态翻译。 放弃
このコンテンツは動的に機械翻訳されています。免責事項
이 콘텐츠는 동적으로 기계 번역되었습니다. 책임 부인
Este texto foi traduzido automaticamente. (Aviso legal)
Questo contenuto è stato tradotto dinamicamente con traduzione automatica.(Esclusione di responsabilità))
This article has been machine translated.
Dieser Artikel wurde maschinell übersetzt. (Haftungsausschluss)
Ce article a été traduit automatiquement. (Clause de non responsabilité)
Este artículo ha sido traducido automáticamente. (Aviso legal)
この記事は機械翻訳されています.免責事項
이 기사는 기계 번역되었습니다.책임 부인
Este artigo foi traduzido automaticamente.(Aviso legal)
这篇文章已经过机器翻译.放弃
Questo articolo è stato tradotto automaticamente.(Esclusione di responsabilità))
Translation failed!
NetScaler Console on Nutanix hypervisor (Acropolis)
Note:
This feature is available in release 14.1-38.xx and later.
You can use the KVM software image to configure the NetScaler® Console server on Nutanix hypervisor. Before you begin, ensure that you have configured Nutanix Prism to create a VM for NetScaler Console.
Hardware requirements
| Component | Requirement |
|---|---|
| CPU | A 64-bit x86 processor with the hardware virtualization features that are included in the Intel VT-X processor. Provide at least 8 CPU cores to host Linux-KVM. |
| Memory (RAM) | Minimum 4 GB for the host Linux kernel. Add additional memory as required by the VMs. |
| Hard Disk | Calculate the space for Host Linux kernel and VM requirements. A single NetScaler Console VM requires 120 GB of disk space. |
Download the NetScaler Console setup file
To download the NetScaler Console setup file:
-
Log on to www.citrix.com/downloads page.
-
Select NetScaler Console from the product list.
-
Under Release 14.1, select the 14.1-38.x or later build.
The selected build page is displayed.
-
On the Jump to Download list, select Citrix ADM image for KVM, 14.1 Build xx.xx
-
Click Download File, accept the EULA, and download the compressed image file to any folder on your local machine.
Configure NetScaler Console on Nutanix hypervisor
-
Unpack the
.tgzfile. -
Log on to Nutanix Prism.
-
Navigate to Settings and choose Image Configuration.
-
Specify an image name.
-
Select DISK as the image type.
-
Select a storage container.
-
In Image Source, select Upload a file, and upload the file with
.qcow2extension. -
Click Save.
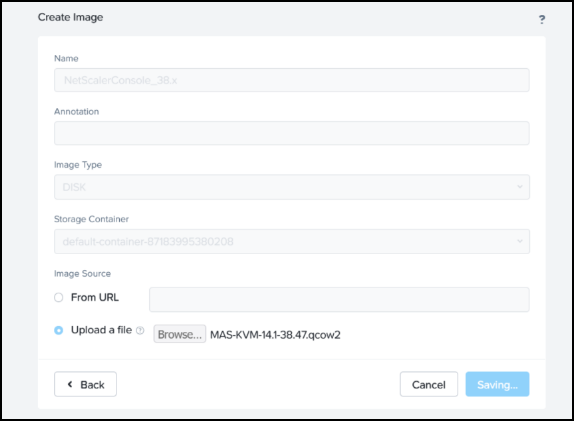
After you upload and save, the image and its status is shown:

-
-
Navigate to VM and click Create VM.
-
On the Create VM page, remove the CD ROM Drive.
-
Add a new disk.
-
Select DISK from the Type list.
-
Select Clone from Image Service from the Operation list.
-
Select SCSI from the Bus Type list.
-
Select the NetScaler Console image from the list.
-
Click Add.
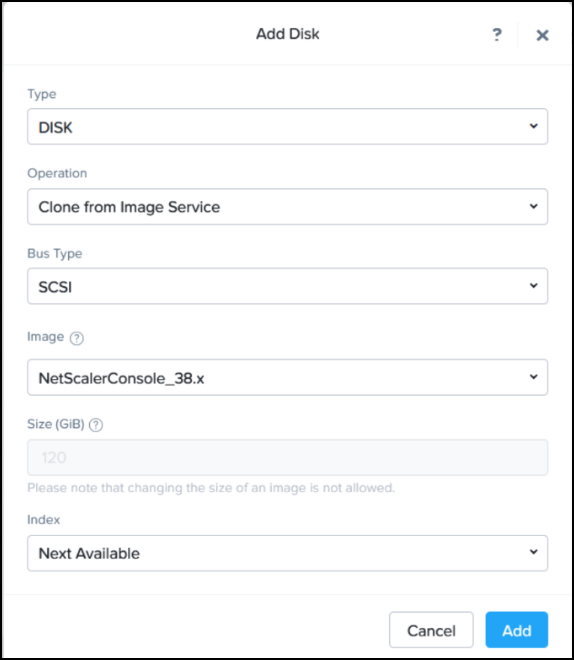
The disk is added.
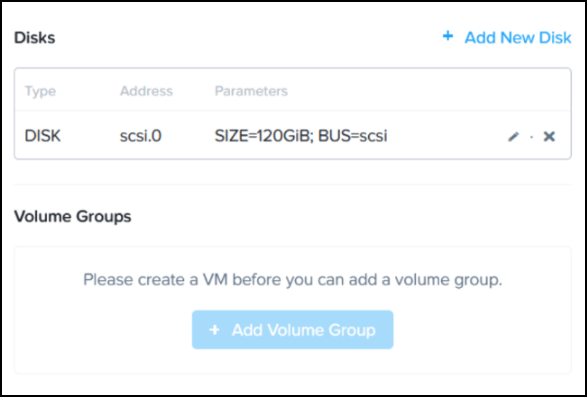
-
-
Add the following NIC details to the VM:
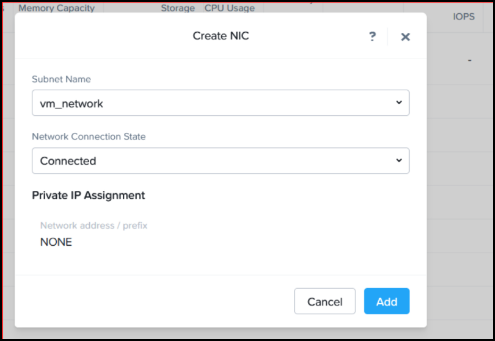
-
Click Save.
-
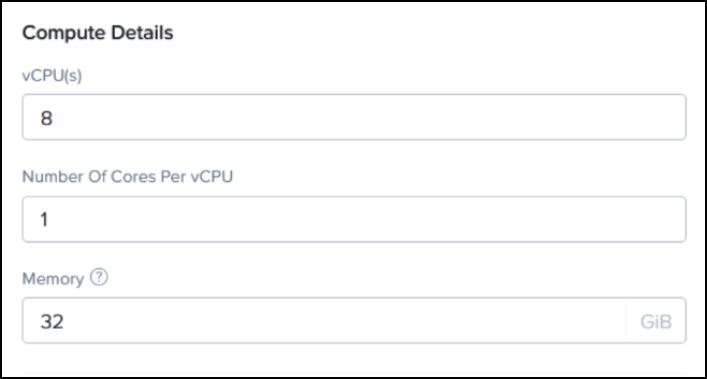
Specify the Compute details. Use the default values for NetScaler Console and NetScaler agent.
-
Click Save.
After the VM is listed and shows as powered off, you must add the serial port to boot the VM.
-
SSH into the Controller VM (CVM) using the user name and the password you set for that account. You can find a list of CVM IP addresses in the Hardware section of the Prism Element console.
-
Enter ACLI.
-
Use the following command to create the serial port. Type the name of the VPX appliance in
vmnamevm.serial_port_create <vmname> type=kServer index=0
Network configuration
-
Power on the VM.
-
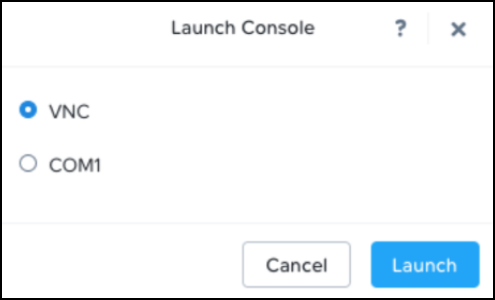
Launch the VNC console.
-
After the VM boots, log in using the default credentials (nsrecover/nsroot).
-
At the prompt, type: shell
-
Type networkconfig to enter the NetScaler Console initial network configuration menu. Configure the management IP address.
-
To complete the initial network configuration of NetScaler Console, follow the prompts. The console displays the NetScaler Console initial network configuration options for setting the following parameters. The host name is populated by default.
-
Enter 2 to update NetScaler Console IPv4 address - management IP address to access NetScaler Console.
-
Enter 3 to update Netmask - subnet mask associated with the Management IP address.
-
Enter 4 to update Gateway IPv4 address - default gateway IP address for the subnet of the Management IP address of the NetScaler Console.
-
Enter 7 to save and quit - saves your configuration changes and exits the system.
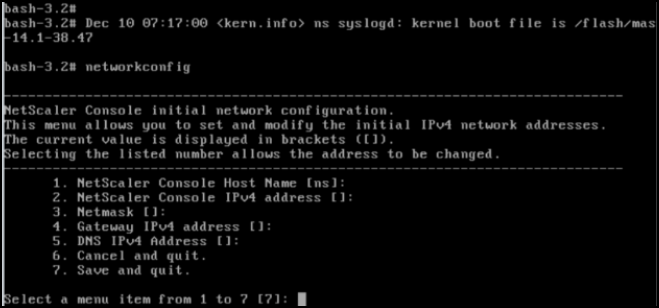
You can access the NetScaler Console by typing the IP address of the NetScaler Console server in the address bar of your browser. The default administrator credentials to log on to the server are nsroot/nsroot.
-
Share
Share
This Preview product documentation is Cloud Software Group Confidential.
You agree to hold this documentation confidential pursuant to the terms of your Cloud Software Group Beta/Tech Preview Agreement.
The development, release and timing of any features or functionality described in the Preview documentation remains at our sole discretion and are subject to change without notice or consultation.
The documentation is for informational purposes only and is not a commitment, promise or legal obligation to deliver any material, code or functionality and should not be relied upon in making Cloud Software Group product purchase decisions.
If you do not agree, select I DO NOT AGREE to exit.