-
-
Upgrade
-
-
-
Scenarios for Flexed or Pooled license expiry and connectivity issues behavior
-
Configure NetScaler Console as the Flexed or Pooled license server
This content has been machine translated dynamically.
Dieser Inhalt ist eine maschinelle Übersetzung, die dynamisch erstellt wurde. (Haftungsausschluss)
Cet article a été traduit automatiquement de manière dynamique. (Clause de non responsabilité)
Este artículo lo ha traducido una máquina de forma dinámica. (Aviso legal)
此内容已经过机器动态翻译。 放弃
このコンテンツは動的に機械翻訳されています。免責事項
이 콘텐츠는 동적으로 기계 번역되었습니다. 책임 부인
Este texto foi traduzido automaticamente. (Aviso legal)
Questo contenuto è stato tradotto dinamicamente con traduzione automatica.(Esclusione di responsabilità))
This article has been machine translated.
Dieser Artikel wurde maschinell übersetzt. (Haftungsausschluss)
Ce article a été traduit automatiquement. (Clause de non responsabilité)
Este artículo ha sido traducido automáticamente. (Aviso legal)
この記事は機械翻訳されています.免責事項
이 기사는 기계 번역되었습니다.책임 부인
Este artigo foi traduzido automaticamente.(Aviso legal)
这篇文章已经过机器翻译.放弃
Questo articolo è stato tradotto automaticamente.(Esclusione di responsabilità))
Translation failed!
Upgrade
Each NetScaler Console release offers new and updated features with increased functionality. We recommend you upgrade NetScaler Console to the latest release to avail of the new features and bug fixes. A comprehensive list of enhancements, known issues, and bug fixes is included in the release notes accompanying every release announcement. It is also important to understand the licensing framework and the types of licenses that can be used before you start to upgrade. For NetScaler Console licensing information, see Licensing.
Before you upgrade
Download the upgrade package from the NetScaler Console Downloads page and follow the instructions in this article to upgrade your system to the latest 14.1 build. After the upgrade process begins, NetScaler Console restarts and the existing connections are terminated and reconnected when the upgrade completes. The existing configuration is preserved, but NetScaler Console does not process any data until the upgrade completes.
Important
The NetScaler Console version and build should be equal to or higher than your NetScaler version and build. For example, if you have installed NetScaler Console 12.1 Build 50.39, then ensure you have installed NetScaler 12.1 Build 50.28/50.31 or earlier.
Points to note before upgrading to 14.1:
-
If you upgrade from version 11.1 or version 12.0 56.x and previous builds, perform the following steps:
-
Upgrade from the existing version to 12.0 build 57.24.
-
Upgrade to the latest build of version 12.1.
-
Upgrade to version 13.1.
-
Upgrade to version 14.1.
-
-
If you upgrade from 12.0 build 57.24 and higher, first upgrade to 12.1, then to 13.1, and then to 14.1.
-
If you upgrade from 12.1, you must first upgrade to 13.0 64.xx, and then directly to 14.1
-
If you upgrade from versions lower than 13.0 64.xx, for better user experience, first upgrade to 13.0 64.xx and then to 14.1.
-
To upgrade from version 13.1 to version 14.1, first upgrade to the latest build of version 13.1 and then upgrade to version 14.1.
-
After the successful upgrade to 14.1 and you login to the GUI, it recommends you to change the password if you are using the default password.
Important points to note before upgrading to 14.1-xx.xx and later
When you upgrade the NetScaler Console to version 14.1-xx.xx, your NetScaler Console database is also migrated. This data migration happens because NetScaler Console now uses PostgreSQL version 10.11.
Note:
Downgrading the NetScaler Console is unsupported. Do not attempt to downgrade.
Recommended precautions:
-
Take a snapshot of the NetScaler Console server for each upgrade, if you are upgrading to 14.1-xx.xx and later.
-
Back up the NetScaler Console server before you upgrade.
-
After the upgrade, you might have to reestablish connections between the NetScaler Console server and the managed instances. A confirmation prompt warns you that connections can fail if you proceed.
-
For NetScaler Console servers in high availability setup, when upgrading, do not make any configuration changes on either of the nodes.
Warning:
Do not refresh the browser until the upgrade process is successfully completed. Check the GUI for the approximate time for the upgrade to complete.
Upgrade a single NetScaler Console server to 14.1-xx.xx
-
Log on to NetScaler Console with administrator credentials.
-
Navigate to Settings > Administration. Under System Maintenance, click Upgrade NetScaler Console.

-
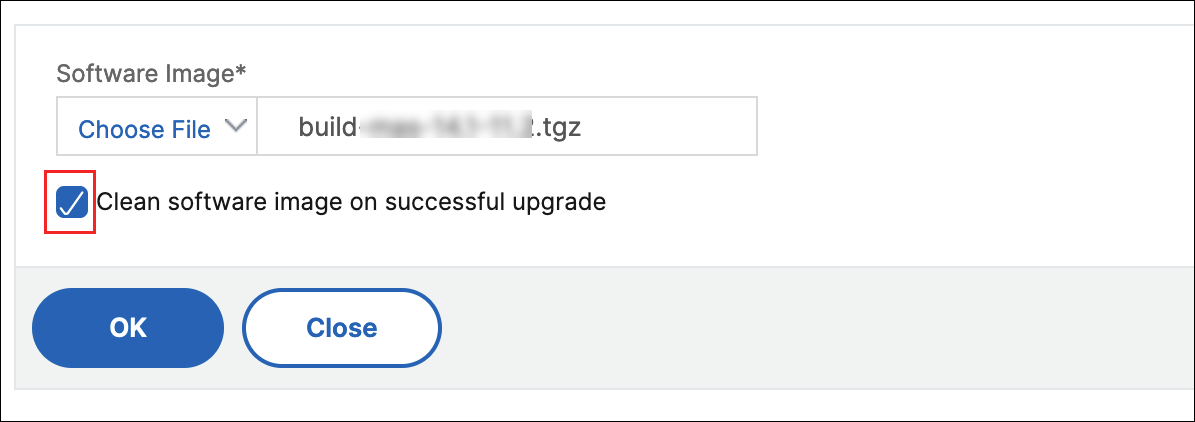
On the Upgrade NetScaler Console page, select the Clean software image on successful upgrade checkbox to delete image files after upgrade. Selecting this option removes the NetScaler Console image files automatically upon upgrade.
Note:
This option is selected by default. If you do not select this checkbox before starting the upgrade process, you must manually delete the images.
-
You can then upload a new image file by selecting either Local (your local machine) or Appliance. The build file must be present on the NetScaler Console virtual appliance.
-
Click OK. The Confirm dialog box is displayed. Click Yes.
The upgrade process starts.
After your configuration is migrated, you can log on to the NetScaler Console GUI. Upon logon, the historical data starts to migrate at the background while you can continue to work on NetScaler Console.
During historical data migration, some of the old data might not be available. The time taken to migrate your database depends on the size of data and the number of tables.
You can monitor the database migration using the NetScaler Console GUI. Click View upgrade progress and the Database Migration Status appears.
Upgrade a high availability pair to 14.1 release
For NetScaler Console servers in a high availability mode, you can upgrade by either accessing the active node or the floating IP address. Both the NetScaler Console servers are automatically upgraded to the latest build once you initiate the upgrade process in either of the servers.
Upgrade NetScaler Console disaster recovery deployment
Note:
- Ensure that the password is same for both HA pair and disaster recovery node.
- Upgrade the Disaster Recovery node only after upgrading the standalone node or HA node. If you upgrade the Disaster Recovery node before upgrading the primary or HA node, you might observe database synchronization issues.
Upgrading NetScaler Console disaster recovery deployment is a two-step process:
-
Upgrade the NetScaler Console nodes configured in high availability mode in the primary site. Later you must upgrade the disaster recovery node.
-
Ensure that you have upgraded the NetScaler Console servers that are deployed in high availability, before upgrading the disaster recovery node.
Upgrade the NetScaler Console disaster recovery node
-
Download NetScaler Console upgrade image file from NetScaler site.
-
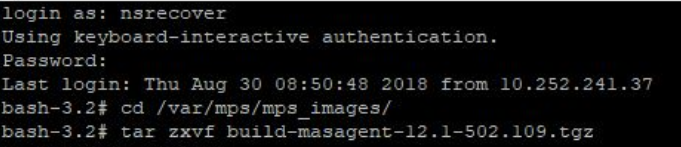
Upload this file to the disaster recovery node using
nsrecovercredentials. -
Log on to the disaster recovery node using the
nsrecovercredentials. -
Navigate to the folder where you placed the image file and unzip the file.
-
Run the following script:
./installmas

Upgrade on-prem agents for multisite deployment
Upgrading NetScaler agent deployment is a three-step process. Ensure that you have completed the following tasks before upgrading the on-prem agents:
-
Upgrade the NetScaler Console servers that are deployed in high availability.
-
Upgrade the NetScaler Console disaster recovery node.
For more information, see Upgrade NetScaler Console disaster recovery deployment.
Upgrade the on-prem agent
-
Download NetScaler agent upgrade image file from NetScaler site.
-
Upload this file to the agent node using
nsrecovercredentials. -
Ensure that you download the correct agent upgrade image.
-
Log on to the on-prem agent using the
nsrecovercredentials. -
Navigate to the folder where you placed the image file and unzip the file.
-
Run the following script:
./installmasagent
Add an extra disk to the NetScaler Console server
If your NetScaler Console storage requirement exceeds the default disk space (120 GB), you can attach an extra disk. You can attach more disk in both single-server and high availability deployments.
When you upgrade NetScaler Console from release version 12.1–13.10, the partitions that you had created on the additional disk in the earlier version remain the same. The partitions are not removed or resized.
The procedure to attach more disk remains the same in the upgraded build. You can now use the new disk partitioning tool in NetScaler Console to create partitions in the newly added disk. You can also use the tool to resize the partitions in the existing more disk. For more information on how to attach more disks and to use the new disk partitioning tool, see How to attach an extra disk to NetScaler Console.
Share
Share
This Preview product documentation is Cloud Software Group Confidential.
You agree to hold this documentation confidential pursuant to the terms of your Cloud Software Group Beta/Tech Preview Agreement.
The development, release and timing of any features or functionality described in the Preview documentation remains at our sole discretion and are subject to change without notice or consultation.
The documentation is for informational purposes only and is not a commitment, promise or legal obligation to deliver any material, code or functionality and should not be relied upon in making Cloud Software Group product purchase decisions.
If you do not agree, select I DO NOT AGREE to exit.