-
-
NetScaler Console on Azure Cloud
-
NetScaler Console HA pair on Azure Cloud
-
-
Install a NetScaler Console agent OpenShift operator for NetScaler Console on-prem deployment
-
Migrate NetScaler Console single-server deployment to a high availability deployment
-
Integrate NetScaler Console with Citrix Virtual Desktop Director
-
-
-
-
Scenarios for Flexed or Pooled license expiry and connectivity issues behavior
-
Configure NetScaler Console as the Flexed or Pooled license server
This content has been machine translated dynamically.
Dieser Inhalt ist eine maschinelle Übersetzung, die dynamisch erstellt wurde. (Haftungsausschluss)
Cet article a été traduit automatiquement de manière dynamique. (Clause de non responsabilité)
Este artículo lo ha traducido una máquina de forma dinámica. (Aviso legal)
此内容已经过机器动态翻译。 放弃
このコンテンツは動的に機械翻訳されています。免責事項
이 콘텐츠는 동적으로 기계 번역되었습니다. 책임 부인
Este texto foi traduzido automaticamente. (Aviso legal)
Questo contenuto è stato tradotto dinamicamente con traduzione automatica.(Esclusione di responsabilità))
This article has been machine translated.
Dieser Artikel wurde maschinell übersetzt. (Haftungsausschluss)
Ce article a été traduit automatiquement. (Clause de non responsabilité)
Este artículo ha sido traducido automáticamente. (Aviso legal)
この記事は機械翻訳されています.免責事項
이 기사는 기계 번역되었습니다.책임 부인
Este artigo foi traduzido automaticamente.(Aviso legal)
这篇文章已经过机器翻译.放弃
Questo articolo è stato tradotto automaticamente.(Esclusione di responsabilità))
Translation failed!
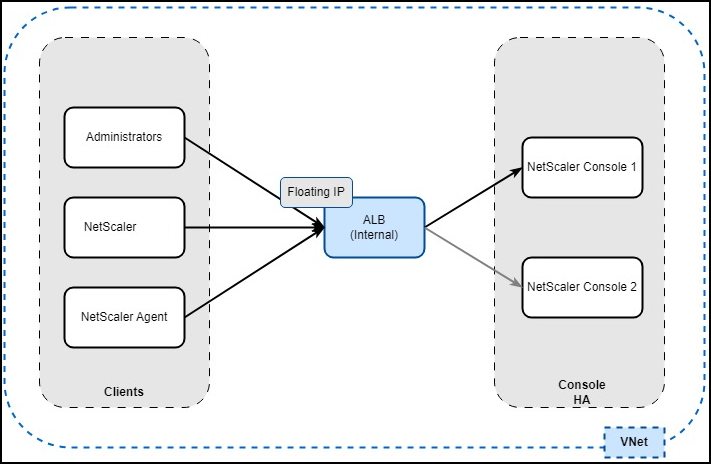
NetScaler Console HA pair on Azure Cloud
In Azure, high availability for NetScaler Console is achieved using an Azure Load Balancer (ALB). ALB monitors instances by sending health probes to both the primary and secondary nodes. The primary instance responds with 200 OK, while the secondary instance does not respond. Based on these responses, ALB sends traffic exclusively to the primary instance. In the event of a failover, the new primary begins responding with 200 OK, and ALB automatically sends traffic to it.
Prerequisites
Ensure that:
-
You have access to Azure Cloud and Resource Group.
Note:
We recommend that you create a resource group, network security group, virtual network, and other required entities before you provision NetScaler Console.
-
You create two standalone NetScaler Console instances on Azure Cloud.
-
The required ports are open for communication. For more information, see System Requirements.
Configure NetScaler Console HA pair
After you configure two standalone NetScaler Console instances:
-
Login to one of the NetScaler Console GUI.
-
Navigate to Settings > High Availability Settings.
Note:
-
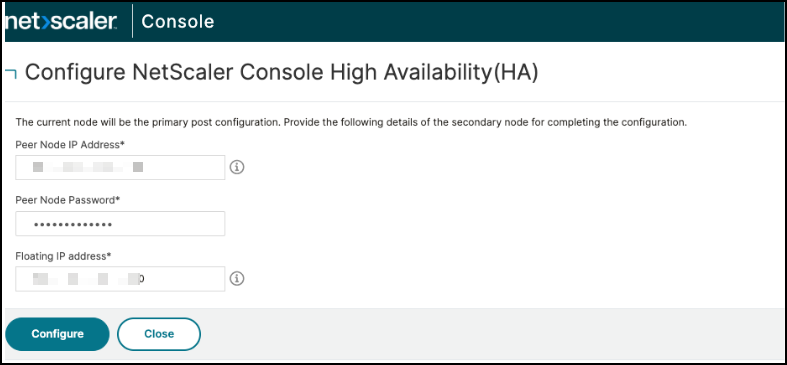
For configuring an HA pair, you must provide the private IP address of the other NetScaler Console.
-
Floating IP can be any available IP from the Azure VNet (Virtual Network).
-
-
Click Configure NetScaler Console High Availability (HA), and provide the secondary node details, floating IP address, and click Configure.
-
In the confirmation window, click Yes. NetScaler Console instances reboot to form a HA pair.
-
After the HA pair configuration is complete, login to the primary NetScaler Console and navigate to Settings > HA Deployment to validate the primary and secondary nodes.

The next step is to configure the floating IP address as the frontend IP of Azure load balancer in Azure Cloud. In Azure Cloud portal, search for load balancer, and select Load Balancers in the results, and click Create:
-
In Basics, create an Azure Load Balancer (ALB) in the same Resource Group and Region where the Console VMs are configured.
- Select SKU: Standard, Type: Internal, and Tier: Regional under Instance details.
-
In Frontend IP Configuration, add a frontend IP with the floating IP configured for the Console HA pair.
-
In Backend pools, add the IP address of the two Console instances.
-
Load balancing rules: Configure the following rules with Protocol, Port, Backend Port, Health Probe, and floating IP enabled:
Rule name Protocol Port Backend port Floating IP Rule-80 TCP 80 80 Yes Rule-443 TCP 443 443 Yes Rule-5454 TCP 5454 5454 Yes Rule-22 TCP 22 22 Yes Rule-8443 TCP 8443 8443 Yes Rule-7443 TCP 7443 7443 Yes Rule-27000 TCP 27000 27000 Yes Rule-7279 TCP 7279 7279 Yes Rule-5563 TCP 5563 5563 Yes Rule-4739 UDP 4739 4739 Yes Rule-5140 UDP 5140 5140 Yes Rule-162 UDP 162 162 Yes Rule-514 UDP 514 514 Yes Rule-5557 UDP 5557 5557 Yes Rule-5558 UDP 5558 5558 Yes -
Health Probe: Create an HTTP health check with all the required ports listed in Step 4. This health probe enables the primary Console as Active and secondary Console as Passive. For example:
- Port: 443
- URL:
/mas_health -
Expected Response Code: 200
For more information to create a load balancer, see Create load balancer in Azure documentation.
After you configure the load balancer, you can use the frontend IP address of ALB to access NetScaler Console.
Note:
Ensure that you have an Azure Virtual Desktop running in the same Azure network to access NetScaler Console through frontend IP address.
Share
Share
In this article
This Preview product documentation is Cloud Software Group Confidential.
You agree to hold this documentation confidential pursuant to the terms of your Cloud Software Group Beta/Tech Preview Agreement.
The development, release and timing of any features or functionality described in the Preview documentation remains at our sole discretion and are subject to change without notice or consultation.
The documentation is for informational purposes only and is not a commitment, promise or legal obligation to deliver any material, code or functionality and should not be relied upon in making Cloud Software Group product purchase decisions.
If you do not agree, select I DO NOT AGREE to exit.