-
-
-
-
Remediate vulnerabilities for CVE-2021-22927 and CVE-2021-22920
-
-
Scenarios for Flexed or Pooled license expiry and connectivity issues behavior
-
Configure NetScaler Console as the Flexed or Pooled license server
This content has been machine translated dynamically.
Dieser Inhalt ist eine maschinelle Übersetzung, die dynamisch erstellt wurde. (Haftungsausschluss)
Cet article a été traduit automatiquement de manière dynamique. (Clause de non responsabilité)
Este artículo lo ha traducido una máquina de forma dinámica. (Aviso legal)
此内容已经过机器动态翻译。 放弃
このコンテンツは動的に機械翻訳されています。免責事項
이 콘텐츠는 동적으로 기계 번역되었습니다. 책임 부인
Este texto foi traduzido automaticamente. (Aviso legal)
Questo contenuto è stato tradotto dinamicamente con traduzione automatica.(Esclusione di responsabilità))
This article has been machine translated.
Dieser Artikel wurde maschinell übersetzt. (Haftungsausschluss)
Ce article a été traduit automatiquement. (Clause de non responsabilité)
Este artículo ha sido traducido automáticamente. (Aviso legal)
この記事は機械翻訳されています.免責事項
이 기사는 기계 번역되었습니다.책임 부인
Este artigo foi traduzido automaticamente.(Aviso legal)
这篇文章已经过机器翻译.放弃
Questo articolo è stato tradotto automaticamente.(Esclusione di responsabilità))
Translation failed!
Remediate vulnerabilities for CVE-2021-22927 and CVE-2021-22920
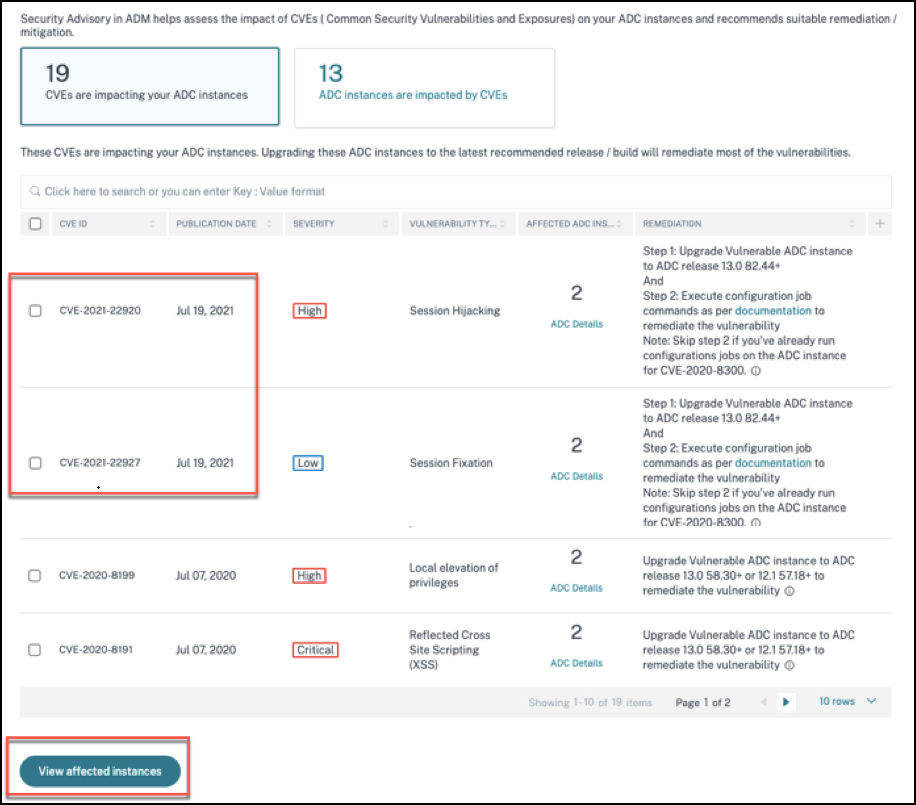
In the NetScaler Console security advisory dashboard, under Current CVEs > <number of> NetScaler instances are impacted by CVEs, you can see all the instances vulnerable due to CVE-2021-22927 and CVE-2021-22920. To check the details of the instances impacted by these two CVEs, select one or more CVEs and click View Affected Instances.
Note
It might take a couple of hours for the security advisory system scan to conclude and reflect the impact of CVE-2021-22927 and CVE-2021-22920 in the security advisory module. To see the impact sooner, start an on-demand scan by clicking Scan-Now.
For more information about the security advisory dashboard see, Security Advisory.
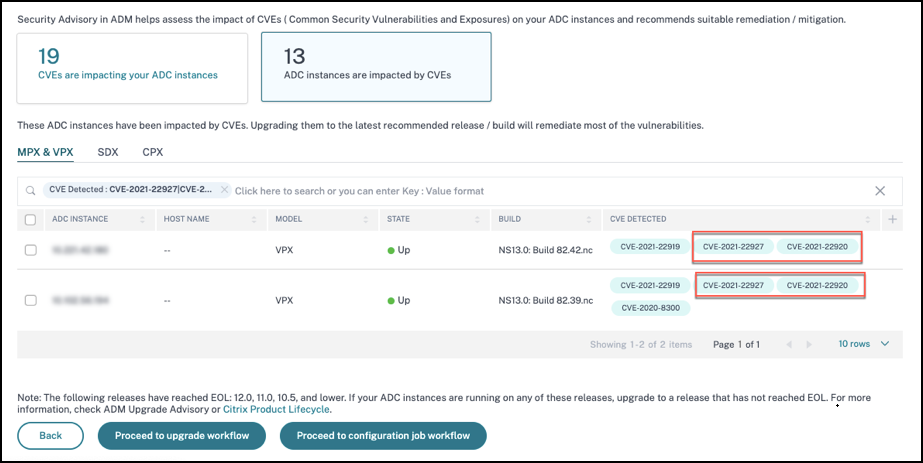
The <number of> NetScaler instances impacted by CVEs window appears. In the following screen capture, you can see the count and details of the NetScaler instances impacted by CVE-2021-22927 and CVE-2021-22920.
Remediate CVE-2021-22927 and CVE-2021-22920
For CVE-2021-22927 and CVE-2021-22920 impacted NetScaler instances, the remediation is a two-step process. In the GUI, under Current CVEs > NetScaler instances are impacted by CVEs, you can see step 1 and 2.
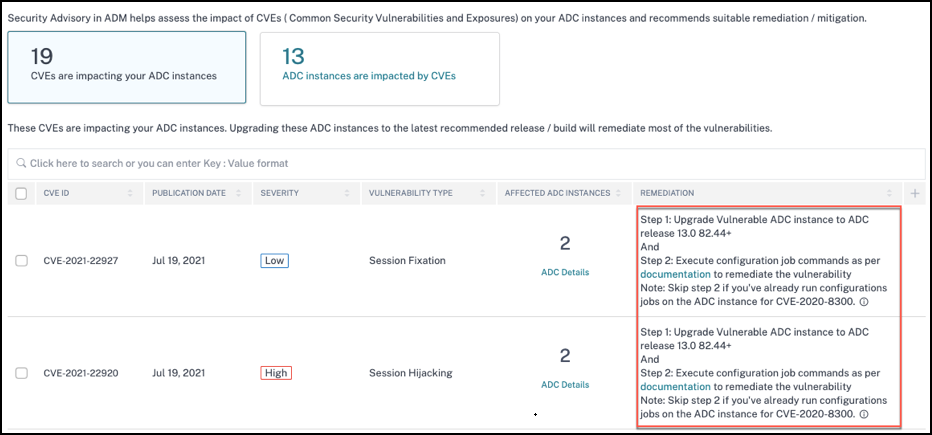
The two steps include:
- Upgrading the vulnerable NetScaler instances to a release and build that has the fix.
- Applying the required configuration commands using the customizable built-in configuration template in configuration jobs. Follow this step for each vulnerable NetScaler one at a time and include all SAML actions for that NetScaler.
Note
Skip step 2 if you’ve already run configuration jobs on the NetScaler instance for CVE-2020-8300.
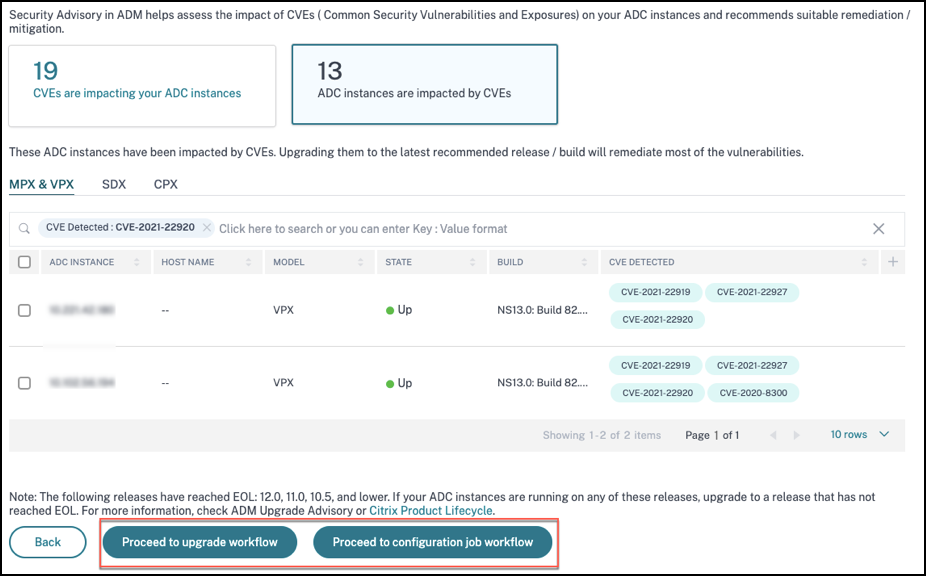
Under Current CVEs> NetScaler instances impacted by CVEs, you see two separate workflows for this 2-step remediation process: which are Proceed to upgrade workflow and Proceed to configuration job workflow.
Step 1: Upgrade the vulnerable NetScaler instances
To upgrade the vulnerable instances, select the instances and click Proceed to upgrade workflow. The upgrade workflow opens with the vulnerable NetScaler instances already populated.
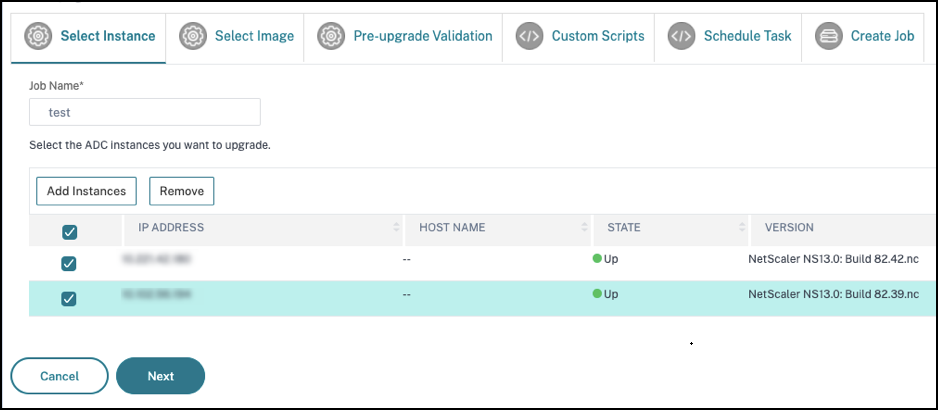
For more information on how to use NetScaler Console to upgrade NetScaler instances, see Create a NetScaler upgrade job.
Note
This step can be done at once for all the vulnerable NetScaler instances. Note
After you have completed step 1 for all the NetScaler instances vulnerable to CVE-2021-22920 and CVE-2021-22927, do an on-demand scan. The updated security posture under Current CVEs helps you understand if the NetScaler instances are still vulnerable to any of these CVEs. From the new posture, you can also check if you need to run configuration jobs. If you’ve already applied the appropriate configuration jobs to the NetScaler instance for CVE-2020-8300 and now you have upgraded the NetScaler instance, after doing the on-demand scan the instance no longer shows as vulnerable for CVE-2020-8300, CVE-2021-22920, and CVE-2021-22927.
Step 2: Apply configuration commands
After you’ve upgraded the impacted instances, in the <number of> NetScaler instances impacted by CVEs window, select one instance impacted by CVE-2021-22927 and CVE-2021-22920 and click Proceed to configuration job workflow. The workflow includes the following steps.
- Customizing the configuration.
- Reviewing the auto-populated impacted instances.
- Specifying inputs for variables for the job.
- Reviewing the final config with variable inputs populated.
- Running the job.
Keep the following points in mind before you select an instance and click Proceed to configuration job workflow:
-
For a NetScaler instance impacted by multiple CVEs (such as CVE-2020-8300, CVE-2021-22927, CVE-2021-22920, and CVE-2021-22956): when you select the instance and click Proceed to configuration job workflow, the built-in configuration template does not auto-populate under Select configuration. Drag and drop the appropriate config job template under Security Advisory Template manually to the config job pane on the right side.
-
For multiple NetScaler instances that are impacted by CVE-2021-22956 only: you can run config jobs on all instances at once. For example, you’ve NetScaler 1, NetScaler 2, and NetScaler 3, and all of them are impacted only by CVE-2021-22956. Select all these instances and click Proceed to configuration job workflow, and the built-in configuration template auto-populates under Select configuration.
-
For multiple NetScaler instances impacted by CVE-2021-22956 and one or more other CVEs (such as CVE-2020-8300, CVE-2021-22927, and CVE-2021-22920), which require remediation to be applied to each NetScaler at a time: when you select these instances and click Proceed to configuration job workflow, an error message appears telling you to run the config job on each NetScaler at a time.
Step 1: Select configuration
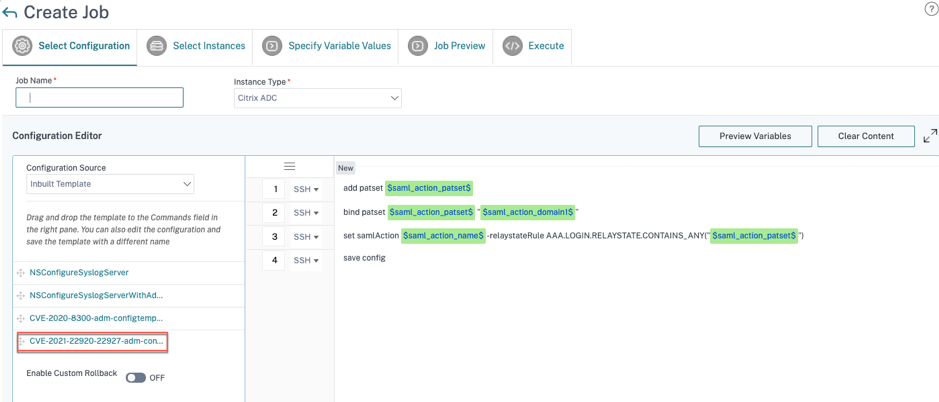
In the configuration job workflow, the built-in configuration base template auto-populates under Select configuration.
Note
If the NetScaler instance selected in step 2 for applying configuration commands, is vulnerable to CVE-2021-22927, CVE-2021-22920, and also CVE-2020-8300, the base template for CVE-2020-8300 is auto-populated. The CVE-2020-8300 template is a super set of the config commands required for all the three CVEs. Customize this base template according to your NetScaler instance deployment and requirement.
You must run a separate configuration job for each impacted NetScaler instance, one at a time, and include all SAML actions for that NetScaler. For example, if you have two vulnerable NetScaler instances each having two SAML actions, you must run this configuration job two times. One time per NetScaler covering all its SAML actions.
| NetScaler 1 | NetScaler 2 |
|---|---|
| Job 1: two SAML actions | Job 2: two SAML actions |
Give the job a name and customize the template for the following specifications. The built-in configuration template is only an outline or base template. Customize the template based on your deployment for the following requirements:
a. SAML actions and their associated domains
Depending on the number of SAML actions you have in your deployment, you must replicate lines 1–3 and customize the domains for each SAML action.
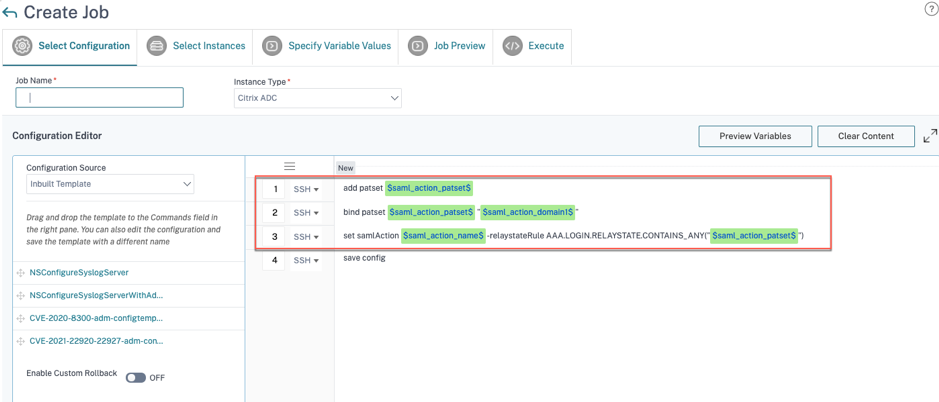
For example, if you have two SAML actions, repeat lines 1–3 two times and accordingly customize the variable definitions for each SAML action.
And if you have N domains for a SAML action, you must manually type the line bind patset $saml_action_patset$ “$saml_action_domain1$” multiple times to ensure that the line appears N times for that SAML action. And change the following variable definition names:
-
saml_action_patset: is the config template variable, and it represents the value of the name of the pattern set (patset) for the SAML action. You can specify the real value in step 3 of the config job workflow. See the section Step 3: Specify variable values in this doc. -
saml_action_domain1: is the config template variable, and it represents the domain name for that specific SAML action. You can specify the real value in step 3, of the config job workflow. See the section Step 3: Specify variable values in this doc.
To find all the SAML actions for a device, run the command show samlaction.

Step 2: Select the instance
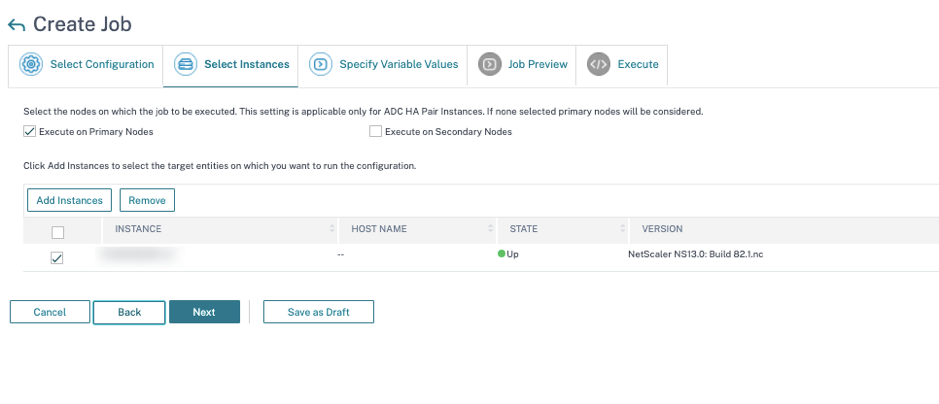
The impacted instance is auto-populated under Select Instances. Select the instance and click Next.
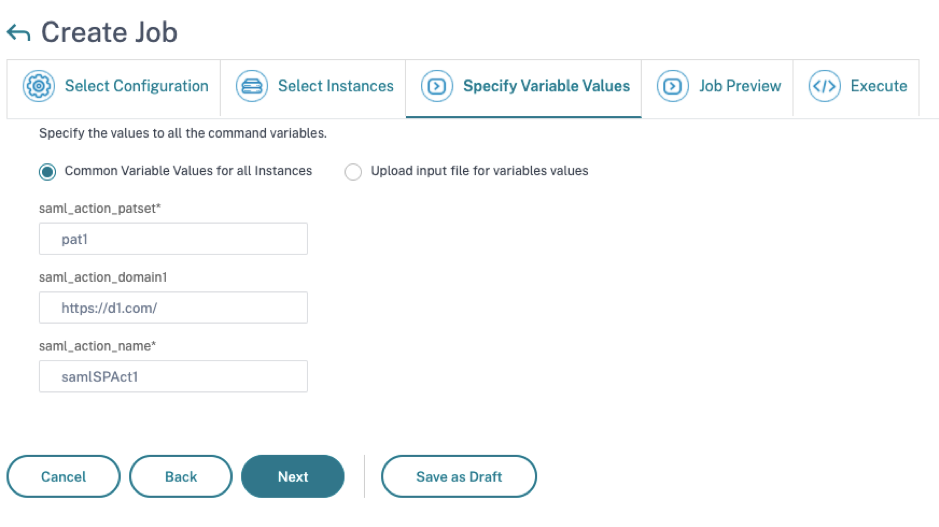
Step 3: Specify variable values
Enter the variable values.
-
saml_action_patset: add a name for the SAML action -
saml_action_domain1: enter a domain in the formathttps://<example1.com>/ -
saml_action_name: enter the same of the SAML action for which you are configuring the job
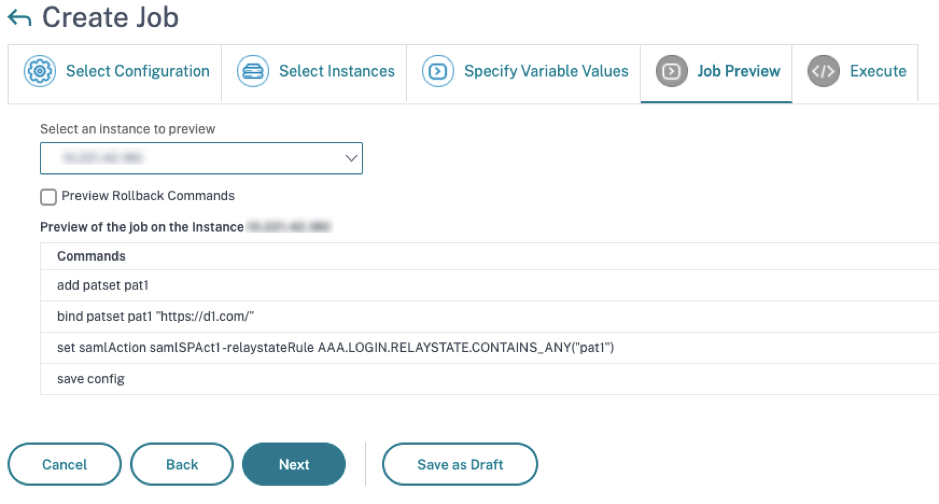
Step 4: Preview the configuration
Previews the variable values having been inserted in the config and click Next.
Step 5: Run the job
Click Finish to run the configuration job.
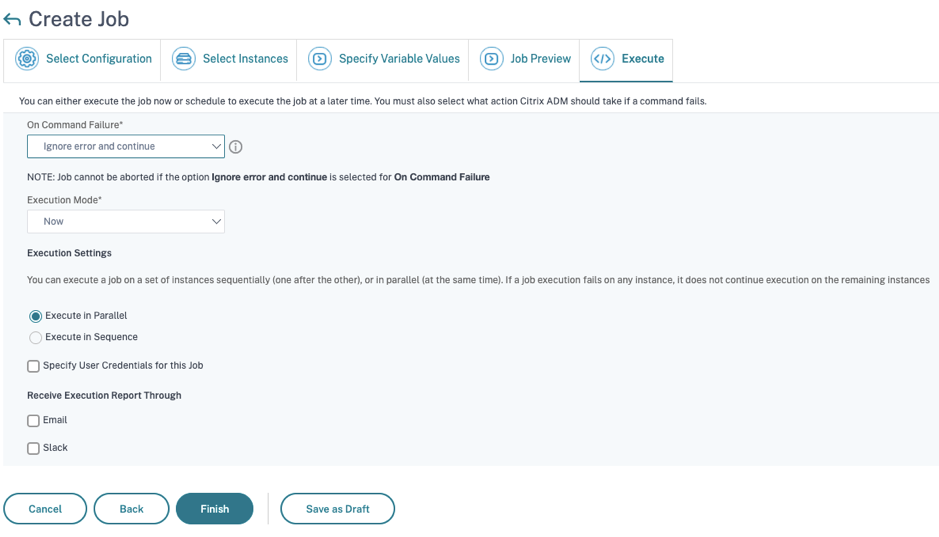
After the job is run, it appears under Infrastructure > Configuration > Configuration Jobs.
After completing the two remediation steps for all vulnerable NetScaler instances, you can run an on-demand scan to see the revised security posture.
Scenario
In this scenario, two NetScaler instances are vulnerable to CVE-2021-22920, and you need to remediate all the instances. Follow these steps:
-
Upgrade all the three NetScaler instances by following the steps given in the “Upgrade an instance” section in this document.
-
Apply the config patch to one NetScaler at a time, using the configuration job workflow. See the steps given in the “Apply configuration commands” section in this document.
The vulnerable NetScaler 1 has two SAML actions:
- SAML action 1 has one domain
- SAML action 2 has two domains
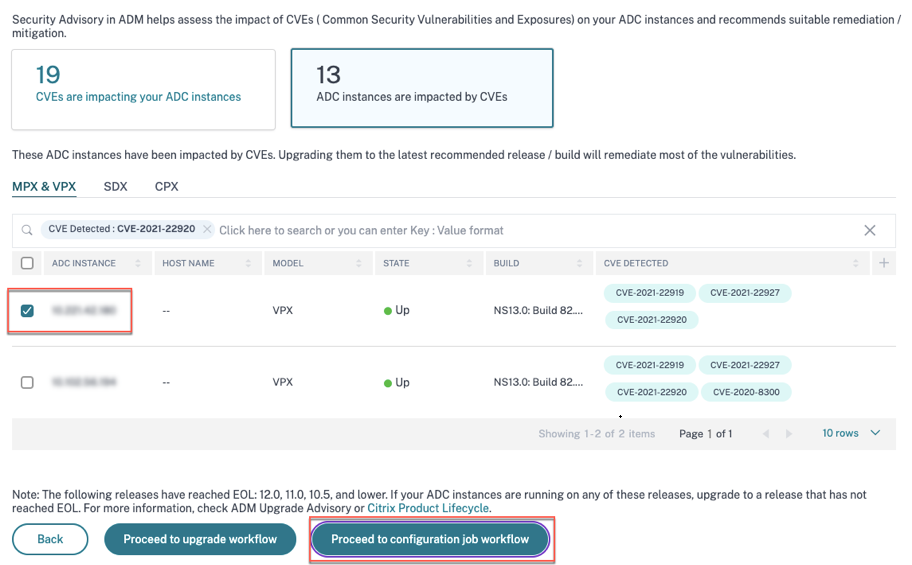
Select NetScaler 1 and click Proceed to configuration job workflow. The built-in base template auto-populates. Next, give a job name and customize the template according to the given configuration.
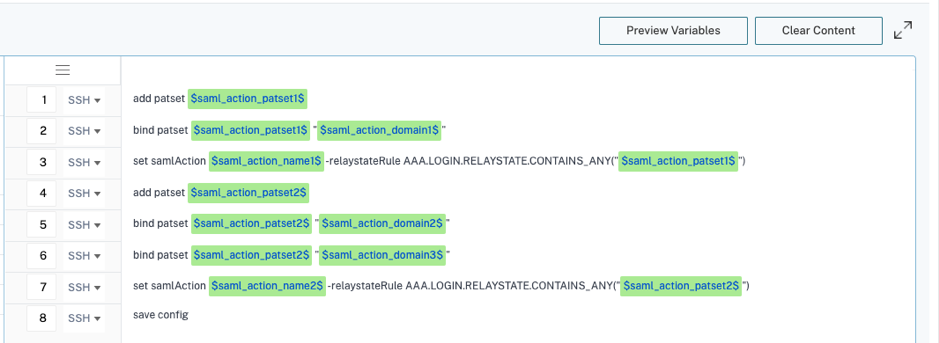
The following table lists the variable definitions for customized parameters.
Table. Variable definitions for SAML action
| NetScaler configuration | Variable definition for patset | Variable definition for SAML action name | Variable definition for domain |
|---|---|---|---|
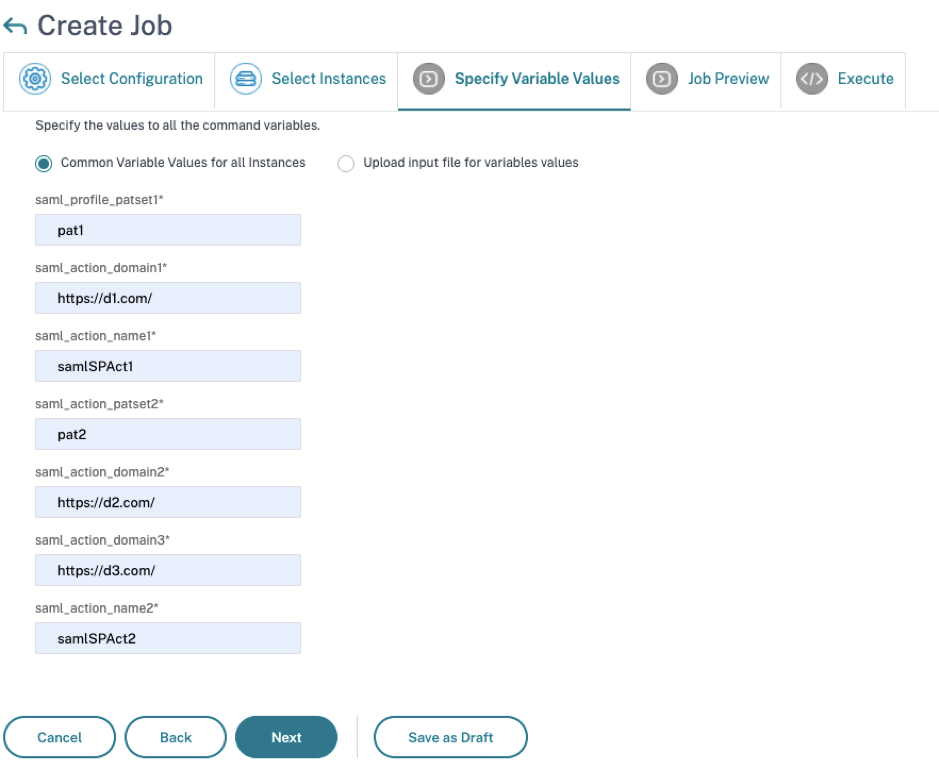
| SAML action 1 has one domain | saml_action_patset1 | saml_action_name1 | saml_action_domain1 |
| SAML action 2 has two domains | saml_action_patset2 | saml_action_name2 | saml_action_domain2, saml_action_domain3 |
Under Select Instances, select NetScaler 1 and click Next. The Specify Variable Values window appears. In this step, you need to provide values for all the variables defined in the previous step.
Next, review the variables.
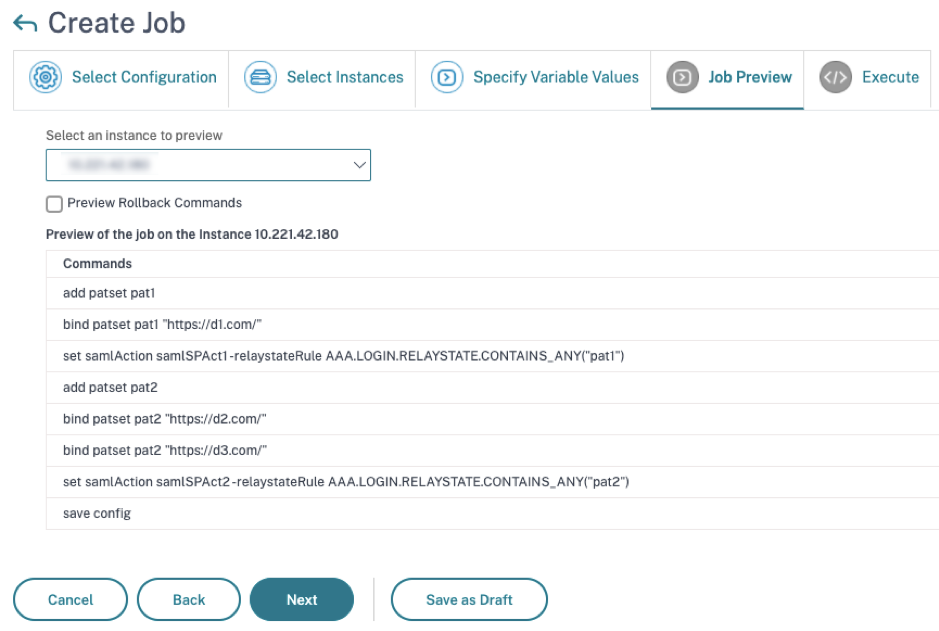
Click Next and then click Finish to run the job.
After the job is run, it appears under Infrastructure > Configuration > Configuration Jobs.
After completing the two remediation steps for NetScaler1, follow the same steps to remediate NetScaler 2 and NetScaler 3. After remediation is complete, you can run an on-demand scan to see the revised security posture.
Share
Share
In this article
This Preview product documentation is Cloud Software Group Confidential.
You agree to hold this documentation confidential pursuant to the terms of your Cloud Software Group Beta/Tech Preview Agreement.
The development, release and timing of any features or functionality described in the Preview documentation remains at our sole discretion and are subject to change without notice or consultation.
The documentation is for informational purposes only and is not a commitment, promise or legal obligation to deliver any material, code or functionality and should not be relied upon in making Cloud Software Group product purchase decisions.
If you do not agree, select I DO NOT AGREE to exit.