-
-
-
VMware ESX、Linux KVM、およびCitrix HypervisorでNetScaler ADC VPXのパフォーマンスを最適化する
-
AWSでNetScaler ADC VPXインスタンスを展開する
-
-
-
-
-
-
-
-
-
-
-
-
-
-
ユースケース 13: 負荷分散のためのCitrix Virtual Appsの構成
-
-
-
This content has been machine translated dynamically.
Dieser Inhalt ist eine maschinelle Übersetzung, die dynamisch erstellt wurde. (Haftungsausschluss)
Cet article a été traduit automatiquement de manière dynamique. (Clause de non responsabilité)
Este artículo lo ha traducido una máquina de forma dinámica. (Aviso legal)
此内容已经过机器动态翻译。 放弃
このコンテンツは動的に機械翻訳されています。免責事項
이 콘텐츠는 동적으로 기계 번역되었습니다. 책임 부인
Este texto foi traduzido automaticamente. (Aviso legal)
Questo contenuto è stato tradotto dinamicamente con traduzione automatica.(Esclusione di responsabilità))
This article has been machine translated.
Dieser Artikel wurde maschinell übersetzt. (Haftungsausschluss)
Ce article a été traduit automatiquement. (Clause de non responsabilité)
Este artículo ha sido traducido automáticamente. (Aviso legal)
この記事は機械翻訳されています.免責事項
이 기사는 기계 번역되었습니다.책임 부인
Este artigo foi traduzido automaticamente.(Aviso legal)
这篇文章已经过机器翻译.放弃
Questo articolo è stato tradotto automaticamente.(Esclusione di responsabilità))
Translation failed!
ユースケース 13: 負荷分散のためのCitrix Virtual Appsの構成
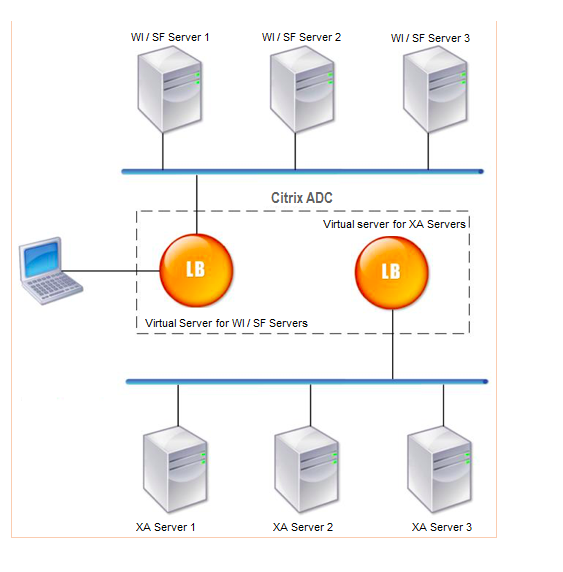
アプリケーションを効率的に配信するには、NetScalerアプライアンスをCitrix Virtual Appsと統合し、NetScaler負荷分散機能を使用してCitrix Virtual Appsサーバーファーム全体に負荷を分散できます。次の図は、このような設定のトポロジー図です。

Web Interfaceサーバーは、ユーザーのWebブラウザからCitrix Virtual Appsアプリケーションリソースへの安全なアクセスを提供します。Web Interfaceクライアントは、Citrix Virtual Appsサーバーファームで使用可能なアプリケーション、コンテンツ、デスクトップなどのすべてのリソースをユーザーに提供します。ユーザーは、標準のWebブラウザまたはCitrixオンラインプラグインを介して公開リソースにアクセスできます。
ユーザーのデバイス上の Web ブラウザーは、Web サーバーに情報を送信します。Web サーバーは、サーバーファーム上のサーバーと通信して、ユーザーがリソースにアクセスできるようにします。
Web インターフェイスと XML ブローカは補完的なサービスです。Web Interface はユーザーにアプリケーションへのアクセスを提供し、XML Broker はユーザーの権限を評価して Web Interface に表示されるアプリケーションを決定します。
XML サービスは、サーバーファーム内のすべてのサーバーにインストールされます。Web インターフェイスで指定された XML サービスは、XML ブローカとして機能します。Web Interface サーバーによって渡されたユーザー資格情報に基づいて、XML Broker サーバーはユーザーがアクセスできるアプリケーションのリストを送信します。
複数のWeb InterfaceサーバーとXML Brokerサーバーを展開する大企業では、NetScalerアプライアンスを使用してこれらのサーバーの負荷を分散することをお勧めします。Web Interface サーバーを負荷分散するように 1 つの仮想サーバーを構成し、XML Broker サーバー用に別の仮想サーバーを構成します。負荷分散方式およびその他の機能は、必要に応じて仮想サーバ上で設定できます。
注
HTTPプロトコルを使用することもできますが、クライアントとNetScaler間の通信にはSSLを使用することをお勧めします。クライアントとの通信にSSLプロトコルを使用する場合でも、NetScalerとWIサーバー間の通信にはHTTPプロトコルを使用できます。
GUIを使用してCitrix Virtual Appsの負荷分散を構成するには
- サービスを作成します。
- [ 設定 ] > [ トラフィック管理 ] > [ 負荷分散 ] > [ サービス ] に移動し、[ 追加] をクリックします。
- 名前、IP アドレス、ポート、プロトコルタイプを指定してサービスを作成し、「 OK」をクリックします。
- 負荷分散仮想サーバーを作成します。
- [ 設定 ] > [ トラフィック管理 ] > [ 負荷分散 ] > [ 仮想サーバー ] に移動し、[ 追加] をクリックします。
- 名前、IP アドレス、ポート、プロトコルタイプを指定して仮想サーバーを作成し、「 OK」をクリックします。
- サービスを負荷分散仮想サーバーにバインドします。
- [ 設定 ] > [ トラフィック管理 ] > [ 負荷分散 ] > [ 仮想サーバー ] に移動し、サーバーを選択します。
- [編集]をクリックします。
- 「 サービス」と「サービスグループ」で、「 ** 」をクリックし、「 **バインドの追加」をクリックします。
- バインドするサービスを選択し、重量値を入力します。
- [Bind] をクリックします。
コマンドラインインターフェイスを使用してCitrix Virtual Appsの負荷分散を構成するには
- サービスを作成するには、コマンドプロンプトで次のように入力します。
add service <name> <serverName> <serviceType> <port>
<!--NeedCopy-->
例:
add service Service-HTTP-1 192.0.2.5 HTTP 80
<!--NeedCopy-->
- 仮想サーバーを作成するには、コマンドプロンプトで次のように入力します。
add lb vserver <name> <serviceType> <ip> <port>
<!--NeedCopy-->
例:
add lb vserver Vserver-LB-1 HTTP 10.102.29.60 80
<!--NeedCopy-->
- サービスを負荷分散仮想サーバーにバインドするには、コマンドプロンプトで次のように入力します。
bind lb vserver <name> <serviceName>
<!--NeedCopy-->
例:
bind lb vserver Vserver-LB-1 Service-HTTP-1
<!--NeedCopy-->
共有
共有
This Preview product documentation is Cloud Software Group Confidential.
You agree to hold this documentation confidential pursuant to the terms of your Cloud Software Group Beta/Tech Preview Agreement.
The development, release and timing of any features or functionality described in the Preview documentation remains at our sole discretion and are subject to change without notice or consultation.
The documentation is for informational purposes only and is not a commitment, promise or legal obligation to deliver any material, code or functionality and should not be relied upon in making Cloud Software Group product purchase decisions.
If you do not agree, select I DO NOT AGREE to exit.