-
-
-
-
NetScaler高可用性ペアの作成
-
-
-
This content has been machine translated dynamically.
Dieser Inhalt ist eine maschinelle Übersetzung, die dynamisch erstellt wurde. (Haftungsausschluss)
Cet article a été traduit automatiquement de manière dynamique. (Clause de non responsabilité)
Este artículo lo ha traducido una máquina de forma dinámica. (Aviso legal)
此内容已经过机器动态翻译。 放弃
このコンテンツは動的に機械翻訳されています。免責事項
이 콘텐츠는 동적으로 기계 번역되었습니다. 책임 부인
Este texto foi traduzido automaticamente. (Aviso legal)
Questo contenuto è stato tradotto dinamicamente con traduzione automatica.(Esclusione di responsabilità))
This article has been machine translated.
Dieser Artikel wurde maschinell übersetzt. (Haftungsausschluss)
Ce article a été traduit automatiquement. (Clause de non responsabilité)
Este artículo ha sido traducido automáticamente. (Aviso legal)
この記事は機械翻訳されています.免責事項
이 기사는 기계 번역되었습니다.책임 부인
Este artigo foi traduzido automaticamente.(Aviso legal)
这篇文章已经过机器翻译.放弃
Questo articolo è stato tradotto automaticamente.(Esclusione di responsabilità))
Translation failed!
NetScaler高可用性ペアの作成
NetScaler高可用性 (HA) ペアは、ダウンタイムやネットワーク障害発生時でも中断のない運用を提供できます。NetScaler Console を使用して、NetScaler インスタンスの HA ペアを作成できます。詳細については、NetScaler高可用性を参照してください。
NetScaler Console で NetScaler インスタンスの HA ペアを作成するには、次の手順を実行します。
-
Infrastructure > Instances > NetScaler に移動します。
-
HA ペアを作成する NetScaler インスタンスをリストから選択します。
選択したインスタンスが HA ペアのプライマリインスタンスになります。
-
Action > Create HA Pair をクリックします。
-
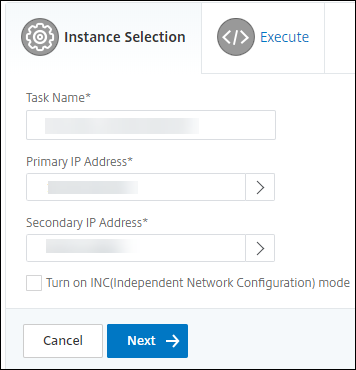
Instance Selection で、次の手順を実行します。
-
Secondary IP Address で、クリックしてセカンダリインスタンスを選択します。
-
HA ペアでセカンダリとして構成する NetScaler インスタンスを選択します。
-
オプションで、HA ペアインスタンスが 2 つのサブネットにある場合は、Turn on INC(Independent Network Configuration) mode を選択します。
-
Next をクリックします。

-
-
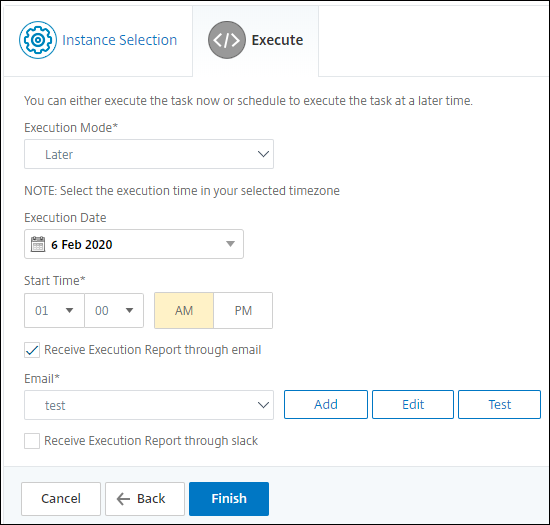
Execute で、HA ペアを今すぐ作成するか、後で作成するかを決定できます。
-
Execution Mode で、次のいずれかの実行モードを選択します。
-
Now - このオプションを選択すると、HA ペアが今すぐ作成されます。
-
Later - このオプションを選択すると、指定した日時で HA ペアが作成されます。
-
-
Execution Mode リストで Later を選択した場合は、このタスクを実行する Execution Date と Start Time を選択します。
注
実行時間は、NetScaler Console で設定されたタイムゾーンで表示されます。

-
このタスクの実行レポートは、次の方法で受け取ることができます。
-
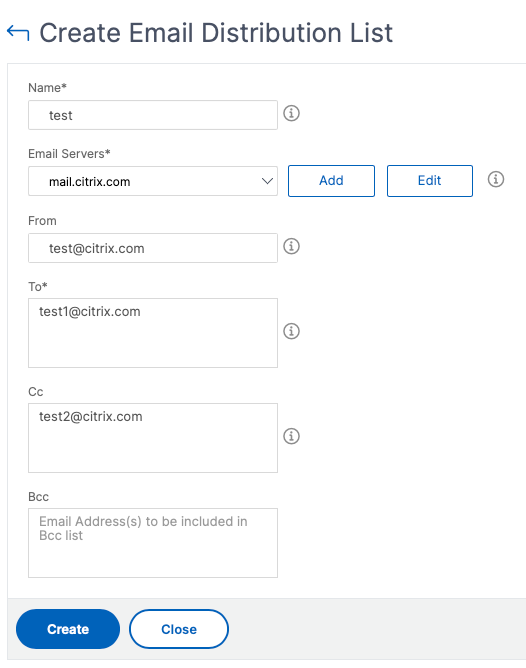
Email - リストからメール配信を選択します。
配信リストを追加するには、Add をクリックします。配信リストを追加するために必要なパラメータを指定し、Create をクリックします。

-
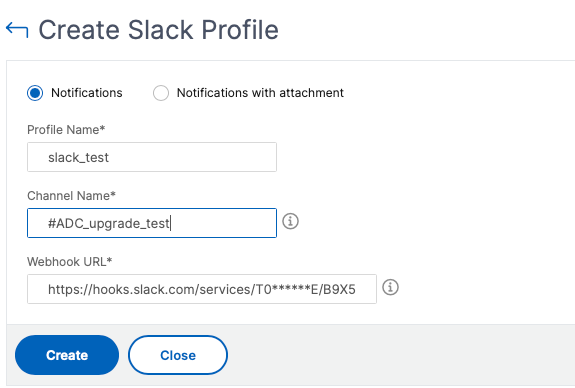
Slack - リストから Slack プロファイルを選択します。
Slack プロファイルを追加するには、Add をクリックします。Profile Name、Channel Name、および Token を指定し、Create をクリックします。

共有
共有
この記事の概要
This Preview product documentation is Cloud Software Group Confidential.
You agree to hold this documentation confidential pursuant to the terms of your Cloud Software Group Beta/Tech Preview Agreement.
The development, release and timing of any features or functionality described in the Preview documentation remains at our sole discretion and are subject to change without notice or consultation.
The documentation is for informational purposes only and is not a commitment, promise or legal obligation to deliver any material, code or functionality and should not be relied upon in making Cloud Software Group product purchase decisions.
If you do not agree, select I DO NOT AGREE to exit.