-
-
-
VMware ESX、Linux KVM、およびCitrix HypervisorでNetScaler ADC VPXのパフォーマンスを最適化する
-
VMware ESXにNetScaler ADC VPXインスタンスをインストールする
-
PCIパススルーネットワークインターフェイスを使用するようにNetScaler VPXを構成する
-
VMware ESXハイパーバイザーでのNetScaler ADCアプライアンスの初回起動時にNetScaler ADC VPXの構成を適用する
-
-
-
-
-
-
-
-
-
-
-
-
-
-
-
This content has been machine translated dynamically.
Dieser Inhalt ist eine maschinelle Übersetzung, die dynamisch erstellt wurde. (Haftungsausschluss)
Cet article a été traduit automatiquement de manière dynamique. (Clause de non responsabilité)
Este artículo lo ha traducido una máquina de forma dinámica. (Aviso legal)
此内容已经过机器动态翻译。 放弃
このコンテンツは動的に機械翻訳されています。免責事項
이 콘텐츠는 동적으로 기계 번역되었습니다. 책임 부인
Este texto foi traduzido automaticamente. (Aviso legal)
Questo contenuto è stato tradotto dinamicamente con traduzione automatica.(Esclusione di responsabilità))
This article has been machine translated.
Dieser Artikel wurde maschinell übersetzt. (Haftungsausschluss)
Ce article a été traduit automatiquement. (Clause de non responsabilité)
Este artículo ha sido traducido automáticamente. (Aviso legal)
この記事は機械翻訳されています.免責事項
이 기사는 기계 번역되었습니다.책임 부인
Este artigo foi traduzido automaticamente.(Aviso legal)
这篇文章已经过机器翻译.放弃
Questo articolo è stato tradotto automaticamente.(Esclusione di responsabilità))
Translation failed!
PCIパススルーネットワークインターフェイスを使用するようにNetScaler VPXインスタンスを構成する
概要
VMware ESX ServerにNetScaler VPXインスタンスをインストールして構成したら、vSphere Web Clientを使用して、PCIパススルーネットワークインターフェイスを使用するように仮想アプライアンスを構成できます。
PCIパススルー機能では、ゲスト仮想マシンからホストに接続された物理PCIおよびPCIeデバイスに直接アクセスできます。
前提条件
- ホストのIntel XL710 NICのファームウェアバージョンは、5.04です。
- ホストに接続され構成されているPCIパススルーデバイス
- サポートされているNIC:
- Intel X710 10G NIC
- Intel XL710 デュアルポート 40G NIC
- Intel XL710 シングルポート 40G NIC
ホスト上のパススルー・デバイスの構成
仮想マシンでパススルー PCI デバイスを構成する前に、ホストマシン上でそれを構成する必要があります。ホストでパススルーデバイスを構成するには次の手順を実行します。
- vSphere Webクライアントのナビゲーターパネルからホストを選択します。
- 管理 > 設定 > PCI デバイスをクリックします。すべての利用可能なパススルーデバイスが表示されます。
- 設定するデバイスを右クリックし、[ 編集] をクリックします。
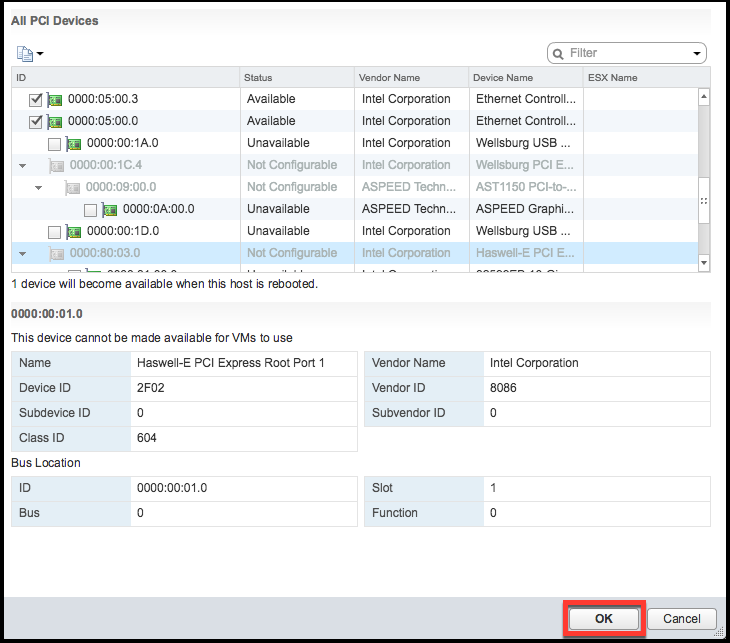
- [PCI デバイスの可用性の編集 ] ウィンドウが表示されます。
-
パススルーに使用するデバイスを選択し、[OK] をクリックします。

- ホストマシンを再起動します。
NetScaler VPXインスタンスでパススルーデバイスを構成する
次の手順に従って、NetScaler VPXインスタンスでパススルーPCIデバイスを構成します。
- 仮想マシンの電源を切ります。
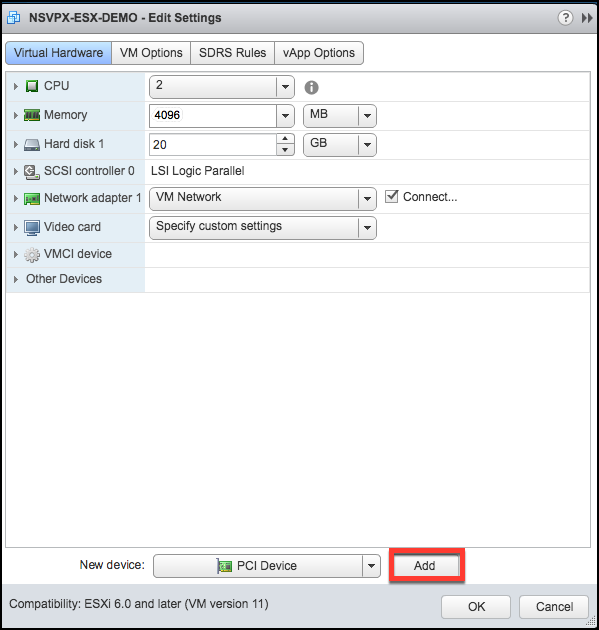
- 仮想マシンを右クリックして、[ 設定の編集] を選択します。
-
[仮想ハードウェア] タブで、[新しい **デバイス] ドロップダウンメニューから [PCI デバイス] を選択し、[追加**] をクリックします。

-
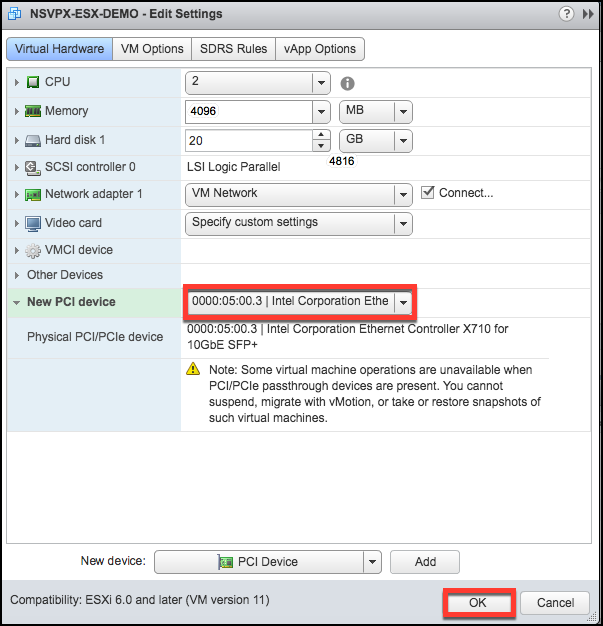
[New PCI device] を展開し、ドロップダウンリストから仮想マシンに接続するパススルーデバイスを選択し、[OK] をクリックします。
注
VMXNET3 ネットワークインターフェイスと PCI パススルーネットワークインターフェイスは共存できません。

- ゲスト仮想マシンの電源を入れます。
PCIパススルーネットワークインターフェイスを使用するようにNetScaler VPXを構成する手順を完了しました。
共有
共有
This Preview product documentation is Cloud Software Group Confidential.
You agree to hold this documentation confidential pursuant to the terms of your Cloud Software Group Beta/Tech Preview Agreement.
The development, release and timing of any features or functionality described in the Preview documentation remains at our sole discretion and are subject to change without notice or consultation.
The documentation is for informational purposes only and is not a commitment, promise or legal obligation to deliver any material, code or functionality and should not be relied upon in making Cloud Software Group product purchase decisions.
If you do not agree, select I DO NOT AGREE to exit.