WAF Insight
Web and web service applications that are exposed to the Internet have become increasingly vulnerable to attacks. To protect applications from attack, you need visibility into the nature and extent of past, present, and impending threats, real-time actionable data on attacks, and recommendations on countermeasures. WAF Insight provides a single-pane solution to help you assess your application security status and take corrective actions to secure your applications.
Note
WAF Insight is supported on NetScaler Console with all NetScaler appliances running on version 11.0 Build 65.31 and later.
How WAF insight works
WAF Insight is an intuitive dashboard-based security analytics solution that gives you full visibility into the threat environment associated with your applications. Security insight is included in NetScaler Console, and it periodically generates reports based on your Application Firewall and NetScaler system security configurations. The reports include the following information for each application:
-
Threat index. A single-digit rating system that indicates the criticality of attacks on the application, regardless of whether the application is protected by a NetScaler appliance. The more critical the attacks on an application, the higher the threat index for that application. Values range from 1 through 7.
The threat index is based on attack information. The attack-related information, such as violation type, attack category, location, and client details, gives you insight into the attacks on the application. Violation information is sent to NetScaler Console only when a violation or attack occurs. Many breaches and vulnerabilities lead to a high threat index value.
-
Safety index. A single-digit rating system that indicates how securely you have configured the NetScaler instances to protect applications from external threats and vulnerabilities. The lower the security risks for an application, the higher the safety index. Values range from 1 through 7.
The safety index considers both the application firewall configuration and the NetScaler system security configuration. For a high safety index value, both configurations must be strong. For example, if rigorous application firewall checks are in place but NetScaler system security measures, such as a strong password for the
nsrootuser, have not been adopted, applications are assigned a low safety index value. -
Actionable information. The information that you need for lowering the threat index and increasing the safety index, which significantly improves application security. For example, you can review information about violations, existing and missing security configurations for application firewall and other security features, the rate at which the applications are being attacked.
Configure WAF insight
Note:
You can get started with configuring protections through the Unified Security dashboard. For more information, see Unified Security dashboard
-
Navigate to Infrastructure > Instances > NetScaler and select the instance type. For example, VPX.
-
Select the instance and from the Select Action list, select Configure Analytics.
-
On the Configure Analytics on virtual server window:
-
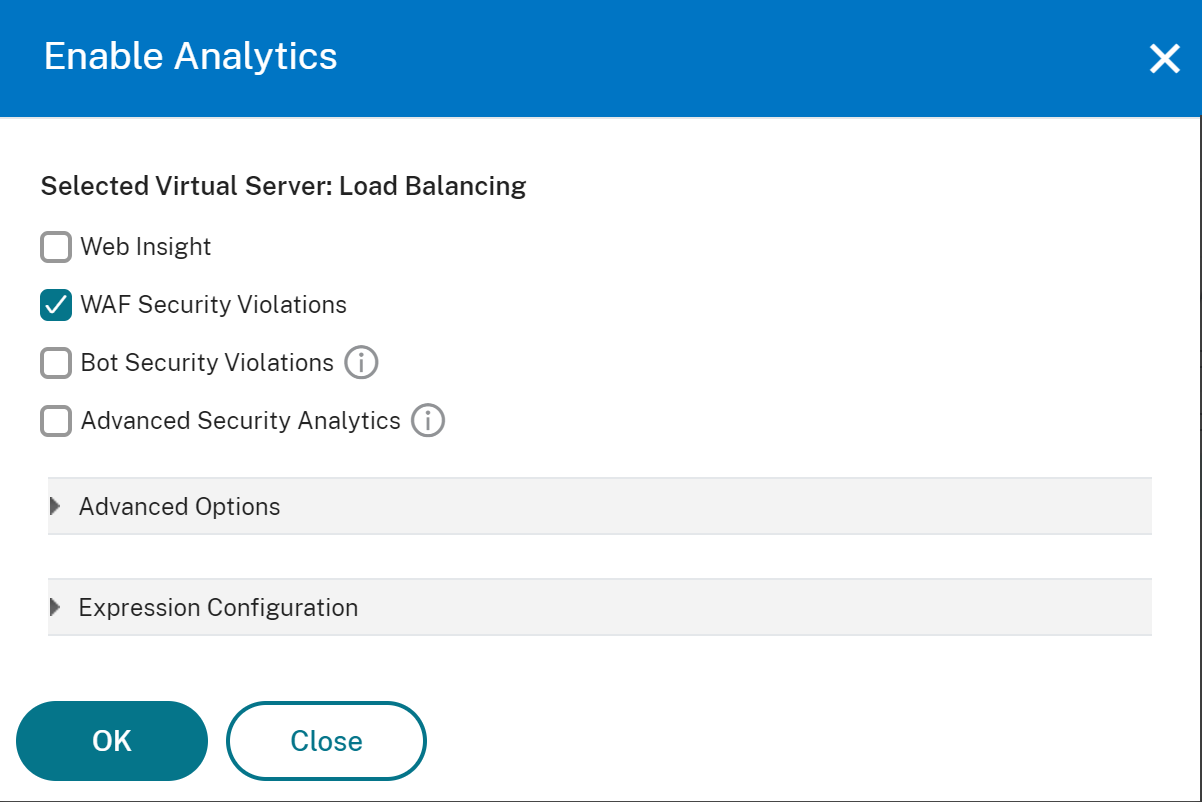
Select the virtual servers that you want to enable security insight and click Enable Security & Analytics.
The Enable Security & Analytics window is displayed.
-
Select WAF Security Violations
- Under Advanced Options, select Logstream or IPFIX as Transport Mode
Note
For NetScaler 12.0 or earlier, IPFIX is the default option for Transport Mode. For NetScaler 12.0 or later, you can either select Logstream or IPFIX as Transport Mode.
For more information about IPFIX and Logstream, see Logstream overview.
-
The Expression is true by default
-
Click OK
Note
- If you are not on the Flexed license and you select virtual servers that are not licensed, then NetScaler Console first licenses those virtual servers and then enables analytics.
-
After you click OK, NetScaler Console processes to enable analytics on the selected virtual servers.
Note
When you create a group, you can assign roles to the group, provide application-level access to the group, and assign users to the group. NetScaler Console analytics now supports virtual IP address based authorization. Your users can now see reports for all Insights for only the applications (virtual servers) that they are authorized to. For more information on groups and assigning users to the group, see Configuring Groups on NetScaler Console.
Configure geo locations for security insight reports
If you configure geo locations in NetScaler Console, WAF Insight reports include the exact geographic locations from which client requests originate. To enable geo locations, specify a private IP block or range of IP addresses for every geographic location in your organization. Add that information in the Geo Database file, along with the city/state/country name and the latitude and longitude coordinates of each location. Contact your NetScaler representative to obtain the Geo Database file, and then upload the file to the NetScaler instance.
To configure geo locations:
-
Copy the Geo Database file, Citrix_Netscaler_InBuilt_GeoIP_DB.csv, to any location on the NetScaler appliance.
-
Open the Geo Database file with a text editor, such as vi editor, and add an entry for every location in your organization.
The entry must be in the following format:
<start IP\>,<end IP\>,,<country\>,<state\>,,<city\>,,longitude,latitudeFor example,
4.17.142.224,4.17.142.239,,US,New York,,Harrison,,73.7304,41.0568 -
Run the following commands to enable geo-location logging and logging in the CEF format:
- add locationFile <Complete path with DB file>
- set appfw settings -geoLocationLogging ON
- set appfw settings -CEFLogging ON
Monitor IP reputation
The IP Reputation feature provides attack-related information about malicious IP addresses. For example, it reports IP Reputation Score, IP Reputation category, IP Reputation attack time, Device IP, and details about the Client IP address.
IP Reputation score indicates the risk associated with an IP address. The score has the following ranges:
| IP Reputation score | Level of Risk |
|---|---|
| 1–20 | High Risk |
| 21–40 | Suspicious |
| 41–60 | Moderate Risk |
| 61–80 | Low Risk |
| 81–100 | Trustworthy |
To monitor IP Reputation:
-
Navigate to Security > Security Violations, and under WAF, select the application you want to monitor.
-
The Threat Index and Safety Index scores are displayed. Click View Details.
-
Under Application Firewall Configuration, you can view the IP reputation safety index score.
Thresholds
You can set and view thresholds on safety index and threat index of applications in WAF Insight.
To set a threshold:
-
Navigate to Settings > Analytics Settings > Thresholds, and select Add.
-
Select the traffic type as Security in the Traffic Type field, and enter required information in the other appropriate fields such as Name, Duration, and entity.
-
In the Rule section, use the Metric, Comparator, and Value fields to set a threshold.
For example, “Threat Index” “>” “5”
-
Click Create.
WAF insight use cases
The following use cases describe how you can use security insight to assess the threat exposure of applications and improve security measures.
Obtain an overview of the threat environment
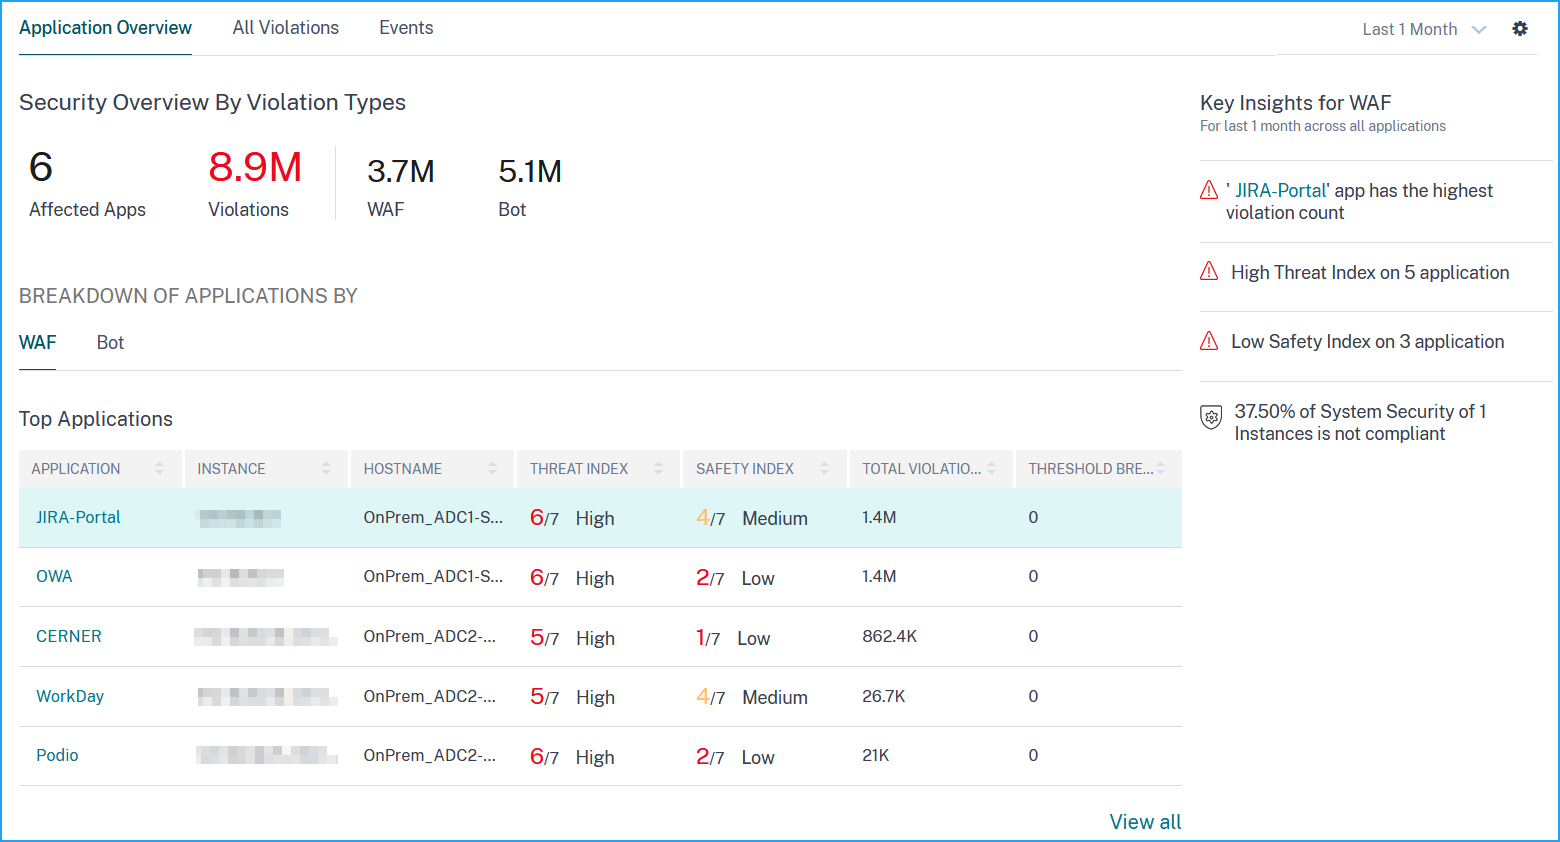
In this use case, you have a set of applications that are exposed to attacks, and you have configured NetScaler Console to monitor the threat environment. You must review the threat index, safety index, and the type and severity of any attacks that the applications might have experienced to focus first on the critical applications. The security insight dashboard provides a summary of the threats experienced by your applications over a time period of your choosing, and for a selected NetScaler device. It displays the list of applications, their threat and safety indexes, and the total number of attacks for the chosen time period.
To obtain a summary of the threat environment, log on to NetScaler Console, and then navigate to Security > Security Violation and under WAF, the top five applications are displayed based on the total violations affected. To view all applications, you can click View All.
Determine the existing and missing security configuration for an application
After reviewing the threat exposure of an application, you want to determine what application security configurations are in place and what configurations are missing for that application. You can obtain this information by drilling down into the application summary.
The summary gives you information about the effectiveness of the following security configurations:
- Application Firewall Configuration. Shows how many signature and security entities are not configured.
-
NetScaler Console System Security. Shows how many system security settings are not configured.
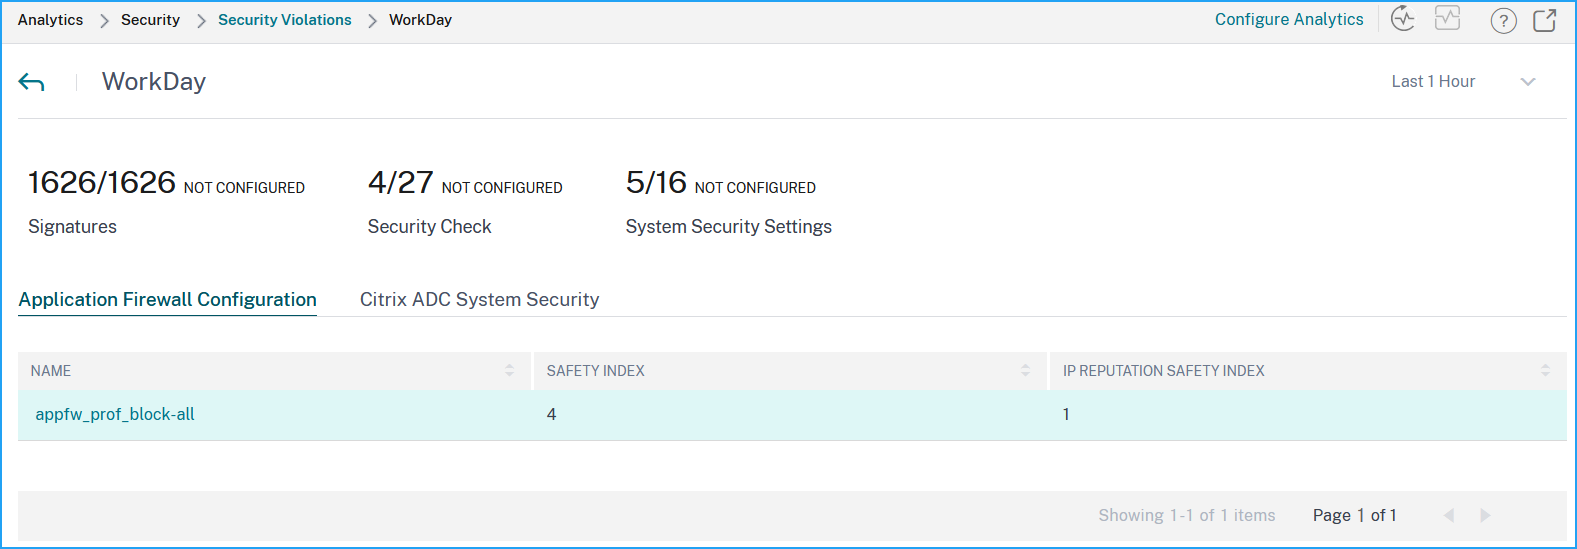
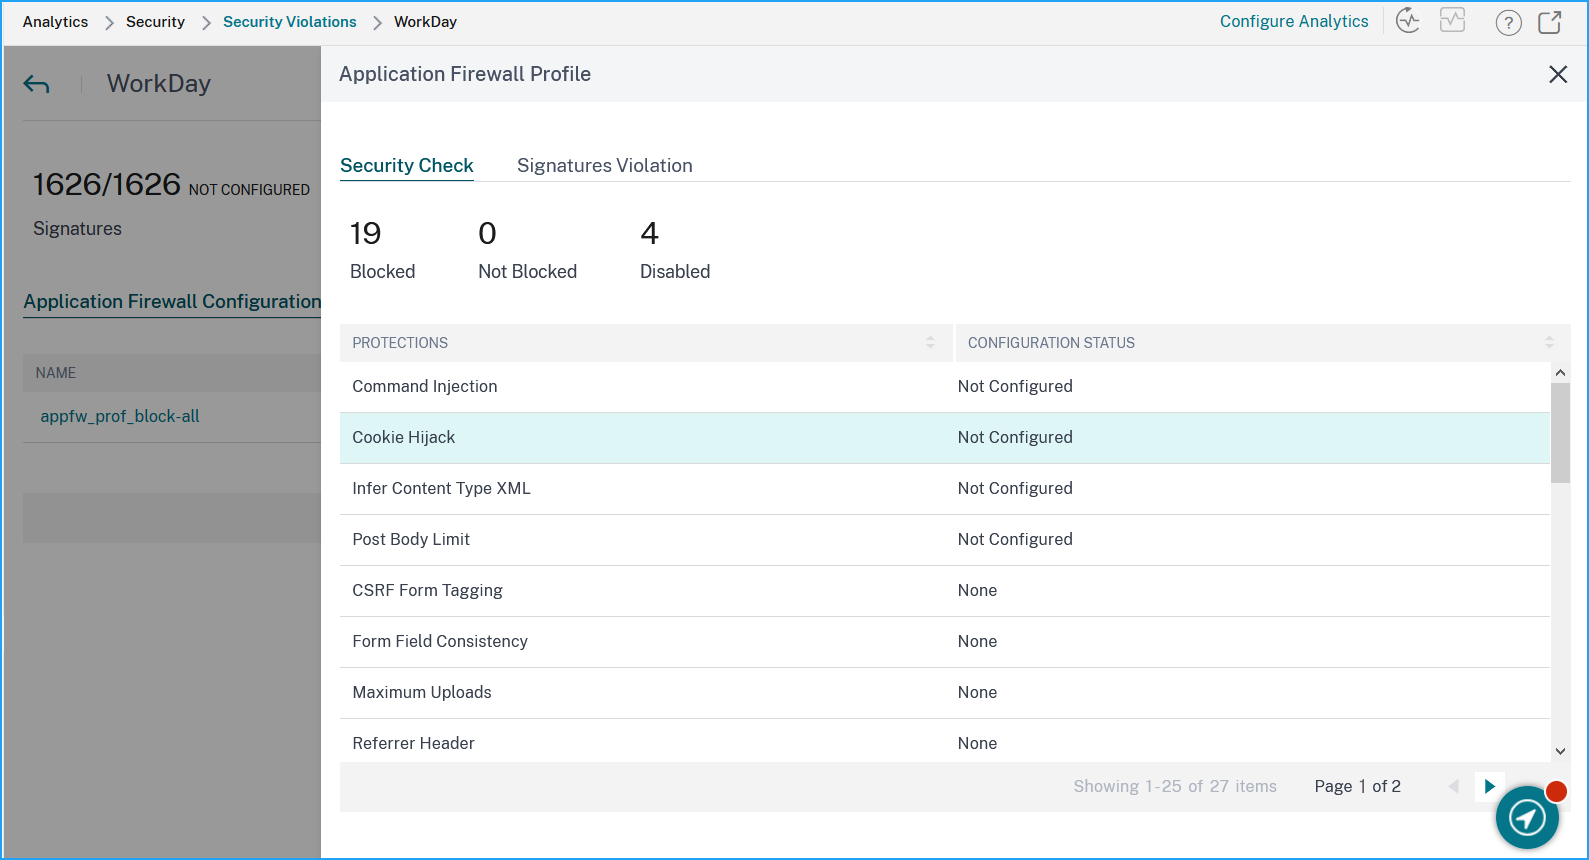
On the Application Firewall Configuration node, review the security check and security violation information.
Click the NetScaler Console System Security node and review the system security settings and Citrix recommendations to improve the application safety index.
Identify applications that require immediate attention
The applications that need immediate attention are the applications having a high threat index and a low safety index.
Determine the number of attacks in a given time
You might want to determine how many attacks occurred on a given application at a given point in time, or you might want to study the attack rate for a specific time period.
Under WAF, click any application to view the total WAF violations detected for the selected duration.

Click Logs to view details for attacks based on severity and action taken. The logs page provides the following details:
-
Attack time
-
IP address of the client from which the attack happened
-
Severity
-
Category of violation
-
URL from which the attack originated, and other details.