WAF recommendations
NetScaler Web App Firewall (WAF) Profile and WAF Signatures protect your web applications from malicious attacks. WAF signatures provide specific, configurable rules to simplify the task of protecting your websites against known attacks. A signature represents a pattern that is a component of a known attack on an operating system, web server, website, XML-based web service, or other resource. To protect your application using signatures, you must review the rules, enable, and configure the ones that you want to apply.
Similarly, to prevent data breaches and provide the right security protection in the application, you must create a WAF profile with security checks. When you create a WAF profile in the NetScaler instance, the traffic might:
-
Get generated with the mentioned security checks
-
Not get generated with the mentioned security checks
The instance might be receiving other attacks, but you might not have enabled that security check in the WAF profiles.
As an administrator, you must understand to enable the right signatures and create the right WAF profiles to protect the web application. Identifying the right signatures and the WAF profiles might be a difficult task at some scenarios.
NetScaler Console WAF recommendation scans the application for vulnerabilities and generates the following recommendations:
-
WAF Profile
-
WAF Signature
For more information, see WAF profile and WAF Signatures.
WAF recommendation database is updated on a frequent duration to include any new vulnerabilities. You can scan and then select to enable the required recommendations. You can enable all signatures and security checks, but it might result in false positives and affect the NetScaler instance performance. Hence, it is recommended to select only the required security checks and signatures. WAF recommendation engine also automatically detects which signatures and security checks must be enabled for the application.
Note
The NetScaler instance must be 13.0 41.28 or later (for security checks) and 13.0 or later (for signatures).
Prerequisites
The applications:
-
Must have the premium license.
-
Must be the load balancing virtual server.
Configure the WAF scan settings
In NetScaler Console, navigate to Security > WAF Recommendation and under Applications, click Start Scan to configure the WAF scan settings for an application.
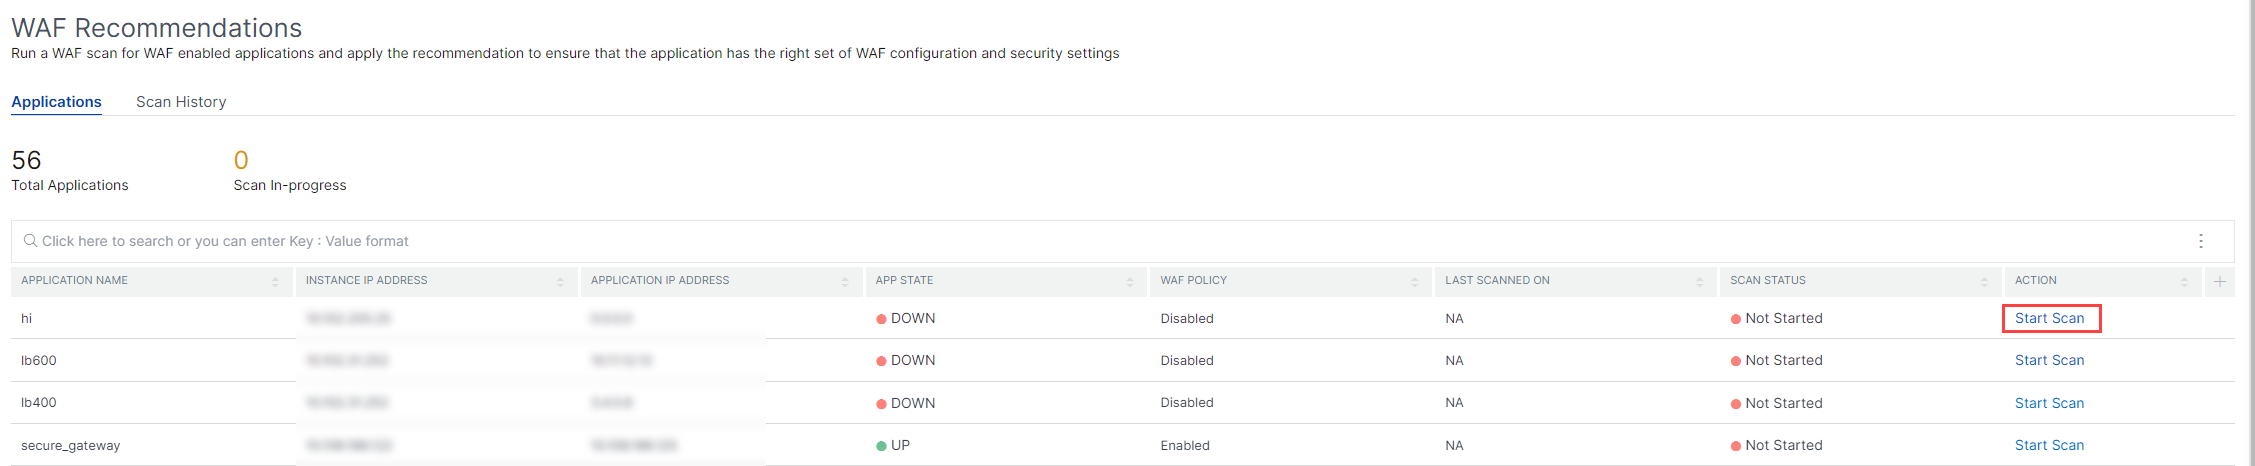
In the WAF Recommendations page:
-
Domain Name – Specify the publicly accessible/publicly reachable domain name that is associated with the application VIP. For example:
www.example.com.NoteStart URL, Login URL and Logout URL must match the specified domain. -
Traffic and Start URL – Provide the URL details of the application (server).
-
HTTP/HTTPS Protocol – Select the protocol of the application.
-
Traffic Timeout – The wait time (in seconds) for a single request during the scan. The value must be greater than 0.
-
Start URL – The home page of the application to initiate the scan. For example,
https://www.example.com/home. The URL must be a valid IPv4 address. If the IP addresses are private, then you must ensure that the private IP address is accessible from the NetScaler Console management IP.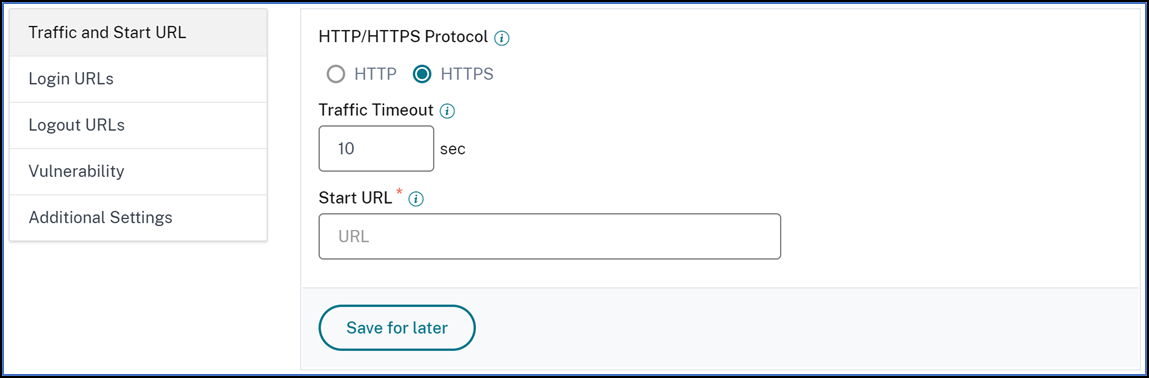
-
-
Login URLs – Specify the login credentials, URLs, if any, to access the application.
-
Login URL – The URL to which the login data is sent for authentication. In HTML, this URL is commonly known as the action URL.
-
Authentication Method – Select the supported authentication method (form based or header based) for your application.
-
Form-based authentication requires submitting a form to the login URL with the login credentials. These credentials must be in the form of form fields and their values. The application then shares the session cookie that is used to maintain sessions during the scan.
-
Header-based authentication requires the Authentication header and its value in the headers section. The Authentication header must have a valid value and is used to maintain sessions during the scan. The form-fields should be left empty for Header-based.
-
-
Request Method – Select the HTTP method used when submitting form data to the login URL. The allowed request method is POST, GET, and PUT.
-
Form Fields – Specify the form data to be submitted to the login URL. Form Fields are required only if you select the form-based authentication. You must specify in the key-value pairs, where Field Name is the Key and Field Value is the Value. Ensure that all form fields needed for login to work are added correctly, including passwords. The values are encrypted before storing it in the database. You can click the Add button to add multiple form fields. For example, Field Name – user name and Field Value – admin.
-
HTTP Headers – The HTTP headers maybe required for the login to succeed. You must specify in the key-value pairs, where Header Name is the Key and Header Value is the Value. You can click the Add button to add multiple HTTP headers. One of the most common required HTTP headers is Content-Type header.

-
-
Logout URLs – Specify the URL that terminates the session after accessing. For example:
https://www.example.com/customer/logout.
-
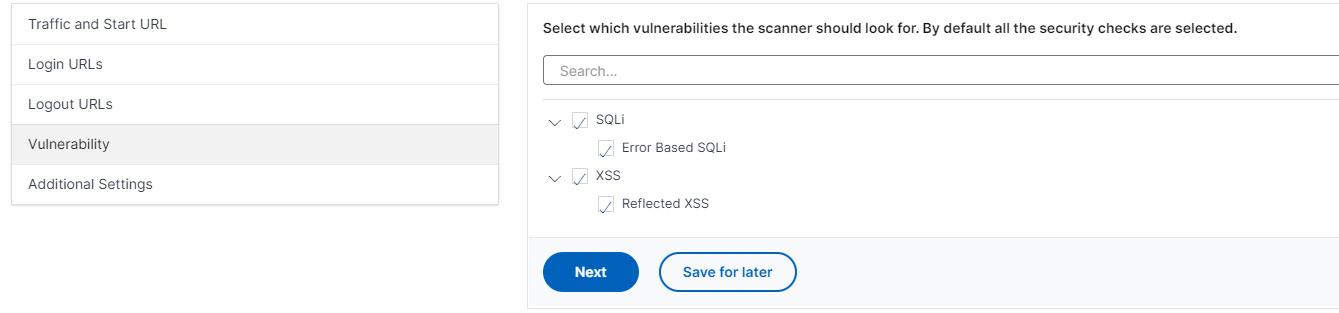
Vulnerability – Select the vulnerabilities for the scanner to detect them. Currently, this is done for SQL Injection and Cross-site scripting violations. By default, all the violations are selected. After selecting the vulnerabilities, it simulates these attacks on the application to report the potential vulnerability. It is recommended to enable this detection that is not in the production environment. All other vulnerabilities are also reported, without simulating these attacks on the application.
-
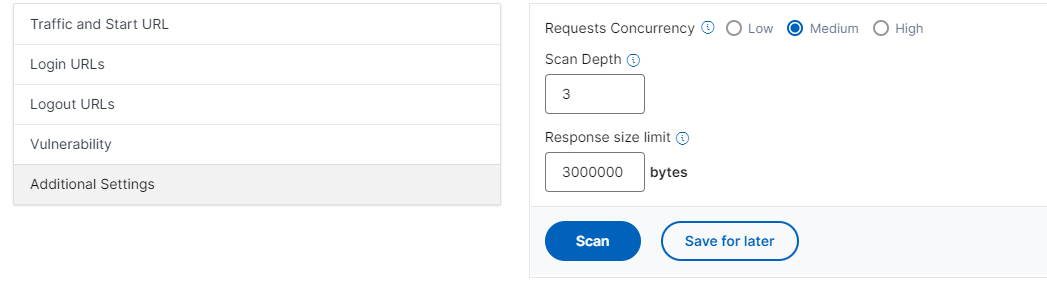
Additional Settings
-
Requests Concurrency – The total requests sent to the web application in parallel.
-
Scan Depth - The depth of the web application up to which the scan must go on. For example, for a scan depth of value 2, the Start URL and all the links found in this URL are scanned. You must specify a value greater than or equal to 1.
-
Response size limit – The maximum limit on the response size. Any responses beyond the mentioned value are not scanned. The recommended limit is 3 MB (300000 bytes).
-
The WAF scan settings configuration is complete. You can click Scan to start the scanning process or you can click Save for later to save the configurations and scan later.
WAF scan recommendation process
When you start the scan, the WAF recommendation engine:
-
Scans the provided web application through the provided URL.
-
Inspects the web application to discover the technologies used by the web application.
-
Simulates security attacks on the web application to detect potential vulnerabilities.
-
Recommends signatures based on the web technologies detected.
-
Recommends security checks based on vulnerabilities found and the analysis of the traffic.
-
Analyzes the web application responses to generate more granular settings.
The following security checks are supported:
-
Buffer Overflow
-
Field Formats
-
Credit Card
-
Cookie Consistency
-
HTML SQL Injection
-
HTML Cross Site Scripting
-
Form Field Consistency
-
CSRF Form Tagging
View scan report
After the scan is complete, click View Report to view the results.
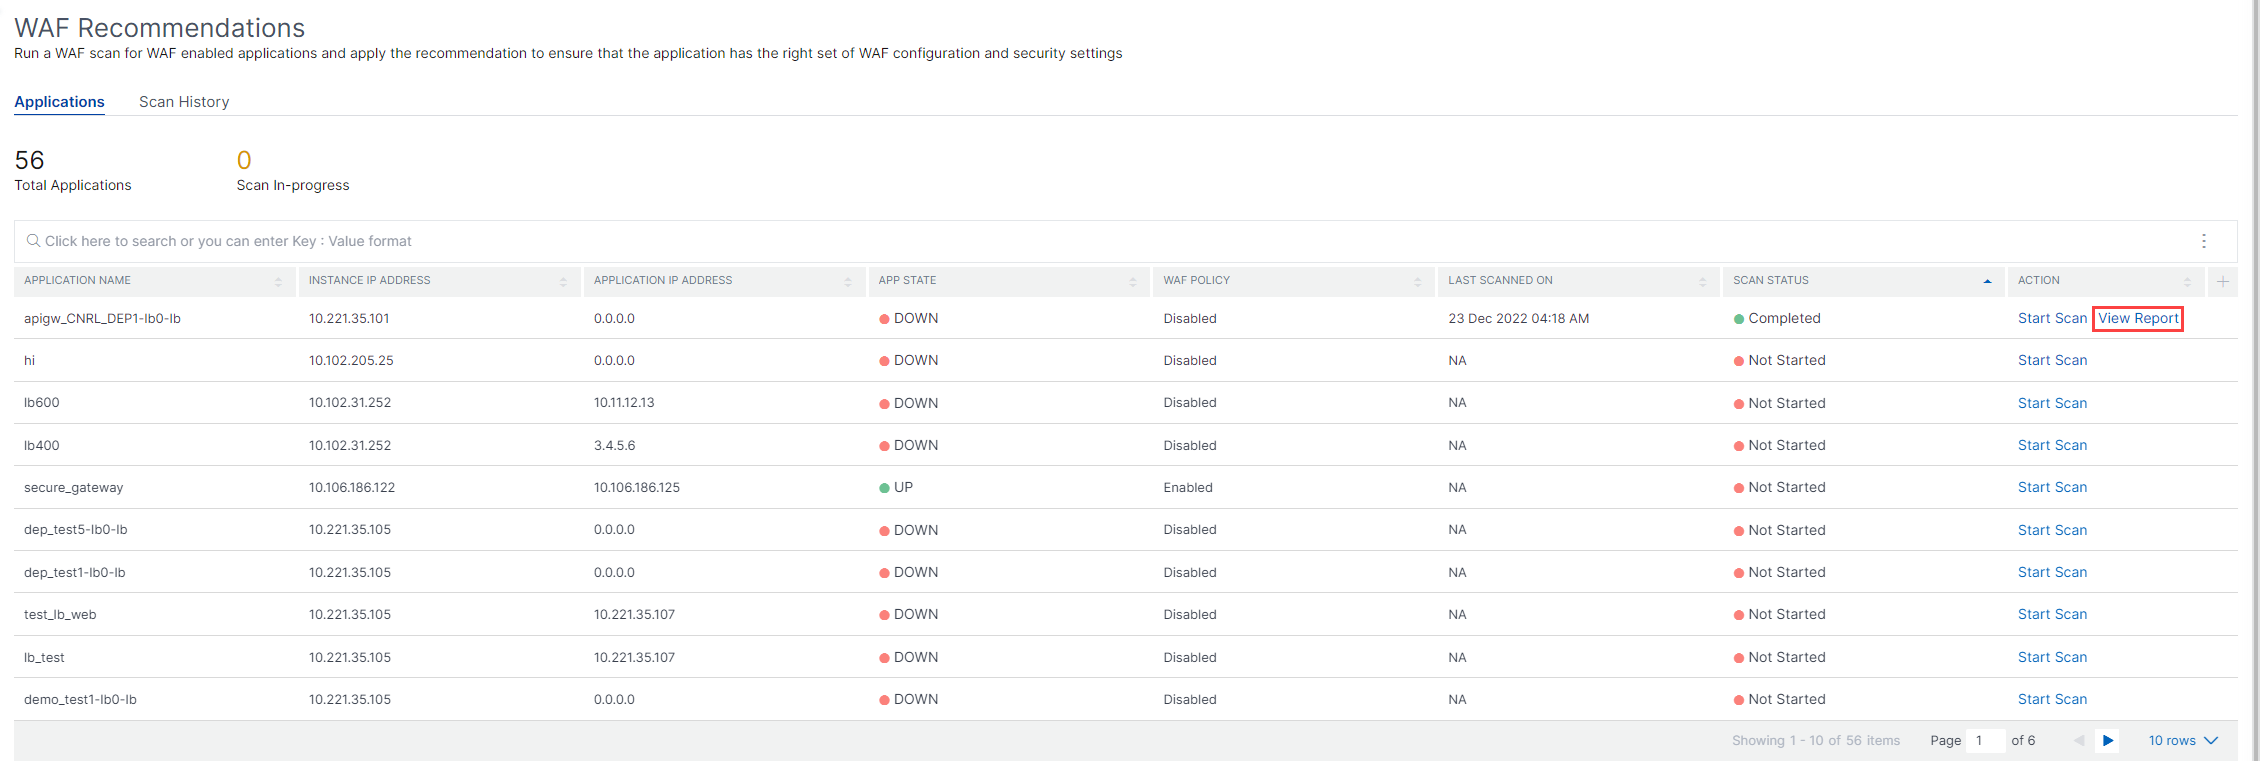
The scan result provides:
-
WAF Recommendation – Enables you to view the summary of the total signatures and security checks recommended for the application.
-
Scan Detections – Enables you to view the collection of information such as technologies and violation details performed on the application. Click View Details to see the information about the detections and other details of the scan.

Under WAF Recommendation, click Review Recommendation to view the details for Security Checks and Signatures.
The recommended security settings suggest the recommended security checks and signatures for the application. You can edit the recommendations from the list and click view or edit to view details or edit changes according to the requirement. The Reset to default resets all changes made and brings back to the original recommendations.
After reviewing details, click Apply Recommendation. The recommendations are configured using the StyleBooks. You must ensure to apply recommendation in the Security Checks and Signature tabs separately.
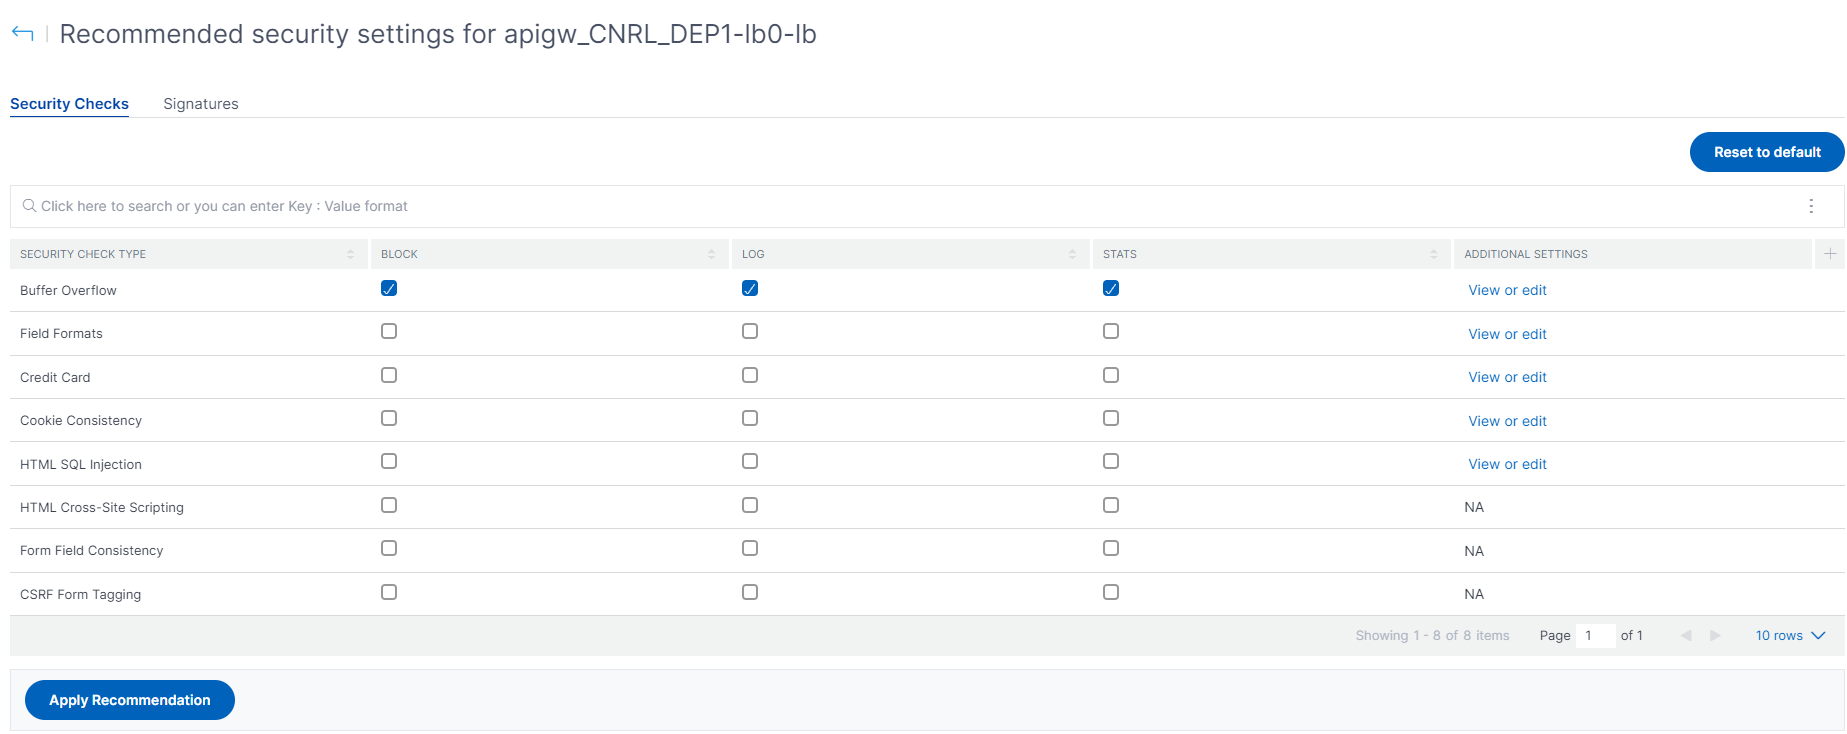
It is recommended to apply the signatures first and then the security checks. This binds the signatures to the profile automatically.
When you apply signatures successfully:
-
The configuration is applied on the NetScaler instance through the
appfw-import-objectStyleBook. -
The signatures file with recommendations configured is imported in the NetScaler instance.
Note
Signatures are supported in NetScaler 13.0 or later version.
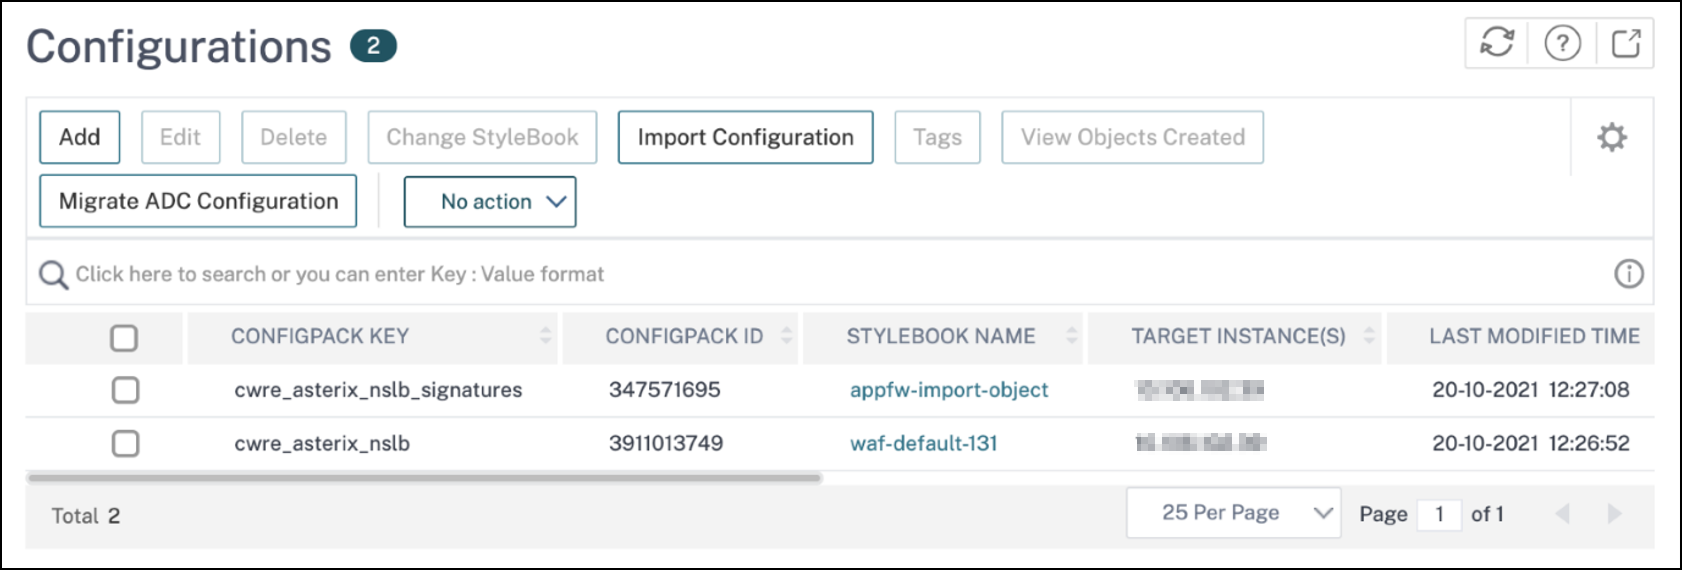
Before you proceed to apply the Security Check recommendations, navigate to Applications > Configuration > Config Packs and ensure that the signatures configpack is successfully created.
When you apply security checks successfully:
-
The configuration is applied on the NetScaler instance through StyleBooks, depending upon the NetScaler version. For NetScaler 13.0,
waf-default-130StyleBook is used and for NetScaler 13.1,waf-default-131stylebook is used. -
The
Appfwprofile is created on your NetScaler and bound to the application using thepolicylabel. -
The signatures are bound to the appfw profile, if the recommended signatures are already applied.
Note
Security checks are supported in NetScaler 13.0 41.28 or later version.
After you apply the recommendation (security checks and signatures), you can view the following confirmation message:

You can verify the WAF profiles and signatures are applied through the default StyleBooks by navigating to Applications > Configuration > Config Packs.