Connect SAML as an identity provider to NetScaler Console
NetScaler Console supports using SAML (Security Assertion Markup Language) as an identity provider to authenticate administrators and subscribers signing in to their NetScaler Console. You can use the SAML 2.0 provider of your choice with your on-premises Active Directory (AD).
For most SAML providers, use the information in this article to set up SAML authentication. If you want to use SAML authentication with your Azure AD, you have the option to use the Citrix Cloud™ SAML SSO app from the Azure AD app gallery.
Prerequisites
The SAML authentication with NetScaler Console has the following requirements:
-
SAML provider that supports SAML 2.0
-
On-premises AD domain
-
Two Cloud Connectors deployed to a resource location and joined to your on-premises AD domain. The Cloud Connectors are used to ensure Citrix Cloud can communicate with your resource location.
-
AD integration with your SAML provider.
Cloud Connectors
You must have at least two (2) servers on which to install the Citrix Cloud Connector™ software. It is recommended to have at least two servers for Cloud Connector high availability. These servers must meet the following requirements:
-
Meets the system requirements described in Cloud Connector Technical Details.
-
Does not have any other Citrix components installed, is not an AD domain controller, and is not a machine critical to your resource location infrastructure.
-
Joined to the domain where your resources reside. If users access resources in multiple domains, you must install at least two Cloud Connectors in each domain.
-
Connected to a network that can contact the resources that subscribers access through Citrix Workspace.
-
Connected to the internet.
Active Directory
Before configuring SAML authentication, perform the following tasks:
-
The First Name, Last Name, and Email fields are mandatory for the users in Active Directory to import users to Okta Instance.
-
Verify that your workspace subscribers have user accounts in Active Directory (AD). Subscribers without AD accounts can’t sign in to their workspaces successfully when SAML authentication is configured.
-
Ensure that the user properties in your subscribers’ AD accounts are populated. Citrix Cloud requires these properties to establish the user context when subscribers sign in to Citrix Workspace. If these properties aren’t populated, subscribers can’t sign in. These properties include:
-
Email address
-
Display name (optional)
-
Common name
-
SAM account name
-
User Principal Name
-
Object GUID
-
SID
-
-
Connect your Active Directory (AD) to your Citrix Cloud account by deploying Cloud Connectors in your on-premises AD.
-
Synchronize your AD users to the SAML provider. Citrix Cloud requires the AD user attributes for your workspace subscribers so they can sign in successfully.
SAML SSO configuration
In an Okta instance, navigate to Directory integrations > Add Active Directory.
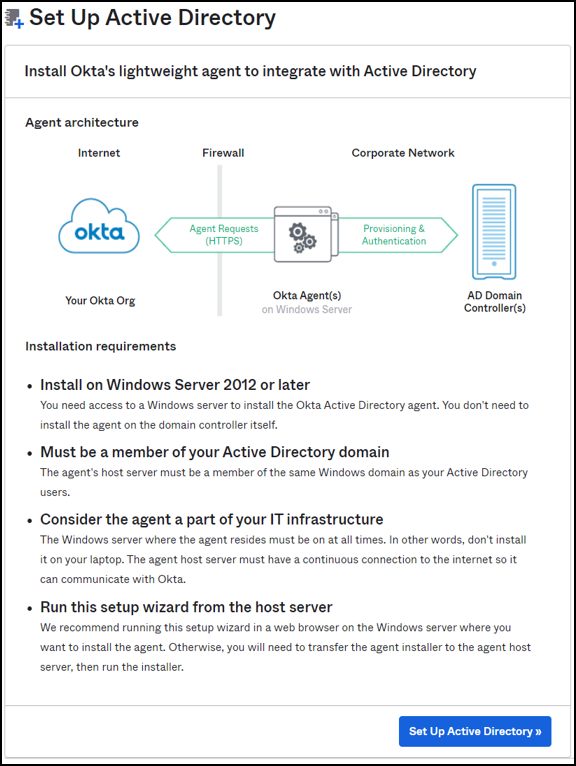
For a successful integration, the SAML identity provider must pass Citrix Cloud certain Active Directory attributes of the user in the SAML assertion. Specifically,
- Security Identifier (SID)
- objectGUID (OID)
- user Principal Name (UPN)
- Mail (Email)
-
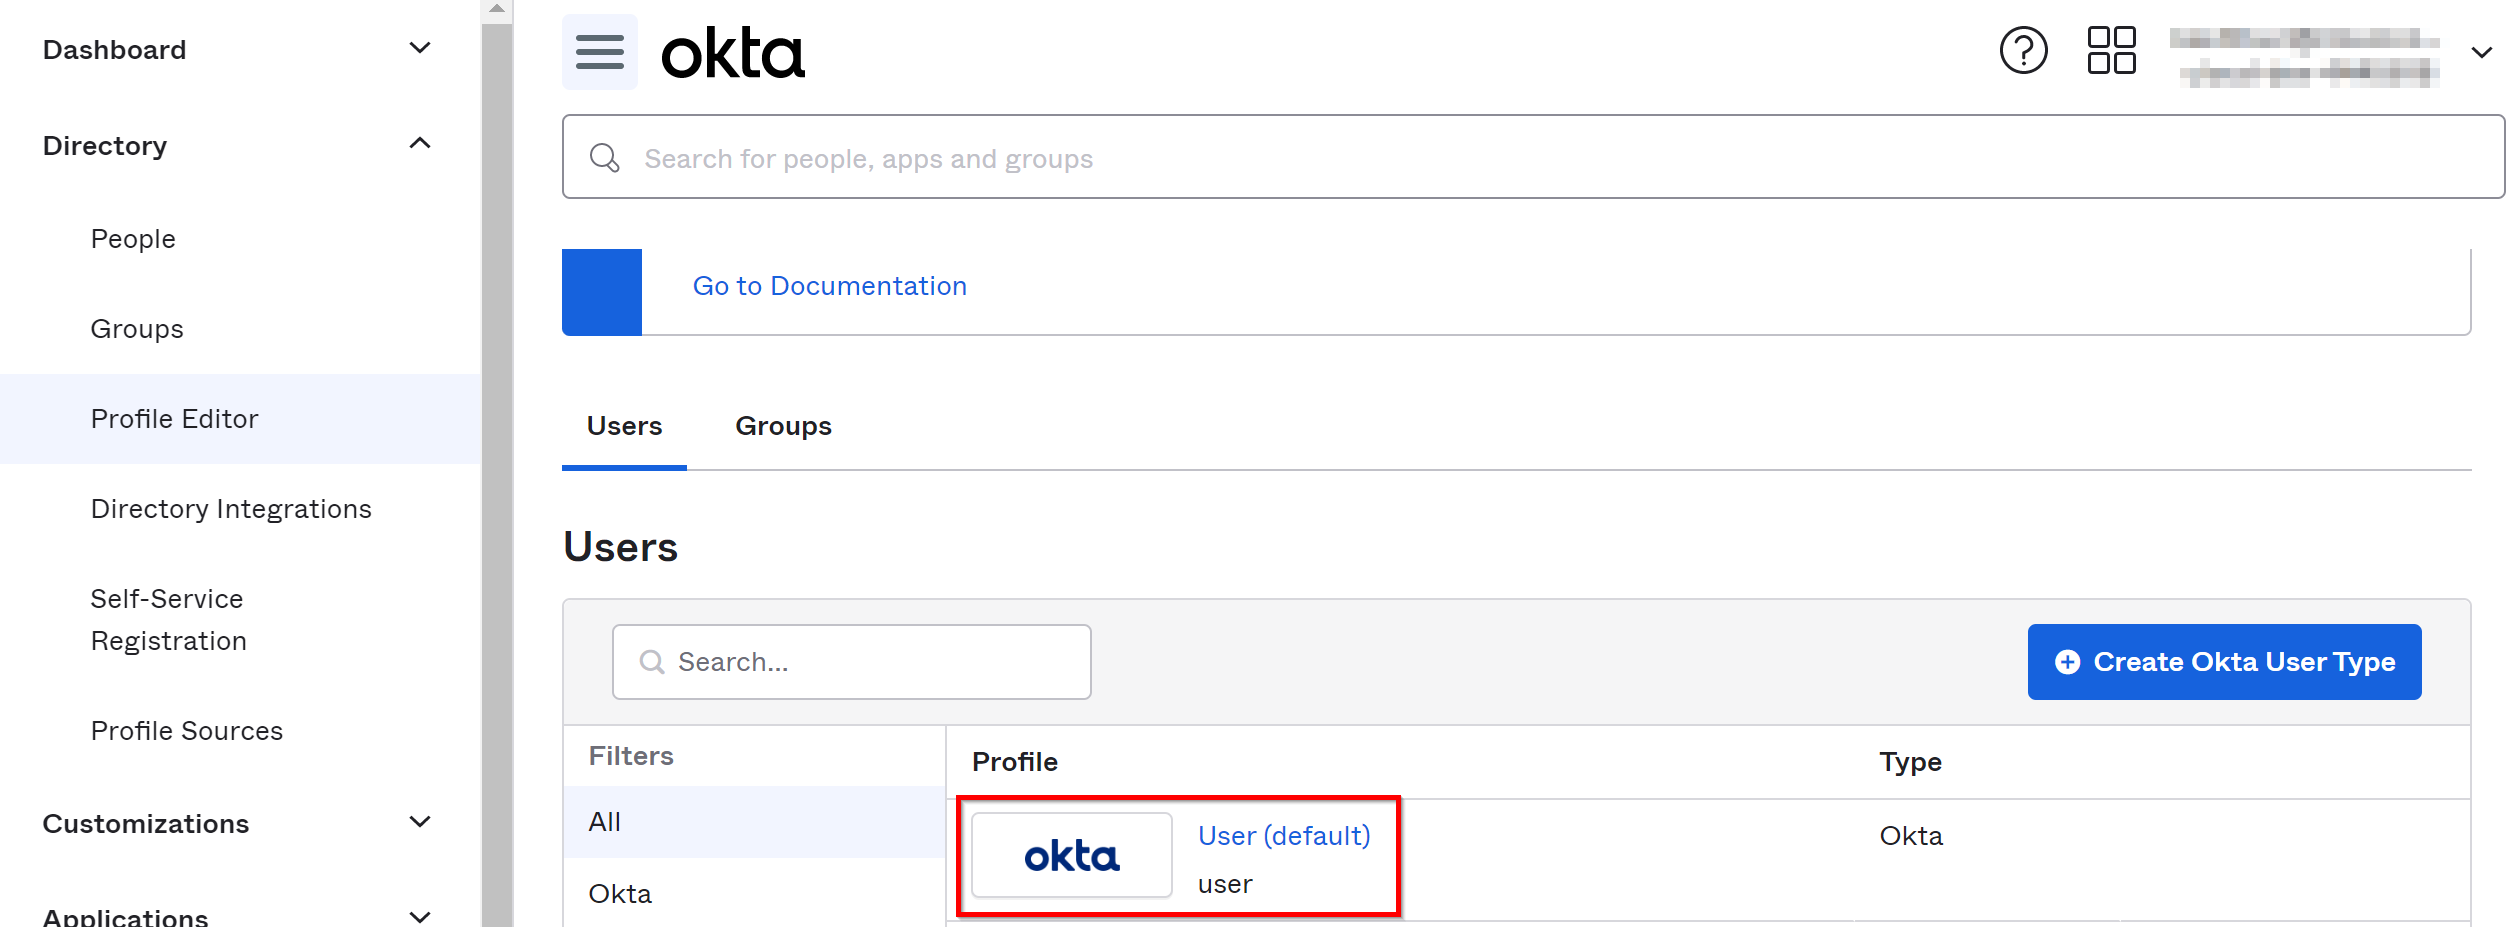
Log on to Okta with administrator credentials.
-
Select Directory > Profile Editor and select the Okta User (default) profile. Okta displays the User profile page.
-
Under Attributes, select Add Attributes and add the custom fields.
cip_sidcip_upncip_oid-
cip_email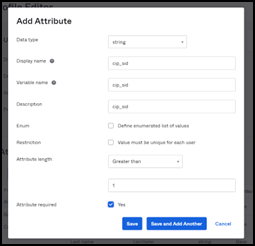
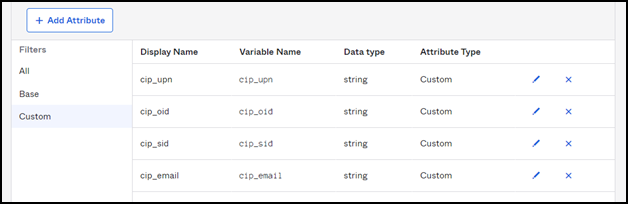
Click Save and Add Another and repeat the process to create 4 custom attributes.
You can view the following details after creating 4 custom attributes:
-
Map Active Directory Attributes to the Custom Attributes. Select the Active Directory you are using under Users > Directories.
-
Edit the attribute mappings:
-
From the Okta console, navigate to Directory > Profile Editor.
-
Locate the
active_directoryprofile for your AD. This profile might be labeled using the format myDomain User, where myDomain is the name of your integrated AD domain. -
Select Mappings. The User Profile Mappings page for your AD domain appears and the tab for mapping your AD to Okta User is selected.
-
In the Okta User User Profile column, map the Active Directory attributes to the custom attributes you have created:
-
For
cip_email, select email from the User Profile column for your domain. When selected, the mapping appears asappuser.email. -
For
cip_sid, select objectSid from the User Profile column for your domain. When selected, the mapping appears asappuser.objectSid. -
For
cip_upn, selectuserNamefrom the User Profile column for your domain. When selected, the mapping appears asappuser.userName. -
For
cip_oid, selectexternalIdfrom the User Profile column for your domain. When selected, the mapping appears asappuser.externalId.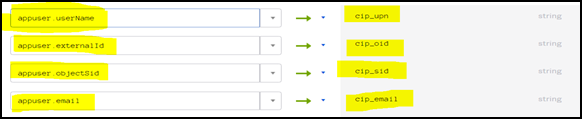
-
-
-
Sign in to Citrix Cloud at
https://citrix.cloud.com. -
From the Citrix Cloud menu, select Identity and Access Management.
-
Locate SAML 2.0 and click Connect.
The Configure SAML page is displayed.
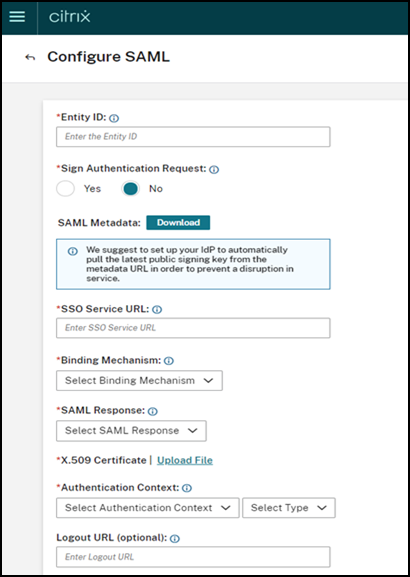
Download the
xmlfile and open the file using any file editor. You must return to this page again after completing further configuration in Okta. -
In Okta, navigate to Application > Create App Integration.
-
In the Add Application page, click Create New App.
-
In the Create a New Application Integration page, select SAML 2.0 and click Create.
-
Provide details such as app name, app logo (optional), set the app visibility, and then click Next.
-
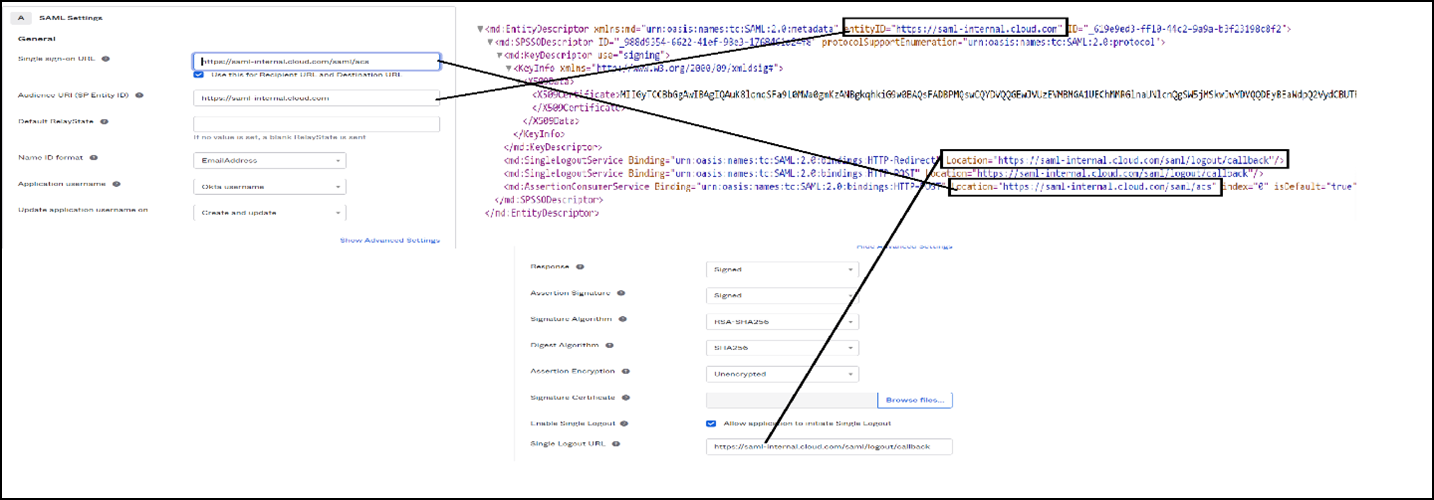
In the Configuration SAML tab, you must use the details from the downloaded
xmlfile:-
Provide the URL details for Single sign-on URL as
https://saml-internal.cloud.com/saml/acsand Audience URI (SP Entity ID) ashttps://saml-internal.cloud.com.Note:
If external Citrix Cloud, then the URL must be
https://saml.cloud.com/saml/acsandhttps://saml.cloud.cominstead ofhttps://saml-internal.cloud.comdomain. -
Select Unspecified for Name ID Format.
-
Select Okta Username for Application Username.
-
Click Show Advanced Settings and ensure that Response and Assertion are selected with Signed.
-
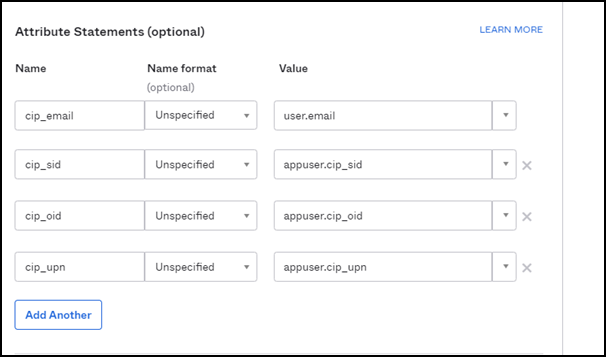
Add Attribute Statements as shown in the following image.
-
You can leave all other options by default and click Next.
-
Select I’m an Okta customer adding an internal app and then click Finish.
-
-
The Okta application is now created and click View Setup Instructions.
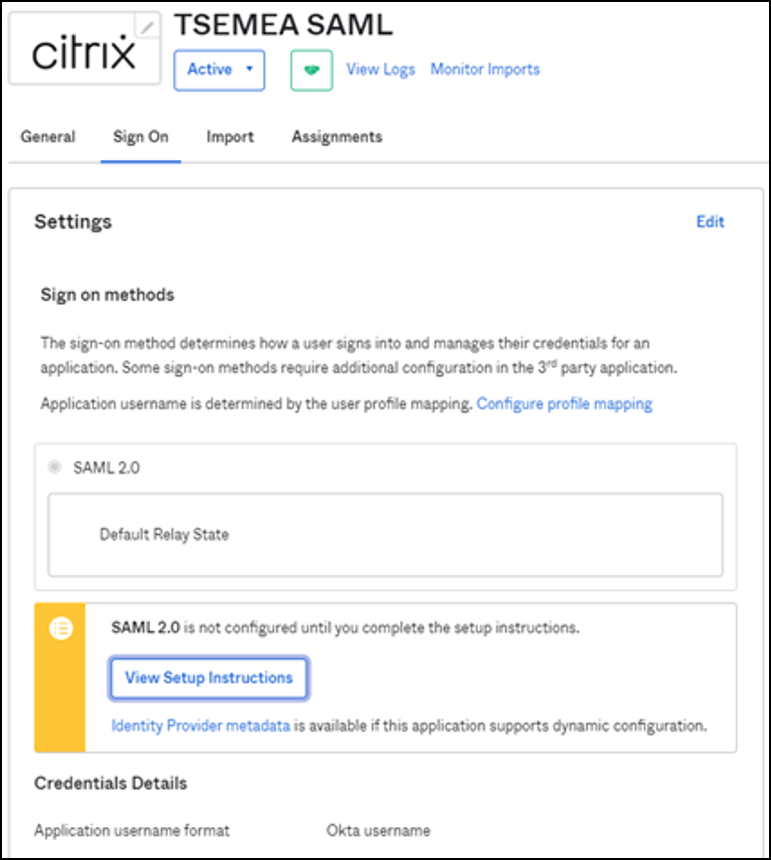
The How to Configure SAML 2.0 for test Application page is displayed with details that you must again add it in the Citrix Cloud.
Download the certificate to upload it in Citrix Cloud.
-
You must now return to the Configure SAML page in Citrix Cloud and complete the remaining configuration as mentioned in the following:
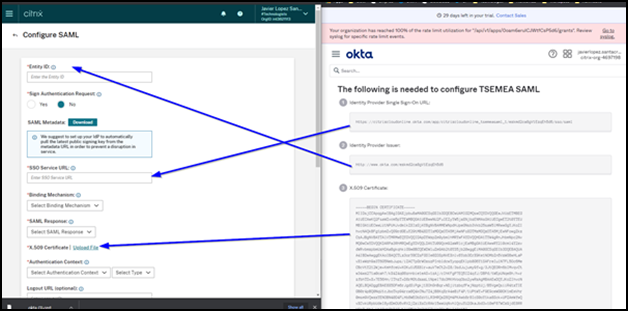
Use the downloaded certificate and rename the file name extension from
.certto.crtto upload it to Citrix Cloud. -
After you upload the certificate, use all other options that are by default:
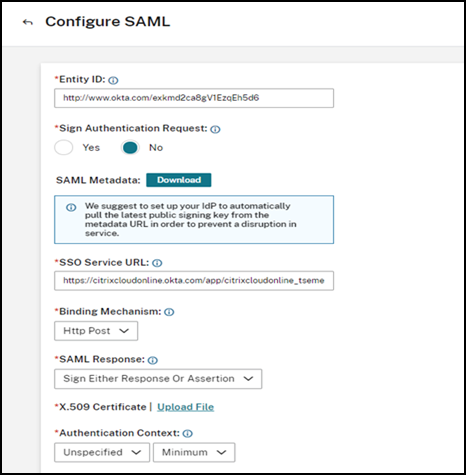
-
Next, you must ensure
appuser.userNameis defined at Directory-integrations > Active Directory -> Provisiong > To okta.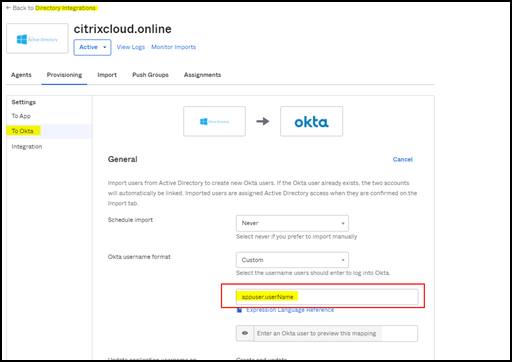
Note:
Sometimes, you must use
user.cip_upn, insteadappuser.cip_upn. Ensure to verify the definition of your application in the OKTA integration as shown in this image. -
You must now try to add users in Okta to this SAML application. You can assign users through multiple ways.
Method 1:
-
Log on to Okta with administrator credentials
-
Navigate to Applications > Applications
-
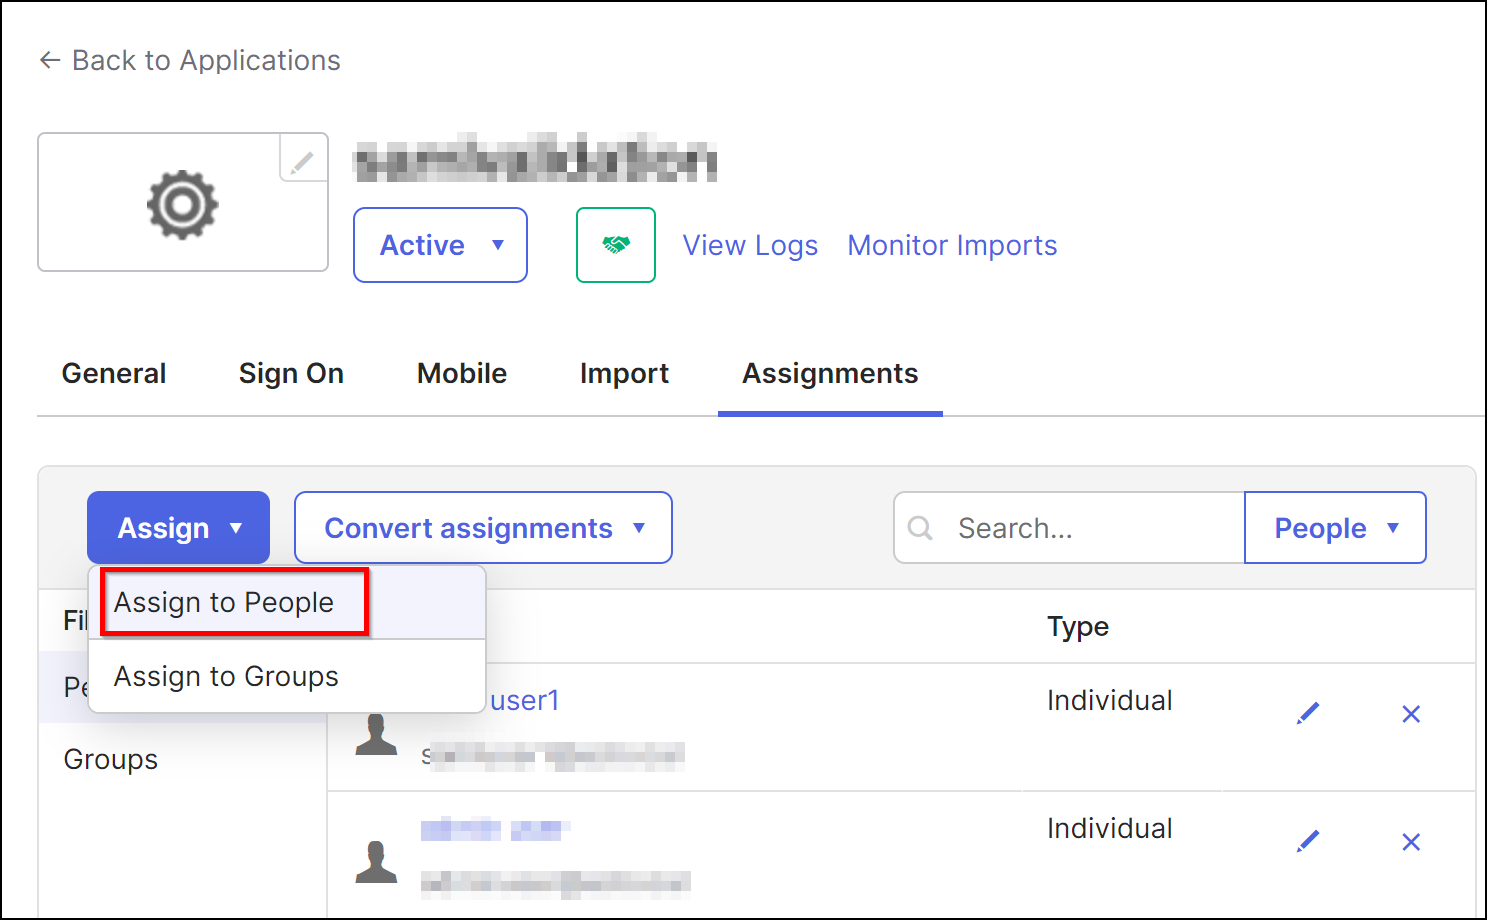
Select the SAML application that you created
-
Click Assign > Assign to People
-
Click Assign and then select Save and Go back.
-
Click Done.
Method 2:
-
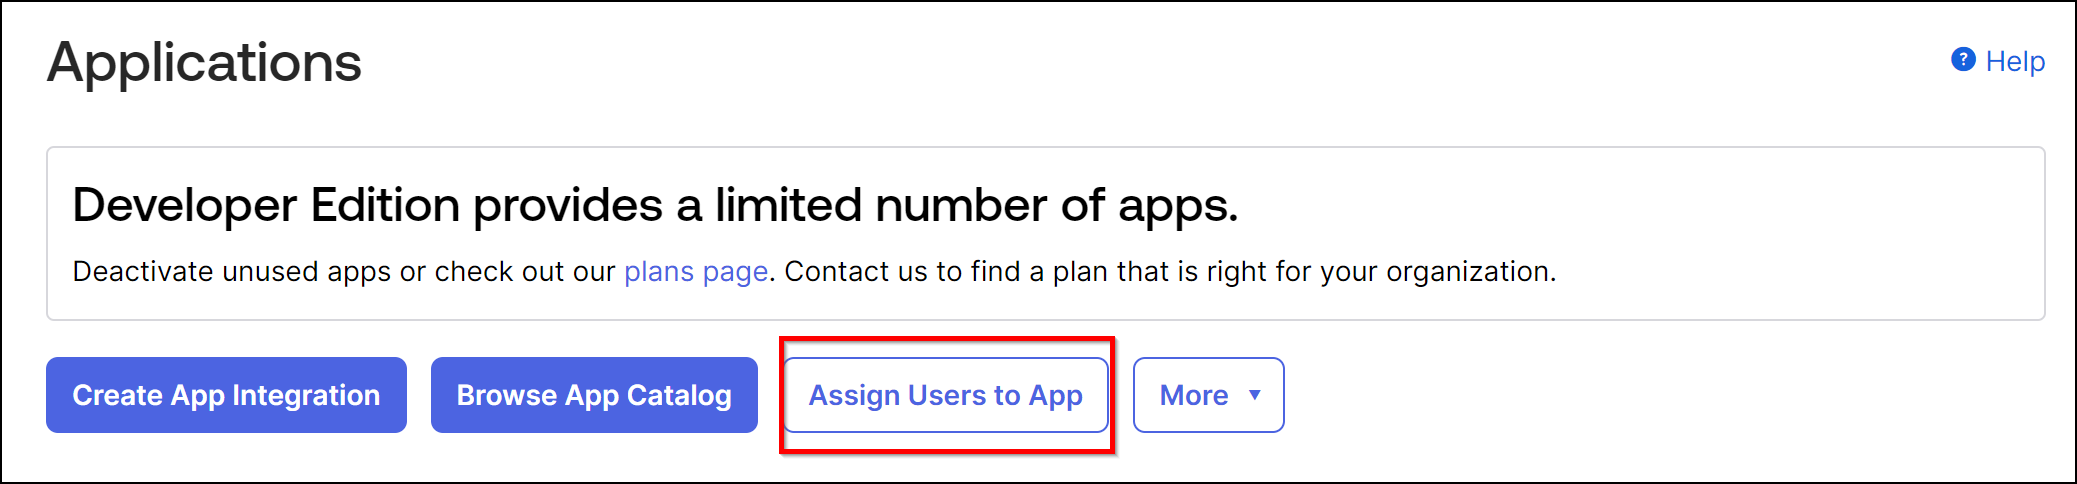
Navigate to Applications > Applications.
-
Click Assign Users to App.
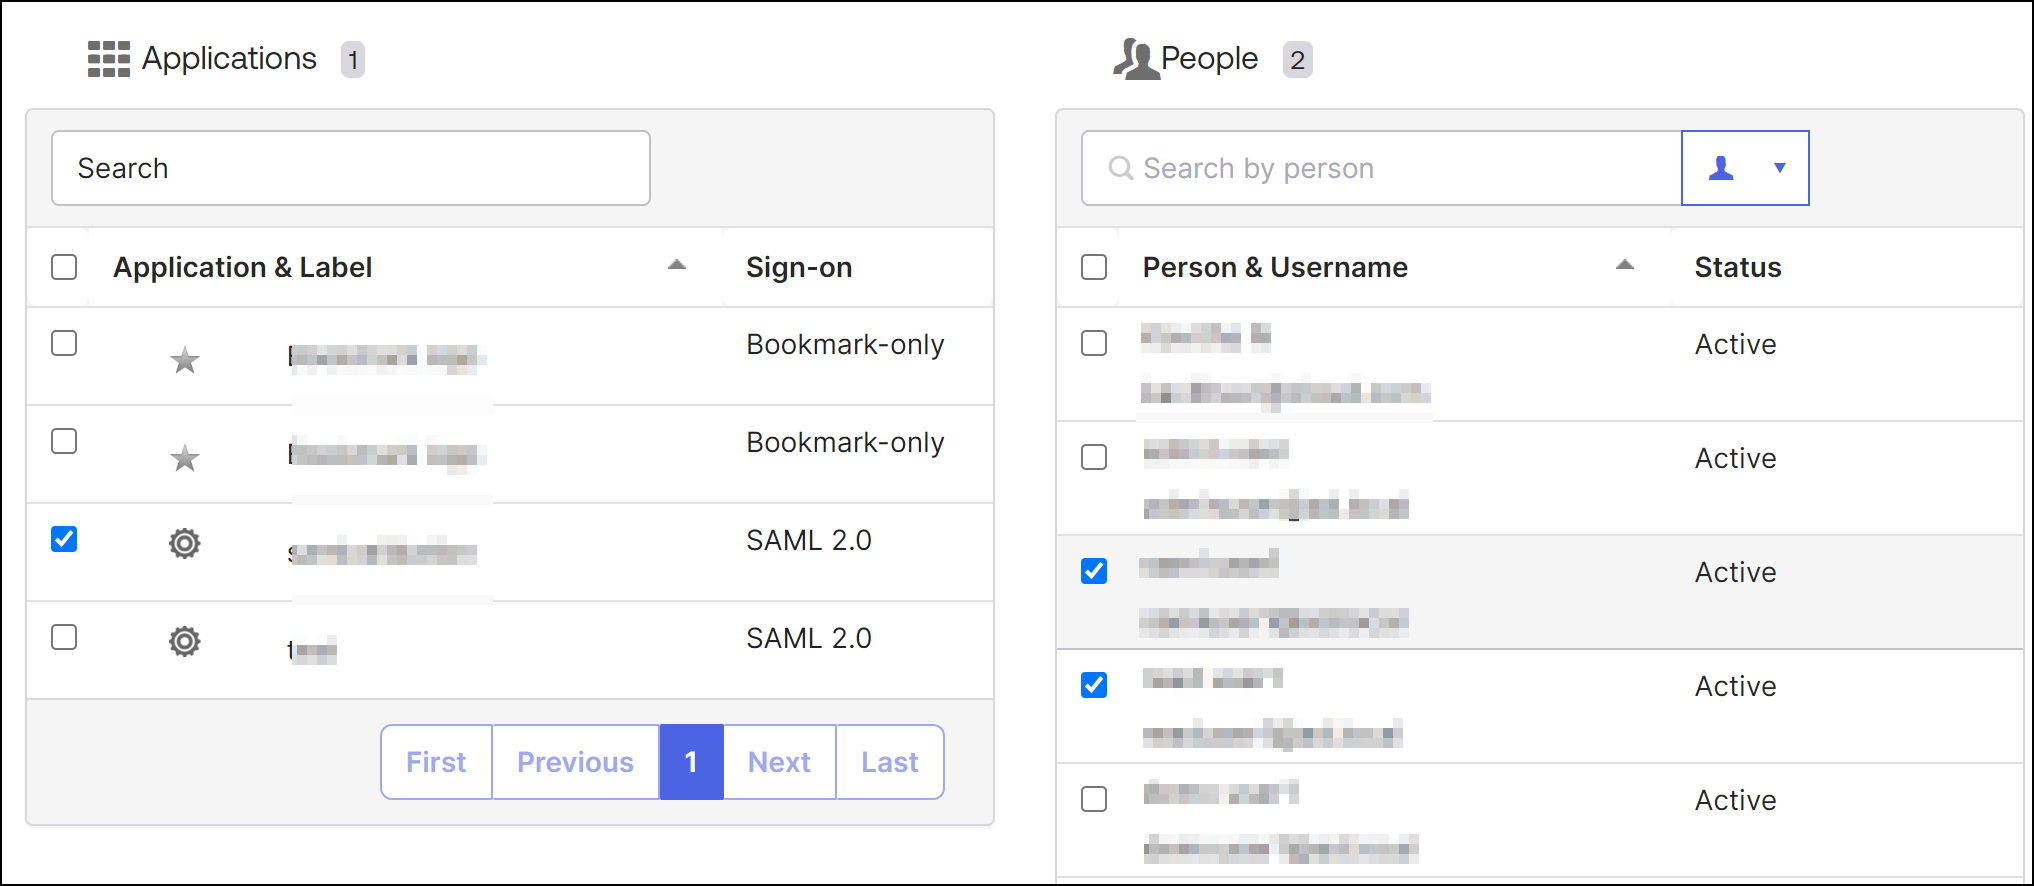
-
Select the application and users, and then click Next.
-
Click Confirm Assignments.
Method 3:
-
Navigate to Directory > People.
-
Select any user.
-
Click Assign Applications and assign the SAML application to the user.
-
-
After assigning users, log on to Citrix Cloud.
-
From the Citrix Cloud menu, select Identity and Access Management.
-
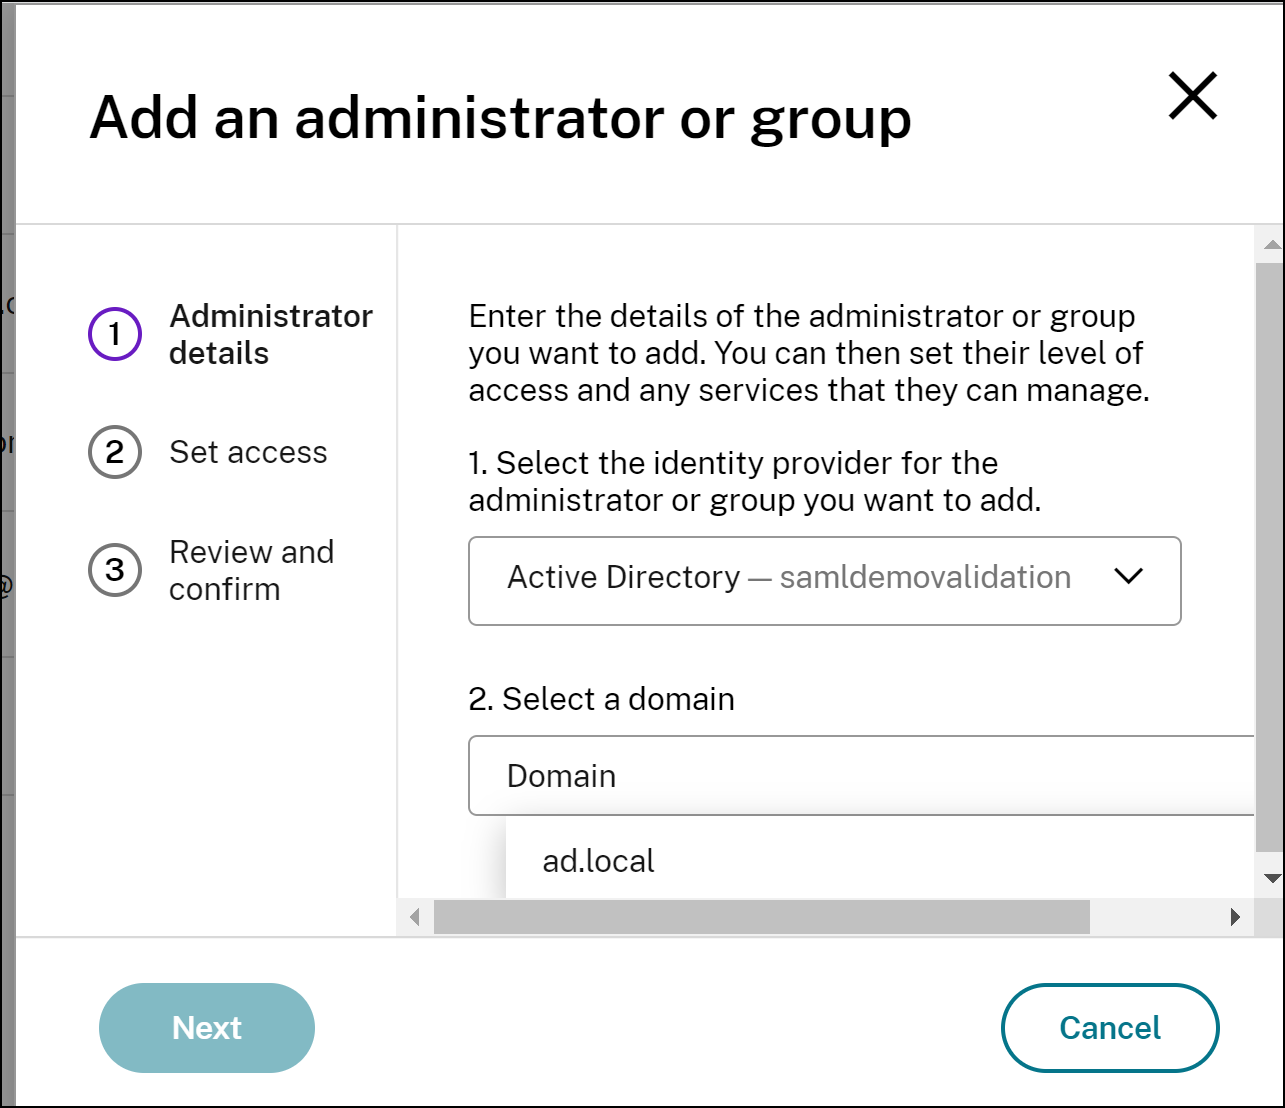
In the Administrators tab, click Add Administrator/group.
-
Select Active Directory - [your SAML app name] from the list, select the domain, and then click Next.
-
Specify the access permissions.
-
Review if everything is correct and click Send Invitiation.
-
In Authentication tab, you can view the sign-in URL for SAML 2.0. The following is an example:
