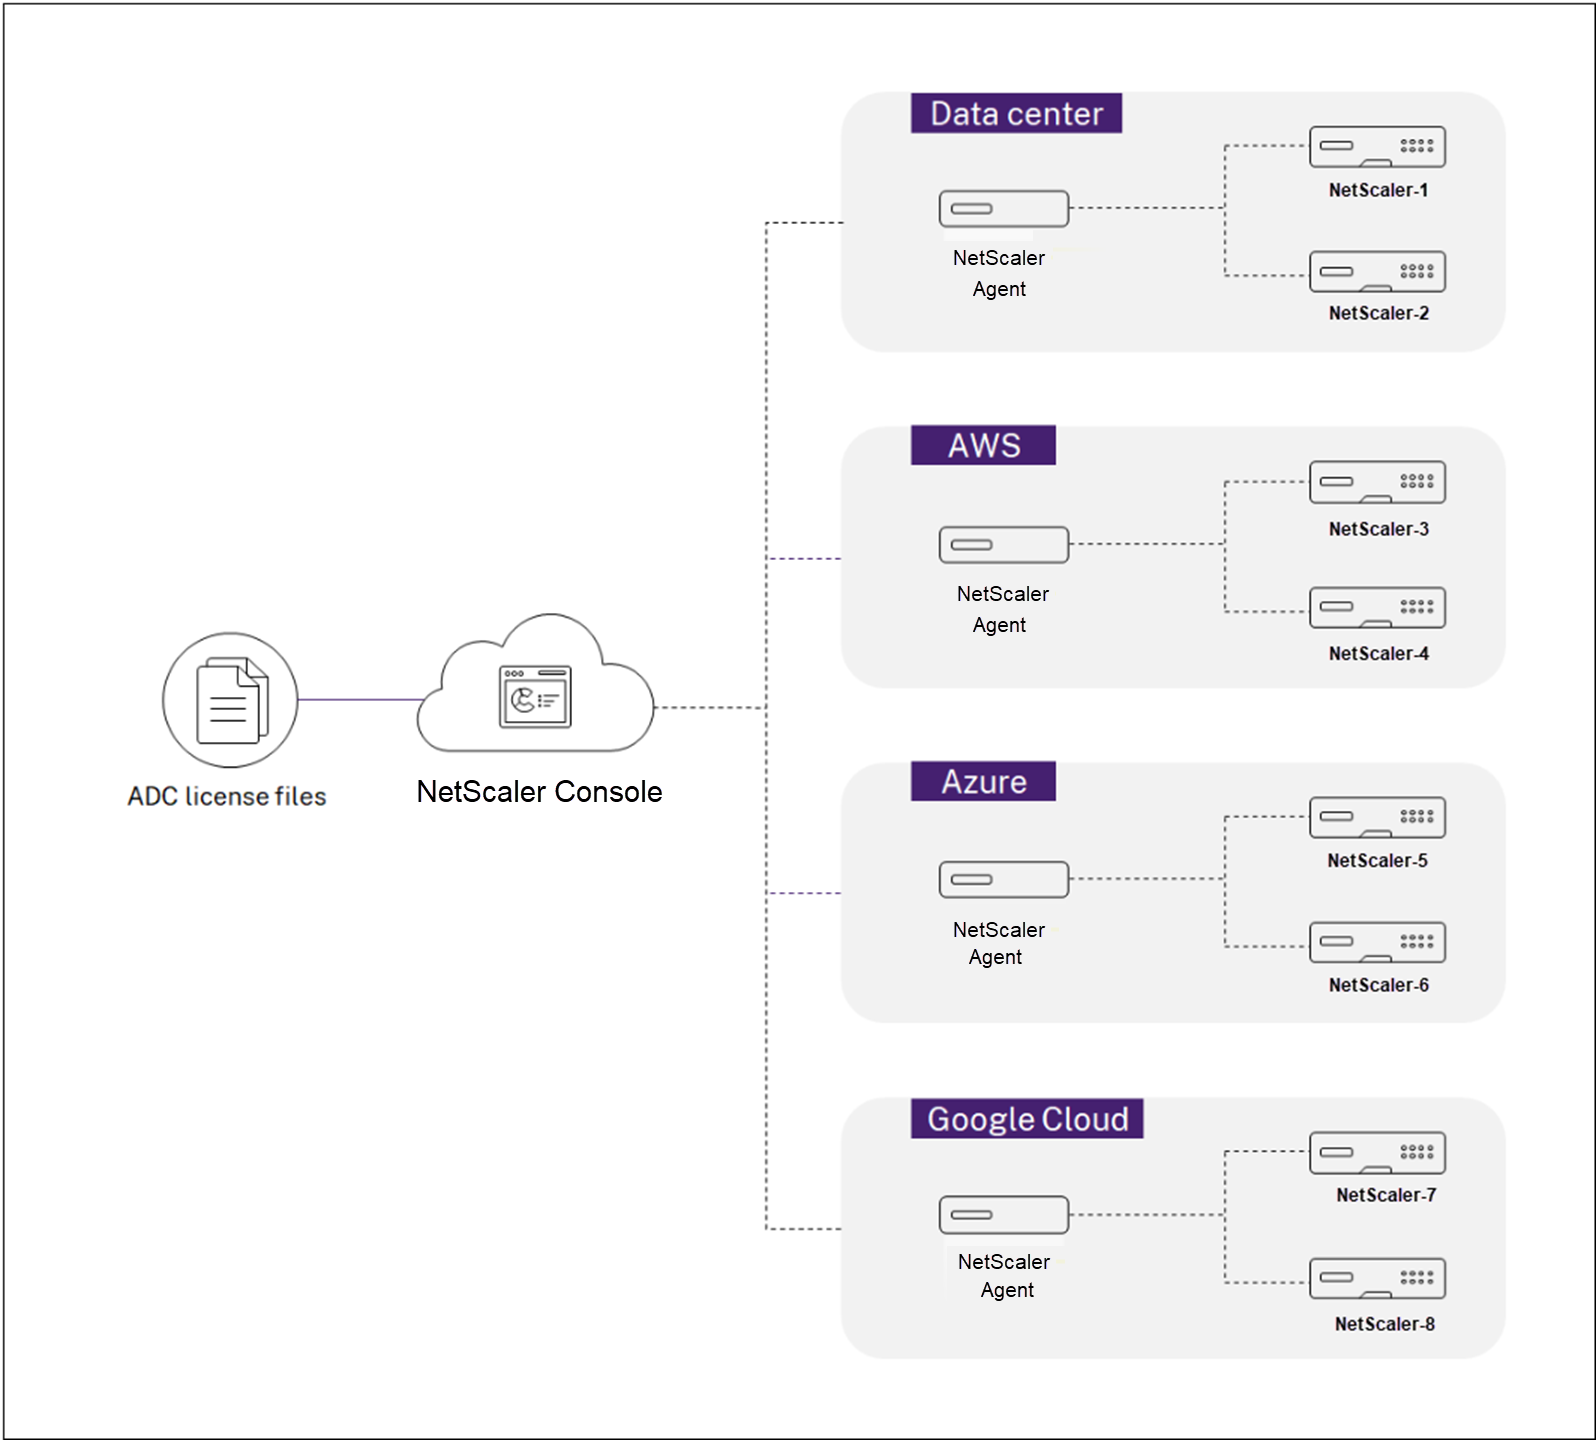
Configure Pooled capacity
The NetScaler Pooled capacity allows you to share bandwidth or instance licenses across different NetScaler form factors. For virtual CPU subscription based instances, you can share virtual CPU license across instances. Use this Pooled capacity for the instances that are in the data center or public clouds. When an instance no longer requires the resources, it checks the allocated capacity back into the common pool. Reuse the released capacity to other NetScaler instances that need resources.
You can use Pooled licensing to maximize the bandwidth utilization by ensuring the necessary bandwidth allocation to an instance and not more than its need. Increase or decrease the bandwidth allocated to an instance at run time without affecting the traffic. With the Pooled capacity licenses, you can automate the instance provisioning.
To use NetScaler Pooled capacity, you must attach an NetScaler Console agent to an NetScaler instance. NetScaler instances check in and check out licenses from NetScaler Console through an agent.
You can also use Pooled capacity licenses for NetScaler FIPS instances. You can perform the following tasks in NetScaler Console:
-
Upload the Pooled capacity license files (bandwidth pool or instance Pool) to the license server.
-
Allocate licenses from the license pool to NetScaler instances on demand.
- Check out the licenses from NetScaler instances (MPX-Z /SDX-Z/VPX/CPX/BLX) based on the minimum and maximum capacity of the instance.
You can download Pooled licenses, including bandwidth, instance, and Z-cap licenses from citrix.com. For more information, see Licensing guide for NetScaler.
NetScaler Pooled capacity issues
The Pooled capacity states indicate the license requirement on an NetScaler instance. The NetScaler instances configured with Pooled capacity display one of the following states:
-
Optimum: Instance is running with proper license capacity.
-
Capacity mismatch: Instance is running with a capacity less than the user configured.
-
Grace: Instance is running on a grace license.
-
Grace & Mismatch: Instance is running on grace but with a capacity less than the user configured.
-
Not available: Instance is not registered with NetScaler Console for management, or NITRO communication from NetScaler Console to the instances is not working.
-
Not allocated: License is not allocated in the instance.
Before you begin
Ensure the following before you configure Pooled capacity:
-
Install and register an agent in NetScaler Console. To install and register an agent, see Getting started.
-
Ensure that all registered agents are in UP state for Pooled licensing to work properly. If agents are in DOWN state but not yet decommissioned or terminated, bring them to UP state. If DOWN agents are decommissioned or terminated or not in use anymore, delete them from NetScaler Console.
-
The
27000and7279ports are available to check out licenses from NetScaler Console to an instance. See, System requirements.
Step 1 - Apply licenses in NetScaler Console
-
In NetScaler Console, navigate to Infrastructure > Pooled Licensing.
-
In the License Files section, select Add License File and select one of the following options:
-
Upload license files from a local computer. If a license file is already present on your local computer, you can upload it to NetScaler Console.
-
Use license access code. Specify the license access code for the license that you have purchased from Citrix. Then, select Get Licenses. Then select Finish.
Note:
At any time, you can add more licenses to NetScaler Console from License Settings.
-
-
Click Finish.
The license files are added to NetScaler Console. The License Expiry Information tab lists the licenses present in the NetScaler Console and the remaining days to expiry.
-
In License Files, select a license file that you want to apply and click Apply licenses.
This action enables NetScaler instances to use the selected license as a Pooled capacity.
Step 2 - Register NetScaler Console as a license server
You can register the NetScaler Console as a license server to a NetScaler instance using an agent.
Use one of the following procedures to register the NetScaler Console as a license server:
Use GUI to register an agent
In the NetScaler Console GUI, register the agent associated with a NetScaler instance.
-
Log in to NetScaler GUI.
-
Navigate to System > Licenses > Manage Licenses.
-
Click Add New License.
-
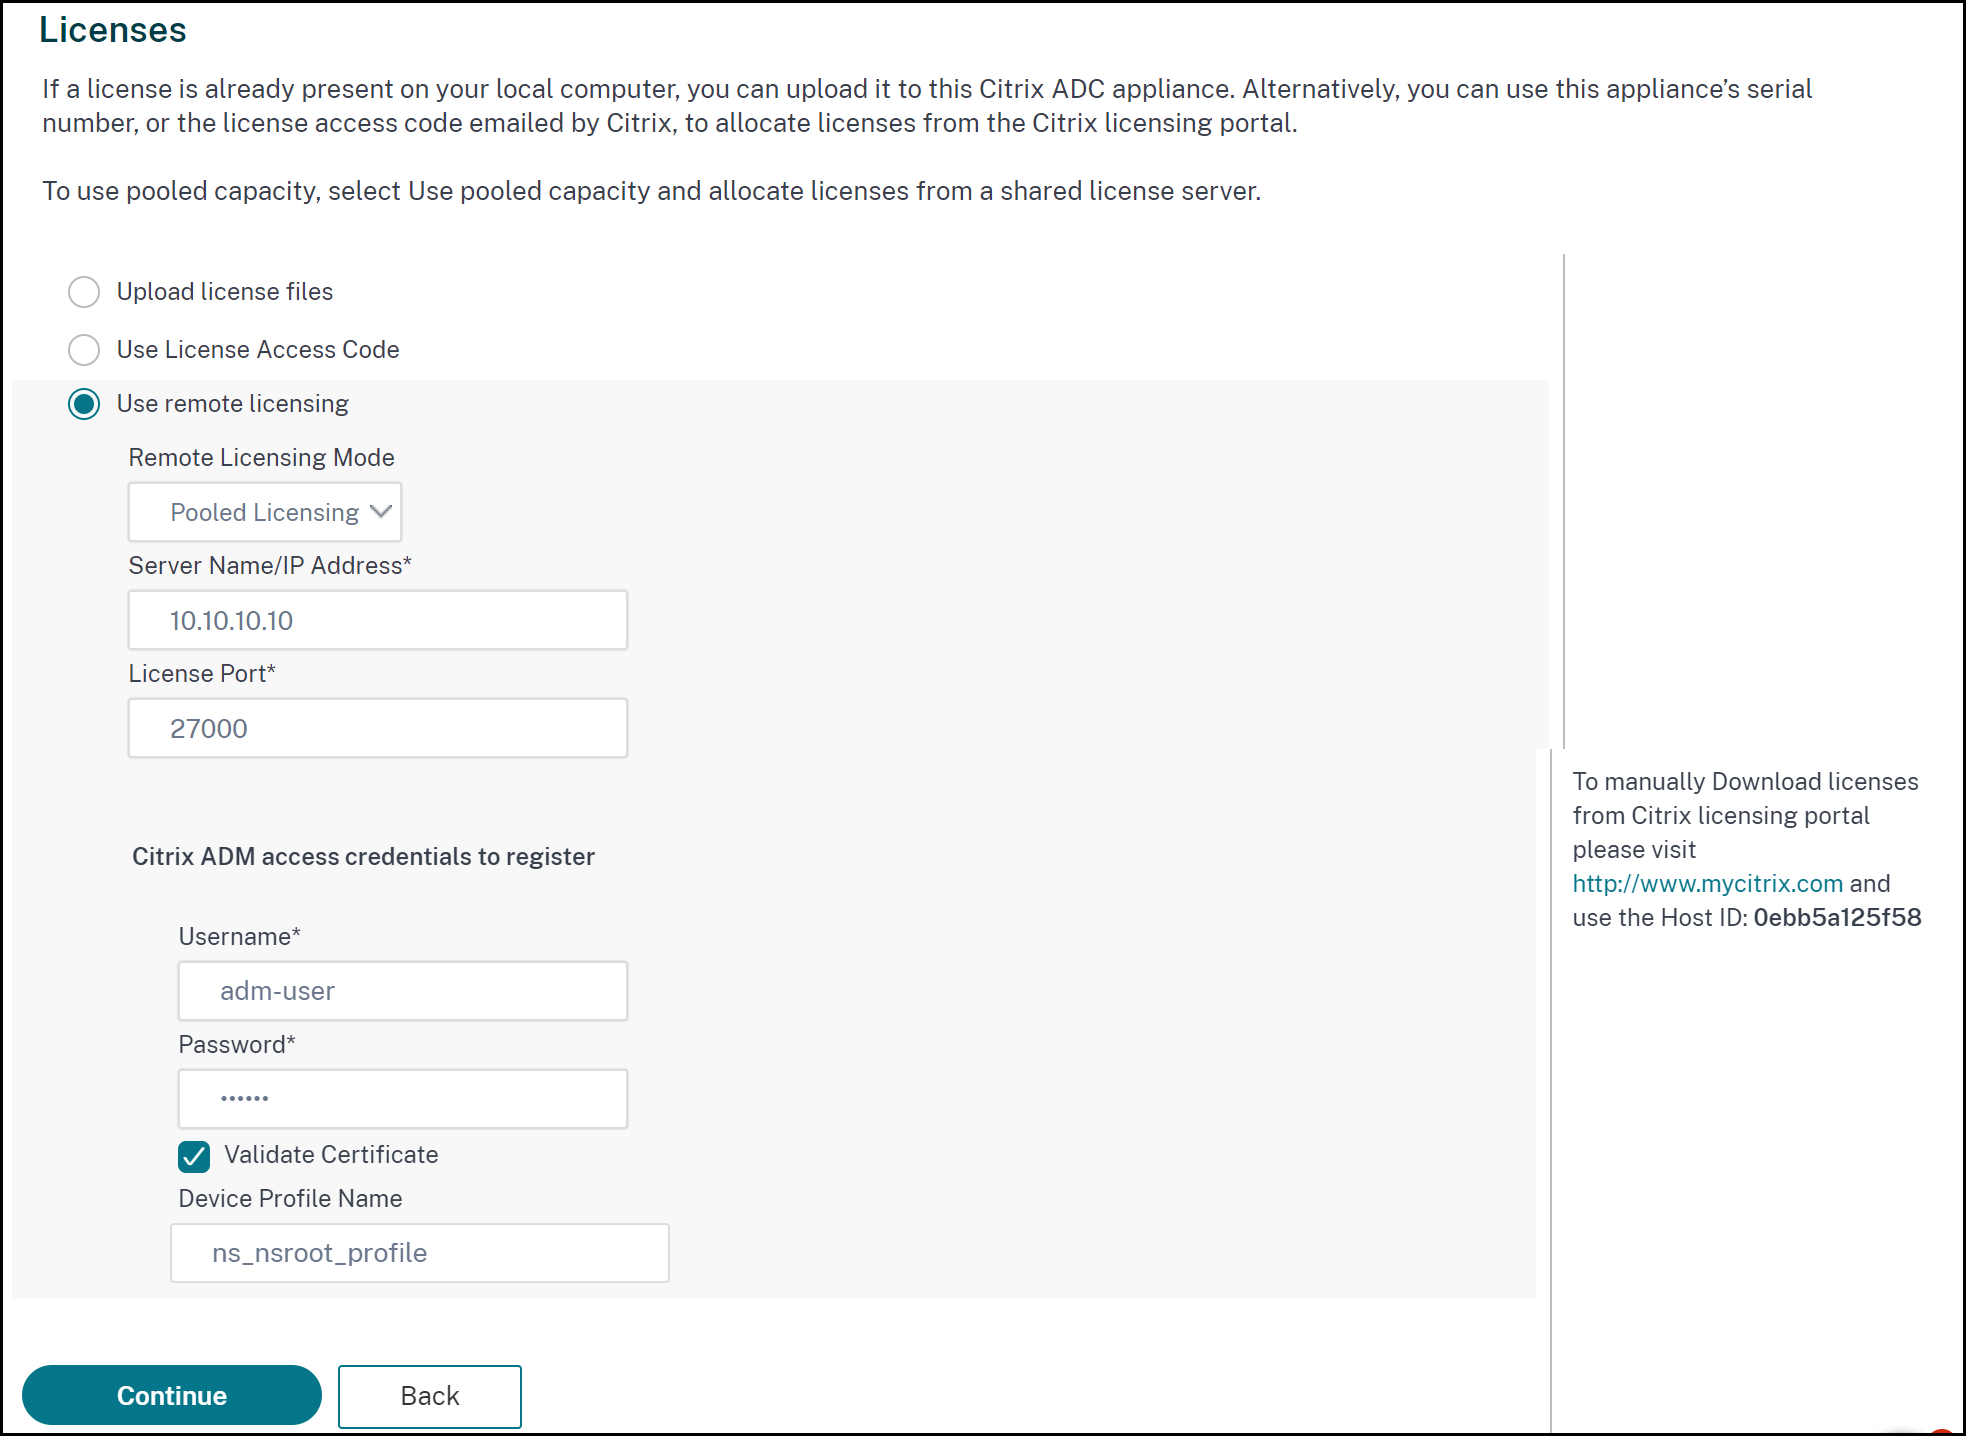
Select Use remote licensing and under Remote Licensing Mode, select Pooled Licensing from the list.
-
In the Server Name/IP address field, specify the associated NetScaler Console agent IP address that is registered with NetScaler Console.
-
The default license port is 27000.
-
Enter your NetScaler agent credentials to register an instance with NetScaler Console and click Continue. In NetScaler Console, one of the agents is the license server.
Notes:
-
Select the Validate Certificate checkbox only if you have uploaded a valid digital certificate (issued by a Certificate Authority (CA)) on the NetScaler agent. In NetScaler Console, navigate to Infrastructure > Instances > Agents and from the Select Action list, select Install Certificate to upload the certificate.
-
Device registration might fail if NetScaler is reachable only through an NAT IP. You can still check out the license, but NetScaler Console displays those NetScaler instances as unmanaged instances.
-
-
Under Device Profile Name, specify the instance profile that NetScaler Console can use to access the instance. This instance profile contains the user name and password of the instances that you want to add to NetScaler Console. The default profile is ns_nsroot_profile. If you have changed the default admin credentials of your instances, you can define a custom instance profile name.
-
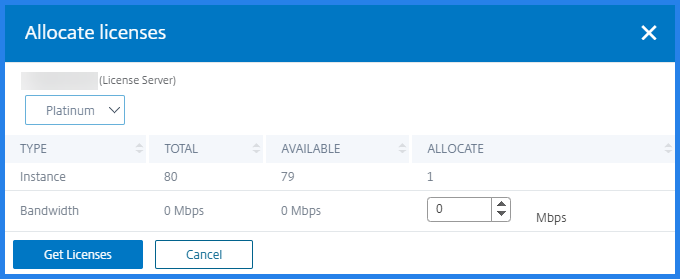
In Allocate licenses, select the license edition and specify the required bandwidth.
For the first time, allocate licenses in NetScaler. You can later change or release the license allocation from the NetScaler Console GUI.
-
Click Get Licenses.
Important
Warm restart the instance if you change the license edition. The configuration changes do not take effect until you restart the instance.
Use CLI to add an agent
If a NetScaler instance has no GUI, use the following CLI commands to add an agent associated with an instance:
-
Log in to the NetScaler console.
-
Add the associated agent’s IP address that is registered with the NetScaler Console:
> add ns licenseserver <adm-agent-IP-address> -port <adm-agent-license-port-number> -
View the license bandwidth available in the license server:
> sh ns licenseserverpool -
Allocate the license bandwidth from the required license edition:
> set ns capacity -unit gbps -bandwidth <specify-license-bandwidth> edition <specify-license-edition>The license edition can be Standard or Advanced or Premium.
Important
Warm restart the instance if you change the license edition.
reboot -wThe configuration changes do not take effect until you restart the instance.
Step 3 - Allocate Pooled licenses to NetScaler instances
To allocate Pooled capacity licenses from the NetScaler Console GUI:
-
Log in to NetScaler Console.
-
Navigate to Infrastructure > Pooled Licensing > Bandwidth Licenses > Pooled Capacity.
The FIPS instance capacity appears only if you upload FIPS instance licenses to NetScaler Console.
-
Click the license pool that you want to manage.
Note:
The Allocated Capacity field does not reflect the changed bandwidth immediately. The bandwidth change takes effect after the NetScaler warm restart.
In Allocation Details, the Requested and Applied fields are updated when you change the instance’s bandwidth allocation.
-
Select a NetScaler instance from the list of available instances by clicking the > button.

The License status column displays corresponding license allocation status messages.
Note:
The Unmanaged Instances tab displays the instances that are discovered but not managed in NetScaler Console.

-
Click Change allocation or Release allocation to modify the license allocation.
-
A pop-up window with the available licenses in the License Server appears.
-
You can choose the bandwidth or instance allocation to the instance by setting the Allocate list options. After making your selections, click Allocate.
-
You can also change the allocated license edition from the list options in the Change License Allocation window.
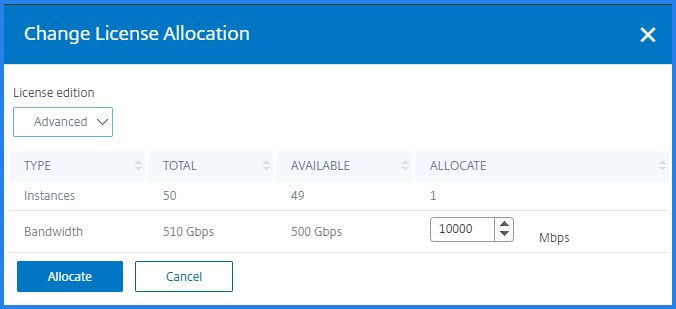
Note:
Warm restart an instance if you change the license edition.
Configure Pooled capacity on NetScaler instances
You can configure Pooled capacity licenses on the following NetScaler instances:
- NetScaler MPX-Z instances
- NetScaler SDX-Z instances
- NetScaler VPX instances
- NetScaler high-availability pair
NetScaler MPX-Z instances
MPX-Z is the pooled-capacity enabled NetScaler MPX appliance. MPX-Z supports bandwidth pooling for Premium, Advanced, or Standard edition licenses.
MPX-Z requires a license before it can connect to the License Server. You can install the MPX-Z license by using one of the following ways:
- Uploading the license file from a local computer.
- Using the instance’s hardware serial number.
- The License Access Code from the System > Licenses section of the instance’s GUI.
If you remove the MPX-Z license, the pooled-capacity feature is disabled. The instance licenses are released to the license server.
You can dynamically modify the bandwidth of an MPX-Z instance without a restart. A restart is required only if you want to change the license edition.
Note:
When you restart the instance, it automatically checks out the Pooled licenses required for its configured capacity.
NetScaler SDX-Z instances
SDX-Z is the pooled-capacity enabled NetScaler SDX appliance. SDX-Z supports bandwidth and instance pooling for Premium, Advanced, or Standard edition licenses.
SDX-Z requires a license before it can connect to the License Server. You can install the SDX-Z license by using one of the following ways:
- Uploading the license file from a local computer.
- Using the instance’s hardware serial number.
- The License Access Code from the System > Licenses section of the instance’s GUI.
If you remove the SDX-Z license, the pooled-capacity feature is disabled. The instance licenses are released to the license server.
You can dynamically modify the bandwidth of an SDX-Z instance without a restart. A restart is required only if you want to change the license edition.
Note:
When you restart the instance, it automatically checks out the Pooled licenses required for its configured capacity.
NetScaler instances
A pooled-capacity enabled NetScaler VPX instance can check out licenses from a bandwidth pool (Premium/Advanced/Standard editions). You can use the NetScaler GUI to check out licenses from the License Server.
You can dynamically modify the bandwidth of a VPX instance without a restart. A restart is required only if you want to change the license edition.
Note:
When you restart the instance, the configured Pooled capacity licenses are automatically checked out from the NetScaler Console server.
NetScaler high-availability pair
Before you begin, ensure that the NetScaler Console server is configured as a license server. For more information, see Configure NetScaler Console as a license server
When you allocate the bandwidth to a NetScaler HA pair, the NetScaler Console checks out the same bandwidth to primary and secondary instances. If you allocate 10 Mbps bandwidth to a NetScaler HA pair, NetScaler Console does the following:
- Checks out 20 Mbps bandwidth to the HA pair.
- Allocates 10 Mbps to each instance in the HA pair.
To allocate pool license to a NetScaler HA pair, see Allocate pooled licenses to NetScaler instances.
The Pooled Capacity page displays the instances and their allocated capacity separately. If you change or release the bandwidth of the primary instance, the secondary instance bandwidth automatically synchronizes with the primary instance. However, the synchronization does not happen if you change or release the secondary instance bandwidth.