-
-
VMware ESXiでのNetScalerエージェント展開の自動化
-
-
-
This content has been machine translated dynamically.
Dieser Inhalt ist eine maschinelle Übersetzung, die dynamisch erstellt wurde. (Haftungsausschluss)
Cet article a été traduit automatiquement de manière dynamique. (Clause de non responsabilité)
Este artículo lo ha traducido una máquina de forma dinámica. (Aviso legal)
此内容已经过机器动态翻译。 放弃
このコンテンツは動的に機械翻訳されています。免責事項
이 콘텐츠는 동적으로 기계 번역되었습니다. 책임 부인
Este texto foi traduzido automaticamente. (Aviso legal)
Questo contenuto è stato tradotto dinamicamente con traduzione automatica.(Esclusione di responsabilità))
This article has been machine translated.
Dieser Artikel wurde maschinell übersetzt. (Haftungsausschluss)
Ce article a été traduit automatiquement. (Clause de non responsabilité)
Este artículo ha sido traducido automáticamente. (Aviso legal)
この記事は機械翻訳されています.免責事項
이 기사는 기계 번역되었습니다.책임 부인
Este artigo foi traduzido automaticamente.(Aviso legal)
这篇文章已经过机器翻译.放弃
Questo articolo è stato tradotto automaticamente.(Esclusione di responsabilità))
Translation failed!
VMware ESXiへのNetScaler®エージェントの展開自動化
NetScaler Consoleを使用すると、VMware ESXiへのNetScalerエージェントの展開を自動化できます。
管理者として、次のアクションを自動化できます。
- NetScalerエージェントの構成
- NetScalerエージェントの登録とエージェントのデフォルトパスワードの変更
NetScalerエージェントの構成
エージェントの構成を自動化するには、.ovfファイルに次のパラメーターの値を追加します。
IPAddressNetmaskGatewayNameserverHostname
注:
.ovfファイルはエージェントイメージファイルに含まれています。NetScalerエージェントファイルをダウンロードするには、https://www.citrix.com/downloads/citrix-application-management/にアクセスしてください。エージェントイメージファイルの命名パターンは次のとおりです。MASAGENT-ESX-releasenumber-buildnumber.zip
NetScalerエージェントの登録とデフォルトパスワードの変更
注:
登録とデフォルトパスワードの変更を行う前に、NetScalerエージェントの構成で指定されたパラメーターを追加したことを確認してください。
NetScalerエージェントの登録とデフォルトパスワードの変更を自動化するには、同じ.ovfファイルに次のパラメーターの値を追加します。
NetScaler Console Server IPNetScaler Console UsernameNetScaler Console PasswordAgent New Password
前提条件
仮想アプライアンスのインストールを開始する前に、次の点を確認してください。
- 最小システム要件を満たす管理ワークステーションにVMware vSphere 8.xをインストールします。
- NetScaler Consoleセットアップファイルをダウンロードします。
NetScalerエージェントの構成と登録方法
ステップ1:OVFファイルのダウンロードと編集
-
MASAGENT-ESX-releasenumber-buildnumber.zipからファイルを目的の場所に抽出します。次のファイルが抽出されます。
- .ovfファイル
- .vmdkファイル
- .ovaファイル
- .mfファイル
-
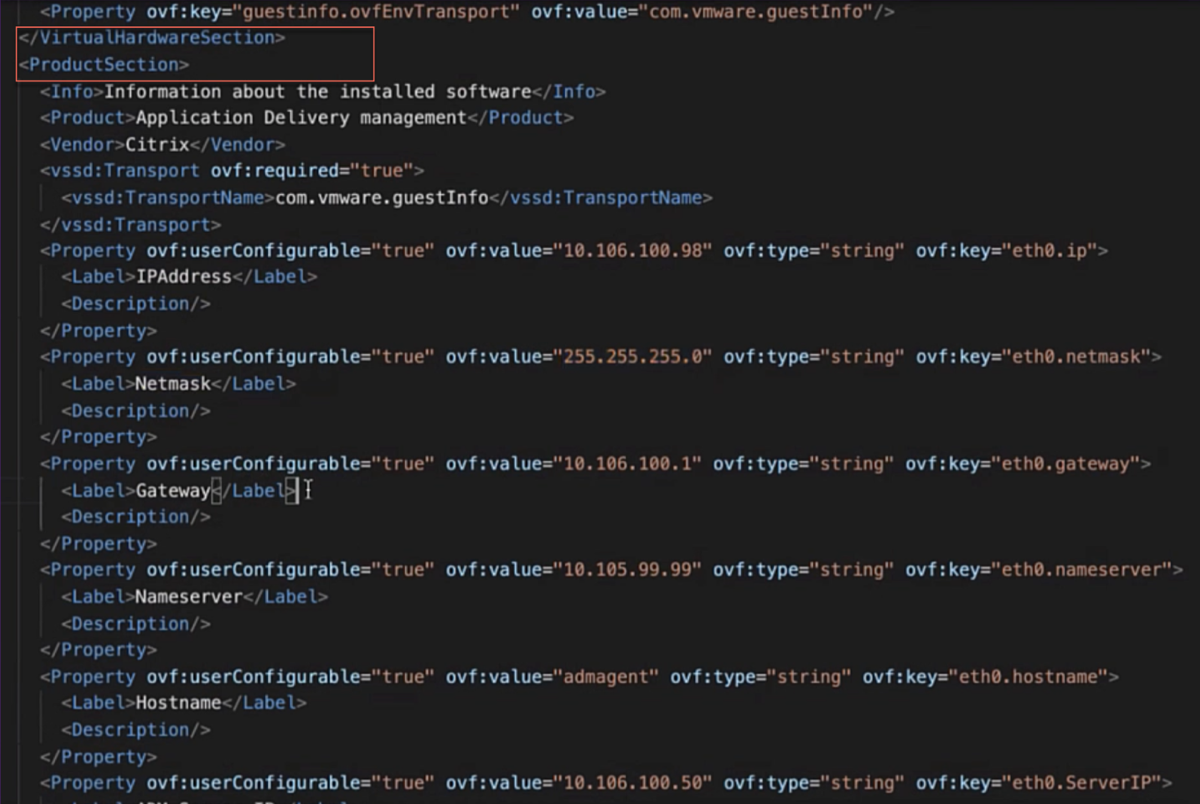
任意のテキストエディターで.ovfファイルを開き、
</VirtualHardwareSection>タグの後に次の<ProductSection>..</ProductSection>サンプルコードを追加します。<ProductSection> <Info>Information about the installed software</Info> <Product>Application Delivery management</Product> <Vendor>Citrix</Vendor> <Property ovf:userConfigurable="true" ovf:value="VALUE" ovf:type="string" ovf:key="eth0.ip"> <Label>IPAddress</Label> </Property> <Property ovf:userConfigurable="true" ovf:value="VALUE" ovf:type="string" ovf:key="eth0.netmask"> <Label>Netmask</Label> </Property> <Property ovf:userConfigurable="true" ovf:value="VALUE" ovf:type="string" ovf:key="eth0.gateway"> <Label>Gateway</Label> </Property> <Property ovf:userConfigurable="true" ovf:value="VALUE" ovf:type="string" ovf:key="eth0.nameserver"> <Label>Nameserver</Label> </Property> <Property ovf:userConfigurable="true" ovf:value="VALUE" ovf:type="string" ovf:key="eth0.hostname"> <Label>Hostname</Label> </Property> <Property ovf:userConfigurable="true" ovf:value="VALUE" ovf:type="string" ovf:key="eth0.ServerIP"> <Label>NetScaler Console Server IP</Label> </Property> <Property ovf:userConfigurable="true" ovf:value="VALUE" ovf:type="string" ovf:key="eth0.ServerUname"> <Label>NetScaler Console Username</Label> </Property> <Property ovf:userConfigurable="true" ovf:password="true" ovf:value="VALUE" ovf:type="string" ovf:key="eth0.ServerPassword"> <Label>NetScaler Console Password</Label> </Property> <Property ovf:userConfigurable="true" ovf:password="true" ovf:value="VALUE" ovf:type="string" ovf:key="eth0.NewPassword"> <Label>Agent New Password</Label> </Property> </ProductSection> <!--NeedCopy--> -
構成するパラメーターについては、
ovf:value="VALUE"にそれぞれの値を追加します。-
NetScalerエージェントを構成するには、次のパラメーターに値を追加します。
IPAddressNetmaskGatewayNameserverHostname
-
NetScalerエージェントを登録し、デフォルトパスワードを変更するには、次のパラメーターに値を追加します。
NetScaler Console Server IPNetScaler Console UsernameNetScaler Console PasswordAgent New Password
注:
- エージェントのデフォルトパスワードを登録および変更する前に、NetScalerエージェントを構成する必要があります。
- .ovfファイルでデフォルトパスワードを登録および変更しない場合、VMの展開後にこれらのアクションを手動で実行します。
-
-
パラメーターとその値を追加したら、.ovfファイルを保存します。
ステップ2:VMware ESXiへのNetScaler Console仮想アプライアンスのインストール
-
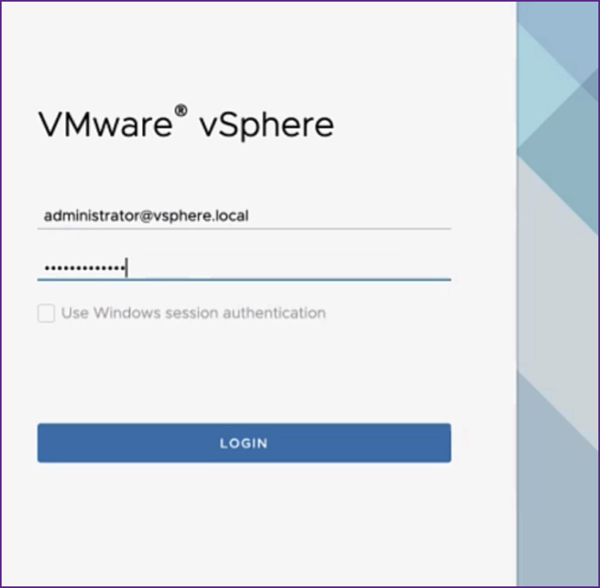
VMWare vSphere Clientにログインし、管理者資格情報を入力します。[Login] をクリックします。
-
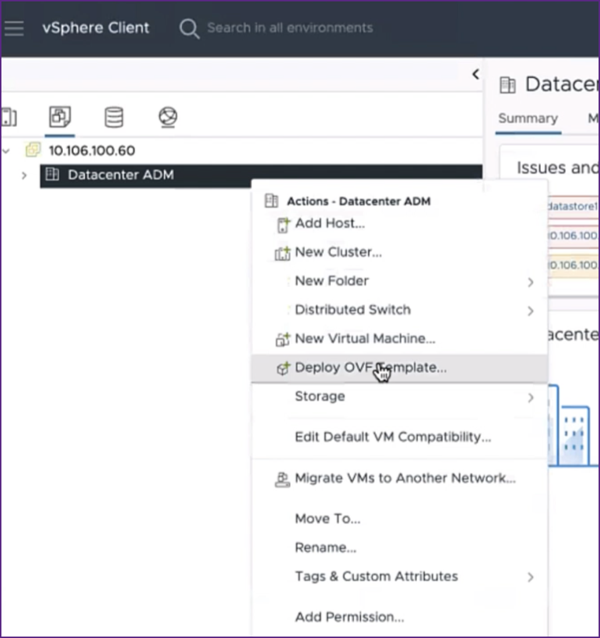
ESXiサーバーを選択し、右クリックして [Deploy OVF Template] を選択します。
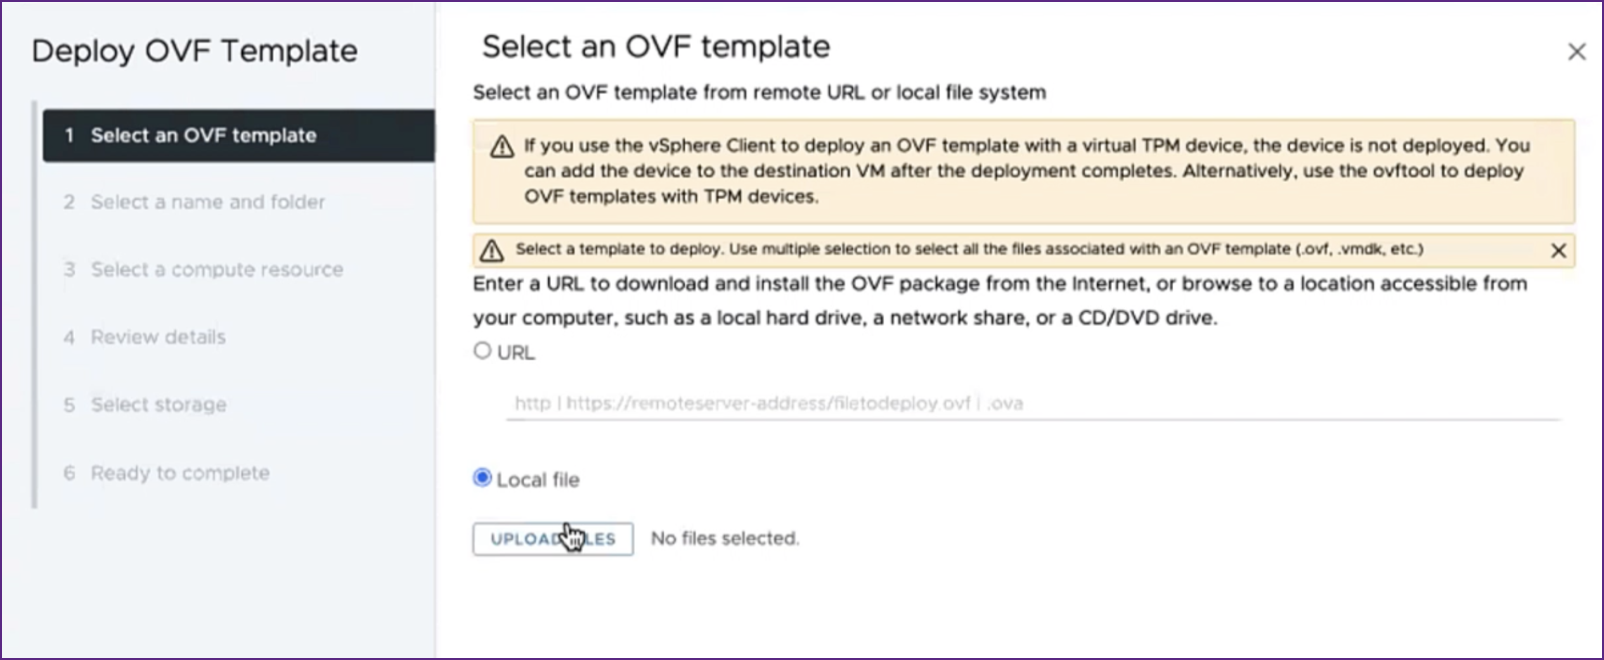
- [Deploy OVF Template] ページで、次の操作を行います。
-
OVFテンプレートの選択:[Local file] を選択し、編集した.ovfファイルと.vmdkファイルを保存した場所に移動します。ファイルを選択し、[Open] をクリックしてアップロードします。[Next] をクリックします。
-
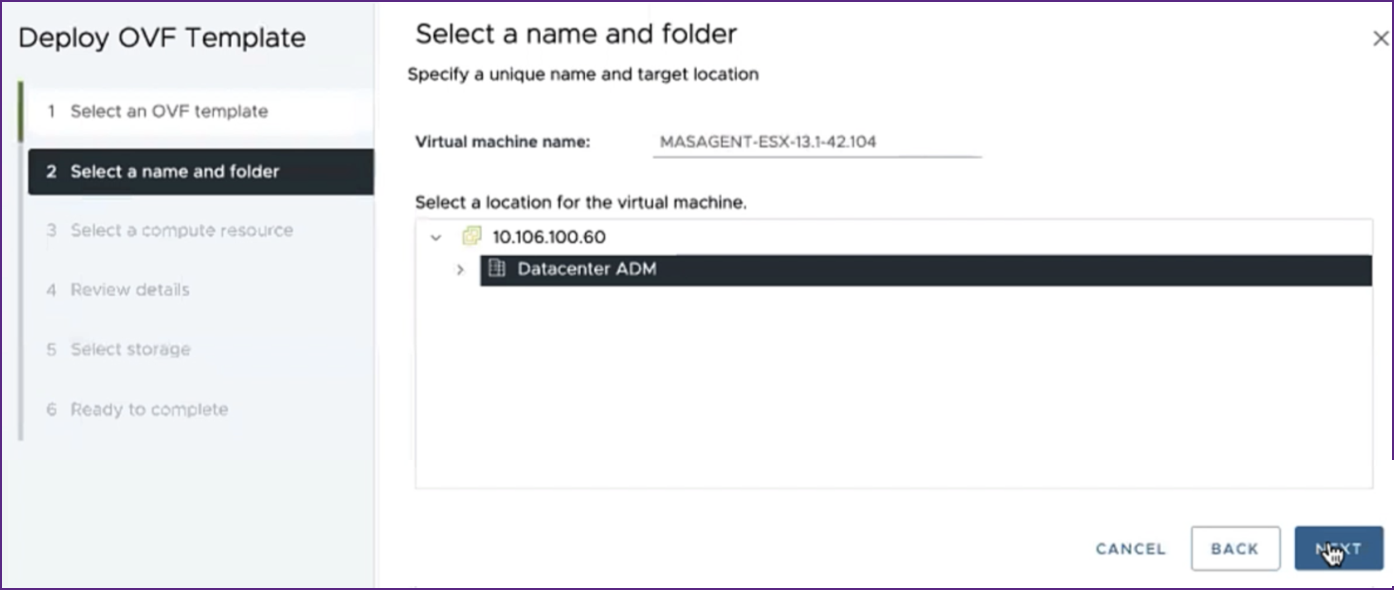
名前とフォルダーの選択:仮想アプライアンスの名前を追加し、仮想マシンを展開するESXi上の場所を選択します。[Next] をクリックします。
-
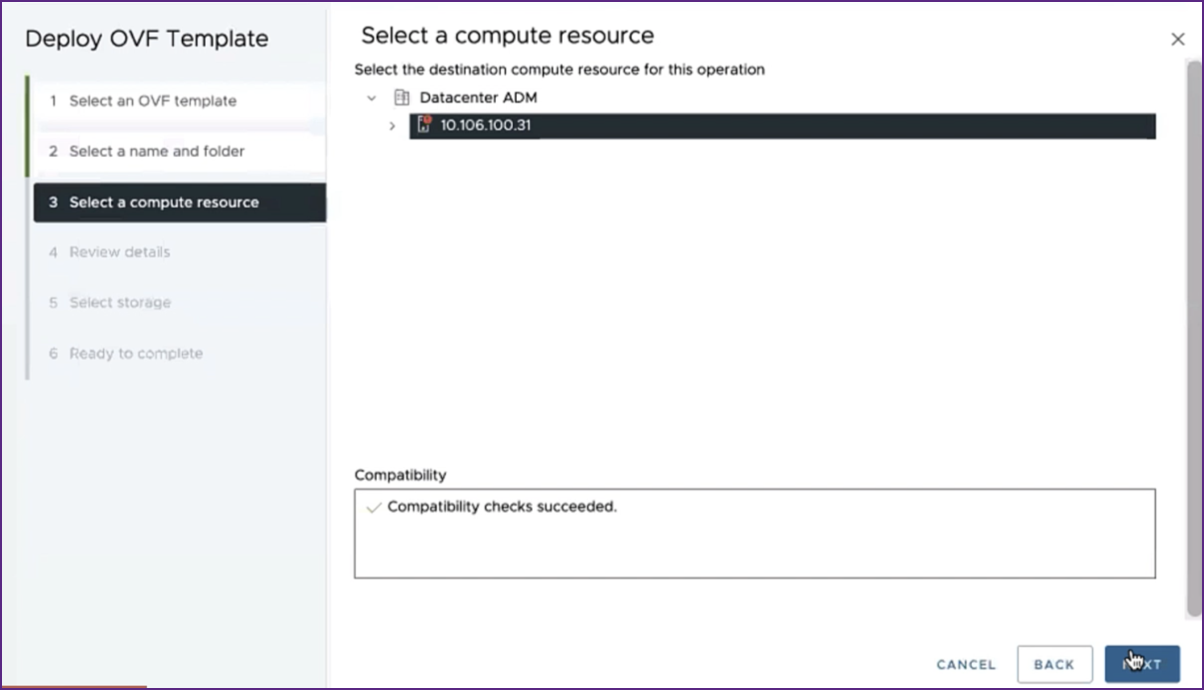
コンピューティングリソースの選択:テンプレートの展開後に実行するリソースを選択します。[Next] をクリックします。
-
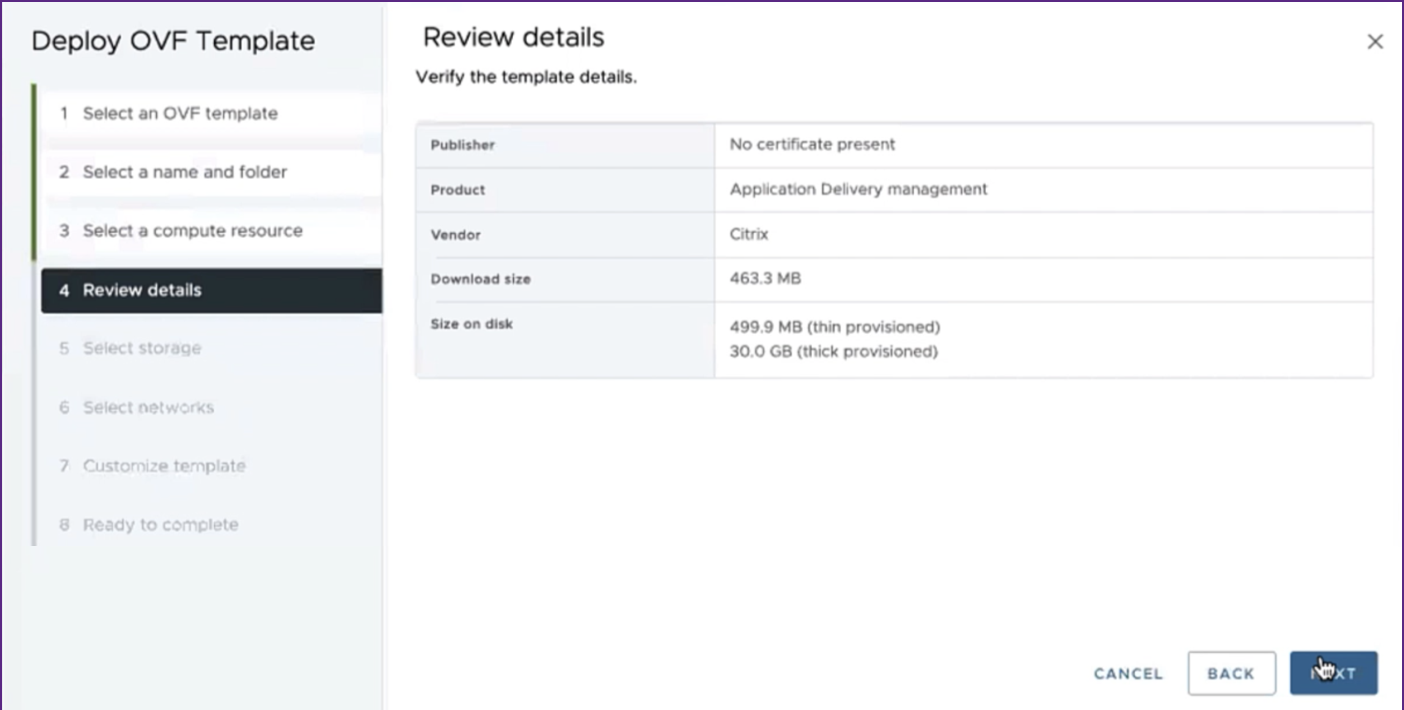
詳細の確認:OVFテンプレートの詳細を確認します。[Next] をクリックします。
-
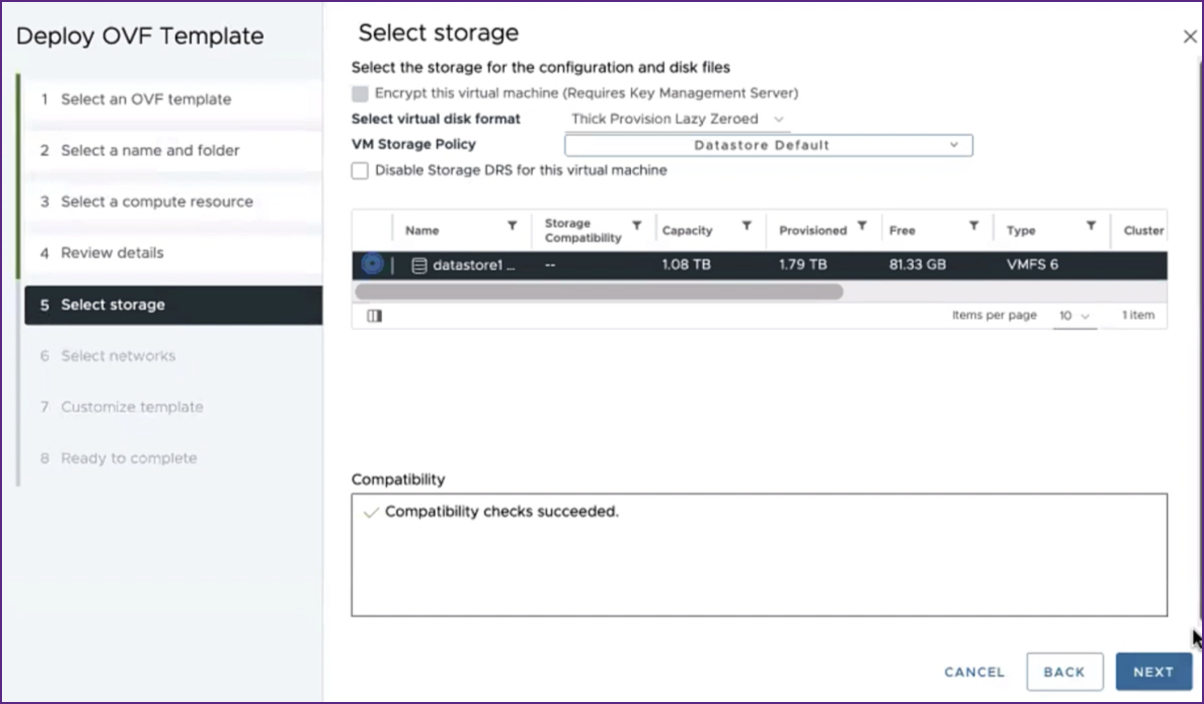
ストレージの選択:OVFテンプレートを保存するデータストアを選択します。[Next] をクリックします。
-
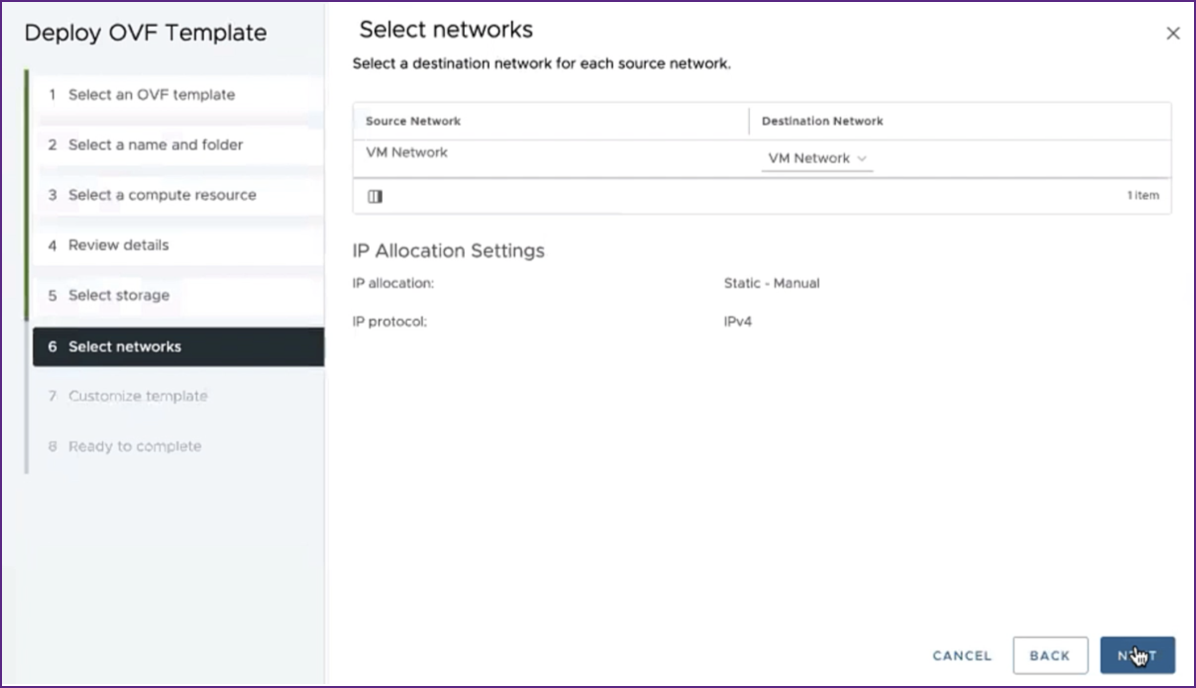
ネットワークの選択:デフォルト設定で続行します。[Next] をクリックします。
-
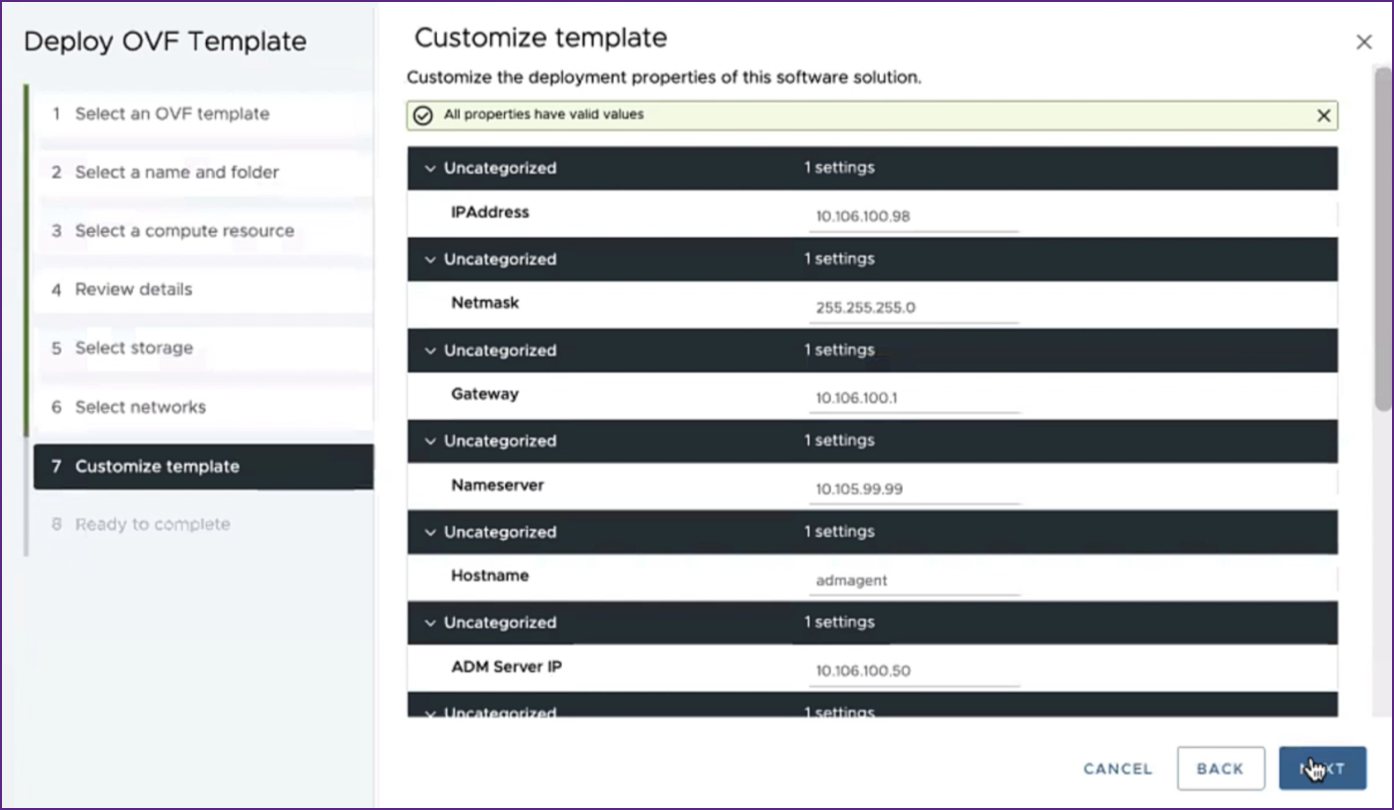
テンプレートのカスタマイズ:OVFテンプレートのすべてのプロパティを確認します。OVFファイルのダウンロードと編集セクションで.ovfファイルに追加したすべてのパラメーターと値が表示されます。
-
完了準備完了:設定を保存して展開プロセスを開始するには、[Finish] をクリックします。
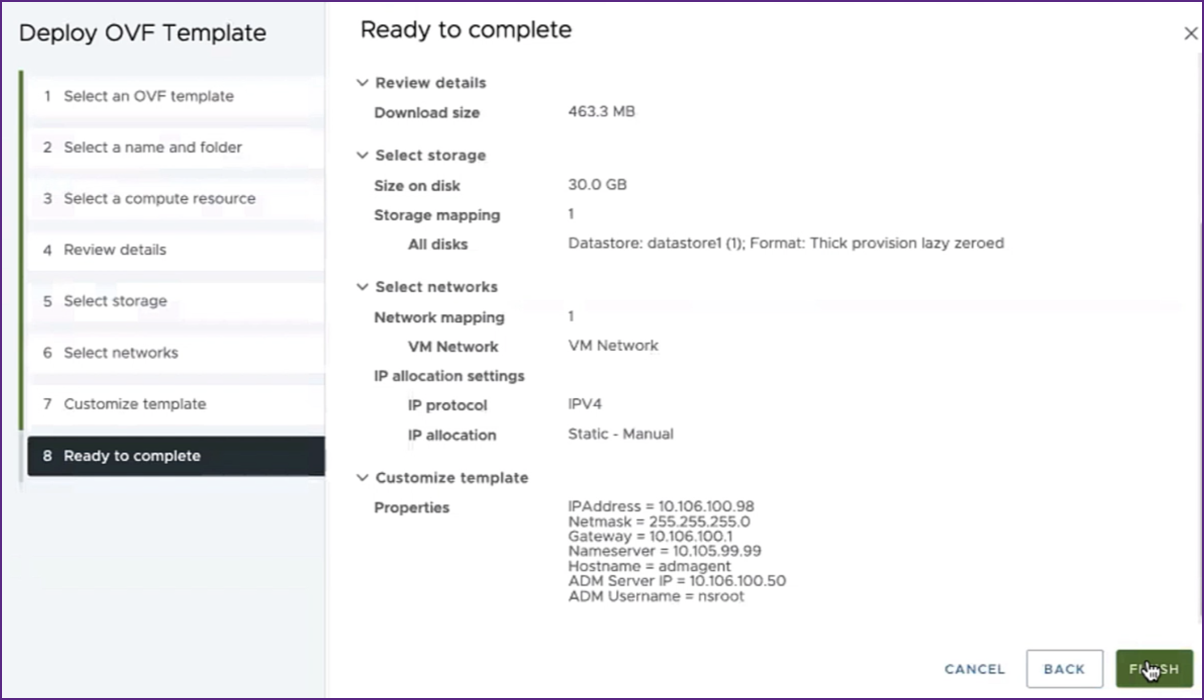
展開が完了するまで待ちます。[Deploy OVF template] 操作のステータスが100%完了すると、エージェントが展開されます。

重要:
設定を編集する前に、仮想アプライアンスの電源をオンにしないでください。
-
-
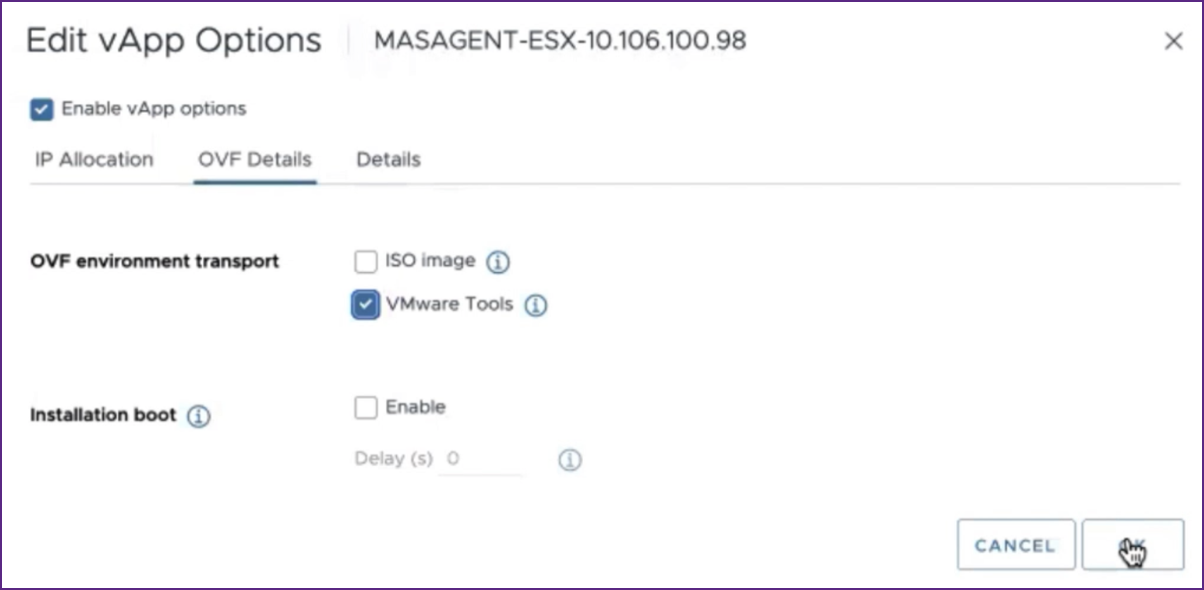
インストールした新しい仮想アプライアンスをクリックし、Configure > Settings > vApp Options > Edit に移動します。
-
[Edit vApp Options] ウィンドウで、In OVF Details > OVF environment transport に移動し、[VMware Tools] を選択します。[OK] をクリックします。
-
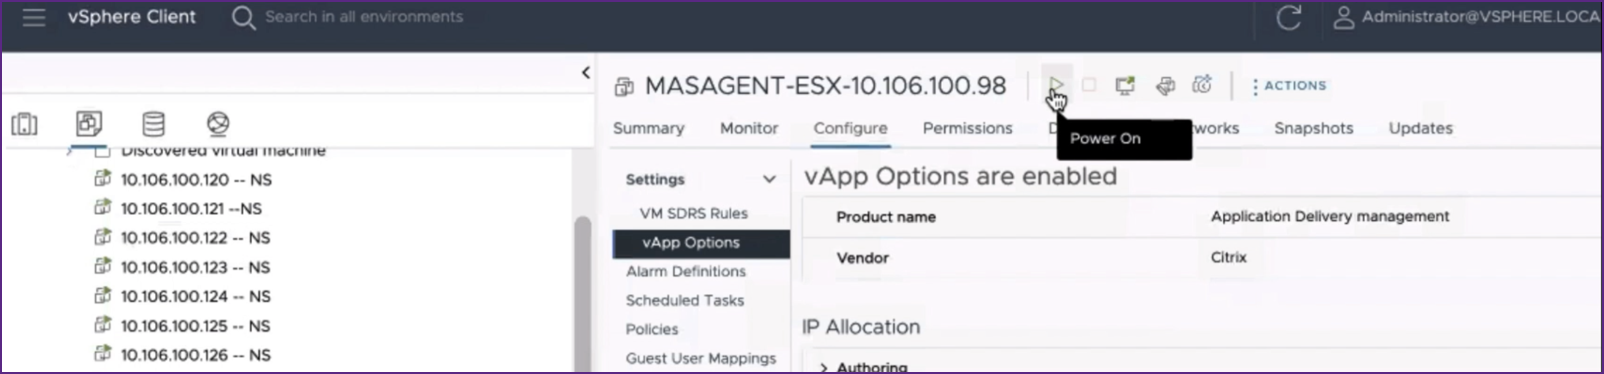
仮想マシンを右クリックし、[Power On] をクリックします。または、仮想マシンの [Summary] タブを選択し、[Power On] をクリックすることもできます。
-
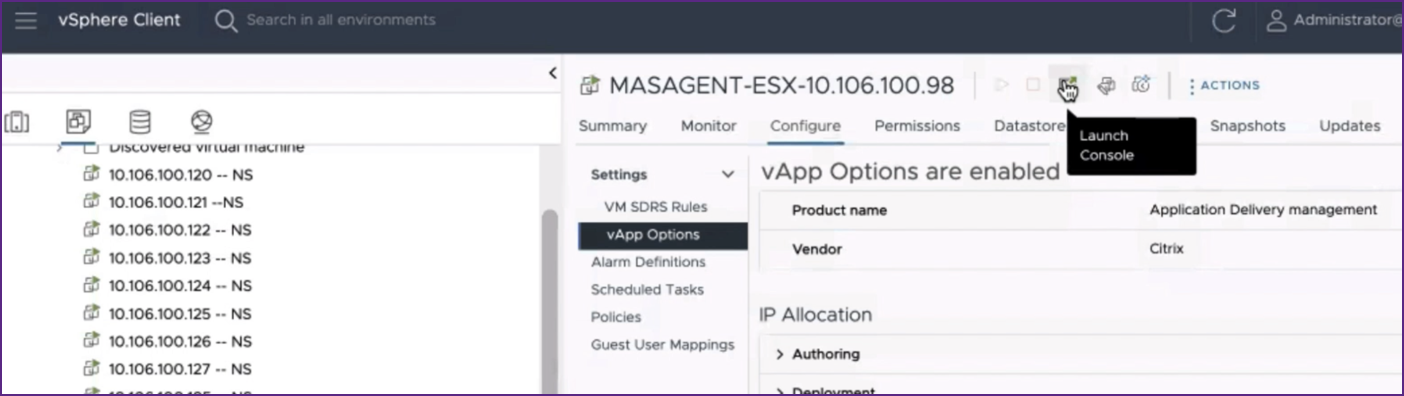
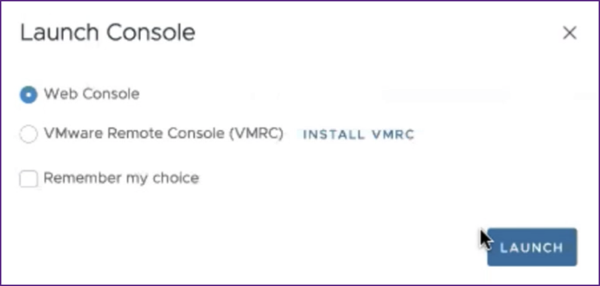
[Summary] タブで、[Launch Web Console] を選択します。[Launch Console] ウィンドウで、[Web Console] を選択します。[Launch] をクリックします。
-
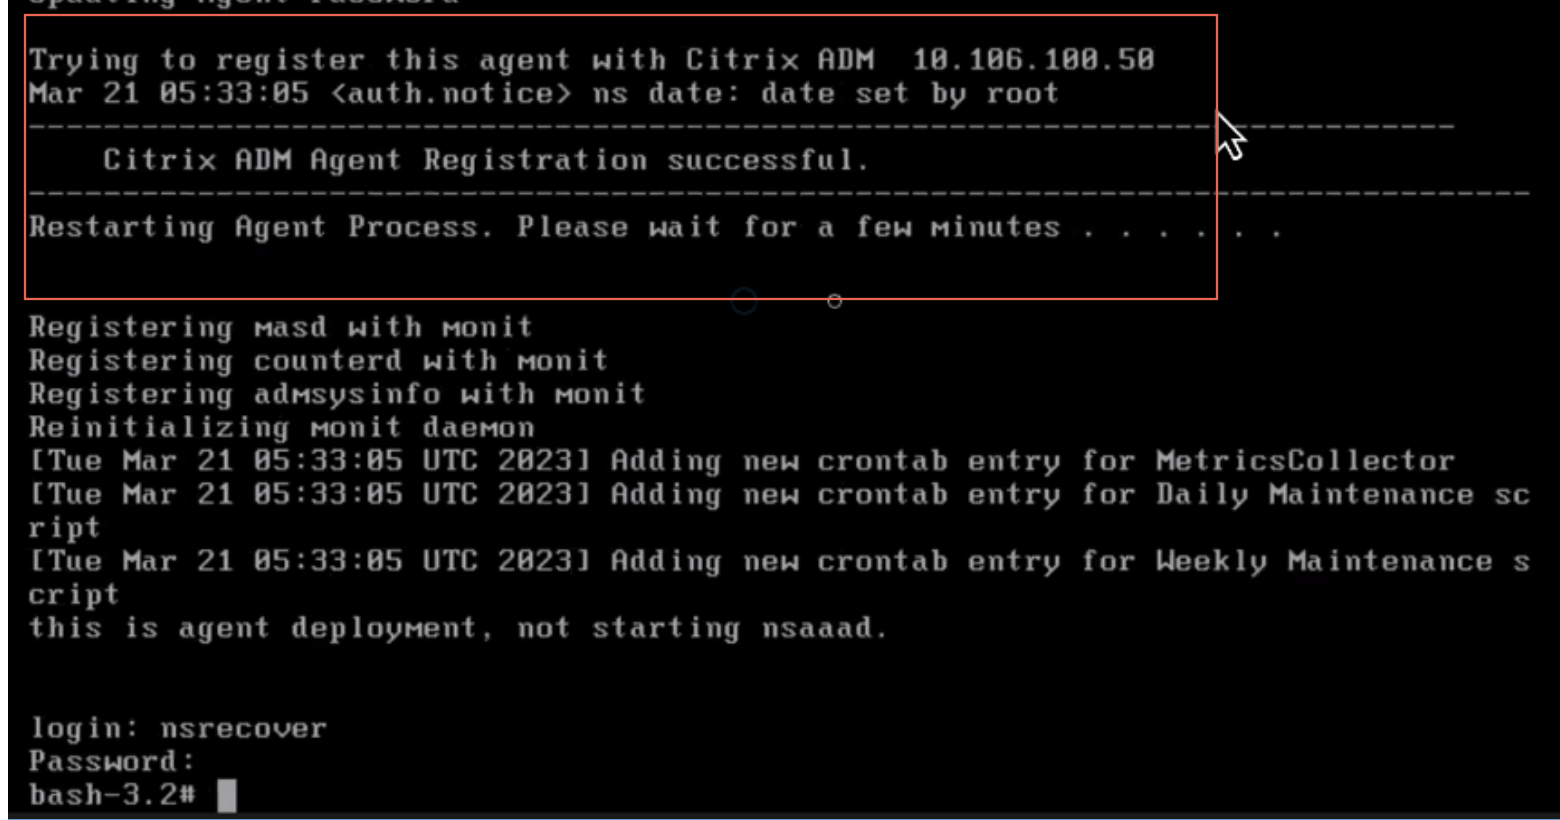
コンソールに、NetScalerエージェントがNetScaler Consoleサーバーに登録された後、登録成功メッセージが表示されます。NetScalerエージェントが展開され、デフォルトパスワードが変更されたことを確認するには、NetScalerエージェントのユーザー名と新しいパスワードでログインします。
ステップ3:確認
NetScalerエージェントが展開されていることを確認するには、次の操作を行います。
- NetScalerエージェントが展開されたら、ブラウザーにNetScaler ConsoleサーバーのIPアドレスを入力してNetScaler Console GUIにアクセスします。
- 資格情報を使用してサーバーにログインします。
- Infrastructure > Instances > Agents に移動します。新しく展開されたエージェントがESXプラットフォームに表示されます。
共有
共有
This Preview product documentation is Cloud Software Group Confidential.
You agree to hold this documentation confidential pursuant to the terms of your Cloud Software Group Beta/Tech Preview Agreement.
The development, release and timing of any features or functionality described in the Preview documentation remains at our sole discretion and are subject to change without notice or consultation.
The documentation is for informational purposes only and is not a commitment, promise or legal obligation to deliver any material, code or functionality and should not be relied upon in making Cloud Software Group product purchase decisions.
If you do not agree, select I DO NOT AGREE to exit.