-
-
VMware ESXi上のNetScaler Console
-
-
-
This content has been machine translated dynamically.
Dieser Inhalt ist eine maschinelle Übersetzung, die dynamisch erstellt wurde. (Haftungsausschluss)
Cet article a été traduit automatiquement de manière dynamique. (Clause de non responsabilité)
Este artículo lo ha traducido una máquina de forma dinámica. (Aviso legal)
此内容已经过机器动态翻译。 放弃
このコンテンツは動的に機械翻訳されています。免責事項
이 콘텐츠는 동적으로 기계 번역되었습니다. 책임 부인
Este texto foi traduzido automaticamente. (Aviso legal)
Questo contenuto è stato tradotto dinamicamente con traduzione automatica.(Esclusione di responsabilità))
This article has been machine translated.
Dieser Artikel wurde maschinell übersetzt. (Haftungsausschluss)
Ce article a été traduit automatiquement. (Clause de non responsabilité)
Este artículo ha sido traducido automáticamente. (Aviso legal)
この記事は機械翻訳されています.免責事項
이 기사는 기계 번역되었습니다.책임 부인
Este artigo foi traduzido automaticamente.(Aviso legal)
这篇文章已经过机器翻译.放弃
Questo articolo è stato tradotto automaticamente.(Esclusione di responsabilità))
Translation failed!
VMware ESXi 上のNetScaler Console
このドキュメントでは、VMware vSphere クライアントを使用して、VMware ESXi に NetScaler Console 仮想アプライアンスをインストールする方法について説明します。
前提条件
仮想アプライアンスのインストールを開始する前に、次の要件を確認してください。
- サポートされている VMware ESXi バージョンをインストールします。サポートされているバージョンの一覧については、「サポートされているハイパーバイザー」を参照してください。
- 最小システム要件を満たす管理ワークステーションに VMware Client をインストールします。
- NetScaler Console セットアップファイルをダウンロードします。
注
- VMotion は、NetScaler Console 13.0 Build 47.22 以降でのみサポートされています。vSphere 高可用性および vSphere DRS セットアップを含む、ESXi ハイパーバイザーに展開された NetScaler Console サーバーの移行をスケジュールおよび自動化できます。
- NetScaler Console 用の VMware Tools は、ソフトウェアビルドの一部として提供されており、個別にアップグレードまたは変更することはできません。
NetScaler Console のインストール
VMware ESXi に NetScaler Console 仮想アプライアンスをインストールするには、次の手順に従います。
注
手順とスクリーンショットは VMware ESXi バージョン 6.0 に基づいています。GUI は他の ESXi バージョンでは異なる場合があります。VMXNET3 アダプターを備えた VMware ESXi バージョン 7.0.1c ビルド番号 17325551 は、NetScaler Console 13.0 71.40 以降でサポートされています。バージョン固有の手順については、VMware のドキュメントを参照してください。
- ワークステーションで VMware vSphere クライアントを起動します。
- [IP address / Name] テキストボックスに、接続する VMware ESXi サーバーの IP アドレスを入力します。
- [User Name] および [Password] テキストボックスに管理者資格情報を入力し、[Login] をクリックします。
- [File] メニューで、[Deploy OVF Template] をクリックします。
-
[Deploy OVF Template] ダイアログボックスの [Deploy from a file or URL] で、.ovf ファイルを選択し、[Next] をクリックします。
注
「The operating system identifier is not supported on the selected host, check to see if the VMware server supports the FreeBSD operating system.」という警告メッセージが表示された場合は、[Yes] をクリックします。
- [OVF Template Details] ページで、[Next] をクリックします。
- NetScaler Console 仮想アプライアンスの名前を入力し、[Next] をクリックします。
-
シンプロビジョニング形式またはシックプロビジョニング形式のいずれかを選択して、ディスクフォーマットを指定します。
注
シックプロビジョニング形式を選択することをお勧めします。
-
[Finish] をクリックしてインストールプロセスを開始します。

- これで、NetScaler Console 仮想アプライアンスを起動する準備ができました。
-
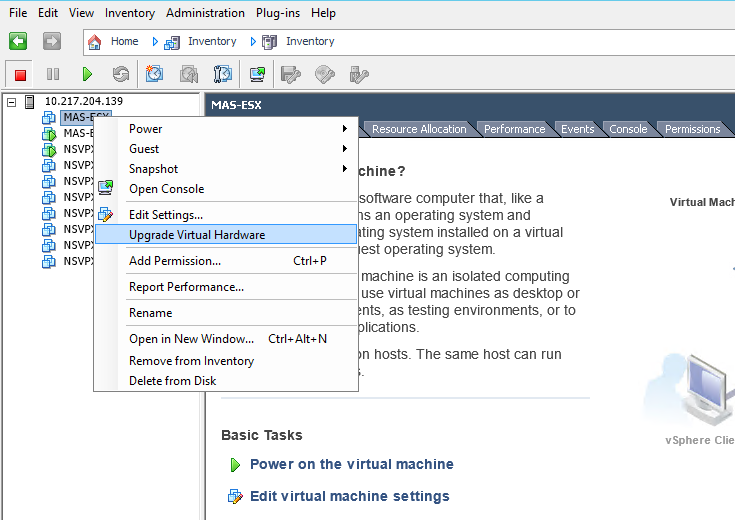
ナビゲーションペインで、インストールした仮想アプライアンスを選択します。[Inventory] メニューから [Virtual Machine] を右クリックし、[Upgrade Virtual Hardware] をクリックします。[Confirm Virtual Machine] ダイアログボックスで、[Yes] をクリックします。
- [Inventory] メニューで、[Virtual Machine] をクリックし、[Edit Settings] をクリックします。
- [Virtual Machine Properties] ダイアログボックスの [Hardware] タブで、[Memory] をクリックし、右ペインで [Memory Size] を 32 GB に指定します。
- [CPUs] をクリックし、右ペインで CPU を 8 に指定します。[OK] をクリックします。
-
要件に応じて追加ディスクを追加します。

- ナビゲーションペインで、インストールした仮想アプライアンスを選択します。[Inventory] メニューから [Virtual Machine] をクリックし、[Power] をクリックして、[Power On] をクリックします。
-
[Console] タブをクリックして、NetScaler Console の初期ネットワーク構成オプションを表示します。

- 必要な IP アドレスを指定した後、構成設定を保存します。
-
プロンプトが表示されたら、nsrecover/nsroot 資格情報を使用してログオンします。

注
ログオン後、初期ネットワーク構成を更新する場合は、「
networkconfig」と入力して構成を更新し、構成を保存します。 -
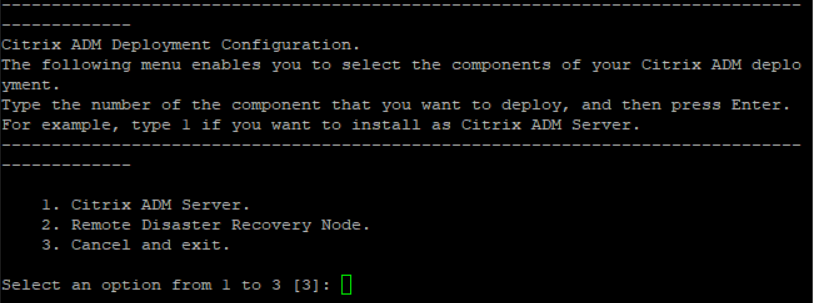
シェルプロンプトでコマンドを入力して、デプロイスクリプトを実行します。
deployment_type.py
<!--NeedCopy-->
-
デプロイタイプとして NetScaler Console Server を選択します。オプションを選択しない場合、デフォルトでサーバーとしてデプロイされます。
- NetScaler Console をスタンドアロンデプロイとして展開するには、「Yes」と入力します。
-
NetScaler Console サーバーを再起動するには、「Yes」と入力します。
注
NetScaler Console をインストールした後、初期構成設定を後で更新できます。
検証
サーバーがインストールされたら、ブラウザーに NetScaler Console サーバーの IP アドレスを入力して GUI にアクセスできます。サーバーにログオンするためのデフォルトの管理者資格情報は nsroot/nsroot です。
ブラウザーに NetScaler Console 構成ユーティリティが表示されます。
注
通常、NetScaler Console のインストール時間は VMware ESXi で約 10 分ですが、一部のシステムではさらに時間がかかる場合があります。
共有
共有
この記事の概要
This Preview product documentation is Cloud Software Group Confidential.
You agree to hold this documentation confidential pursuant to the terms of your Cloud Software Group Beta/Tech Preview Agreement.
The development, release and timing of any features or functionality described in the Preview documentation remains at our sole discretion and are subject to change without notice or consultation.
The documentation is for informational purposes only and is not a commitment, promise or legal obligation to deliver any material, code or functionality and should not be relied upon in making Cloud Software Group product purchase decisions.
If you do not agree, select I DO NOT AGREE to exit.