Adding instances
You can add instances either while setting up the NetScaler Console for the first time or later.
Instances are NetScaler appliances or virtual appliances that you want to discover, manage, and monitor from NetScaler Console. You can add the following NetScaler appliances and virtual appliances to NetScaler Console:
- NetScaler MPX
- NetScaler VPX
- NetScaler SDX
- NetScaler CPX
- NetScaler BLX
- NetScaler Gateway
- Citrix Secure Web Gateway™
To add instances, you must specify either the host name or IP address of each NetScaler instance, or a range of IP addresses.
Specify an instance profile that NetScaler Console can use to access the instance. This instance profile contains the user name and password of the instances that you want to add to the service. For each instance type, a default profile is available. For example, the ns-root-profile is the default profile for NetScaler instances. The default NetScaler administrator credentials define this profile. If you have changed the default admin credentials of your instances, you can define custom instance profiles for those instances. If you change the credentials of an instance after the instance is discovered, you must edit the instance profile or create a profile, and then rediscover the instance.
You can access the GUIs of NetScaler instances from the NetScaler Console after adding the instances in the NetScaler Console. To access the NetScaler instances from the NetScaler Console, you must be connected to the Citrix network.
Note
To add NetScaler instances configured in a cluster, you must specify either the cluster IP address or any one of the individual nodes in the cluster setup. However, on NetScaler Console, the cluster IP address represents the cluster.
For the NetScaler instances set up as an HA pair, when you add one instance, the other instance in the pair is automatically added.
To make sure that the NetScaler user has all the privileges, assign superuser permissions to the user in NetScaler. For more information, see User, user groups, and command policies
How to create a NetScaler® profile
NetScaler profile contains the user name, password, communication ports, and authentication types of the instances that you want to add to NetScaler Console. For each instance type, a default profile is available. For example, the nsroot is the default profile for NetScaler instances. The default profile is defined by using the default NetScaler administrator credentials. If you have changed the default admin credentials of your instances, you can define custom instance profiles for those instances. If you change the credentials of an instance after the instance is discovered, you must edit the instance profile or create a profile, and then rediscover the instance.
You can create a NetScaler profile from the Instance page or while adding or changing an instance.
Note:
Ensure to use the super administrator account to create an instance profile.
To create a NetScaler profile from the Instance page:
-
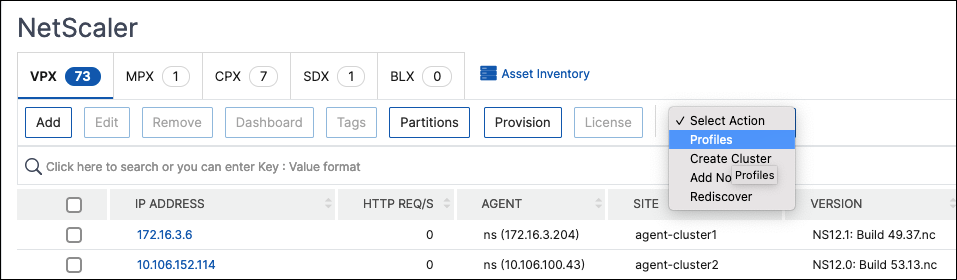
Navigate to Infrastructure > Instances.
-
Select an Instance. For example, NetScaler.
-
On the NetScaler page, under Select Action select Profiles.
-
On the Admin Profiles page, select Add.
-
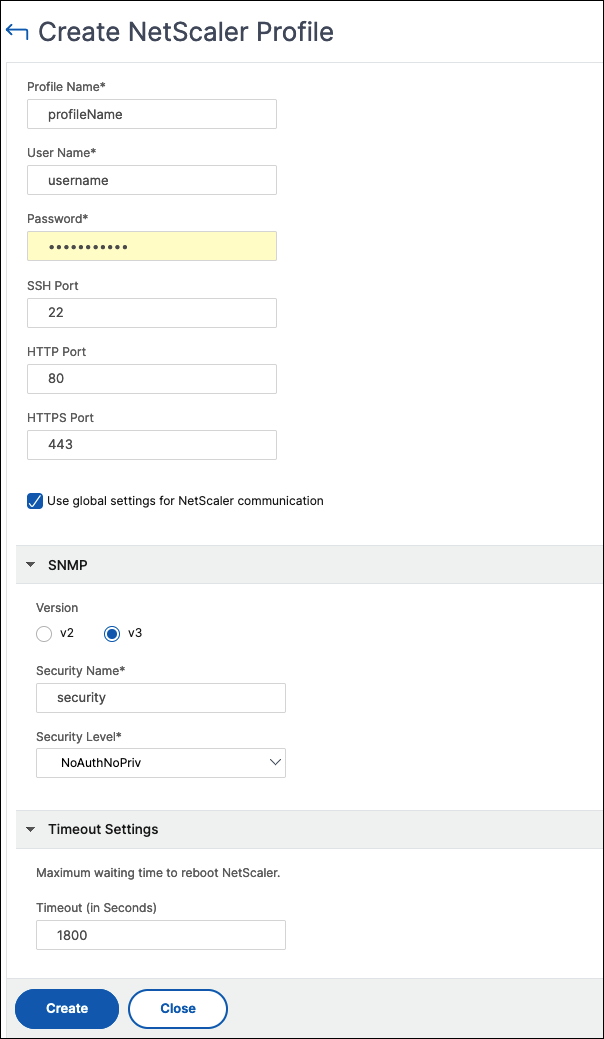
On the Create NetScaler Profile page, do the following:
-
Profile Name: Specify a profile name for the NetScaler instance.
-
User Name: Specify a user name to log on to the NetScaler instance.
-
Password: Specify a password to log on to the NetScaler instance.
-
SSH Port: Specify the port for SSH communication between NetScaler Console and the NetScaler instance.
-
HTTP Port: Specify the port for HTTP communication between NetScaler Console and the NetScaler instance.
Note:
The default HTTP port is 80. You can also specify the non-default or customized HTTP port that you might have configured in your NetScaler CPX instance. The customized HTTP port can be used for communication only between NetScaler Console and NetScaler CPX.
-
HTTPS Port: Specify the port for HTTPS communication between NetScaler Console and the NetScaler instance.
Note:
The default HTTPS port is 443. You can also specify the non-default or customized HTTPS port that you might have configured in your NetScaler CPX instance. The customized HTTPS port can be used for communication only between NetScaler Console and NetScaler CPX.
-
Use global settings for NetScaler communication: Select this option if you want to use the system settings for communication between NetScaler Console and NetScaler instance, otherwise select either HTTP or https.
-
SNMP Version: Select either SNMPv2 or SNMPv3 and do the following:
-
If you select SNMPv2, specify the Community name for authentication.
-
If you select SNMPv3, specify the Security Name and Security Level. Based on the security level, select the Authentication Type and Privacy Type.
Note:
For NetScaler SDX, only SNMPv2 is supported.
-
-
Timeout Settings: Specify the time that NetScaler Console must wait before sending a connection request to the NetScaler instance after a restart.
-
Select Create.
-
To add a NetScaler instance to NetScaler Console
Note
Perform this task to add all other NetScaler instances except the NetScaler CPX instance.
-
Navigate to Infrastructure > Instances > NetScaler. Under Instances, select the type of instance you want to add (for example, NetScaler VPX) and click Add.
-
Select one of the following options:
-
Enter Device IP address - For NetScaler instances, specify any one of the following:
- Host name
- IP address or NAT IP of each NetScaler instance
-
Range of IP addresses
For example, enter one or more host names, IP addresses or NAT IP, and/or a range of IP addresses (for example, 10.10.20.10-10.10.20.45) using a comma separator. Input format for the discovery of NAT HA instances is 10.10.20.10#10.10.20.32 (NAT IP address of both NetScaler HA instances).
-
Import from file - From your local system, upload a text file that contains the IP addresses of all the instances you want to add.
-
-
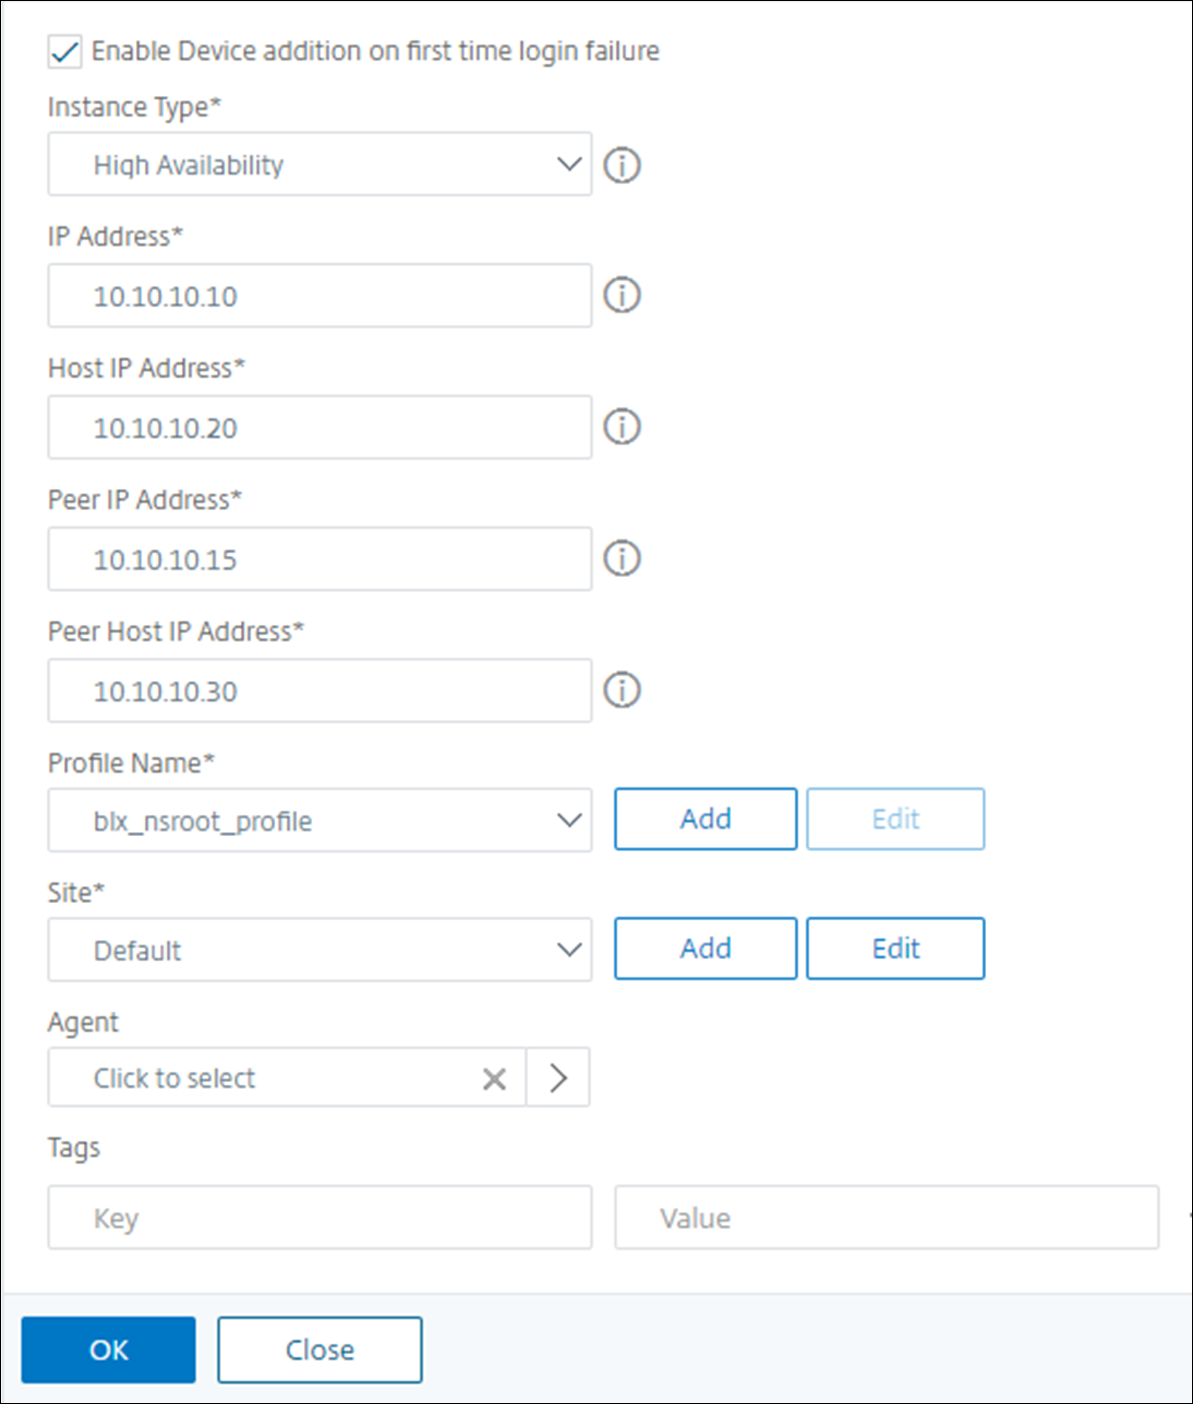
(Optional) Select Enable Device addition on first time login failure. With this option, you can add the instance even without valid credentials.
-
From Profile Name, select the appropriate instance profile, or create a profile by clicking the + icon.
-
From Site, select the site where you want the instance to be added.
-
From Agent, select the agent with which you want to associate the instances, and then click OK.
If there is only one agent configured on your NetScaler Console, that agent is selected by default.

To add NetScaler CPX instance in NetScaler Console
-
Navigate to Infrastructure > Instances. Under Instances, select NetScaler and select the CPX tab.
-
Click Add.
-
Select one of the following options:
-
Enter Device IP address. Specify either the host name or IP address of each instance, or a range of IP addresses.
-
Import from file. From your local system, upload a text file that contains the IP addresses of all the instances you want to add.
-
-
(Optional) Select Enable Device addition on first time login failure. With this option, you can add the instance even without valid credentials.
-
In the Routable IP/Docker IP field, enter the IP address. The IP address can be either the NetScaler CPX instance (if it is reachable) or the Docker host.
-
In the Profile Name field, select the appropriate instance profile, or create a profile by clicking the + icon.
Note
When you are creating a profile, ensure to specify the HTTP, HTTPS, SSH, and SNMP port details of the host. You can also specify the range of ports that are published by the host in the Start Port and Number of ports field.
-
As an option, select the site where you want to deploy the CPX instance. You can create a site also by clicking Add.
-
If available, select the agent from the list of agents.
-
Click OK to initiate the process of adding instances to NetScaler Console.
Note
If you want to rediscover an instance, perform the following steps:
- Navigate to Infrastructure > Instances > NetScaler > CPX.
- Select the instance you want to rediscover.
- From the Select Action list, click Rediscover.
To add a standalone NetScaler BLX instance in NetScaler Console
A standalone NetScaler BLX instance is a single instance that is running on the dedicated host Linux server.
-
Navigate to Infrastructure > Instances > NetScaler.
-
In the BLX tab, click Add.
-
(Optional) Select Enable Device addition on first time login failure. With this option, you can add the instance even without valid credentials.
-
Select the Standalone option from the Instance Type list.
-
In the IP address field, specify the IP address of the BLX instance.
-
In the Host IP address field, specify the IP address of the Linux server where the BLX instance is hosted.
-
In the Profile Name list, select the appropriate profile for a BLX instance, or create a profile.
To create a profile, click Add.
Important
Ensure you have specified the correct host user name and password of the Linux server in the profile.
-
In the Site list, select the site where you want to add an instance.
If you want to add a site, click Add.
-
In the Agent list, select the agent to which you want to associate the instance.
If there is only one agent configured on your NetScaler Console, that agent is selected by default.
-
Click OK.

To add high-availability NetScaler BLX instances in NetScaler Console
The high-availability NetScaler BLX instances that run on different host Linux servers. A Linux server cannot host more than one BLX instances.
-
In the BLX tab, click Add.
-
(Optional) Select Enable Device addition on first time login failure. With this option, you can add the instance even without valid credentials.
-
Select the High Availability option from the Instance Type list.
-
In the IP address field, specify the IP address of the BLX instance.
-
In the Host IP address field, specify the IP address of the Linux server where the BLX instance is hosted.
-
In the Peer IP address field, specify the IP address of the peer BLX instance.
-
In the Peer Host IP address field, specify the IP address of the Linux server where the peer BLX instance is hosted.
-
In the Profile Name list, select the appropriate profile for a BLX instance, or create a profile.
To create a profile, click Add.
Important
Ensure you have specified the correct host user name and password of the Linux server in the profile.
-
In the Site list, select the site where you want to add an instance.
If you want to add a site, click Add.
-
In the Agent list, select the agent to which you want to associate the instance.
If there is only one agent configured on your NetScaler Console, that agent is selected by default.
-
Click OK.
To access an instance GUI from the NetScaler Console
-
Navigate to Infrastructure > Instances > NetScaler.
-
Select the type of instance you want to access (for example, VPX, MPX, CPX, SDX, or BLX).
-
Click the required NetScaler IP address or host name.
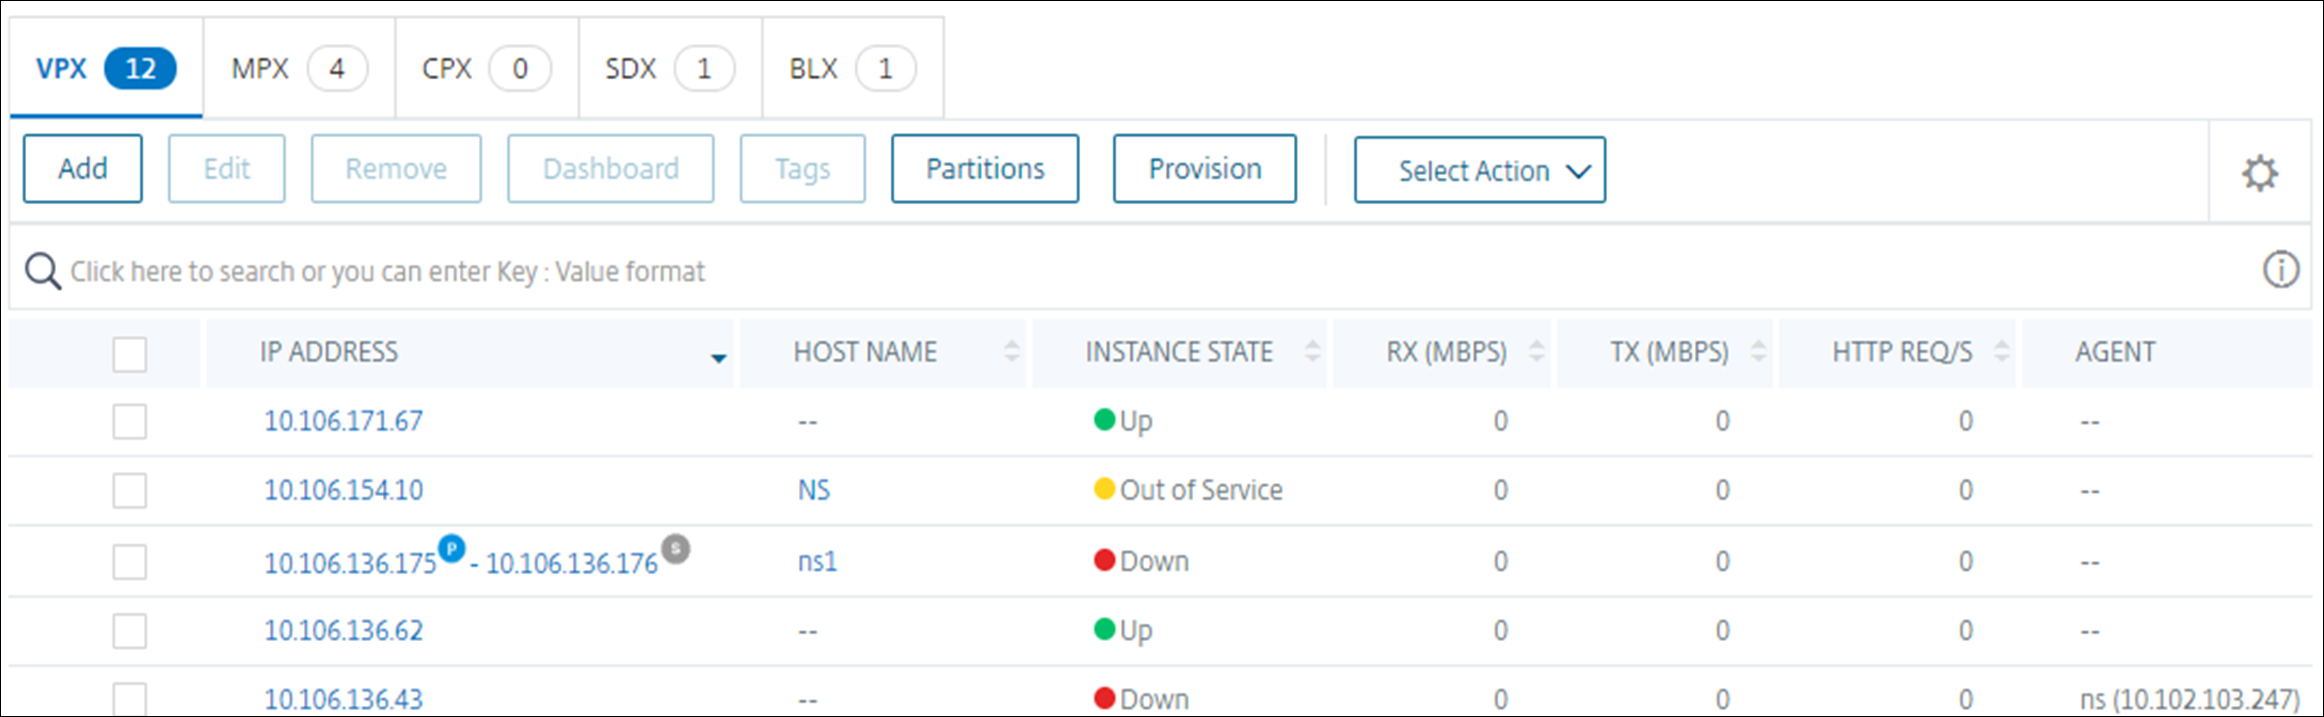
The instance IP addresses indicate the deployment type with the following notations:
-
In high-availability pair, P – Primary server and S – Secondary server.
-
C-Cluster
-
A-Autoscale™ Group
If an Instance has no notation, it indicates the standalone deployment.
The GUI of the selected instance appears in a pop-up window.
Resolve instance warnings
A warning sign appears on the instance for the following reasons:
-
Login failed - When you add an instance without valid credentials, it appears in DOWN state, with a Login failed warning. Specify the correct credentials to manage the instance in NetScaler Console.
If the instance is unlicensed, the License option appears when you select the instance. Click License to apply the license to an instance from the license pool.
-
Unlicensed instance with HTTPS profile - If an unlicensed instance uses only HTTPS connection, apply license to an instance from the NetScaler GUI.
In this article
- How to create a NetScaler® profile
- To add a NetScaler instance to NetScaler Console
- To add NetScaler CPX instance in NetScaler Console
- To add a standalone NetScaler BLX instance in NetScaler Console
- To add high-availability NetScaler BLX instances in NetScaler Console
- To access an instance GUI from the NetScaler Console