Configure role-based access control
NetScaler Console provides fine-grained, role-based access control (RBAC) with which you can grant access permissions based on the roles of individual users within your enterprise.
In NetScaler Console, all users are added in Citrix Cloud. As the first user of your organization, you must first create an account in Citrix Cloud and then log on to the NetScaler Console GUI with the Citrix Cloud credentials. You are granted the super admin role, and by default, you have all access permissions in NetScaler Console. Later you can create other users in your organization in Citrix Cloud.
Users who are created later and who log on to NetScaler Console as regular users are known as delegated admins. These users, by default, have all the permissions except user administration permissions. However, you can grant specific user administration permissions by creating appropriate policies and assigning them to these delegated users. The user administration permissions are at Settings > Users & Roles.
For more information on how to assign specific permissions, see How to Assign extra Permissions to Delegated Admin Users.
More information on how to create policies, roles, groups, and how to bind the users to groups is provided in the following sections.
Example:
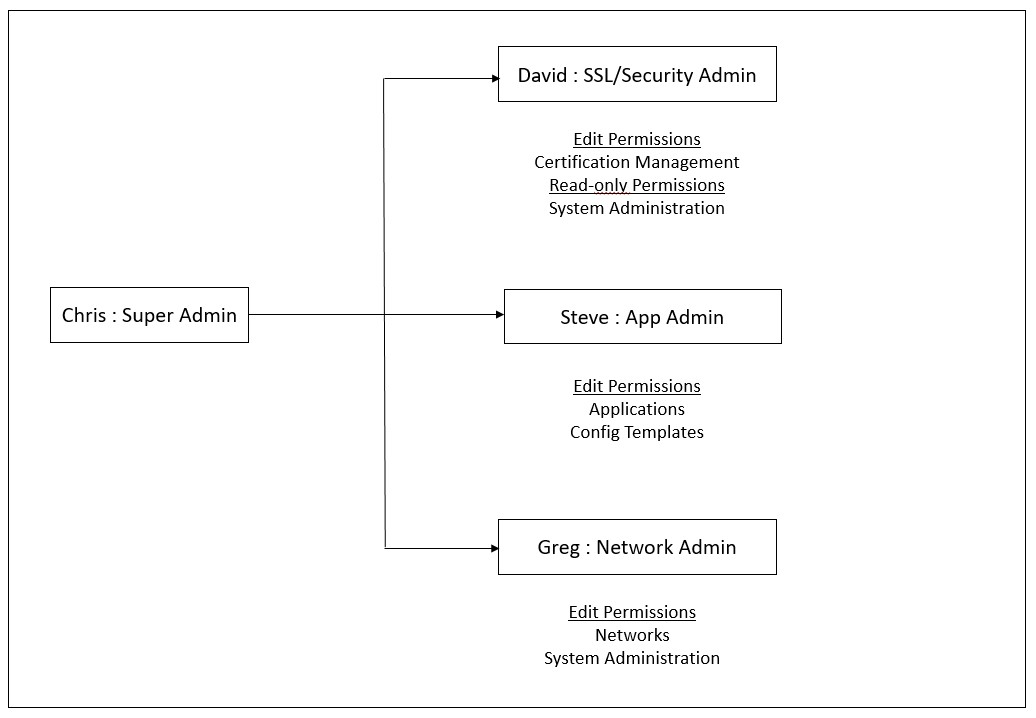
The following example illustrates how RBAC can be achieved in NetScaler Console.
Chris, the NetScaler group head, is the super administrator of NetScaler Console in his organization. He creates three administrator roles: security administrator, application administrator, and network administrator.
- David, the security admin, must have complete access for SSL Certificate management and monitoring but must have read-only access for system administration operations.
- Steve, an application admin, needs access to only specific applications and only specific configuration templates.
- Greg, a network admin, needs access to system and network administration.
- Chris also must provide RBAC for all users, irrespective of the fact that they are local or external.
The following image shows the permissions that the administrators and other users have and their roles in the organization.
To provide role-based access control to his users, Chris must first add users in Citrix Cloud and only after that he can see the users in NetScaler Console. Chris must create access policies for each of the users depending on their role. Access policies are tightly bound to roles. So, Chris must also create roles, and then he must create groups as roles can be assigned to groups only and not to individual users.
Access is the ability to perform a specific task, such as view, create, modify, or delete a file. Roles are defined according to the authority and responsibility of the users within the enterprise. For example, one user might be allowed to perform all network operations, while another user can observe the traffic flow in applications and help in creating configuration templates.
Policies determine the user roles. After creating policies, you can create roles, bind each role to one or more policies, and assign roles to users. You can also assign roles to groups of users. A group is a collection of users who have permissions in common. For example, users who are managing a particular data center can be assigned to a group. A role is an identity granted to users by adding them to specific groups based on specific conditions. In NetScaler Console, creating roles and policies are specific to the RBAC feature in NetScaler. Roles and policies can be easily created, changed, or discontinued as the needs of the enterprise evolve, without having to individually update the privileges for every user.
Roles can be feature based or resource based. For example, consider an SSL/security administrator and an application administrator. An SSL/security administrator must have complete access to SSL Certificate management and monitoring features, but must have read-only access for system administration operations. Application administrators are able to access only the resources within their scope.
Therefore, in your role as Chris, the super admin, perform the following example tasks in NetScaler Console to configure access policies, roles, and user groups for David who is the security admin in your organization.
Configure Users on NetScaler Console
As a super admin, you can create more users by configuring accounts for them in Citrix Cloud and not in NetScaler Console. When the new users are added to NetScaler Console, you can only define their permissions by assigning the appropriate groups to the user.
To add new users in Citrix Cloud™:
-
In the NetScaler Console GUI, click the Hamburger icon at the top left, and select Identity and Access Management.

-
On the Identity and Access Management page, select the Administrators tab.
This tab lists the users that are created in Citrix Cloud.
-
Select the identity provider from the list.
-
Citrix Identity: Type the email address of the user that you want to add in NetScaler Console and click Invite.
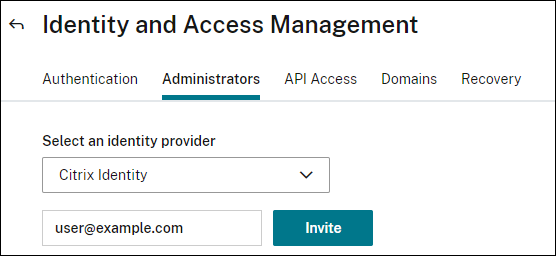
Note:
The user receives an email invite from Citrix Cloud. The user must click the link provided in the email to complete the registration process by providing their full name and password, and later log on to NetScaler Console using their credentials.
-
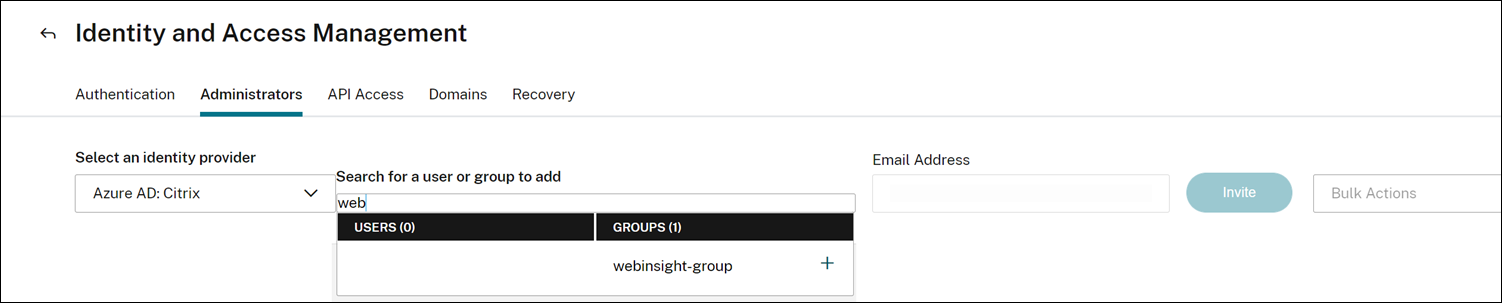
Azure Active Directory (AD): This option appears only if your Azure AD is connected to Citrix Cloud, see Connect Azure Active Directory to Citrix Cloud. When you select this option to invite users or groups, you can specify only Custom Access for the selected user or group. The users can log in to NetScaler Console using their Azure AD credentials. And, you don’t require to create a Citrix Identity for the users who are part of the selected Azure AD. If a user is added to the invited group, you don’t require to send an invite for the newly added user. This user can access NetScaler Console using the Azure AD credentials.
-
-
Select Custom access for the specified user or group.
-
Select Application Delivery Managment.
This option lists the user groups created in NetScaler Console. Select the group to which you want to add the user.
Citrix Identity Azure AD 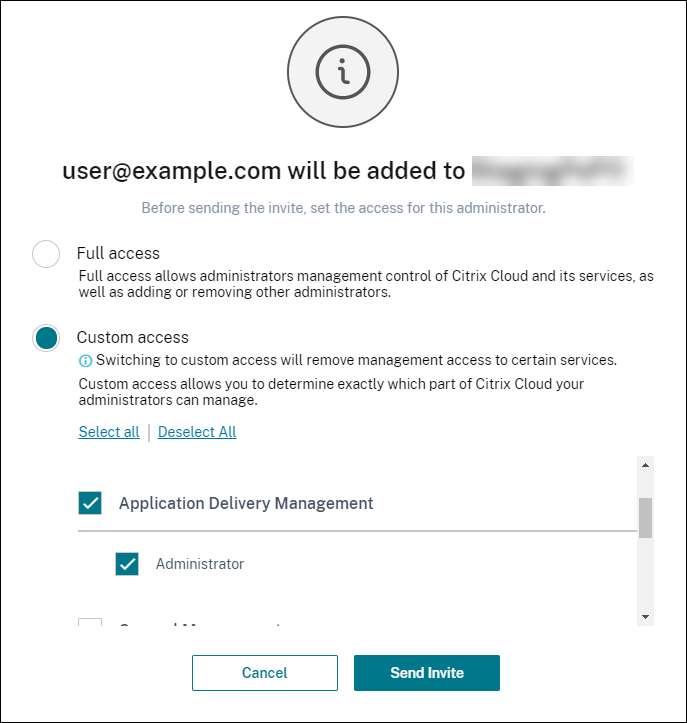
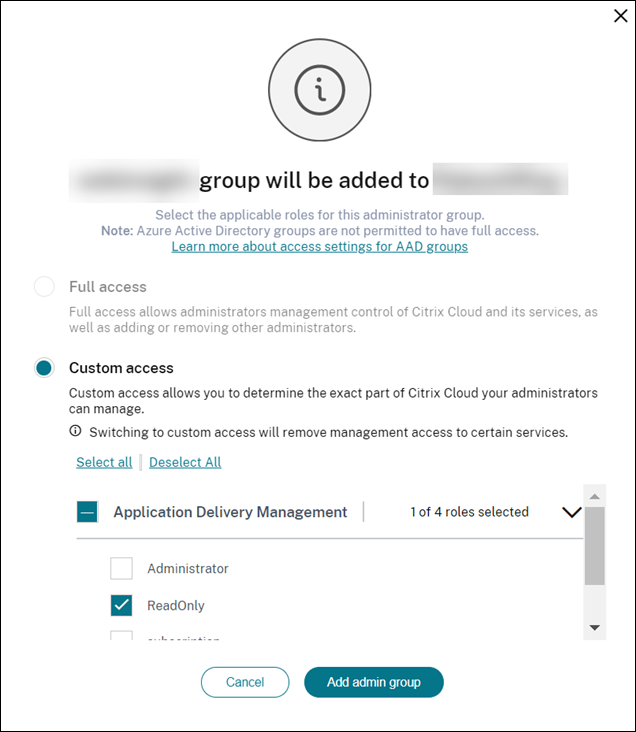
Click Send Invite. Click Add Admin group.
As an admin, you see the new user in the NetScaler Console Users list only after the user logs on to NetScaler Console.
To Configure Users in NetScaler Console:
-
In the NetScaler Console GUI, navigate to Settings > Users & Roles > Users.
-
The user is displayed on the Users page.
-
You can edit the privileges provided to the user by selecting the user and clicking Edit. You can also edit group permissions on the Groups page under the Settings node.
Note:
-
The users are added in NetScaler Console from the Citrix Cloud only. Therefore, even though you have admin permissions, you cannot add or delete users in the NetScaler Console GUI. You can only edit the group permissions. Users can be added or deleted from Citrix Cloud.
-
The user details appear on the service GUI only after the user has logged on to the NetScaler Console at least once.
-
Configure Access Policies on NetScaler Console
Access policies define permissions. A policy can be applied to a user group or to multiple groups by creating roles. Policies determine the user roles. After creating policies, you must create roles, bind each role to one or more policies, and assign roles to user groups. NetScaler Console provides five predefined access policies:
- admin_policy. Grants access to all NetScaler Console nodes. The user has both view and edit permissions, can view all NetScaler Console content, and can do all edit operations. That is, the user can add, modify, and delete operations on the resources.
- adminExceptSystem_policy. Grants access to users for all nodes in NetScaler Console GUI, except access to the Settings node.
- readonly_policy. Grants read-only permissions. The user can view all content on NetScaler Console but is not authorized to do any operations.
-
appadmin_policy. Grants administrative permissions for accessing the application features in NetScaler Console. A user bound to this policy can:
- Add, modify, and delete custom applications
- Enable or disable services, service groups, and the various virtual servers, such as content switching, and cache redirection
- appreadonly_policy. Grants read-only permission for application features. A user bound to this policy can view the applications, but cannot perform any add, modify, or delete, enable, or disable operations.
Though you cannot edit these predefined policies, you can create your own (user-defined) policies.
Earlier, when you assigned policies to roles and bound the roles to user groups, you can provide permissions for the user groups at node level in the NetScaler Console GUI. For example, you might only provide access permissions to the entire Load Balancing node. Your users had permission to access all entity-specific subnodes under Load Balancing (for example, virtual server, services, and others) or they did not have permission to access any node under Load Balancing.
In NetScaler Console 507.x build and later versions, the access policy management is extended to provide permissions for subnodes as well. Access policy settings can be configured for all subnodes such as virtual servers, services, service groups, and servers.
Currently, you can provide such a granular level access permission only for subnodes under a Load Balancing node and also for subnodes under the GSLB node.
For example, as an administrator, you might want to give the user an access permission for only to view virtual servers, but not the back end services, service groups, and application servers in the Load Balancing node. The users with such a policy assigned to them can access only the virtual servers.
To create user-defined access policies:
-
In the NetScaler Console GUI, navigate to Settings > Users & Roles > Access Policies.
-
Click Add.
-
On the Create Access Policies page, in the Policy Name field, enter the name of the policy, and enter the description in the Policy Description field.
The Permissions section lists of all NetScaler Console features, with options for specifying read-only, enable-disable, or edit access.
-
Click the (+) icon to expand each feature group into many features.
-
Select the permission checkbox next to the feature name to grant permission to the users.
-
View: This option allows the user to view the feature in NetScaler Console.
-
Enable-Disable: This option is available only for the Network Functions features that allow enable or disable action on NetScaler Console. The user can enable or disable the feature. The user can also perform the Poll Now action.
When you grant the Enable-Disable permission to a user, the View permission is also granted. You cannot deselect this option.
-
Edit: This option grants the full access to the user. The user can modify the feature and its functions.
If you grant the Edit permission, both View and Enable-Disable permissions are granted. You cannot deselect the auto-selected options.
If you select the feature checkbox, it selects all the permissions for the feature.
-
Note:
Expand Load Balancing and GSLB to view more configuration options.
In the following image, the configuration options of the Load Balancing feature have different permissions:
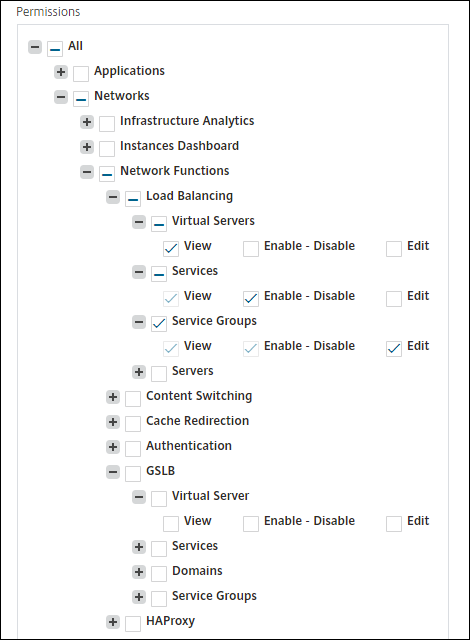
The View permission is granted to a user for the Virtual Servers feature. User can view the load balancing virtual servers in NetScaler Console. To view virtual servers, navigate to Infrastructure > Network Functions > Load Balancing and select the Virtual Servers tab.
The Enable-Disable permission is granted to a user for the Services feature. This permission also grants the View permission. The user can enable or disable the services bound to a load balancing virtual server. Also, the user can perform Poll Now action on services. To enable or disable services, navigate to Infrastructure > Network Functions > Load Balancing and select the Services tab.
Note:
If a user has the Enable-Disable permission, the enable or disable action on a service is restricted in the following page:
-
Navigate to Infrastructure > Network Functions.
-
Select a virtual server and click Configure.
-
Select the Load Balancing Virtual Server Service Binding page. This page displays an error message if you select Enable or Disable.
The Edit permission is granted to a user for the Service Groups feature. This permission grants the full access where View and Enable-Disable permissions are granted. User can modify the service groups that are bound to a load balancing virtual server. To edit service groups, navigate to Infrastructure > Network Functions > Load Balancing and select the Service Groups tab.
-
-
Click Create.
Note:
Selecting Edit might internally assign dependent permissions that are not shown as enabled in the Permissions section. For example, when you enable edit permissions for fault management, NetScaler Console internally provides permission for configuring a mail profile or for creating SMTP server setups, so that the user can send the report as a mail.
Grant StyleBook permissions to users
You can create an access policy to grant StyleBook permissions such as import, delete, download, and more.
Note:
The View permission is automatically enabled when you grant other StyleBook permissions.
Configure Roles on NetScaler Console
In NetScaler Console, each role is bound to one or more access policies. You can define one-to-one, one-to-many, and many-to-many relationships between policies and roles. You can bind one role to multiple policies, and you can bind multiple roles to one policy.
For example, a role might be bound to two policies, with one policy defining access permissions for one feature and the other policy defining access permissions for another feature. One policy might grant permission to add NetScaler instances in NetScaler Console, and the other policy might grant permission to create and deploy a StyleBook and to configure NetScaler instances.
When multiple policies define the edit and read-only permissions for a single feature, the edit permissions have priority over read-only permissions.
NetScaler Console provides five predefined roles:
-
admin_role. Has access to all NetScaler Console features. (This role is bound to
adminpolicy.) - adminExceptSystem_role. Has access to the NetScaler Console GUI except for the Settings permissions. (This role is bound to adminExceptSystem_policy)
-
readonly_role. Has read-only access. (This role is bound to
readonlypolicy.) - appAdmin_role. Has administrative access to only the application features in NetScaler Console. (This role is bound to appAdminPolicy).
- appReadonly_role. Has read-only access to the application features. (This role is bound to appReadOnlyPolicy.)
Though you cannot edit the predefined roles, you can create your own (user-defined) roles.
To create roles and assign policies to them:
-
In the NetScaler Console GUI, navigate to Settings > Users & Roles > Roles.
-
Click Add.
-
On Create Roles page, in the Role Name field, enter the name of the role, and provide the description in the Role Description field (optional.)
-
In the Policies section, add move one or more policies to the Configured list.
Note:
The policies are pre-fixed with a tenant ID (for example,
maasdocfour) that is unique to all tenants.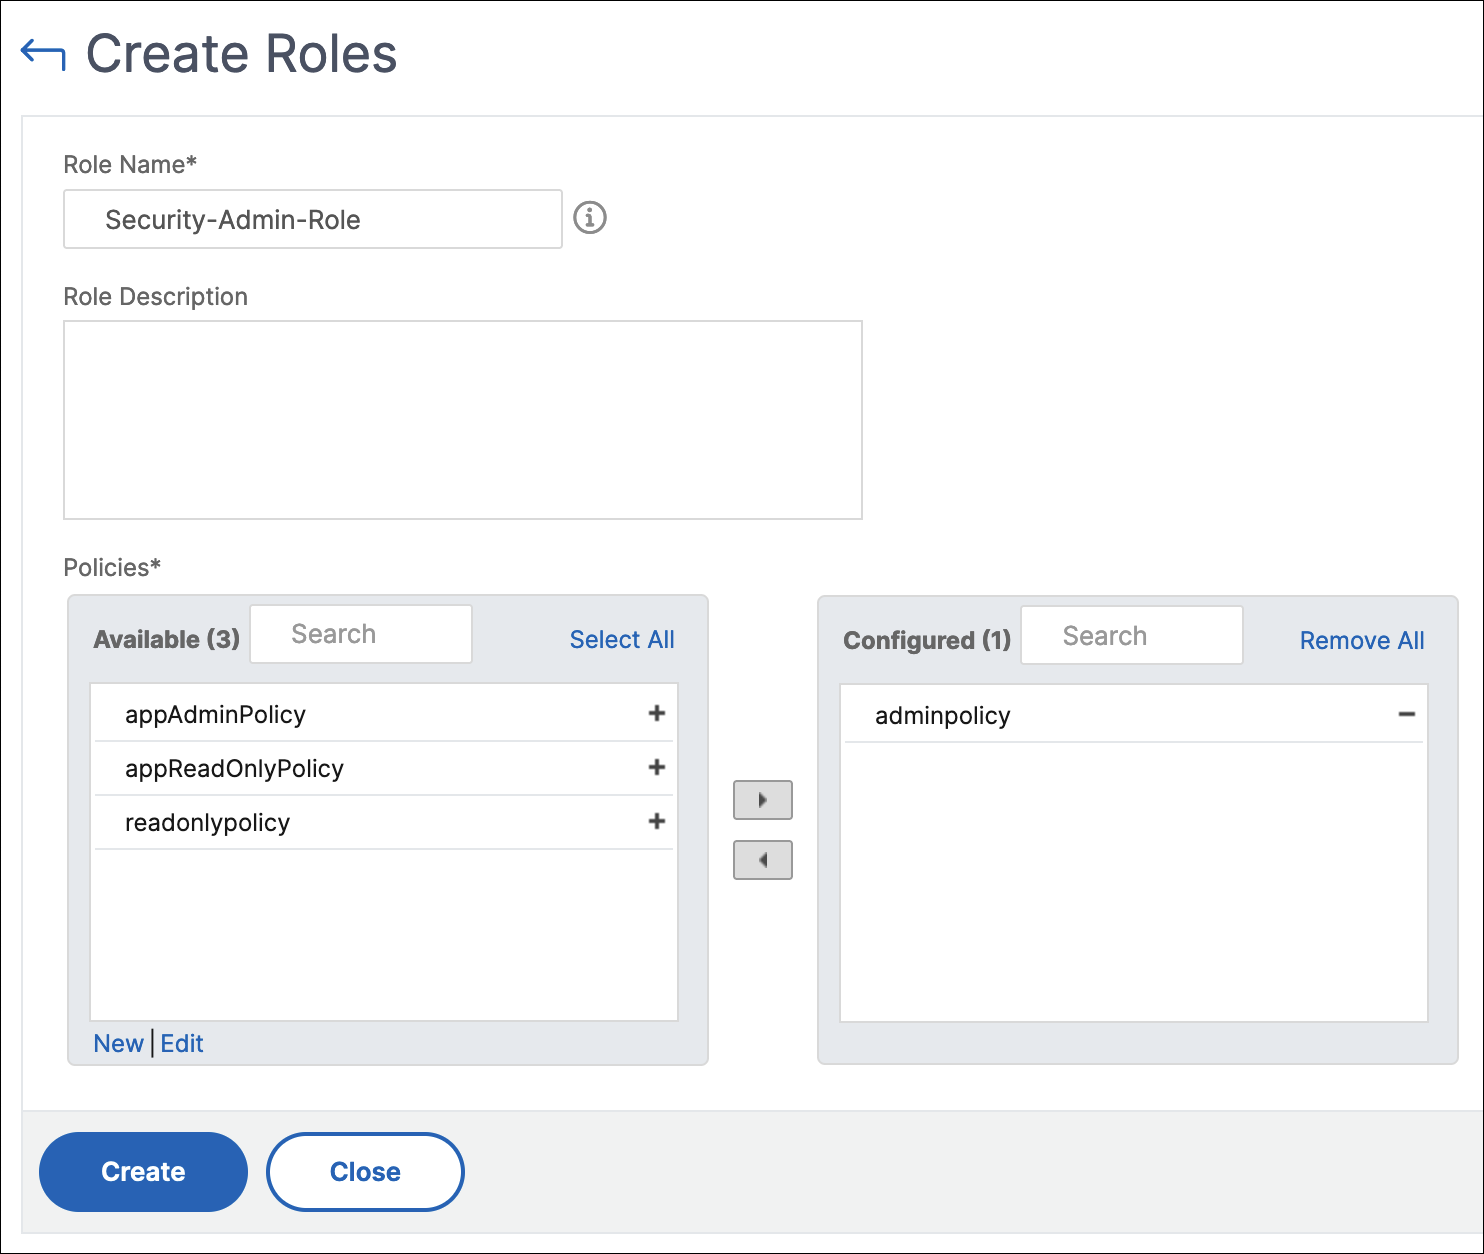
Note:
You can create an access policy by clicking New, or you can navigate to Settings > Users & Roles > Access Policies, and create policies.
-
Click Create.
Configure Groups on NetScaler Console
In NetScaler Console, a group can have both feature-level and resource-level access. For example, one group of users might have access to only selected NetScaler instances; another group with only a selected few applications, and so on.
When you create a group, you can assign roles to the group, provide application-level access to the group, and assign users to the group. All users in that group are assigned the same access rights in NetScaler Console.
You can manage a user access in NetScaler Console at the individual level of network function entities. You can dynamically assign specific permissions to the user or group at the entity level.
NetScaler Console treats virtual server, services, service groups, and servers as network function entities.
-
Virtual server (Applications) - Load Balancing(
lb), GSLB, Context Switching (CS), Cache Redirection (CR), Authentication (Auth), and NetScaler Gateway (vpn) - Services - Load balancing and GSLB services
- Service Group - Load balancing and GSLB service groups
- Servers - Load balancing Servers
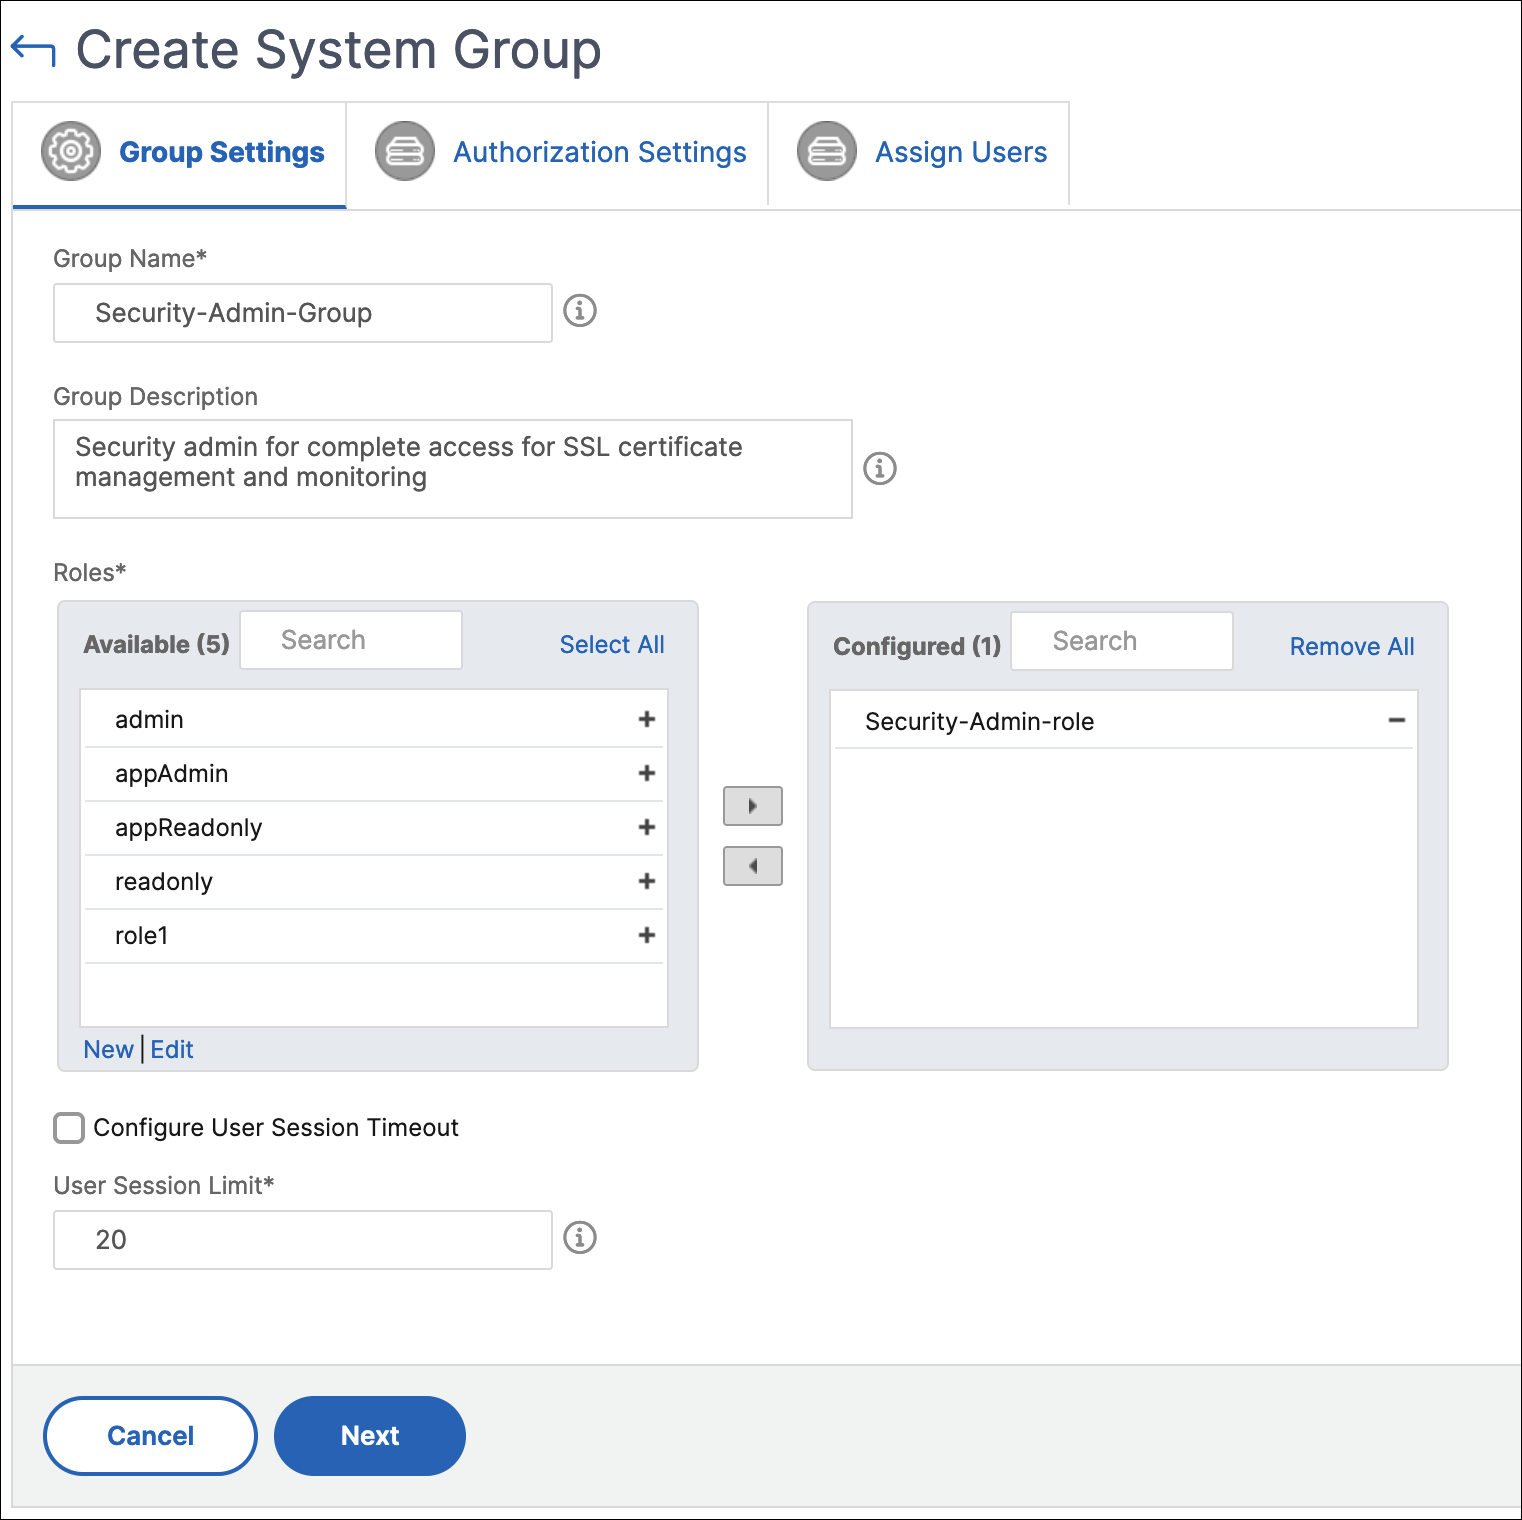
To create a group:
-
In NetScaler Console, navigate to Settings > Users & Roles > Groups.
-
Click Add.
The Create System Group page is displayed.
-
In the Group Name field, enter the name of the group.
-
In the Group Description field, type in a description of your group. Providing a good description helps you to understand the role and function of the group.
-
In the Roles section, move one or more roles to the Configured list.
Note:
The roles are pre-fixed with a tenant ID (for example,
maasdocfour) that is unique to all tenants. -
In the Available list, you can click New or Edit and create or modify roles.
Alternatively, you can navigate to Settings > Users & Roles > Users, and create or modify users.
-
Click Next.
-
In the Authorization Settings tab, you can choose resources from the following categories:
- Autoscale™ Groups
- Instances
- Applications
- Configuration Templates
- IPAM Providers and Networks
- StyleBooks
- Config Packs
- Domain Names
Select specific resources from the categories to which users can have access.
Autoscale Groups:
To select the specific Autoscale groups that a user can view or manage:
-
Clear the All AutoScale Groups checkbox and click Add AutoScale Groups.
-
Select the required Autoscale groups from the list and click OK.
Instances:
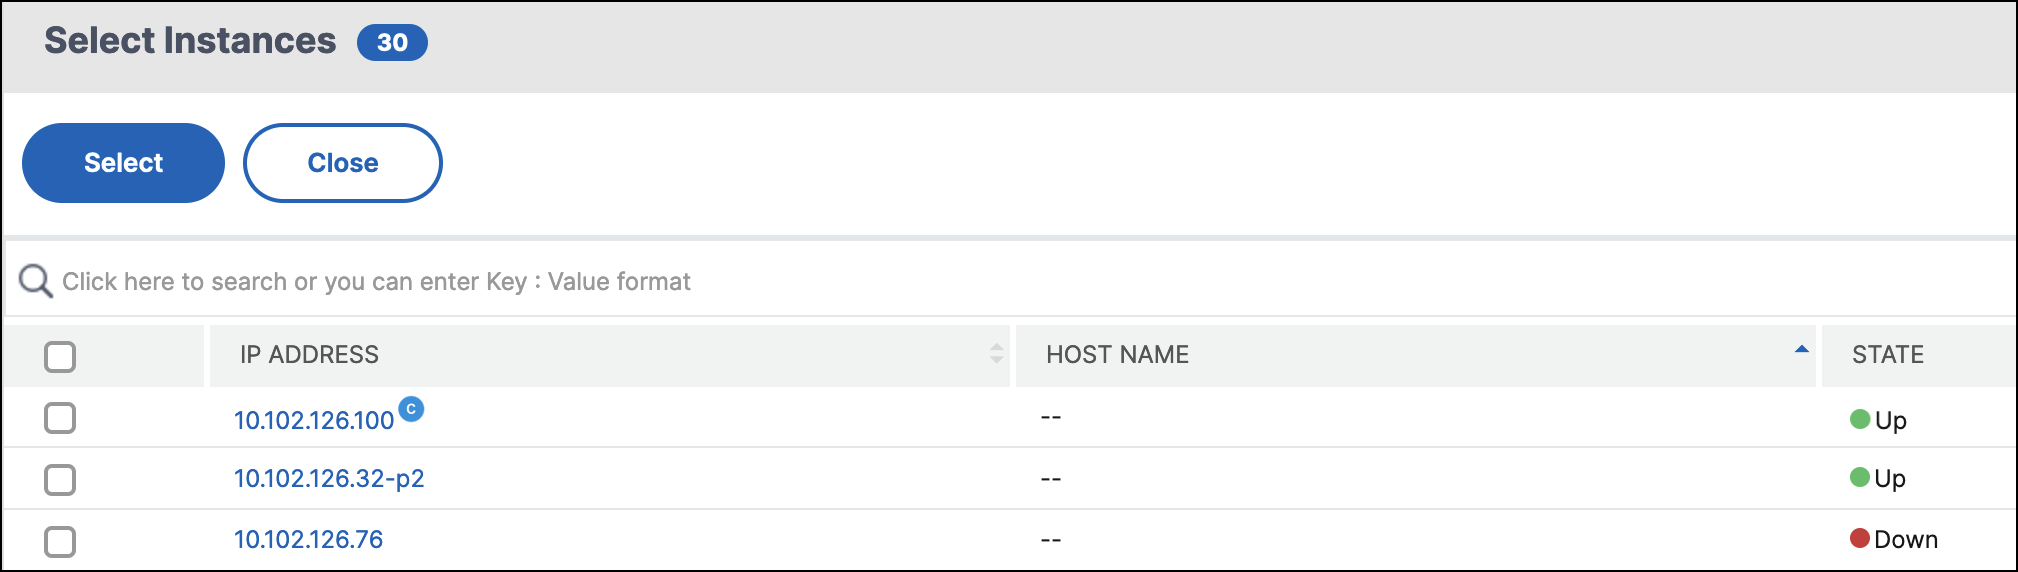
To select the specific instances that a user can view or manage:
-
Clear the All Instances checkbox and click Select Instances.
-
Select the required instances from the list and click OK.
Tags:
To authorize users to view or manage specific instances based on associated tags:
-
Clear the All Instances checkbox and click Select Tags.
-
Select the required tags from the list and click OK.
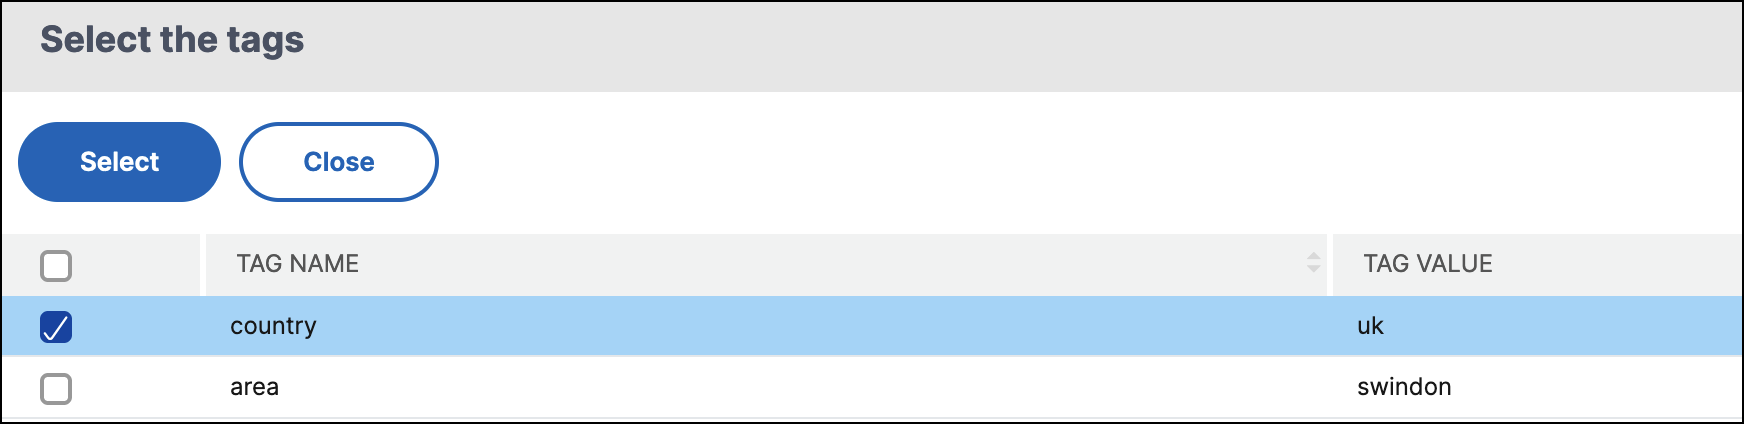
Later, as you associate more instances with the selected tags, the authorized users automatically gain access to the new instances.
For more information about tags and associating tags to instances, see How to create tags and assign to instances.
Applications:
The Choose Applications list allows you to grant access to a user for the required applications.
You can grant access to applications without selecting their instances. Because applications are independent of their instances to grant user access.
When you grant a user access to an application, the user is authorized to access only that application regardless of instance selection.
This list provides you the following options:
-
All Applications: This option is selected by default. It adds all the applications that are present in the NetScaler Console.
-
All Applications of selected instances: This option appears only if you select instances from the All Instances category. It adds all the applications present on the selected instance.
-
Specific Applications: This option allows you to add the required applications that you want users to access. Click Add Applications and select the required applications from the list.
-
Select Individual Entity Type: This option allows you to select the specific type of network function entity and corresponding entities.
You can either add individual entities or select all entities under the required entity type to grant access to a user.
The Apply on bound entities also option authorizes the entities that are bound to the selected entity type. For example, if you select an application and select Apply on bound entities also , NetScaler Console authorizes all the entities that are bound to the selected application.
Note:
Ensure you have selected only one entity type if you want to authorize bound entities.
You can use regular expressions to search and add the network function entities that meet the regex criteria for the groups. The specified regex expression is persisted in NetScaler Console. To add a regular expression, perform the following steps:
-
Click Add Regular Expression.
-
Specify the regular expression in the text box.
The following image explains how to use a regular expression to add an application when you select the Specific Applications option:

The following image explains how to use a regular expression to add network function entities when you choose the Select the Individual Entity Type option:
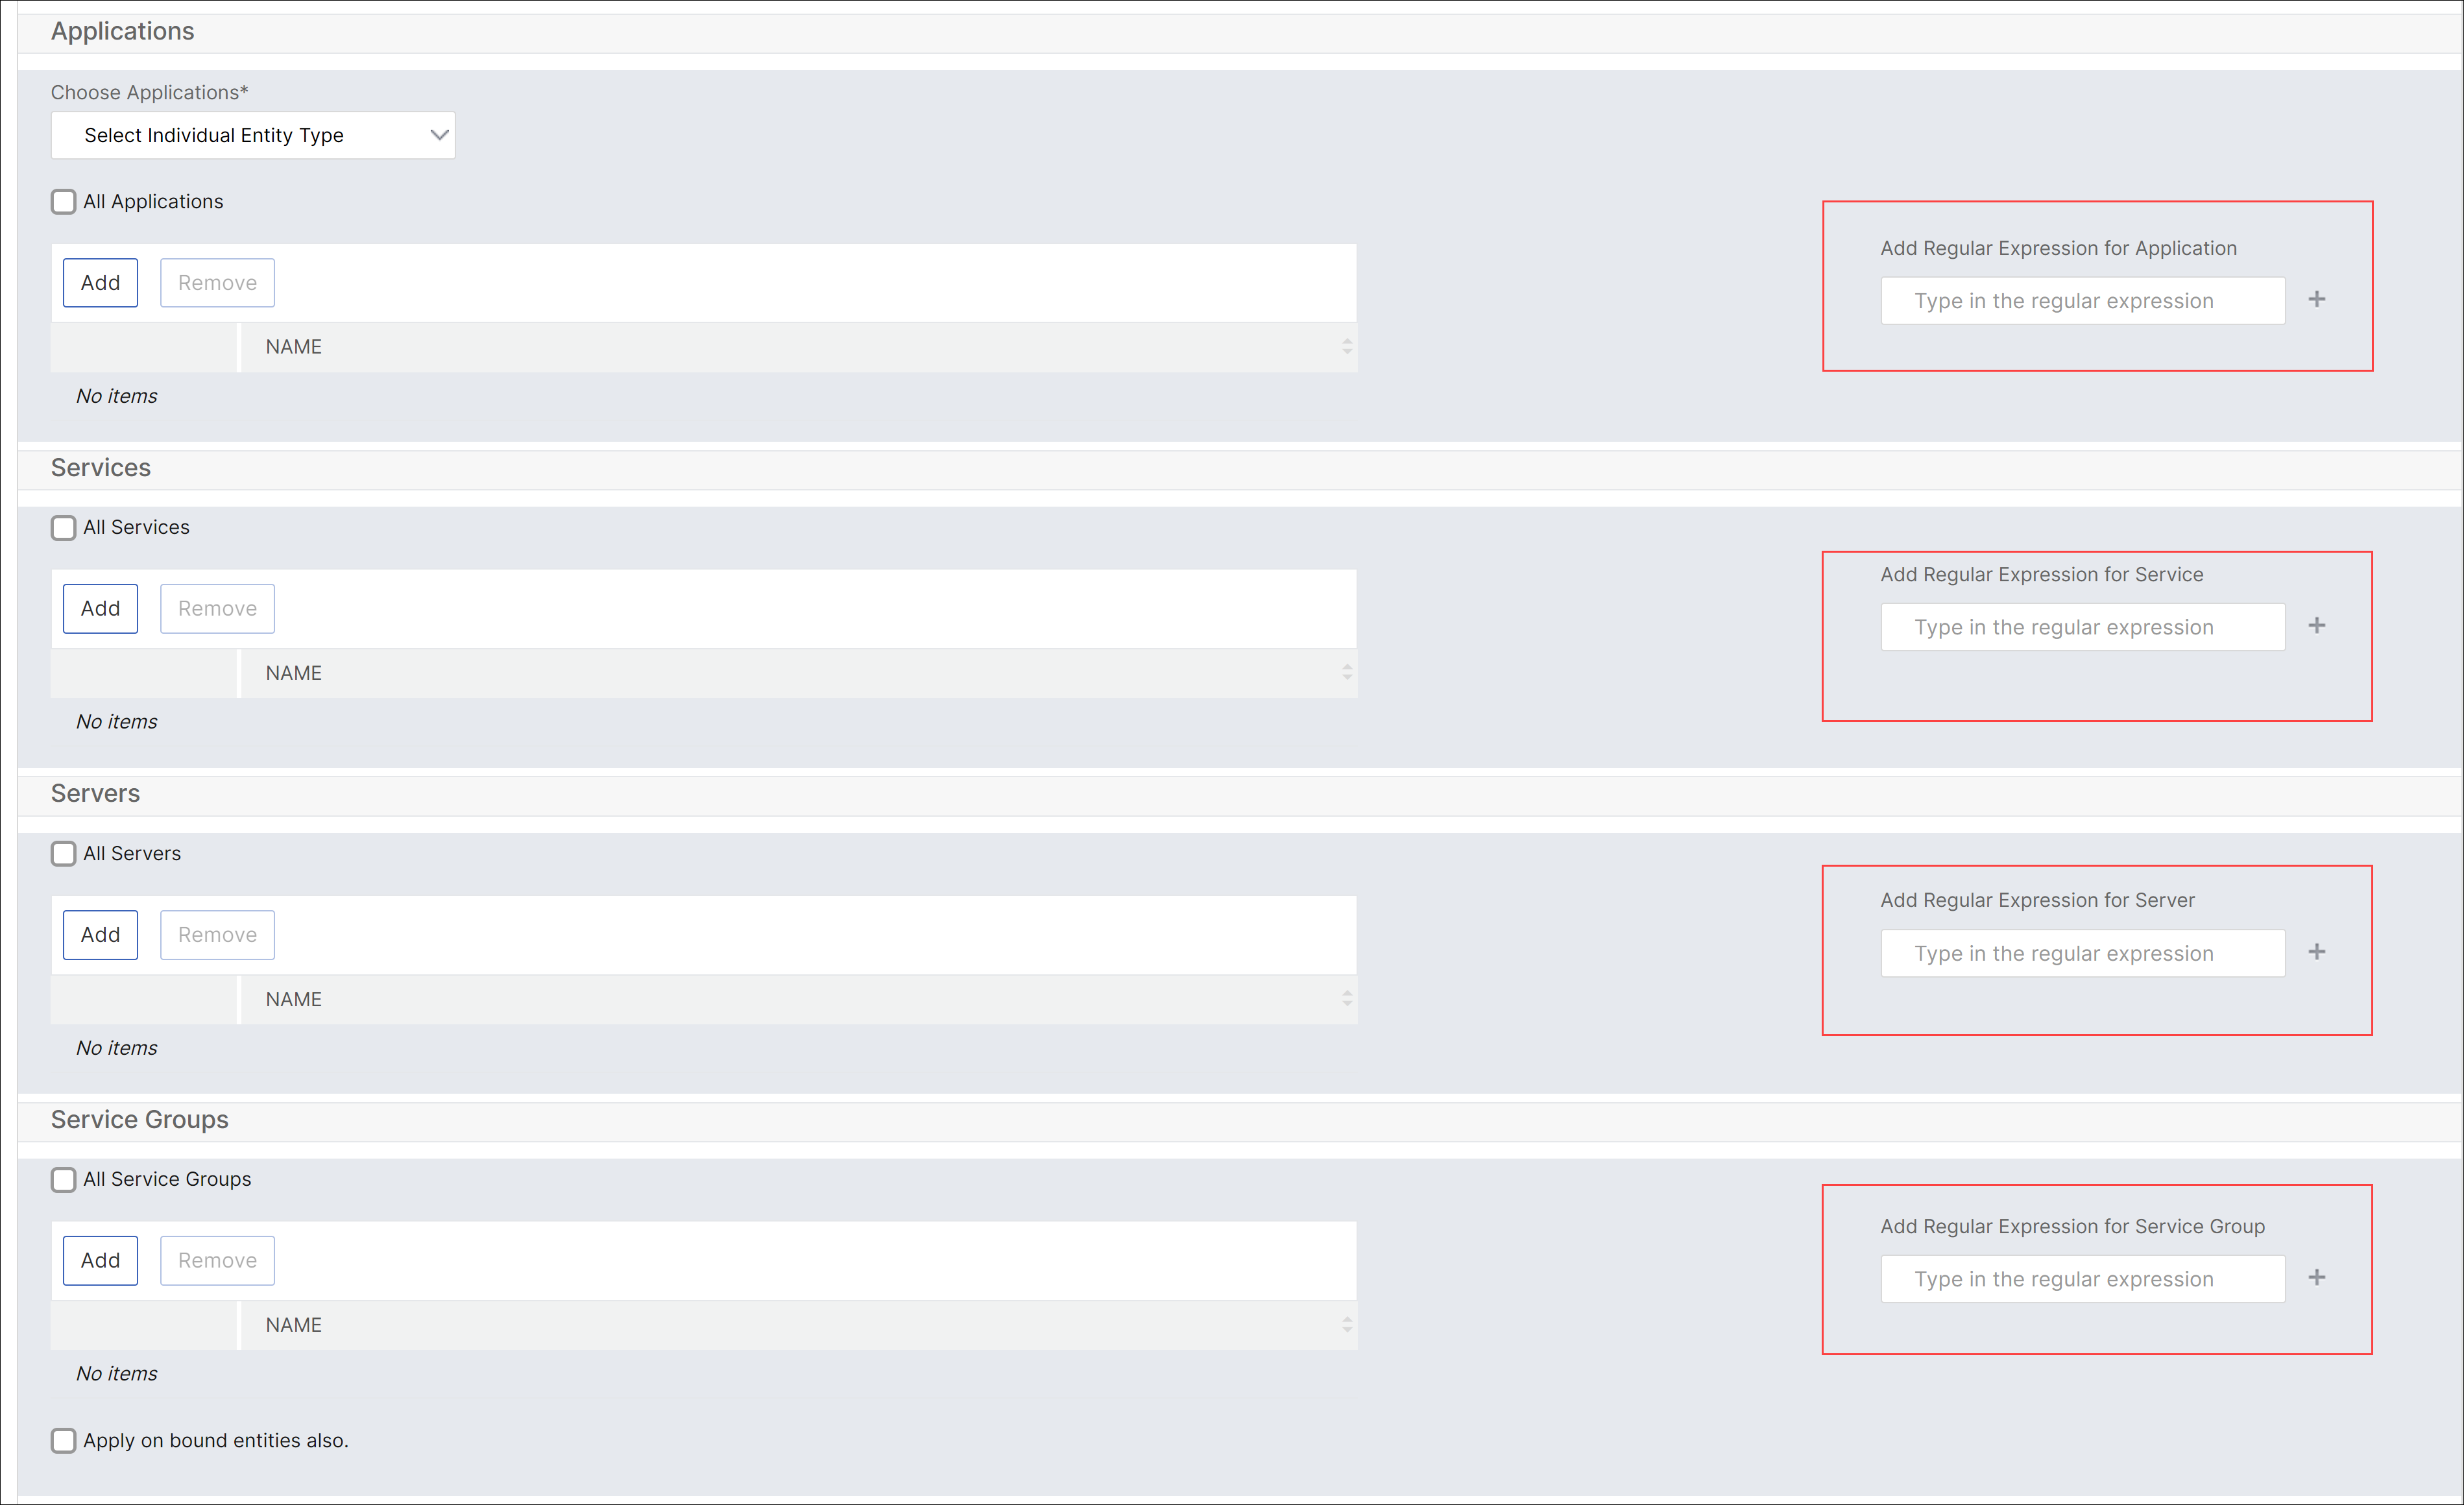
If you want to add more regular expressions, click the + icon.
Note:
The regular expression only matches the server name for the Servers entity type and not the server IP address.
If you select the Apply on bound entities also option for a discovered entity, a user can automatically access the entities that are bound to the discovered entity.
The regular expression is stored in the system to update the authorization scope. When the new entities match the regular expression of their entity type, NetScaler Console updates the authorization scope to the new entities.
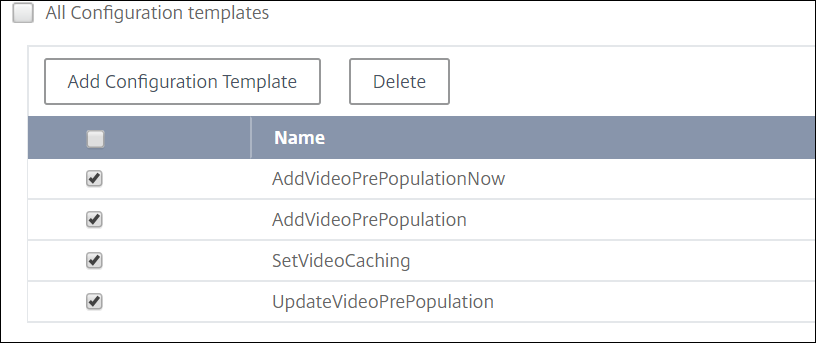
Configuration Templates:
If you want to select the specific configuration template that a user can view or manage, do the following steps:
-
Clear All Configuration templates and click Add Configuration Template.
-
Select the required template from the list and click OK.
IPAM Providers and Networks:
If you want to add the specific IPAM providers and networks that a user can view or manage, perform the following:
-
Add providers - Clear All Providers and click Add Providers. You can select the required providers and click OK.
-
Add networks - Clear All Networks and click Add Networks. You can select the required networks and click OK.
StyleBooks:
If you want to select the specific StyleBook that a user can view or manage, do the following steps:
-
Clear the All StyleBooks checkbox and click Add StyleBook to Group. You can either select individual StyleBooks or specify a filter query to authorize StyleBooks.
If you want to select the individual StyleBooks, select the StyleBooks from the Individual StyleBooks pane and click Save Selection.
If you want to use a query to search StyleBooks, select the Custom Filters pane. A query is a string of key-value pairs where keys are
name,namespace, andversion.You can also use regular expressions as values to search and add StyleBooks that meet the regex criteria for the groups. A custom filter query to search StyleBooks supports both
AndandOroperation.Example:
name=lb-mon|lb AND namespace=com.citrix.adc.stylebooks AND version=1.0
<!--NeedCopy-->
This query lists the StyleBooks that meet the following conditions:
- StyleBook name is either
lb-monorlb. - StyleBook namespace is
com.citrix.adc.stylebooks. - StyleBook version is
1.0.
Use an
Oroperation between value expressions that is defined to the key expression.Example:
- The
name=lb-mon|lbquery is valid. It returns the StyleBooks having a name eitherlb-monorlb. - The
name=lb-mon | version=1.0query is invalid.
Press
Enterto view the search results and click Save Query.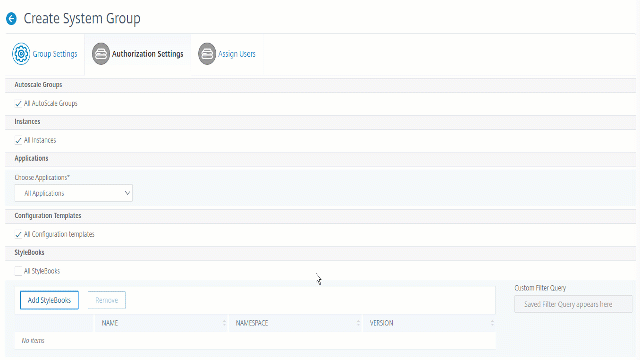
The saved query appears in the Custom Filters Query. Based on the saved query, the NetScaler Console provides user access to those StyleBooks.
- StyleBook name is either
-
Select the required StyleBooks from the list and click OK.
You can select the required StyleBooks when you create groups and add users to that group. When your user selects the permitted StyleBook, all dependent StyleBooks are also selected.
Config packs:
In the config packs, select one of the following options:
-
All Configurations: This option is selected by default. It allows users to manage all the configurations in ADM.
-
All Configurations of the selected StyleBooks: This option adds all the config packs of the selected StyleBook.
-
Specific Configurations: This option allows you to add specific configurations of any StyleBook.
-
All Configurations created by the user group: This option allows users to access only configurations created by users of the same group.
You can select the applicable config packs when you create groups and assign users to that group.
Domain Names:
If you want to select the specific domain name that a user can view or manage, perform the following steps:
-
Clear the All Domain Names checkbox and click Add Domain Name.
-
Select the required domain names from the list and click OK.
-
Click Create Group.
-
In the Assign Users section, select the user in the Available list, and add the user to the Configured list.
Note:
You can also add new users by clicking New.
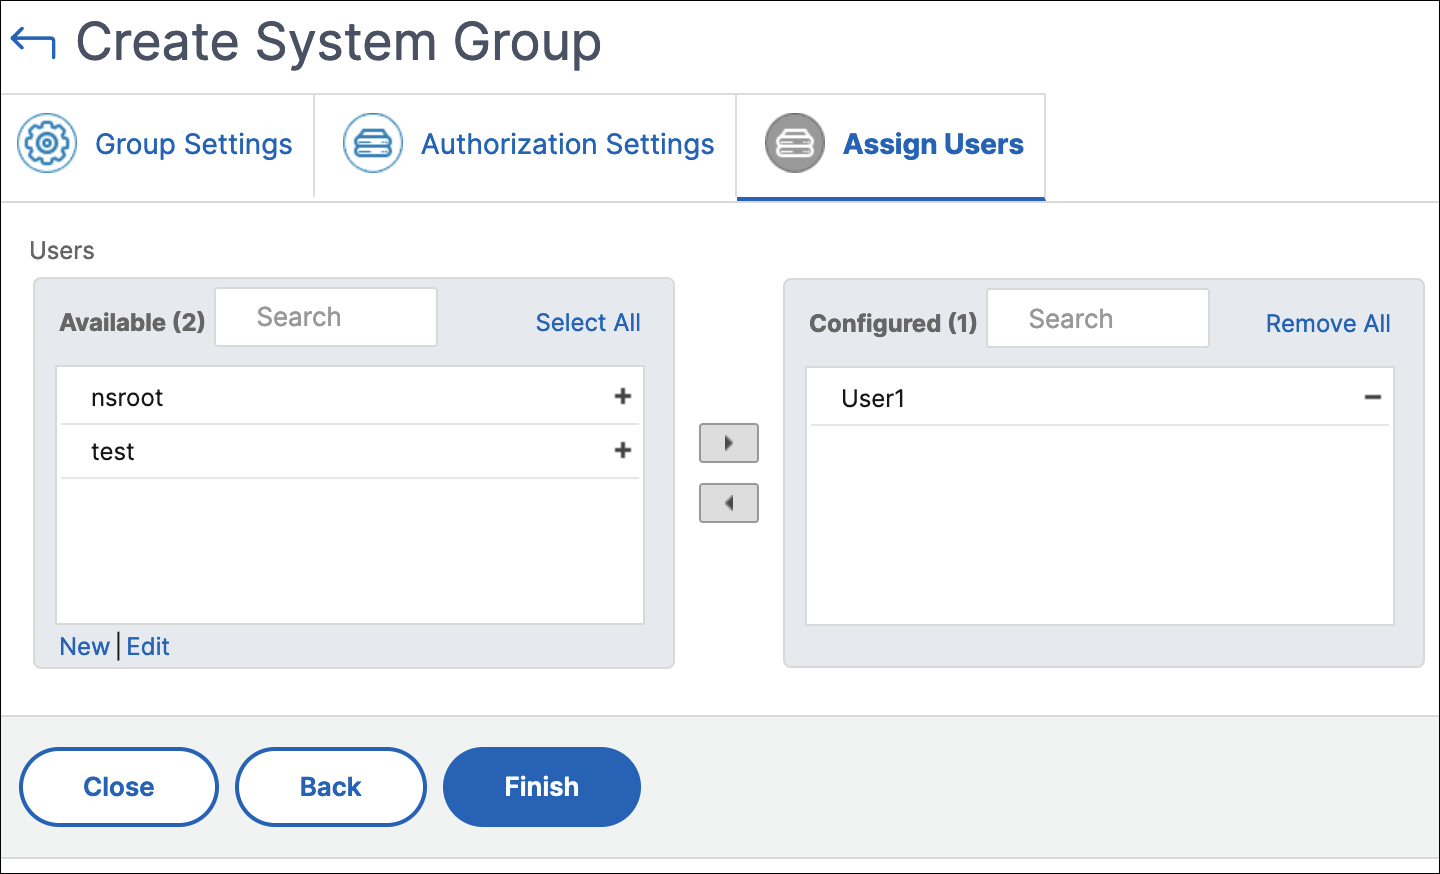
- Click Finish.
How user access changes based on the authorization scope
When an administrator adds a user to a group that has different access policy settings, the user is mapped to more than one authorization scopes and access policies.
In this case, the NetScaler Console grants the user access to applications depending on the specific authorization scope.
Consider a user who is assigned to a group that has two policies Policy-1 and Policy-2.
-
Policy-1 – View only permission to applications.
-
Policy-2 – View and Edit permission to applications.
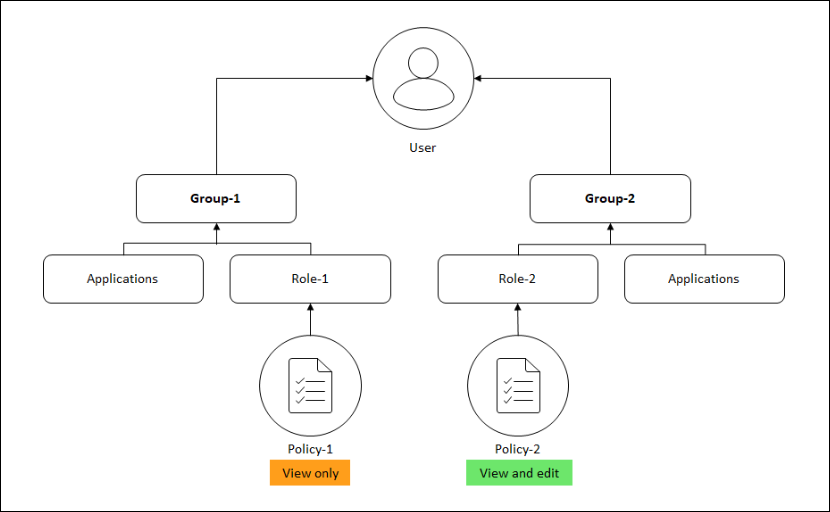
The user can view the applications specified in Policy-1. Also, this user can view and edit the applications specified in Policy-2. The edit access to Group-1 applications are restricted as it is not under Group-1 authorization scope.
Limitations
The following NetScaler Console features do not fully support RBAC:
-
Analytics - The analytics modules do not fully support RBAC. RBAC support is limited to an instance level, and it is not applicable at the application level in the Gateway Insight, HDX™ Insight, and Security Insight analytics modules.
- Example 1: Instance-based RBAC (Supported). An administrator who has been assigned a few instances can see only those instances under HDX Insight > Devices, and only the corresponding virtual servers under HDX Insight > Applications because RBAC is supported at the instance level.
- Example 2: Application-based RBAC (Not Supported). An administrator who has been assigned a few applications can see all virtual servers under HDX Insight > Applications but cannot access them, because RBAC is not supported at the applications level.
-
StyleBooks – RBAC is not fully supported for StyleBooks.
- Consider a situation where many users have access to a single StyleBook but have access permissions for different NetScaler instances. Users can create and update config packs on their own instances since they do not have access to instances other than their own. But they can still view the config packs and objects created on NetScaler instances other than their own.