Configure disaster recovery for high availability
Disaster is a sudden disruption of business functions caused by natural calamities or human caused events. Disasters affect data center operations, after which resources and the data lost at the disaster site must be fully rebuilt and restored. The loss of data or downtime in the data center is critical and collapses the business continuity.
The NetScaler Console disaster recovery (DR) feature provides full system backup and recovery capabilities for NetScaler Console deployed in high availability mode. At the time of recovery, certificates, configuration files, and a complete backup of the database is available in the recovery site.
The following table describes the terms used while configuring disaster recovery in NetScaler Console.
| Terms | Description |
|---|---|
| Primary site (Data center A) | The primary site has NetScaler Console nodes deployed in high availability mode. |
| Recovery site (Data center B) | The recovery site has a disaster recovery node deployed in standalone mode. This node is in read-only mode and is not operational until the primary site is down. |
| Disaster recovery node | The recovery node is a standalone node deployed in the recovery site. This node is made operational (to the new primary) in case a disaster occurs at the primary site and it is nonfunctional. |
Note
The primary site and DR site communicate with each other through ports 5454 and 22, and these ports are enabled by default.
For more information on port and protocol details, see Ports.
Disaster recovery workflow
The following image shows the disaster recovery workflow, the initial setup before disaster, and the workflow after the disaster.
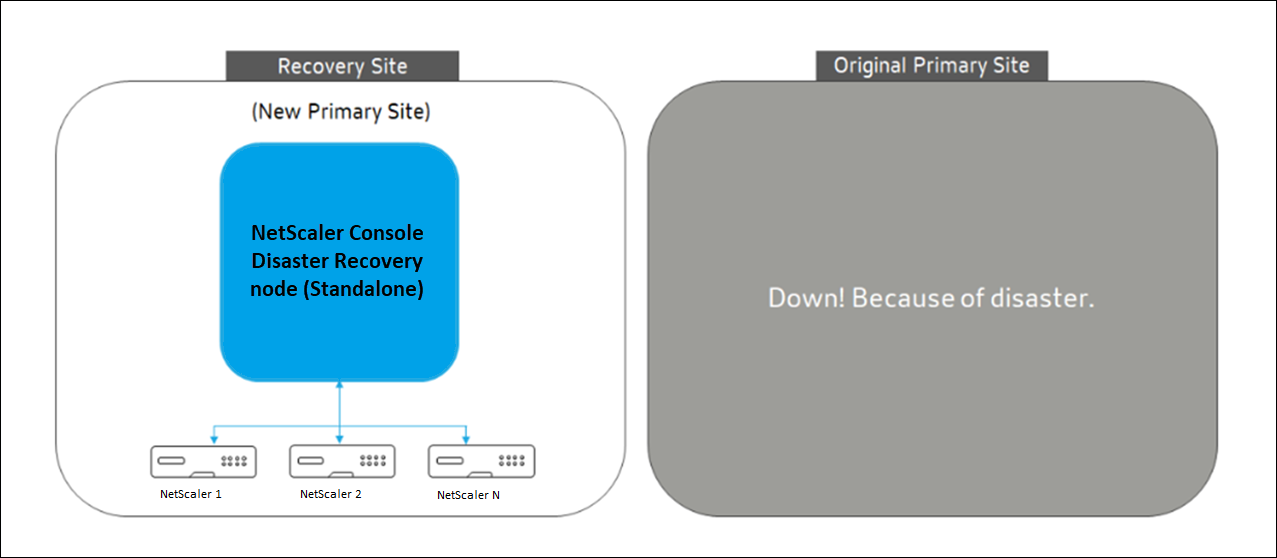
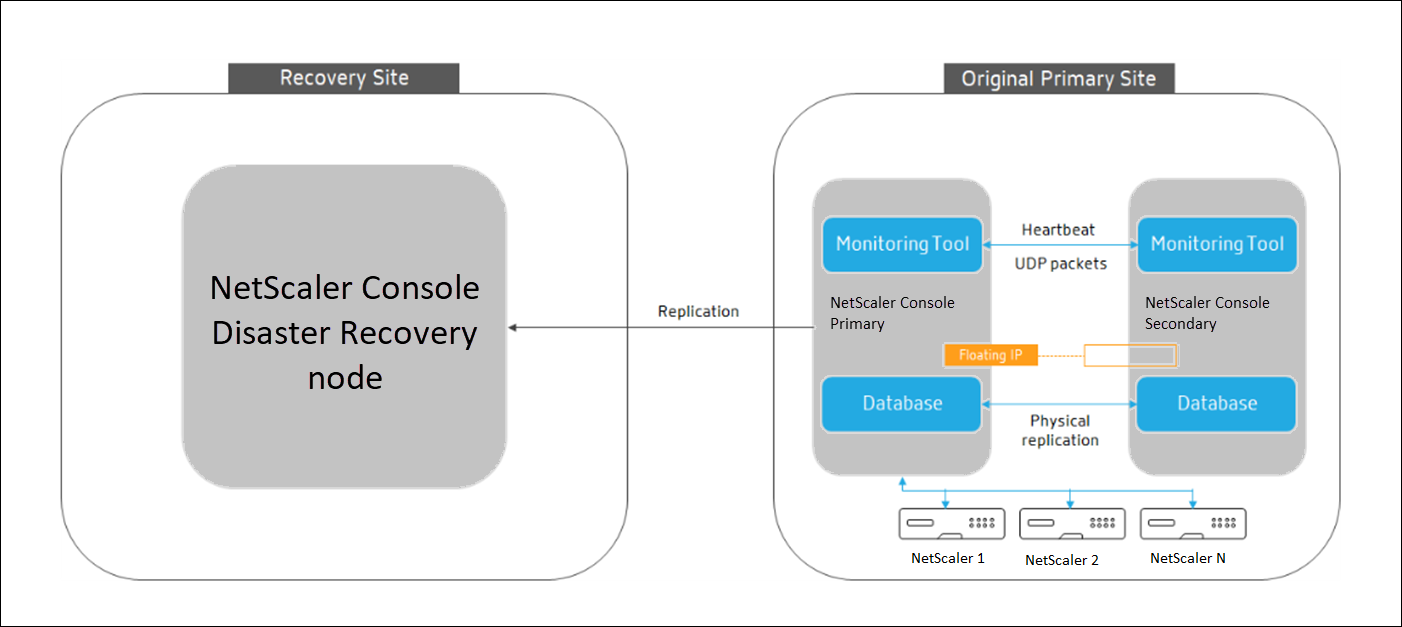
Initial setup before disaster
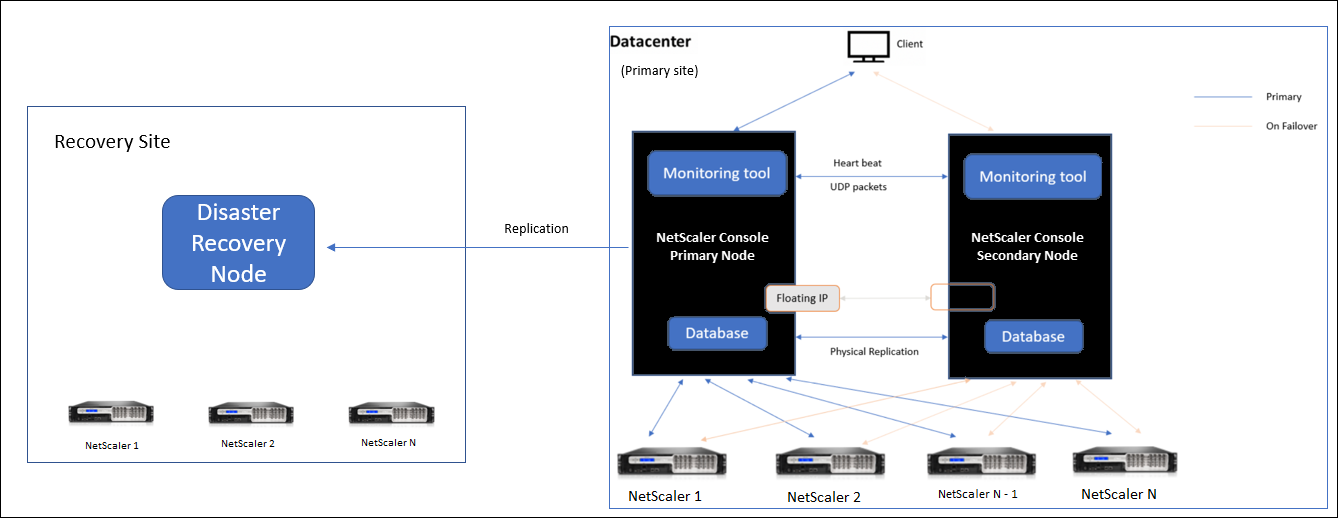
The image shows the disaster recovery setup before disaster.
The primary site has NetScaler Console nodes deployed in the high availability mode. To learn more, see High availability deployment
The recovery site has a standalone NetScaler Console disaster recovery node deployed remotely. The disaster recovery node is in read-only mode and receives data from the primary node to create data backup. NetScaler instances in the recovery site are also discovered but, they do not have any traffic flowing through them. During the backup process, all data, files, and configurations are replicated on the disaster recovery node from the primary node.
Prerequisites
Before you set up the disaster recovery node, note the following the prerequisites:
-
To enable disaster recovery settings, the primary site must have NetScaler Console nodes configured in high availability mode.
-
The NetScaler Console HA pair (in primary site) and the standalone node (in DR site) must have same software version, build, and configurations.
We recommend that you set CPU priority (in virtual machine properties) at the highest level to improve scheduling behavior and network latency.
The following table lists the minimum requirements to configure the Disaster Recovery node:
| Component | Requirement |
|---|---|
| RAM | 32 GB |
| Virtual CPU | 8 CPUs |
| Storage Space | We recommend using solid-state drive (SSD) technology for NetScaler Console deployments. The default value is 120 GB. Actual storage requirement depends on NetScaler Console sizing estimation. If your NetScaler Console storage requirement exceeds 120 GB, you have to attach an extra disk. Note You can add only one more disk. We recommend you to estimate storage and attach more disk at the time of initial deployment. For more information, see How to Attach an Additional Disk to NetScaler Console. |
| Virtual network interfaces | 1 |
| Throughput | 1 Gbps or 100 Mbps |
| Hypervisor | Versions |
| Citrix Hypervisor | 6.2 and 6.5 |
| VMware ESXi | 5.5 and 6.0 |
| Microsoft Hyper-V | 2012 R2 |
| Linux KVM | Ubuntu and Fedora |
First time disaster recovery setup
-
Deploy NetScaler Console in high availability mode
-
Deploy and register the NetScaler Console disaster recovery node
-
Enable and disable disaster recovery settings from the user interface
Deploy NetScaler Console in high availability mode
To set up the disaster recovery settings, ensure that NetScaler Console is deployed in high availability mode. For information on deploying the NetScaler Console in high availability, see High availability deployment
Note
NetScaler Console deployed in high availability mode must be upgraded to NetScaler Console release version 13.1.
Floating IP address is mandatory to register disaster recovery node with the primary node.
Deploy and register the NetScaler Console disaster recovery node using DR console
To register the NetScaler Console disaster recovery node:
-
Download the
.xvaimage file from the NetScaler site and import it into your hypervisor. -
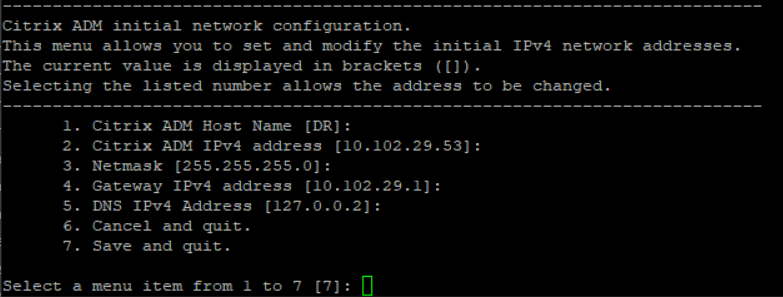
From the Console tab, configure NetScaler Console with the initial network configurations.
Note
The disaster recovery node can be on a different subnet.
-
After the initial network configuration is complete, the system prompts for login. Log on using the following credentials –
nsrecover/nsroot.Important
Do not change the DR node credentials (
nsrecover/nsroot) during registration. You can change the DR node credentials after you register DR node successfully. -
To deploy the disaster recovery node, type /mps/deployment_type.py and press enter. The NetScaler Console deployment configuration menu is displayed.
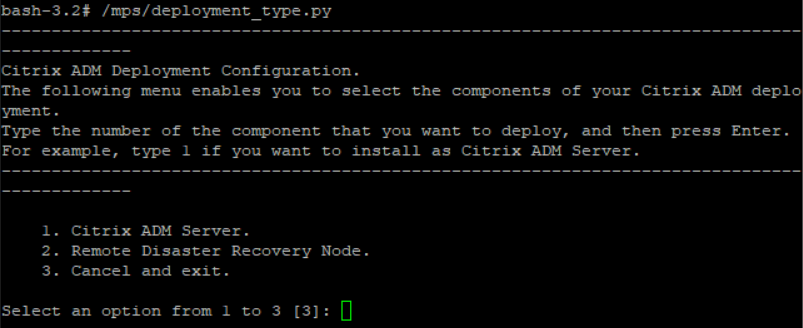
-
Select 2 to register disaster recovery node.
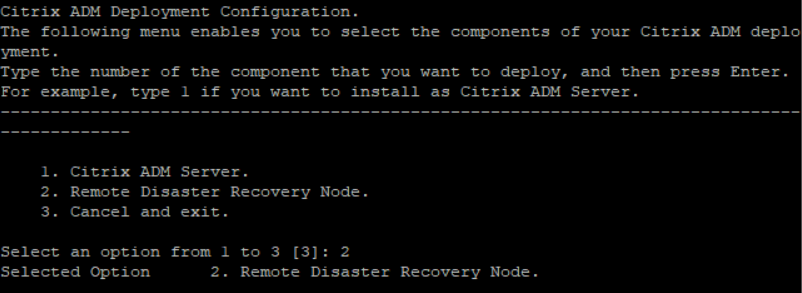
-
The console prompts for floating IP address of the high availability node and password.
-
Enter the floating IP address and password to register the disaster recovery node to the primary node.

The disaster recovery node is now registered successfully.

Note
-
The disaster recovery node does not have a GUI.
-
After registration is successful, the default administrator credentials to log on to the server are
nsroot/nsroot.
-
-
If you want to change the DR node password, run the following script:
/mps/change_freebsd_password.sh <username> <password> <!--NeedCopy-->Example:
/mps/change_freebsd_password.sh nsroot new_password
<!--NeedCopy-->
Deploy the disaster recovery node using NetScaler Console GUI
After the disaster recovery node is registered successfully using DR console, deploy the DR node from the NetScaler Console GUI. This step enables the disaster recovery settings from the NetScaler Console primary site.
-
Navigate to System > System Administration > Disaster Recovery Settings.
-
On the Disaster Recovery page, select Deploy DR Node.
-
A confirmation dialogue box is displayed. Click Yes to continue.
Note
The time taken for system backup depends on the data size and the WAN link speed.
After you deploy the DR node successfully in the NetScaler Console GUI, you can monitor database state, memory, CPU, and disk usage of the DR node.
To disable the disaster recovery settings, select Remove DR Node. A confirmation dialogue box is displayed. Click Yes to continue.
To enable the DR node again, reconfigure the DR node for your high availability pair:
-
Log on to the DR node using a hypervisor or an SSH console.
-
Configure the DR node by following the procedure available at Deploy and register the NetScaler Console disaster recovery node using DR console.
-
Deploy the disaster recovery node using NetScaler Console GUI.
For more information, see the FAQs.
Important
It is the responsibility of the administrator to detect that a disaster has occurred on the primary site.
The disaster recovery workflow is manually initiated by the administrator after the primary site goes down.
An administrator must manually initiate the process by running a recovery script on the disaster recovery node at the recovery site.
If you upgrade the HA pair in primary site, you must also manually upgrade the standalone node in the DR site.
Workflow after the disaster
When the primary site goes down after a disaster, the disaster recovery workflow must be initiated as follows:
-
The administrator identifies that a disaster has struck the primary site and it is not operational.
-
The administrator initiates the recovery process.
-
The administrator must manually run one of the following recovery scripts on the disaster recovery node based on your requirement(at the recovery site):
-
Configure SNMP, Syslog, and Analytics on the DR node:
/mps/scripts/pgsql/pgsql\_restore\_remote\_backup.sh <!--NeedCopy--> -
Configure the DR node as a license server also:
 /mps/scripts/pgsql/pgsql\_restore\_remote\_backup.sh -reconfig-ls <IP-address-of-the-primary-site>

 <!--NeedCopy-->
-
-
Internally, NetScaler instances are automatically reconfigured to send the data to the disaster recovery node that has now become the new primary site.
The following image shows that the disaster recovery workflow after the primary site is struck with a disaster.
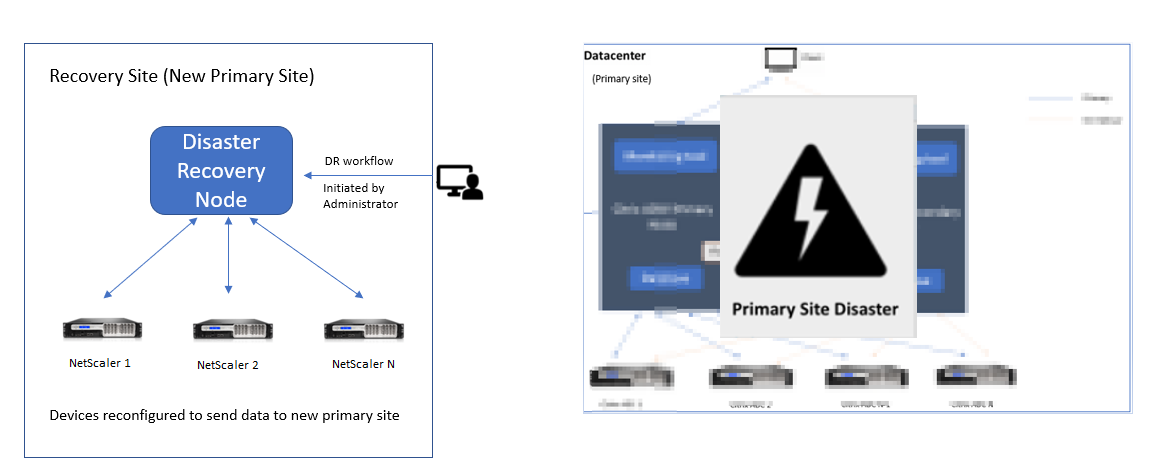
Note:
After you initiate the script at the DR site, the DR site now becomes the new primary site. You can also access the DR user interface.
Post disaster recovery
After the disaster has occurred and the administrator initiates the recovery script, the DR site now becomes the new primary site.
If you want to revert the configurations to the original site later, see Revert configurations to the original primary site.
Important
If you have installed NetScaler Console 12.1.49.x or earlier releases, you get a grace period of 30 days to contact Citrix to rehost the original license on the NetScaler Console (at the DR site).
For 12.1.50.x or later releases, the NetScaler Console license is automatically synchronized to the DR site (Not a requirement to contact Citrix for the license).
If you have applied pooled licenses for the instances, NetScaler instances with version 11.1 65.x or later, 12.1 58.x or later, 13.0 47.x or later, and NetScaler SDX 13.0 76.x or later have the support for auto-license server update in the DR site. All other versions, you must manually reconfigure the instances to the DR site.
Revert configurations to the original primary site
Post disaster the configured disaster recovery (DR) node becomes the new primary site and the client traffic flows through this node.
For more information, see Workflow after the disaster.
When your original primary site is free from disaster and you decide to move all operations to the primary site, reconfigure the original primary site to match the configurations from the DR node.
Before you begin, ensure both primary site and DR site are active.
To revert the changes to the original primary site from the DR site, perform the following steps:
-
Log in to the original primary site and run the following command:
nohup /mps/sync_adm_node.py -I <DR-site-IP-address> -R <DR-node-password> -L <primary-node-password> &
<!--NeedCopy-->
This command configures only Syslog, SNMP, and Analytics to the primary site.
If you want to configure the primary site as a pooled license server for NetScaler instances, run the following command:
nohup /mps/sync_adm_node.py -I <DR-site-IP-address> -R <DR-node-password> -L <primary-node-password>  -O yes &
<!--NeedCopy-->
The
-Ocommand fetches the DR site IP address and reconfigures the primary site as pooled license server. -
Reconfigure the DR site. See, Deploy disaster recovery setup.
After you successfully revert the configurations from the DR site to the original primary site, the client traffic flows through the NetScaler Console primary node.