-
-
-
-
Scenarios for Flexed or Pooled license expiry and connectivity issues behavior
-
Configure NetScaler Console as the Flexed or Pooled license server
This content has been machine translated dynamically.
Dieser Inhalt ist eine maschinelle Übersetzung, die dynamisch erstellt wurde. (Haftungsausschluss)
Cet article a été traduit automatiquement de manière dynamique. (Clause de non responsabilité)
Este artículo lo ha traducido una máquina de forma dinámica. (Aviso legal)
此内容已经过机器动态翻译。 放弃
このコンテンツは動的に機械翻訳されています。免責事項
이 콘텐츠는 동적으로 기계 번역되었습니다. 책임 부인
Este texto foi traduzido automaticamente. (Aviso legal)
Questo contenuto è stato tradotto dinamicamente con traduzione automatica.(Esclusione di responsabilità))
This article has been machine translated.
Dieser Artikel wurde maschinell übersetzt. (Haftungsausschluss)
Ce article a été traduit automatiquement. (Clause de non responsabilité)
Este artículo ha sido traducido automáticamente. (Aviso legal)
この記事は機械翻訳されています.免責事項
이 기사는 기계 번역되었습니다.책임 부인
Este artigo foi traduzido automaticamente.(Aviso legal)
这篇文章已经过机器翻译.放弃
Questo articolo è stato tradotto automaticamente.(Esclusione di responsabilità))
Translation failed!
NetScaler Console Cloud Connect
You can use the NetScaler Console Cloud Connect feature to establish a connection between NetScaler Console on-prem and NetScaler Console service.
This connectivity enables you to select the following feature to use in NetScaler Console on-prem:
Security Advisory – Security Advisory supports automated identification of vulnerable NetScaler and provides remediation workflow benefits. Security Advisory enables you to track any new Common Vulnerabilities and Exposures (CVEs), assess the impact of CVEs, understand the remediation, and resolve the vulnerabilities. As an administrator, you can monitor the NetScaler instances for any new CVEs through the periodic scan or by manually scanning, and take required action for the remediation. For more information, see Security Advisory.
Automated Telemetry Collection – If you are using Flexed licensing, we recommend you to enable Cloud Connect, which is the automated mode of telemetry data collection. For more information, see Flexed capacity license.
Notes:
You do not need to add or migrate the NetScaler® instances to NetScaler Console service.
Cloud Connect requires you to connect to NetScaler Console service by setting up a NetScaler Console service account (if not created already).
Starting from 14.1 8.x build, Cloud Connect replaces the Customer Identity feature.
After you configure Cloud Connect, it will enable Citrix Cloud to collect license, configuration, usage data for license compliance, and to manage, measure and improve the service. For more information, see Data Governance.
When you configure Cloud Connect, optional telemetry parameters are also collected to manage, measure, and improve the service. You can also disable this option if you do not want to share the optional parameters. For more information, see Data categories.
Prerequisites
Before you configure Cloud Connect, ensure that you have the following prerequisites:
-
Ensure to have internet connection or have a proxy server configured in NetScaler Console on-prem for Citrix Cloud accessibility.
-
Ensure that the following endpoint urls are allowed access:
-
Download Service:
https://download.citrixnetworkapi.net -
Trust Service:
*.citrixnetworkapi.net -
Service URLs
-
*.agent.adm.cloud.com -
*.adm.cloud.com -
adm.cloud.com
-
-
Citrix Cloud™ connectivity:
-
Citrix.cloud.com -
Accounts.cloud.com
-
-
-
Ensure you have disabled the pop-up blocker in the browser from where you access the NetScaler Console on-prem GUI.
Configure Cloud Connect
Workflow 1 – If you are a new user without a Citrix Cloud account and NetScaler Console service tenant
-
In NetScaler Console, click the Cloud icon > Get Started.

-
In the Cloud Connect configuration page, click the link
https://onboarding.cloud.com.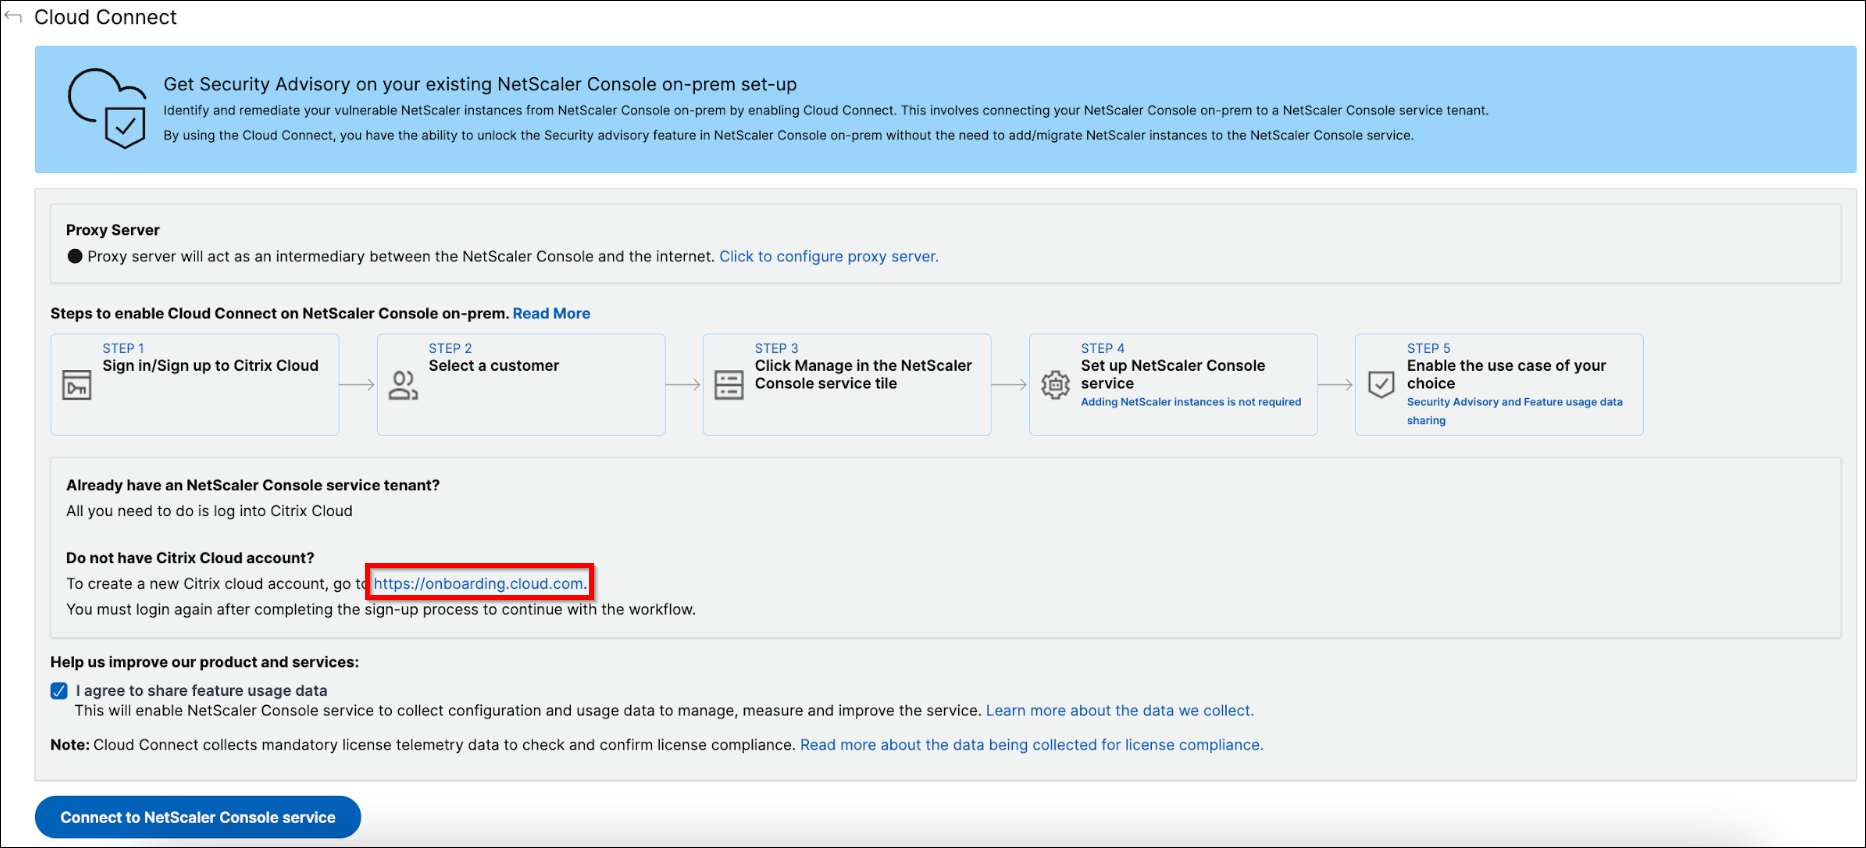
-
Follow the procedure in this document to create a Citrix Cloud account.
-
After you create a Citrix Cloud account, you must again login by clicking Connect to NetScaler Console service in NetScaler Console on-prem. Upon successful login, the page redirects to the NetScaler Console service tenant creation steps.
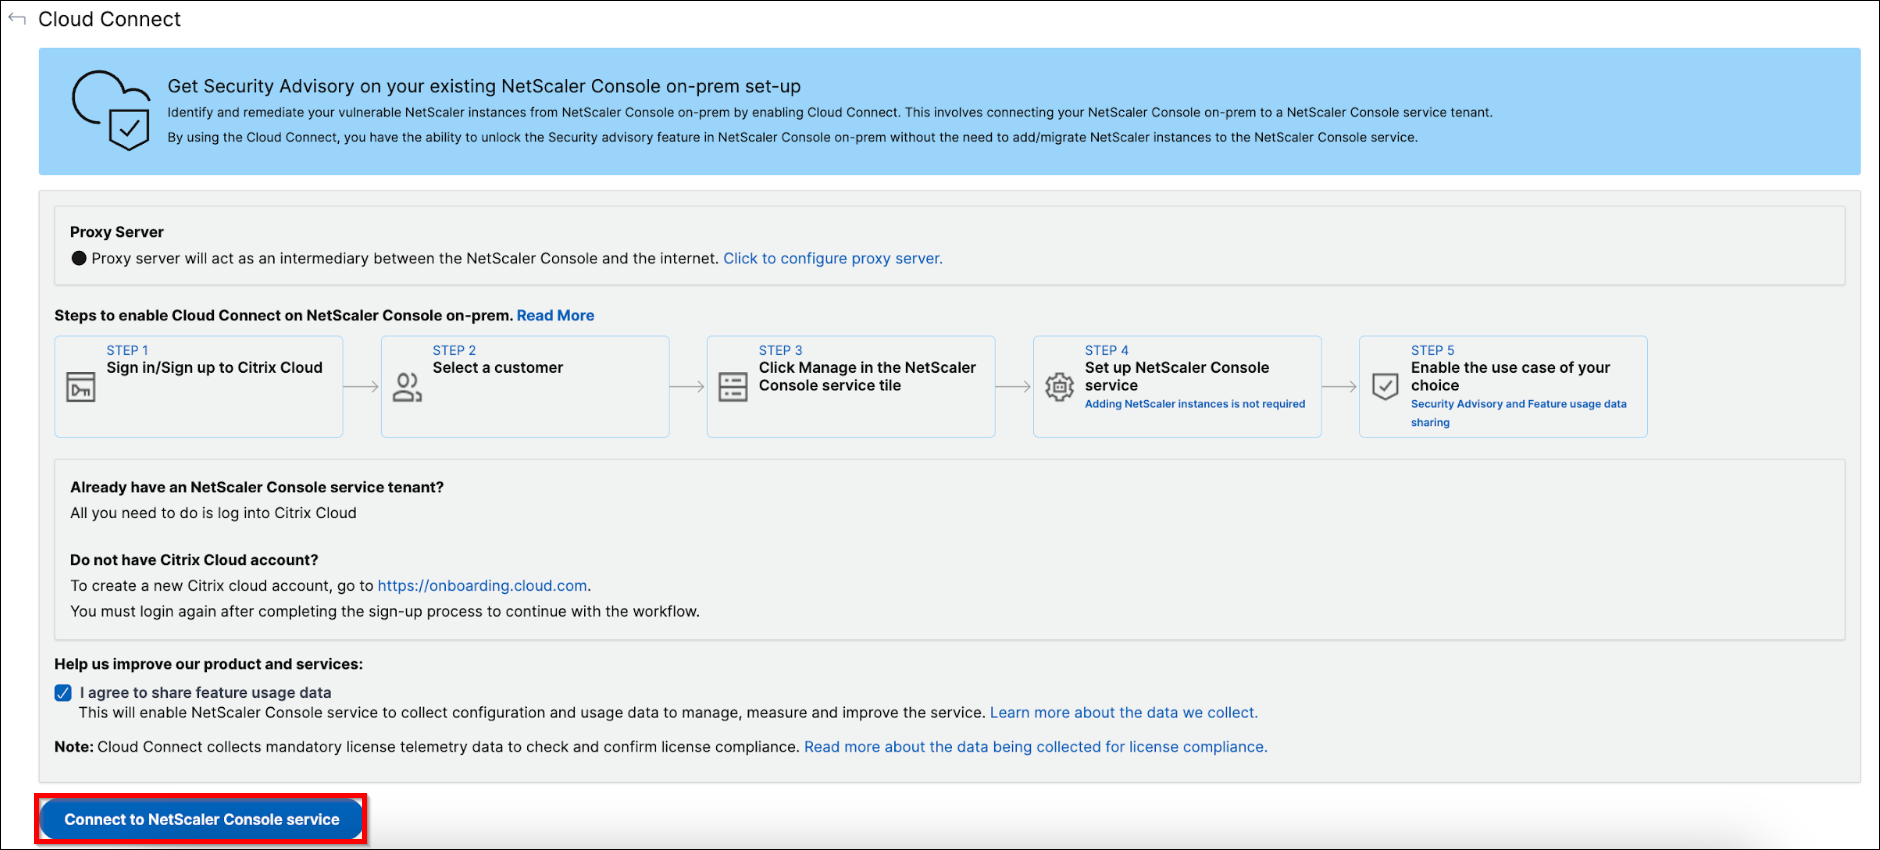
Note:
By default, the I agree to share feature usage data checkbox is selected. This option enables Citrix Cloud to collect certain optional parameters to manage, measure, and improve the service. You can also disable if you do not want to share the optional parameters. For more information, see Data categories.
-
Select a region that suits your business needs and click Done.
-
Select a role and finish the setup.
It might take a few minutes for the configuration to complete. In NetScaler Console on-prem, you can see the Cloud Connect enablement is in progress screen. You can either click Refresh and wait until you get the updated configuration page or click Cancel to skip this screen and check later for the updated configuration page.
-
The Cloud Connect configuration is complete. You can proceed further to enable Security Advisory from the Cloud Connect configuration page.
-
Select Security Advisory and click Save.
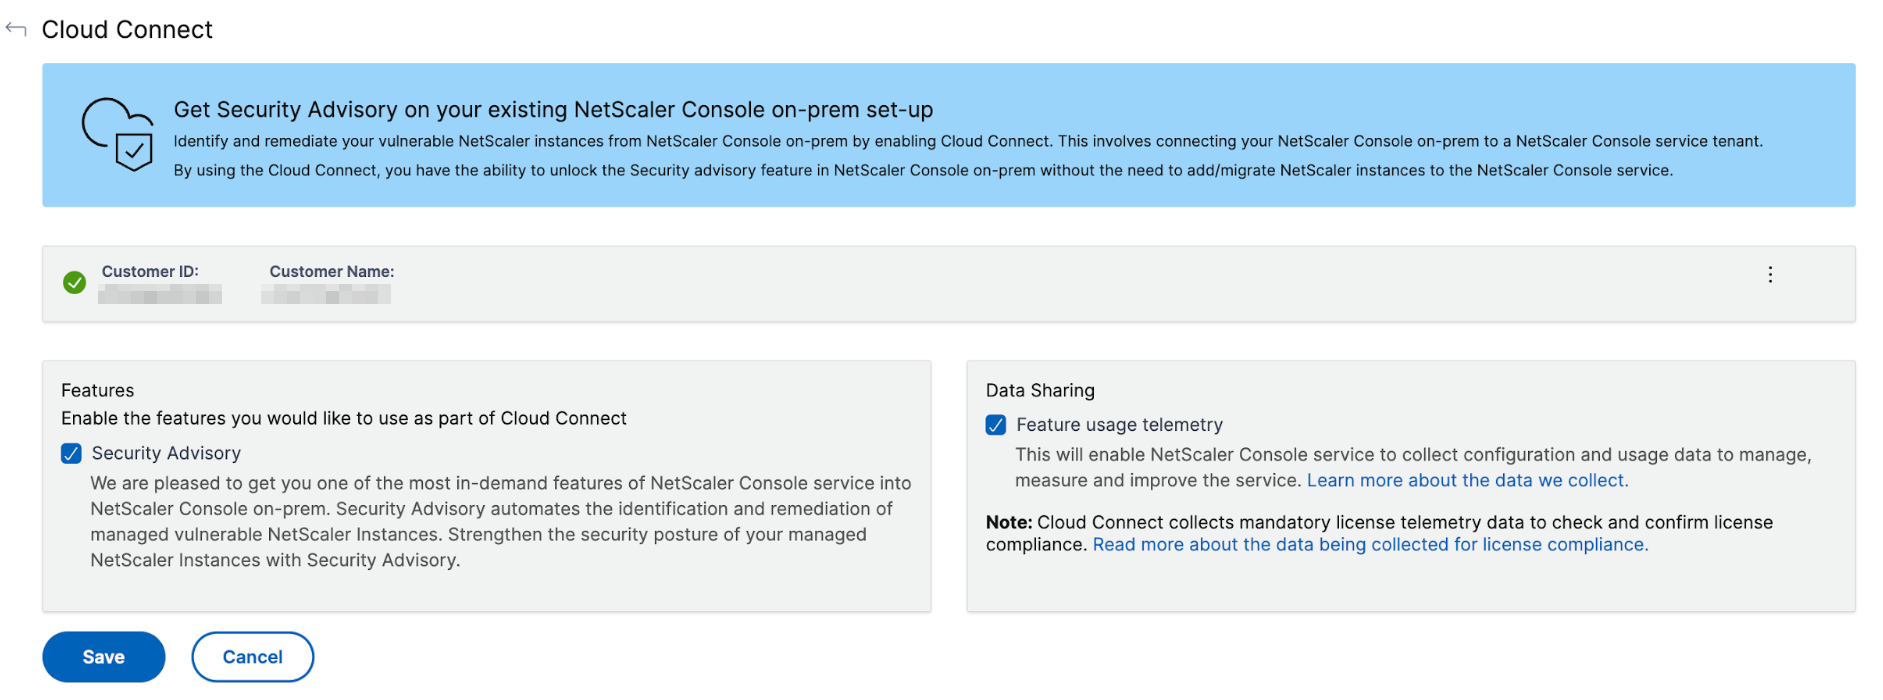
Note:
Feature usage telemetry is enabled by default if you have selected the I agree to share feature usage data option.
You can see the status as connected.

Workflow 2 – If you have a Citrix Cloud account but do not have a NetScaler Console service tenant
-
In NetScaler Console, click the Cloud icon > Get Started.

-
Click Connect to NetScaler Console service.

Note:
By default, the I agree to share feature usage data checkbox is selected. This option enables Citrix Cloud to collect certain optional parameters to manage, measure, and improve the service. You can also disable if you do not want to share the optional parameters. For more information, see Data categories.
-
You will be redirected to a new tab. Sign into Citrix Cloud.
-
Once you get the login successful message, the page redirects to the NetScaler Console onboarding steps.
-
Select a region that suits your business needs and click Done.
-
Select a role and finish the setup.
It might take a few minutes for the configuration to complete. In NetScaler Console on-prem, you can see the Cloud Connect enablement is in progress screen. You can either click Refresh and wait until you get the updated configuration page or click Cancel to skip this screen and check later for the updated configuration page.
-
The Cloud Connect configuration is complete. You can proceed further to enable Security Advisory from the Cloud Connect configuration page.
-
Select Security Advisory and click Save.

Note:
Feature usage telemetry is enabled by default if you have selected the I agree to share feature usage data option.
You can see the status as connected.

Workflow 3 - If you are an existing user with both Citrix Cloud account and NetScaler Console service tenant
-
In NetScaler Console, click the Cloud icon > Get Started.

-
Click Connect to NetScaler Console service.

Note:
By default, the I agree to share feature usage data checkbox is selected. This option enables Citrix Cloud to collect certain optional parameters to manage, measure, and improve the service. You can also disable if you do not want to share the optional parameters. For more information, see Data categories.
-
You will be redirected to a new tab. Sign into Citrix Cloud and select a tenant. After you select the tenant, you get a login successful message.
-
The Cloud Connect configuration is complete. You can proceed further to enable Security Advisory from the Cloud Connect configuration page.
-
Select Security Advisory and click Save.

Note:
Feature usage telemetry is enabled by default if you have selected the I agree to share feature usage data option.
You can see the status as connected.

What happens if Customer Identity is already enabled?
If you are an existing user on an earlier build with Customer Identity enabled, selected data sharing, and upgraded to the latest build (14.1 8.x), the following scenarios are applicable:
-
If you have a NetScaler Console service tenant, Cloud Connect is automatically enabled in your NetScaler Console on-prem. It will enable Citrix Cloud to collect license, configuration and usage data to manage, measure, and improve the service. For more information, see Data Governance. From the Cloud Connect configuration page, you can select Security Advisory to use the feature.
The following notification appears if Cloud Connect is automatically configured in your NetScaler Console.

-
If you do not have a NetScaler Console service tenant or data sharing is not enabled as part of the Customer Identity, the Cloud Connect is not automatically enabled and you must manually configure Cloud Connect. After you configure, it will enable Citrix Cloud to collect license, configuration and usage data to manage, measure and improve the service. Learn more about the data collection.
Other options
After you enable Cloud Connect, you can use the following options:
-
Modify Tenant - Enables you to change the existing tenant. When you click Modify Tenant, you will be redirected to a new tab and you must sign into Citrix Cloud. After successful login, you can select a different tenant.
-
Modify Proxy - Enables you to configure the proxy settings in NetScaler Console on-prem. This is required when NetScaler Console does not have direct access to the internet through the management network. Click Modify Proxy from the list, update details, and then click Save.
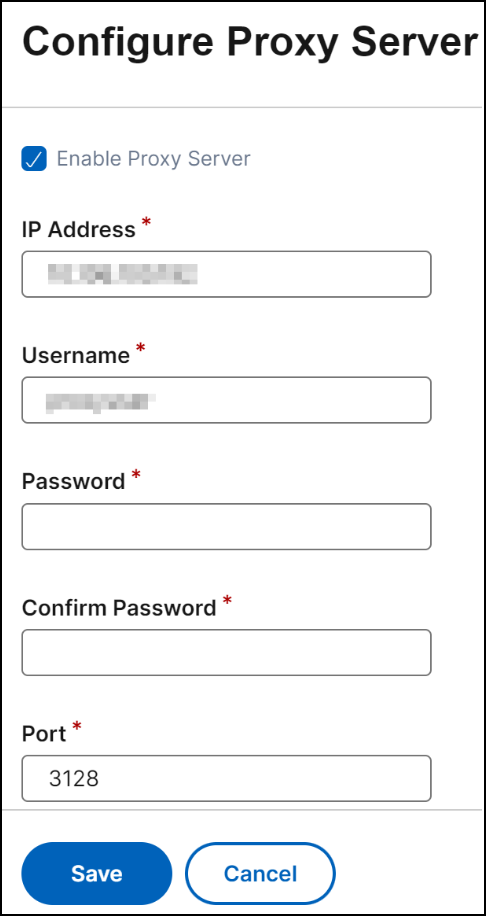
-
Disable - Disables the Cloud Connect feature. If you choose to disable, the data metric collection is disabled and you cannot use the full version of the Security Advisory.
To disable, click Disable from the list.

A confirmation message is displayed. Click Yes to disable.
You can again enable Cloud Connect later without any additional steps.
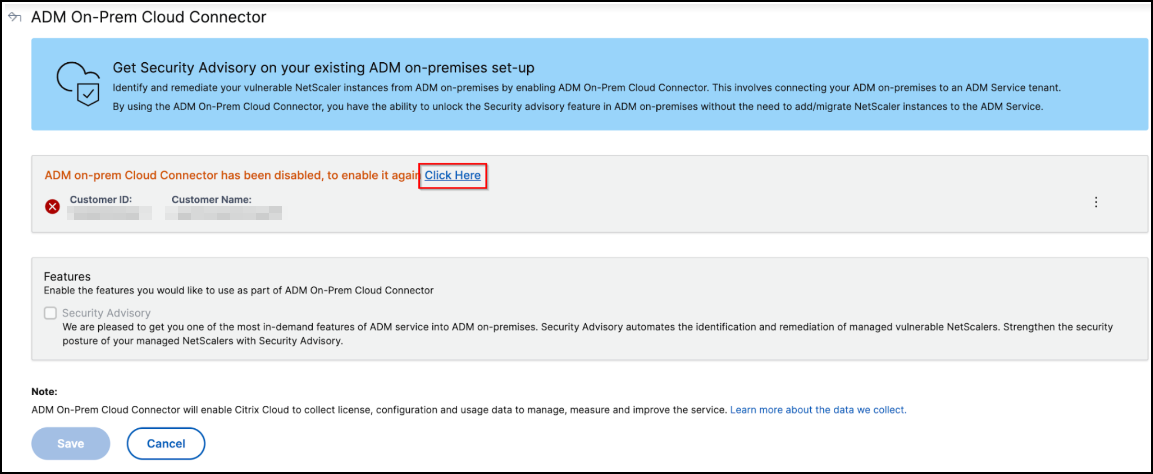
Disable Security Advisory
From the Cloud Connect configuration page, you can also clear the Security Advisory check box to disable the Security Advisory feature. The data metrics are still collected.
Share
Share
This Preview product documentation is Cloud Software Group Confidential.
You agree to hold this documentation confidential pursuant to the terms of your Cloud Software Group Beta/Tech Preview Agreement.
The development, release and timing of any features or functionality described in the Preview documentation remains at our sole discretion and are subject to change without notice or consultation.
The documentation is for informational purposes only and is not a commitment, promise or legal obligation to deliver any material, code or functionality and should not be relied upon in making Cloud Software Group product purchase decisions.
If you do not agree, select I DO NOT AGREE to exit.