-
-
Configure high availability deployment
-
Configure high availability across different layer 3 subnets (HA over L3)
-
-
Install a NetScaler Console agent OpenShift operator for NetScaler Console on-prem deployment
-
Migrate NetScaler Console single-server deployment to a high availability deployment
-
Integrate NetScaler Console with Citrix Virtual Desktop Director
-
-
-
-
Scenarios for Flexed or Pooled license expiry and connectivity issues behavior
-
Configure NetScaler Console as the Flexed or Pooled license server
This content has been machine translated dynamically.
Dieser Inhalt ist eine maschinelle Übersetzung, die dynamisch erstellt wurde. (Haftungsausschluss)
Cet article a été traduit automatiquement de manière dynamique. (Clause de non responsabilité)
Este artículo lo ha traducido una máquina de forma dinámica. (Aviso legal)
此内容已经过机器动态翻译。 放弃
このコンテンツは動的に機械翻訳されています。免責事項
이 콘텐츠는 동적으로 기계 번역되었습니다. 책임 부인
Este texto foi traduzido automaticamente. (Aviso legal)
Questo contenuto è stato tradotto dinamicamente con traduzione automatica.(Esclusione di responsabilità))
This article has been machine translated.
Dieser Artikel wurde maschinell übersetzt. (Haftungsausschluss)
Ce article a été traduit automatiquement. (Clause de non responsabilité)
Este artículo ha sido traducido automáticamente. (Aviso legal)
この記事は機械翻訳されています.免責事項
이 기사는 기계 번역되었습니다.책임 부인
Este artigo foi traduzido automaticamente.(Aviso legal)
这篇文章已经过机器翻译.放弃
Questo articolo è stato tradotto automaticamente.(Esclusione di responsabilità))
Translation failed!
Configure high availability across different layer 3 subnets (HA over L3)
Starting with release 14.1-66.x, NetScaler Console supports high availability (HA) deployments across different layer 3 (L3) subnets.
This enhancement provides the following capabilities:
-
Primary and secondary NetScaler Console nodes can be deployed in different L3 subnets or data centers.
-
The floating IP address (VIP) is configured and owned by an external load balancer.
-
The load balancer forwards client traffic to the active NetScaler Console node.
-
HA synchronization between nodes remains unchanged.
For general HA concepts, node roles, and synchronization behavior, see HA documentation.
NetScaler Console supports HA deployments across different subnets by using an external load balancer to manage the floating IP address(es), removing L2 dependencies.
Previously, NetScaler Console required the primary and secondary nodes to reside in the same subnet because the floating IP address was owned and managed internally by the HA pair. This created a Layer 2 dependency and limited deployments across segmented or geographically separated networks. This restricted HA deployments to Layer 2 environments and prevented customers from:
- Deploying HA across different subnets.
- Distributing nodes across data centers.
- Aligning with routed enterprise network architectures.
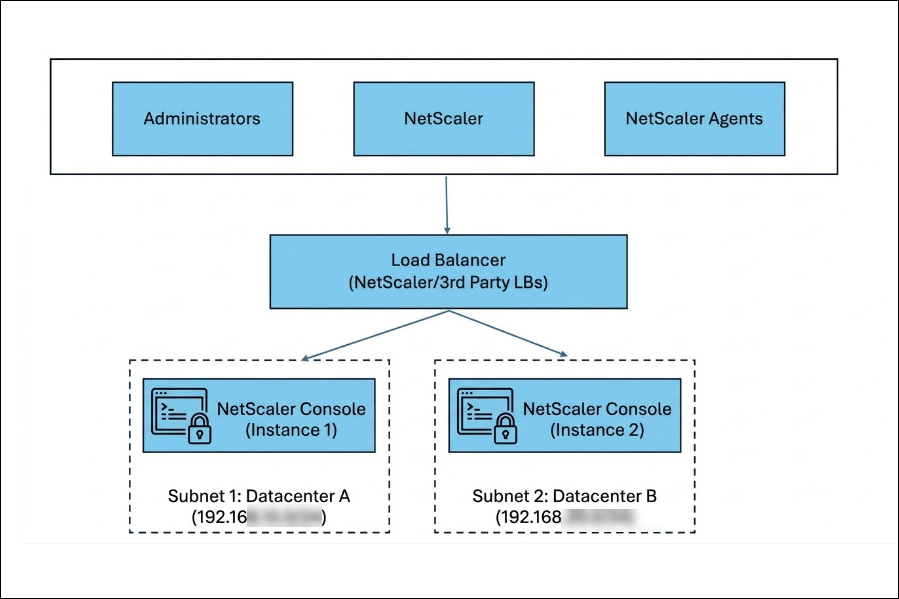
High-level architecture
-
The floating IP address (VIP) is configured on an external load balancer.
-
NetScaler Console does not take ownership of the VIP in this deployment.
-
The load balancer forwards traffic to the active node based on health checks.
-
HA synchronization continues directly between nodes over L3 connectivity.
-
ARP-based VIP takeover within NetScaler Console is not used.
Note:
The recommended load balancer is NetScaler, although third-party load balancers are also supported.
Deployment and configuration
Prerequisites
- An external Layer 3-capable load balancer deployed and reachable by:
- Clients
- Both NetScaler Console nodes
- Network connectivity between primary and secondary nodes.
Workflow
-
Deploy two NetScaler Console nodes (primary and secondary) in separate L3 subnets or data centers.
-
Deploy and configure an external load balancer.
-
Create a floating IP address (VIP) on the load balancer (front-end) and add both NetScaler Console nodes as backend targets.
-
Create load balancing rules for the VIP using the following protocols and ports.
LB virtual server Protocol Port HTTP TCP 80 HTTPS TCP 443 DB and HA TCP 5454 NTP UDP 123 SNMP UDP 162 SYSLOG UDP 514 LICENSE TCP 27000 VENDOR DEMON TCP 7279 -
Configure health monitors on all backend targets so the load balancer forwards traffic only to the active node.
Monitor / Purpose Protocol / Port HA and DB TCP / 5454 SNMP UDP / 162 Syslog UDP / 514 NTP UDP / 123 -
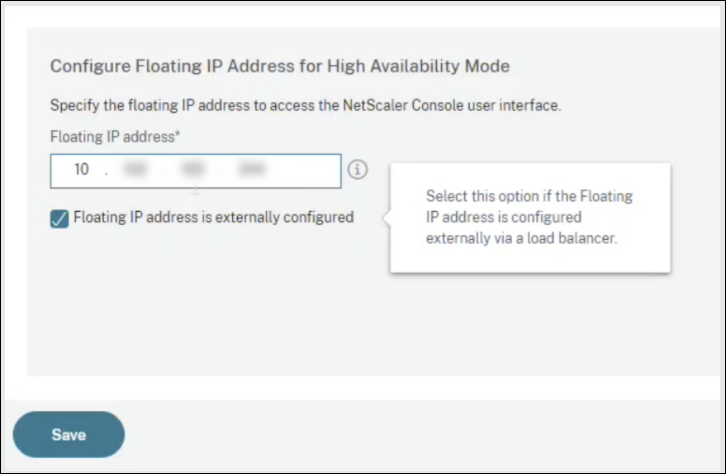
Configure the NetScaler Console HA pair and specify that the floating IP address that is externally configured.
Configure HA in NetScaler Console
-
Sign in to the NetScaler Console GUI on the node you want to configure as primary.
-
Go to Settings > High Availability Settings.
-
Select Configure NetScaler Console High Availability (HA) and provide the secondary node details.
-
Enter the VIP configured on the external load balancer and select Floating IP address is externally configured and click Save.
Note:
Configure the floating IP address (VIP) on the external load balancer. NetScaler Console does not own or manage this VIP in the different-subnets HA model.
-
The NetScaler Console instances reboot to form an HA pair.
-
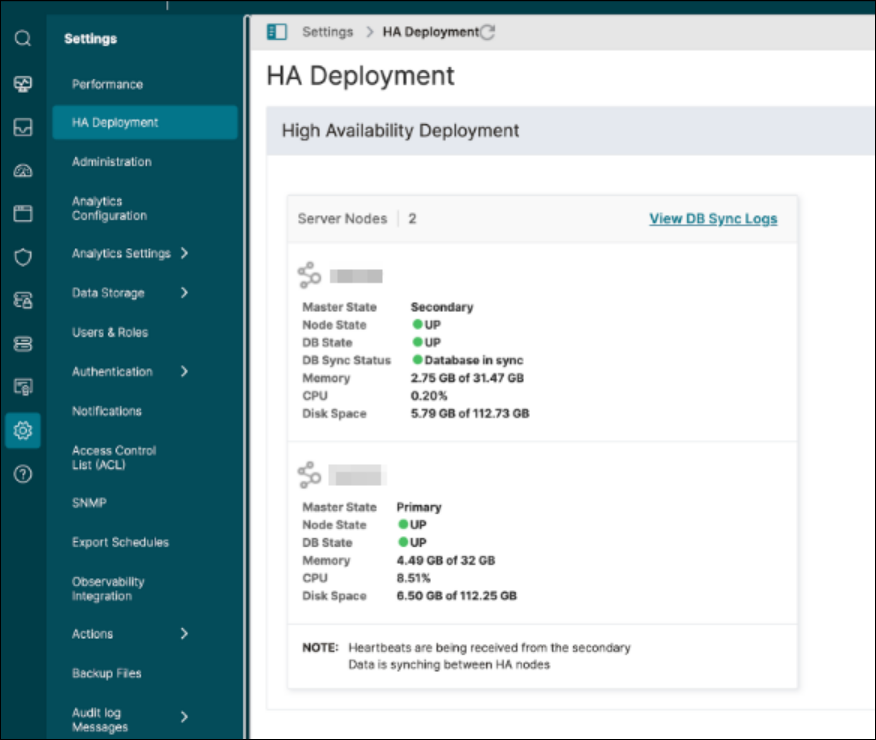
After HA is configured, sign in to the primary node and go to Settings > HA Deployment to validate the primary and secondary status.
Configure NetScaler as an external load balancer
Configure the floating IP address (VIP) and forwarding rules on your external load balancer so that the client traffic is sent only to the active NetScaler Console node. The exact steps vary by load balancer vendor. The following requirements apply broadly and can be implemented on NetScaler or a third-party load balancer:
-
Create all the virtual servers with the same virtual IP address (frontend) that clients use to access NetScaler Console.
-
Create service groups for each of the virtual servers and bind both NetScaler Console nodes as service group members.
-
Bind service groups with the respective virtual servers.
-
Create monitors that reliably indicate the active node and bind them to the service groups configured in Step 2.
Note:
Ensure all necessary ports are open between the load balancer and both NetScaler Console nodes, as defined in System Requirements.
Sample NetScaler load balancing configuration script
Add load balancing virtual servers
add lb vserver ADM-LB HTTP <EXTERNAL_VIP> 80 -persistenceType NONE -cltTimeout 180

add lb vserver ADM-LB-HTTPS SSL <EXTERNAL_VIP> 443 -persistenceType NONE -cltTimeout 180

add lb vserver ADM-LB-SNMP UDP <EXTERNAL_VIP> 162 -persistenceType NONE -cltTimeout 120

add lb vserver ADM-LB-SYSLOG UDP <EXTERNAL_VIP> 514 -persistenceType NONE -cltTimeout 120

add lb vserver ADM-LB-DB_HA TCP <EXTERNAL_VIP> 5454 -persistenceType NONE -cltTimeout 9000

add lb vserver ADM-LB-LICENSE TCP <EXTERNAL_VIP> 27000 -persistenceType NONE -cltTimeout 9000

add lb vserver ADM-LB-NTP UDP <EXTERNAL_VIP> 123 -persistenceType NONE -cltTimeout 120

add lb vserver ADM-LB-VENDOR-DEMON TCP <EXTERNAL_VIP> 7279 -persistenceType NONE -cltTimeout 9000
<!--NeedCopy-->
Add service groups
add serviceGroup ADM-SVCG-HTTP HTTP -maxClient 0 -maxReq 0 -cip DISABLED -usip NO -useproxyport YES -cltTimeout 180 -svrTimeout 360 -CKA NO -TCPB NO -CMP NO

add serviceGroup ADM-SVCG-HTTPS SSL -maxClient 0 -maxReq 0 -cip DISABLED -usip NO -useproxyport YES
-cltTimeout 180 -svrTimeout 360 -CKA NO -TCPB NO -CMP NO

add serviceGroup ADM-SVCG-SNMP UDP -maxClient 0 -maxReq 0 -cip DISABLED -usip NO -useproxyport NO -cltTimeout 120 -svrTimeout 120 -CKA NO -TCPB NO -CMP NO

add serviceGroup ADM-SVCG-SYSLOG UDP -maxClient 0 -maxReq 0 -cip DISABLED -usip NO -useproxyport NO -cltTimeout 120 -svrTimeout 120 -CKA NO -TCPB NO -CMP NO

add serviceGroup ADM-SVCG-DB_HA TCP -maxClient 0 -maxReq 0 -cip DISABLED -usip NO -useproxyport YES -cltTimeout 9000 -svrTimeout 9000 -CKA NO -TCPB NO -CMP NO

add serviceGroup ADM-SVCG-NTP UDP -maxClient 0 -maxReq 0 -cip DISABLED -usip NO -useproxyport NO -cltTimeout 120 -svrTimeout 120 -CKA NO -TCPB NO -CMP NO

add serviceGroup ADM-SVCG-LICENSE TCP -maxClient 0 -maxReq 0 -cip DISABLED -usip NO -useproxyport YES -cltTimeout 9000 -svrTimeout 9000 -CKA NO -TCPB NO -CMP NO

add serviceGroup ADM-SVCG-VENDOR-DEMON TCP -maxClient 0 -maxReq 0 -cip DISABLED -usip NO -useproxyport YES -cltTimeout 9000 -svrTimeout 9000 -CKA NO -TCPB NO -CMP NO
<!--NeedCopy-->
Bind load balancing virtual servers to service groups
bind lb vserver ADM-LB ADM-SVCG-HTTP

bind lb vserver ADM-LB-HTTPS ADM-SVCG-HTTPS

bind lb vserver ADM-LB-SNMP ADM-SVCG-SNMP

bind lb vserver ADM-LB-SYSLOG ADM-SVCG-SYSLOG

bind lb vserver ADM-LB-DB_HA ADM-SVCG-DB_HA

bind lb vserver ADM-LB-NTP ADM-SVCG-NTP

bind lb vserver ADM-LB-LICENSE ADM-SVCG-LICENSE

bind lb vserver ADM-LB-VENDOR-DEMON ADM-SVCG-VENDOR-DEMON
<!--NeedCopy-->
Bind service groups to NetScaler Console nodes
bind serviceGroup ADM-SVCG-HTTP <PRIMARY_IP> 80

bind serviceGroup ADM-SVCG-HTTP <SECONDARY_IP> 80

bind serviceGroup ADM-SVCG-HTTPS <PRIMARY_IP> 443

bind serviceGroup ADM-SVCG-HTTPS <SECONDARY_IP> 443

bind serviceGroup ADM-SVCG-SNMP <PRIMARY_IP> 162

bind serviceGroup ADM-SVCG-SNMP <SECONDARY_IP> 162
<!--NeedCopy-->
Add load balancing monitors
add lb monitor monitor-snmp UDP-ECV -send "Udp data" -destPort 162

add lb monitor monitor-syslog UDP-ECV -send "Udp data" -LRTM DISABLED -destPort 514

add lb monitor monitor-db TCP-ECV -LRTM DISABLED -destPort 5454

add lb monitor monitor-ntp UDP-ECV -send "Udp data" -LRTM DISABLED -destPort 123
<!--NeedCopy-->
Bind monitors and members to service groups
bind serviceGroup ADM-SVCG-SNMP -monitorName monitor-snmp

bind serviceGroup ADM-SVCG-SYSLOG <PRIMARY_IP> 514

bind serviceGroup ADM-SVCG-SYSLOG <SECONDARY_IP> 514

bind serviceGroup ADM-SVCG-SYSLOG -monitorName monitor-syslog

bind serviceGroup ADM-SVCG-DB_HA <PRIMARY_IP> 5454

bind serviceGroup ADM-SVCG-DB_HA <SECONDARY_IP> 5454

bind serviceGroup ADM-SVCG-DB_HA -monitorName monitor-db

bind serviceGroup ADM-SVCG-NTP <PRIMARY_IP> 123

bind serviceGroup ADM-SVCG-NTP <SECONDARY_IP> 123

bind serviceGroup ADM-SVCG-NTP -monitorName monitor-ntp

bind serviceGroup ADM-SVCG-LICENSE <PRIMARY_IP> 27000

bind serviceGroup ADM-SVCG-LICENSE <SECONDARY_IP> 27000

bind serviceGroup ADM-SVCG-VENDOR-DEMON <PRIMARY_IP> 7279

bind serviceGroup ADM-SVCG-VENDOR-DEMON <SECONDARY_IP> 7279
<!--NeedCopy-->
Enable modes and update service groups
enable ns mode USIP

enable ns mode MBF

set serviceGroup ADM-SVCG-SYSLOG -usip YES

set serviceGroup ADM-SVCG-SNMP -usip YES
<!--NeedCopy-->
Benefits
-
Flexible and resilient deployments: Enable HA across different subnets or data centers, improving fault isolation and availability.
-
Alignment with modern network architectures: Supports routed (L3) and segmented enterprise environments without Layer 2 constraints.
-
Leverages existing infrastructure: Integrates with NetScaler ADC or third-party load balancers for scalable and flexible traffic management.
Share
Share
This Preview product documentation is Cloud Software Group Confidential.
You agree to hold this documentation confidential pursuant to the terms of your Cloud Software Group Beta/Tech Preview Agreement.
The development, release and timing of any features or functionality described in the Preview documentation remains at our sole discretion and are subject to change without notice or consultation.
The documentation is for informational purposes only and is not a commitment, promise or legal obligation to deliver any material, code or functionality and should not be relied upon in making Cloud Software Group product purchase decisions.
If you do not agree, select I DO NOT AGREE to exit.