Configure Authoritative DNS
Authoritative DNS answers the incoming DNS queries from the configured DNS zones. It also manages your zones and makes routing decisions based on real-time service availability. It’s highly available, with multiple anycast networks that allow you to run a robust and high-performance infrastructure.
DNS Zones
A zone represents a single parent domain with a collection of records within it. Authoritative DNS supports primary zone creation. You can also import a zone with the most used record types such as A, AAAA, NS, SOA, CNAME, MX, PTR, SRV, SPF, and TXT.
Note:
Secondary zone creation and zone transfer aren’t supported.
When you create a zone, a NameServer (NS) record and a Start Of Authority (SOA) record are automatically created for the zone. You can create, edit, or delete zones.
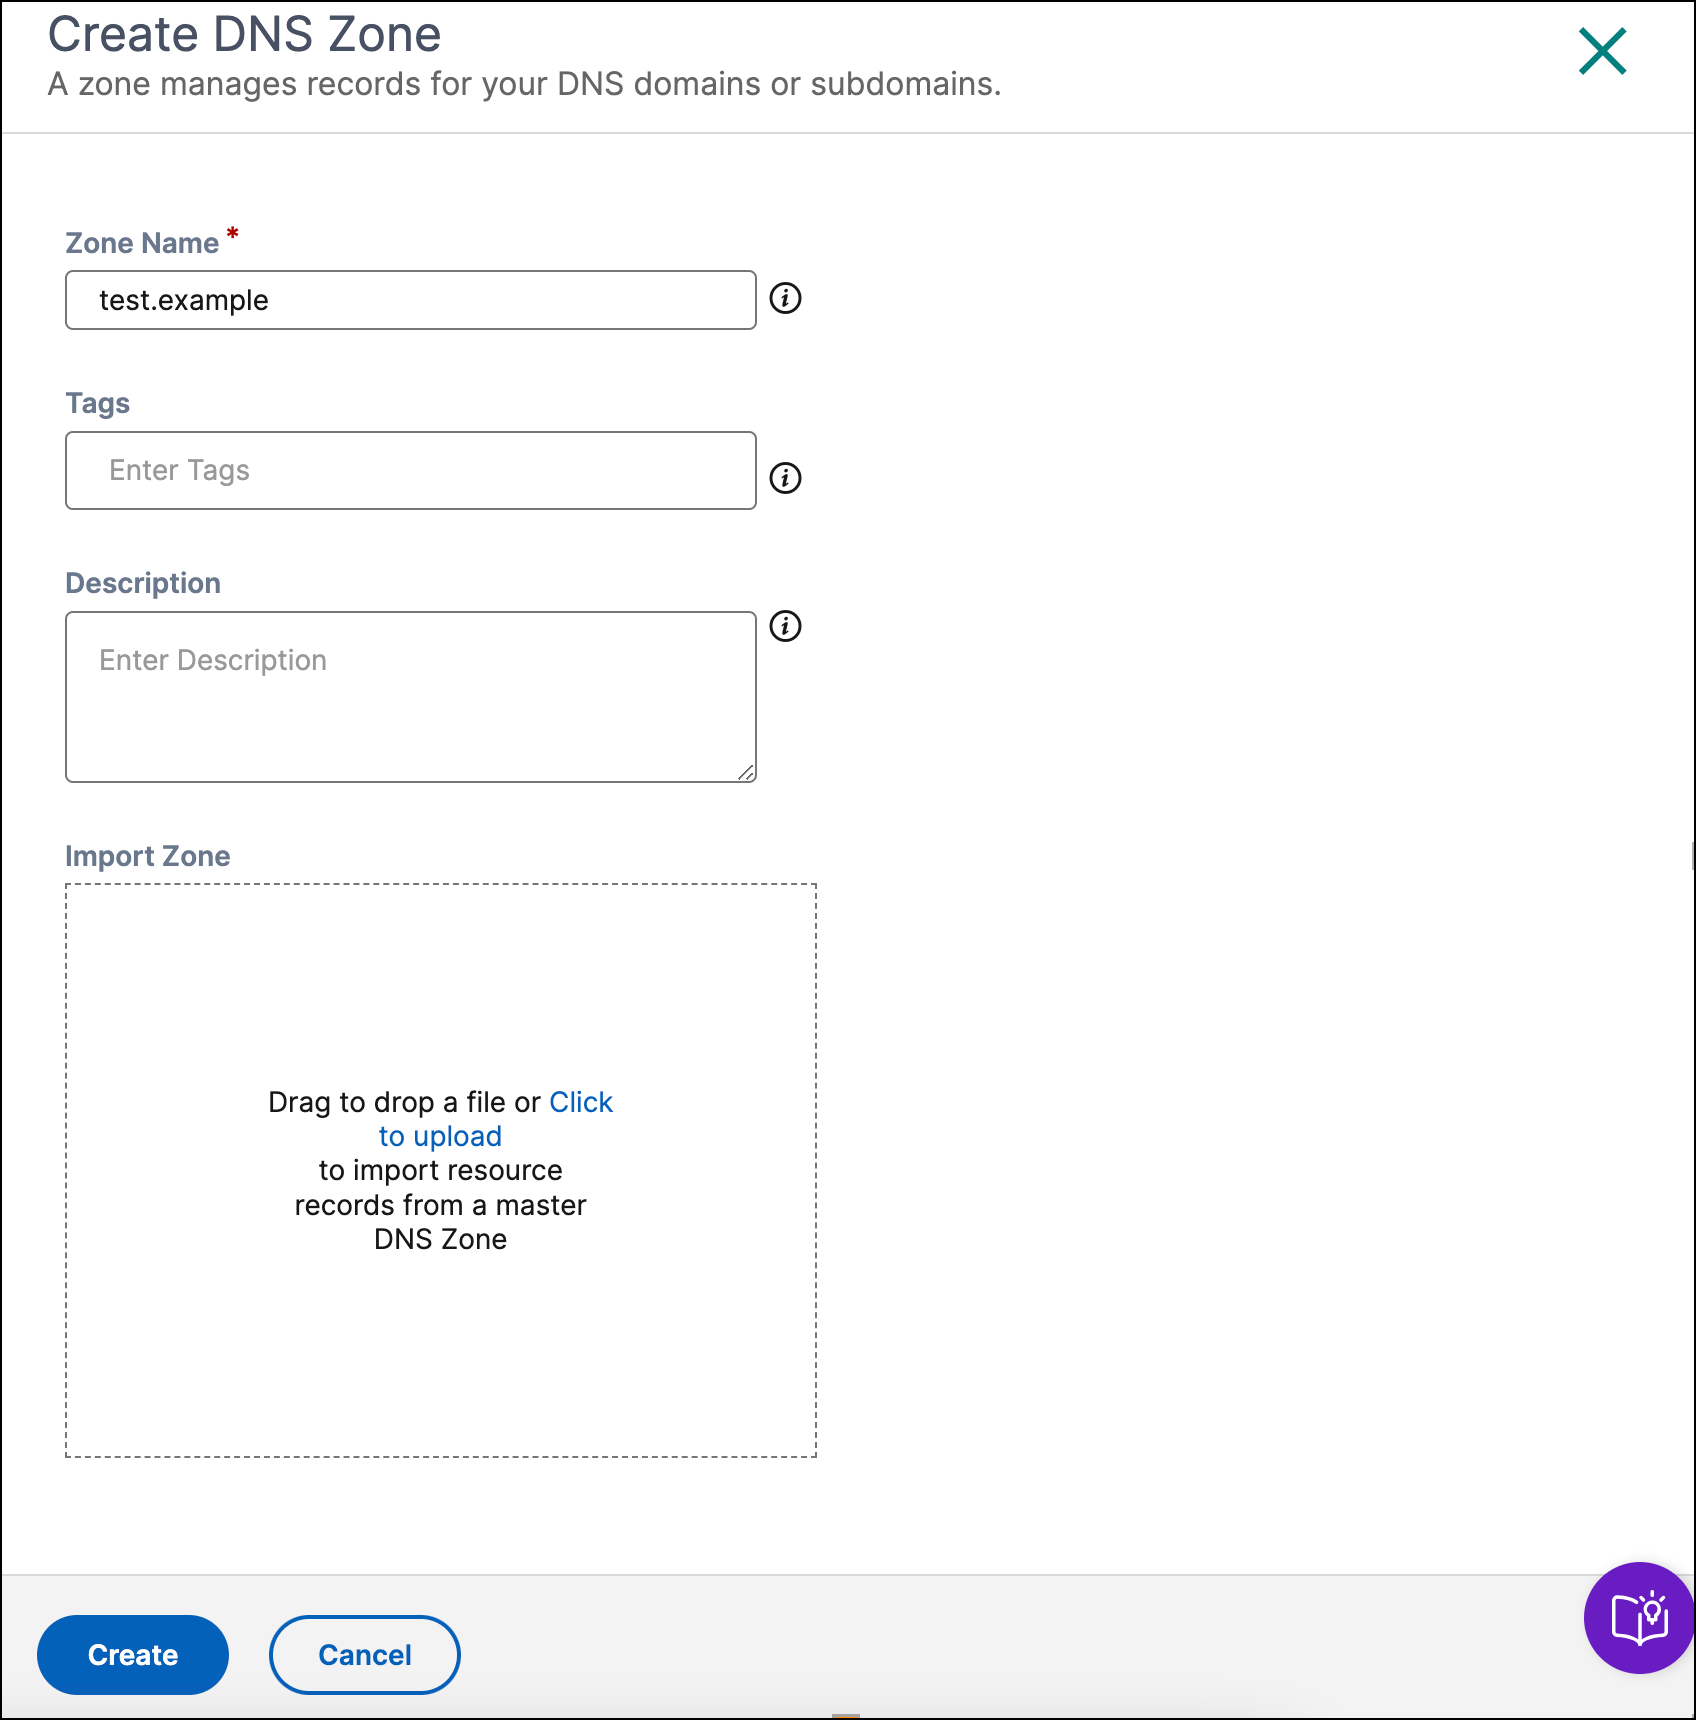
Create a DNS Zone
If you’re creating a DNS zone for the first time, the authoritative DNS start-up screen shows where you can click Create and get started. If you have already created some zones, you see a list of existing zones (domain names) along with the option to create DNS zones.
-
Navigate to Intelligent Traffic Management > Authoritative DNS.
-
Click Create and fill in the following details:
-
Zone Name: Name for the DNS zone. Must be a valid DNS domain or subdomain, and contain only ASCII alphanumeric, underscore, and hyphen (-) characters, for example, subdomain.domain.com. A zone name consists of a series of labels separated by dots. Each label can be up to 63 bytes, whereas the total length of the zone can be up to 253 bytes (including the dots). The maximum length of a DNS record (including the zone name suffix) must not exceed 255 bytes.
-
Tags: A label that helps you identify zones. For example, “demo” identifies the zones used for demo purposes.
-
Description: A description of the DNS zone.
-
Import Zone: If you have a zone import file that has the configuration of your zone, it can be imported to the NetScaler Console. Select Choose File to import a zone file from your computer (if available) or drag the file in the Import Zone field.
Note:
Ensure that the following requirements are met before importing a zone:
- The name of the zone in the zone file must match the name of the zone you’re creating.
- The zone file must use the standard BIND format for records.
- The imported file must have an RFC-defined zone file format.
- The number of records in a zone does not exceed 5000. To import more than the 5000 records, contact NetScaler support.
-
-
Click Create.
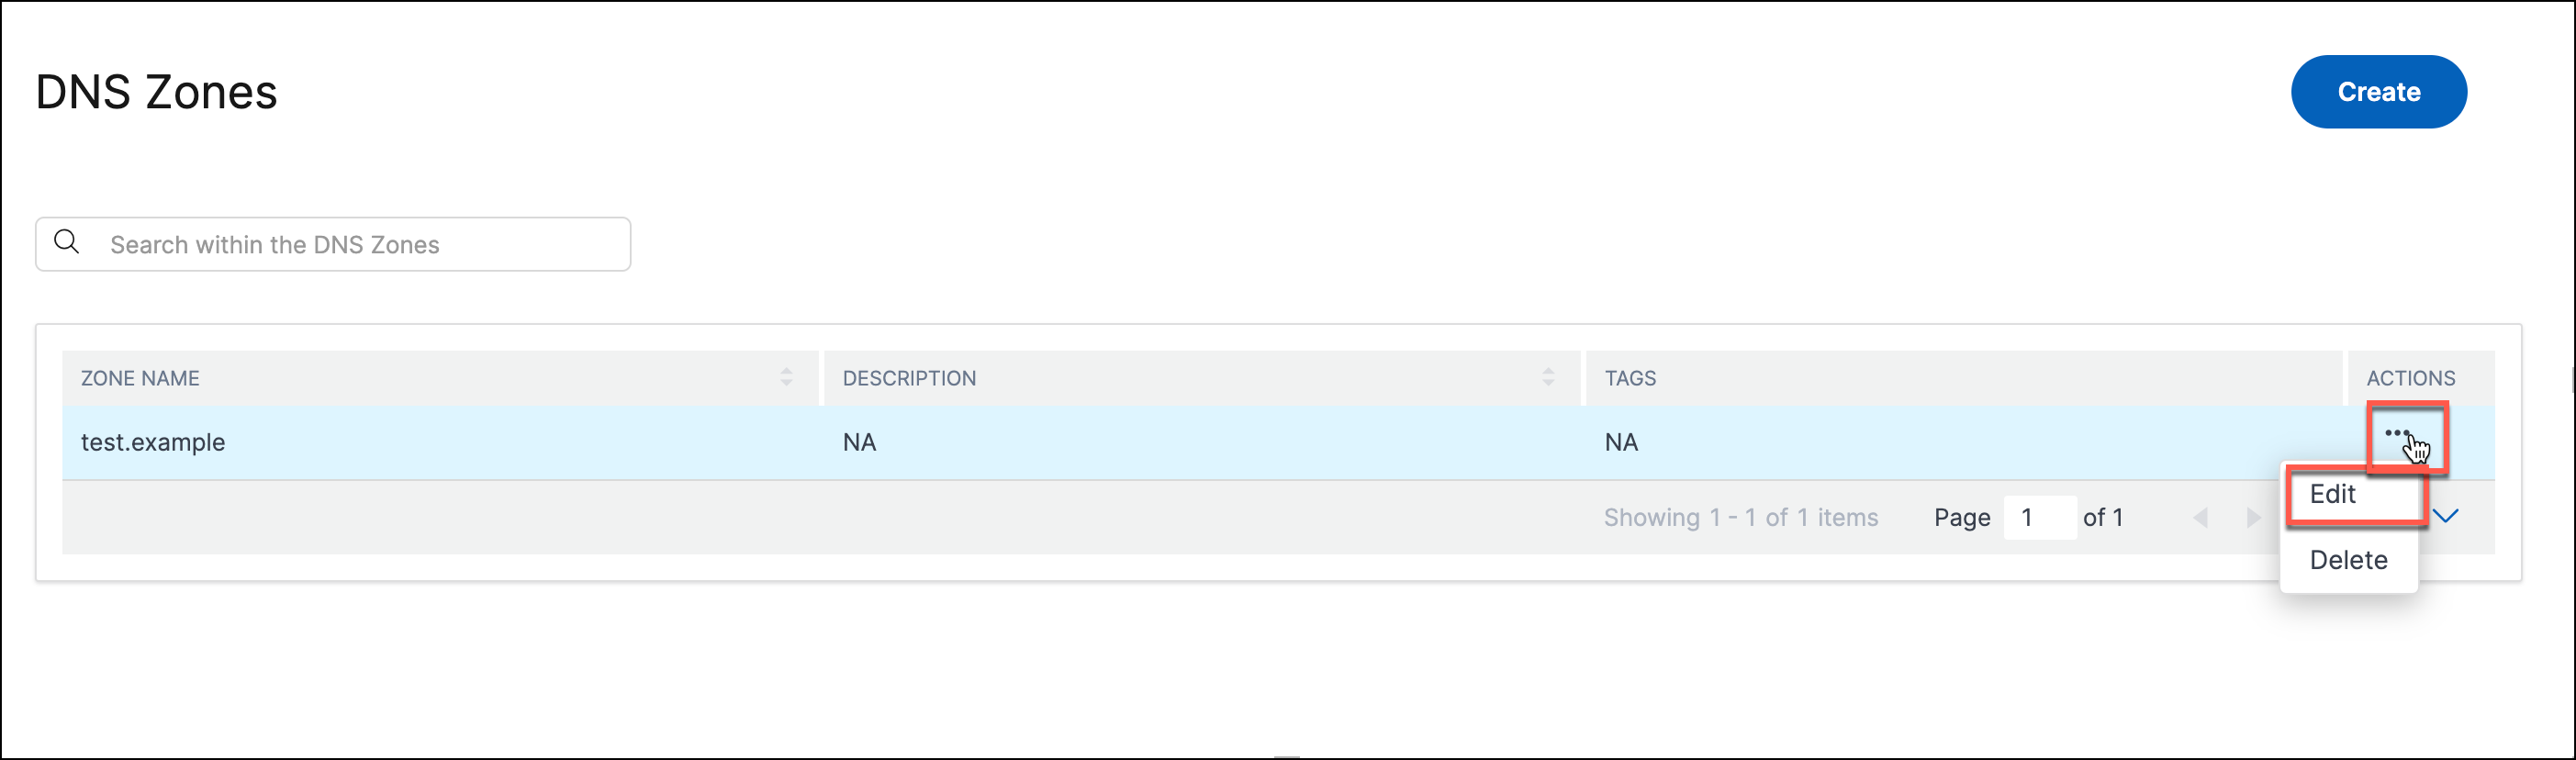
Edit a Zone
To edit a zone:
-
Navigate to Intelligent Traffic Management > Authoritative DNS.
-
Click … under the Actions column corresponding to the required multi-site application and click Edit.
Note:
If the name of a zone containing records for the multi-site application is updated, the corresponding applications remain reachable, but under the updated zone name. This change in the zone name isn’t reflected in the configuration of multi-site application. For the FQDN change to reflect in the configuration, you must delete and recreate the multi-site application.
-
Change the settings as required.
-
Click Update to save your changes.
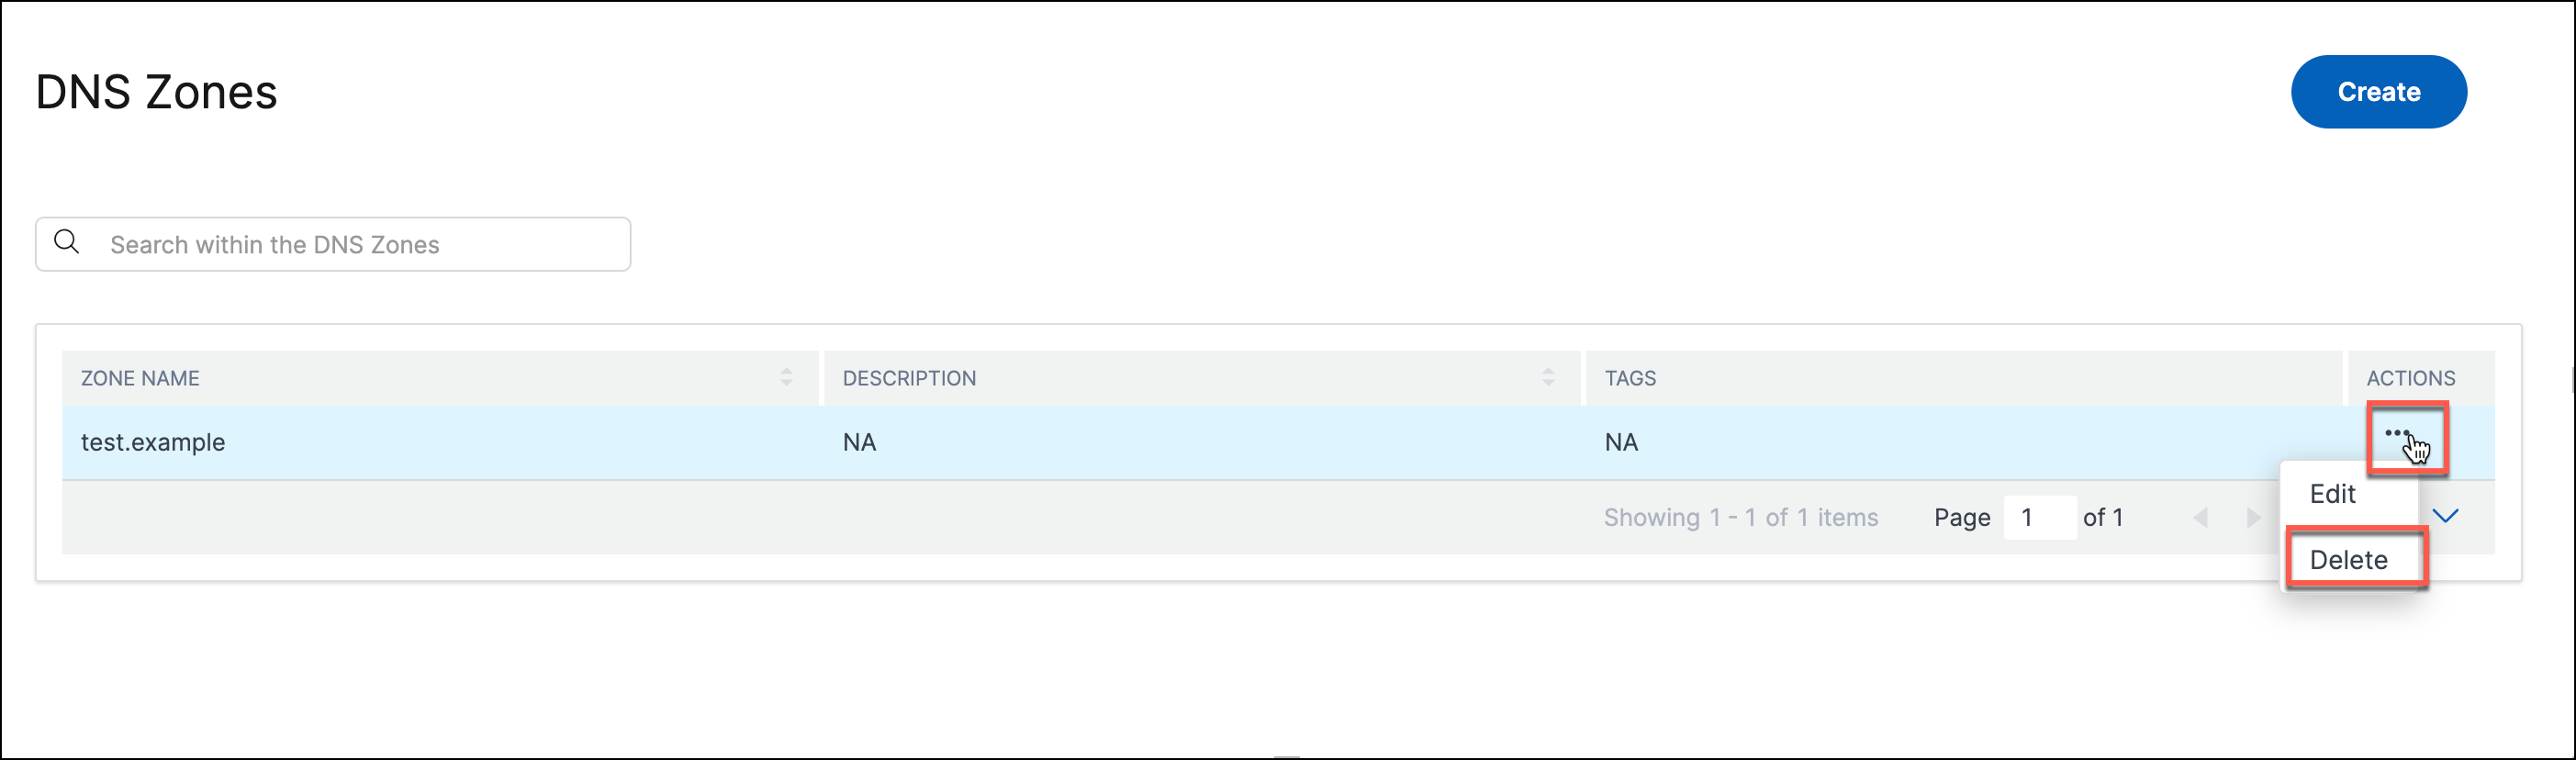
Delete a Zone
To delete a zone:
-
Navigate to Intelligent Traffic Management > Authoritative DNS.
-
Click … under the Actions column corresponding to the required multi-site application and click Delete.
-
When prompted, click Delete.
Important:
- This operation affects the entire zone, including all responses for any record within the zone. Ensure that the operation is performed with extreme caution.
- If the name of a zone containing records for the multi-site application is deleted, then the corresponding applications become unreachable. You must delete and recreate the multi-site application.
DNS Records
After you create a zone (for example testzone.com) for your domain, you can add records to the zone. Each record you add includes a name, a record type, and other information applicable to the record type. All records within the zone inherit its suffix. For example a www record under the testzone.com zone corresponds to www.testzone.com.
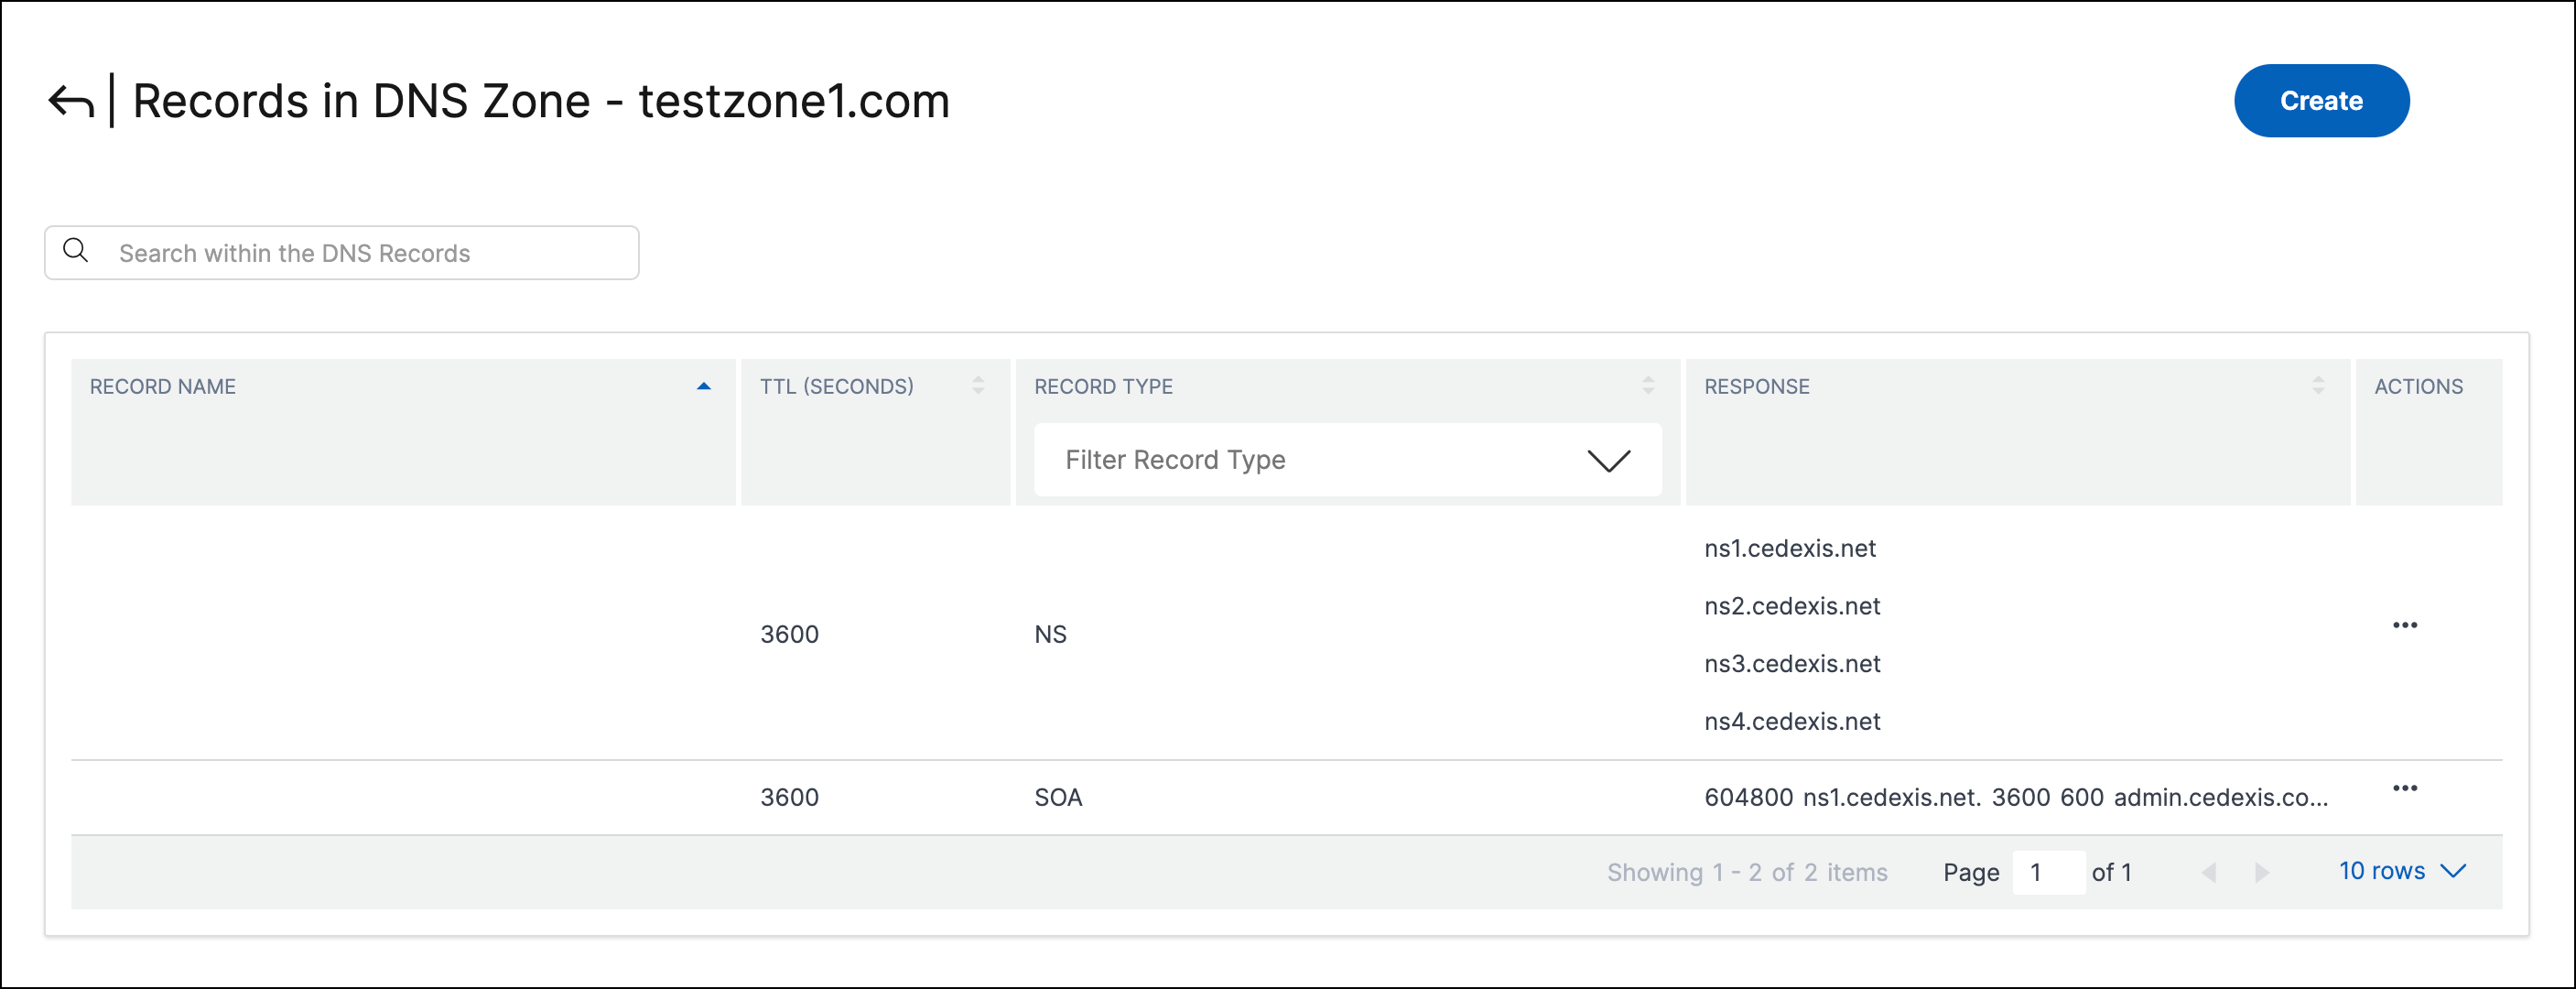
You can click a zone listed on the DNS Zones page to view the list of records within it. The page lists the TTL, Record Type, and Response for each subdomain or record. You can also use the Record Type list to filter this list based on record type.
Even if you haven’t created any records yet, you see at least two record types under Records for one or more zones that you created. These records are the NS and SOA records that are created by default when you create your zone.
You can add, edit, or delete records.
Record Types
NS Record
NS or Name Server records are responsible for delegating a DNS zone to an authoritative server. A name server (NS) record is created automatically when you create a zone. For example, ns1.test.example.net, ns2.test.example.net, ns3.test.example.net and ns4.test.example.net. These servers are the name servers that you would configure in your registrar so that DNS queries can be routed to your zone. These name servers help in confirming that the server set available to service requests matches the set of name servers returned in the delegation request. You can also edit the name servers to ensure they match.
Note:
NS records can be edited but not deleted.
SOA Record
The Start of Authority (SOA) record identifies the authoritative information about the zone. An SOA resource record is created by default when you create your zone. You can modify the record as needed.
Note:
Users can’t create SOA records, but can edit some parameters.
The format of an SOA record is as follows:
[MNAME] [RNAME] [Serial Number] [Refresh Time] [Retry Interval] [Expire Time] [Minimum TTL]
Here’s an example: ns1.test.example.net admin.test.example.com.314 3600 600 604800 10
The elements of the SOA record include:
- MNAME: The domain name of the primary name server, such as
ns1.test.example.netin the preceding example. - RNAME: The email address of the administrator in a format with the @ symbol replaced by a period, such as
admin.test.example.comin the preceding example. - Serial Number: A revision number to increment when you change the zone file and distribute changes to the DNS servers. An unsigned 32-bit integer, such as 314 in the preceding example.
- Refresh Time: Refresh the time in seconds that the DNS servers wait before querying the SOA record to check for changes. An unsigned 32-bit integer time interval in seconds, such as 3600 in the preceding example.
- Retry Interval: The retry interval in seconds that a secondary server waits before retrying a failed zone transfer, such as 600 (10 minutes) in the preceding example. Typically, the retry time is less than the refresh time.
- Expire Time: The time in seconds until which a secondary server tries to complete a zone transfer, such as 604800 (one week) in the preceding example.
- Minimum TTL: The minimum time to live (TTL) in seconds, such as 10 seconds in the preceding example.
A - IPv4 address
The value for an A record is an IPv4 address in dotted decimal notation. For example 192.0.2.235.
AAAA - IPv6 address
The value for an AAAA record is an IPv6 address in colon-separated hexadecimal format as specified in RFC 4291/5952 representations. For example, 2001:0db8:85a3:0:0:8a2e:0370:7334.
CAA
Certificate Authority Authorization (CAA) is a type of DNS record that allows the domain owners to specify which Certificate Authority (CA) can issue SSL certificates for the domain.
CNAME - Canonical name
The fully qualified domain name (for example, www.test.example.com) that you want authoritative DNS to return in response to DNS queries for this record. A CNAME value element is the same format as a domain name.
Important:
- The DNS protocol does not allow you to create a CNAME record for the root of the zone. That is, nameless CNAME records aren’t allowed. For example, if your zone is test.example.com, you can’t create a CNAME record for test.example.com. However, you can create CNAME records for
www.test.example.com,portal.test.example.com, and so on. In addition, if you create a CNAME record for a subdomain, you can’t create any other records for that subdomain. For example, if you create a CNAME record forwww.test.example.com, you can’t create other record types with the namewww.test.example.com.- If a subdomain has a multi-site application record, you can’t have A, AAAA or CNAME records in the same subdomain.
MX - Mail Exchange
MX is the record used in routing requests to mail servers. For example, 1 mail.test.example.com.
Each value for an MX record contains two values:
- The priority for the mail server which can be any 16-bit integer greater than 0.
- The domain name of the mail server.
If you specify multiple servers, the value that you specify for the priority indicates which mail server you want the email to be routed to first, second, and so on. For example, if you have two mail servers and you specify values of 1 and 2 for the priority, email always goes to the server with a priority of 1 unless it is unavailable. If you specify values of 1 and 1, email is routed to the two servers approximately equally.
Multi-site app records
The multi-site application records are automatically created when you create a multi-site application with a user-defined FQDN under a NetScaler managed authoritative DNS zone. These records are read only and displayed for informational purposes. You can only delete or update these records by deleting or updating the corresponding multi-site application.
PTR - Pointer record
PTR records are used to map an IP address to a domain name, primarily for reverse DNS. Properly configured PTR records can be important for security scenarios such as validating the credibility of email senders, or the reverse DNS lookup performed in an SSH session establishment. A PTR record value has the same format as a domain name. For example, hostname.test.example.com.
SPF - Sender Policy Framework
An SPF record identifies which mail servers are permitted to send an email on behalf of your domain. It starts with v=spf, for example, v=spf1 ip4:192.168.0.1/16-all.
SRV - Service locator
An SRV record is used by voice over IP, instant messaging protocols, service discovery, and other applications. An SRV record value element consists of four space-separated values. The first three values are decimal numbers representing priority, weight, and port. The fourth value is a domain name.
The format of an SRV record is: [priority] [weight] [port] [domain name]
For example: 1 10 5269 xmpp-server.example.com
TXT - Text
A text record can contain arbitrary text and can also be used to define machine-readable data, such as security or abuse prevention information. It’s also often used for domain ownership verification (for example, you can get a certificate, register third-party tools to operate on behalf of your domain). It just needs to contain text, for example, Sample Text Entry.
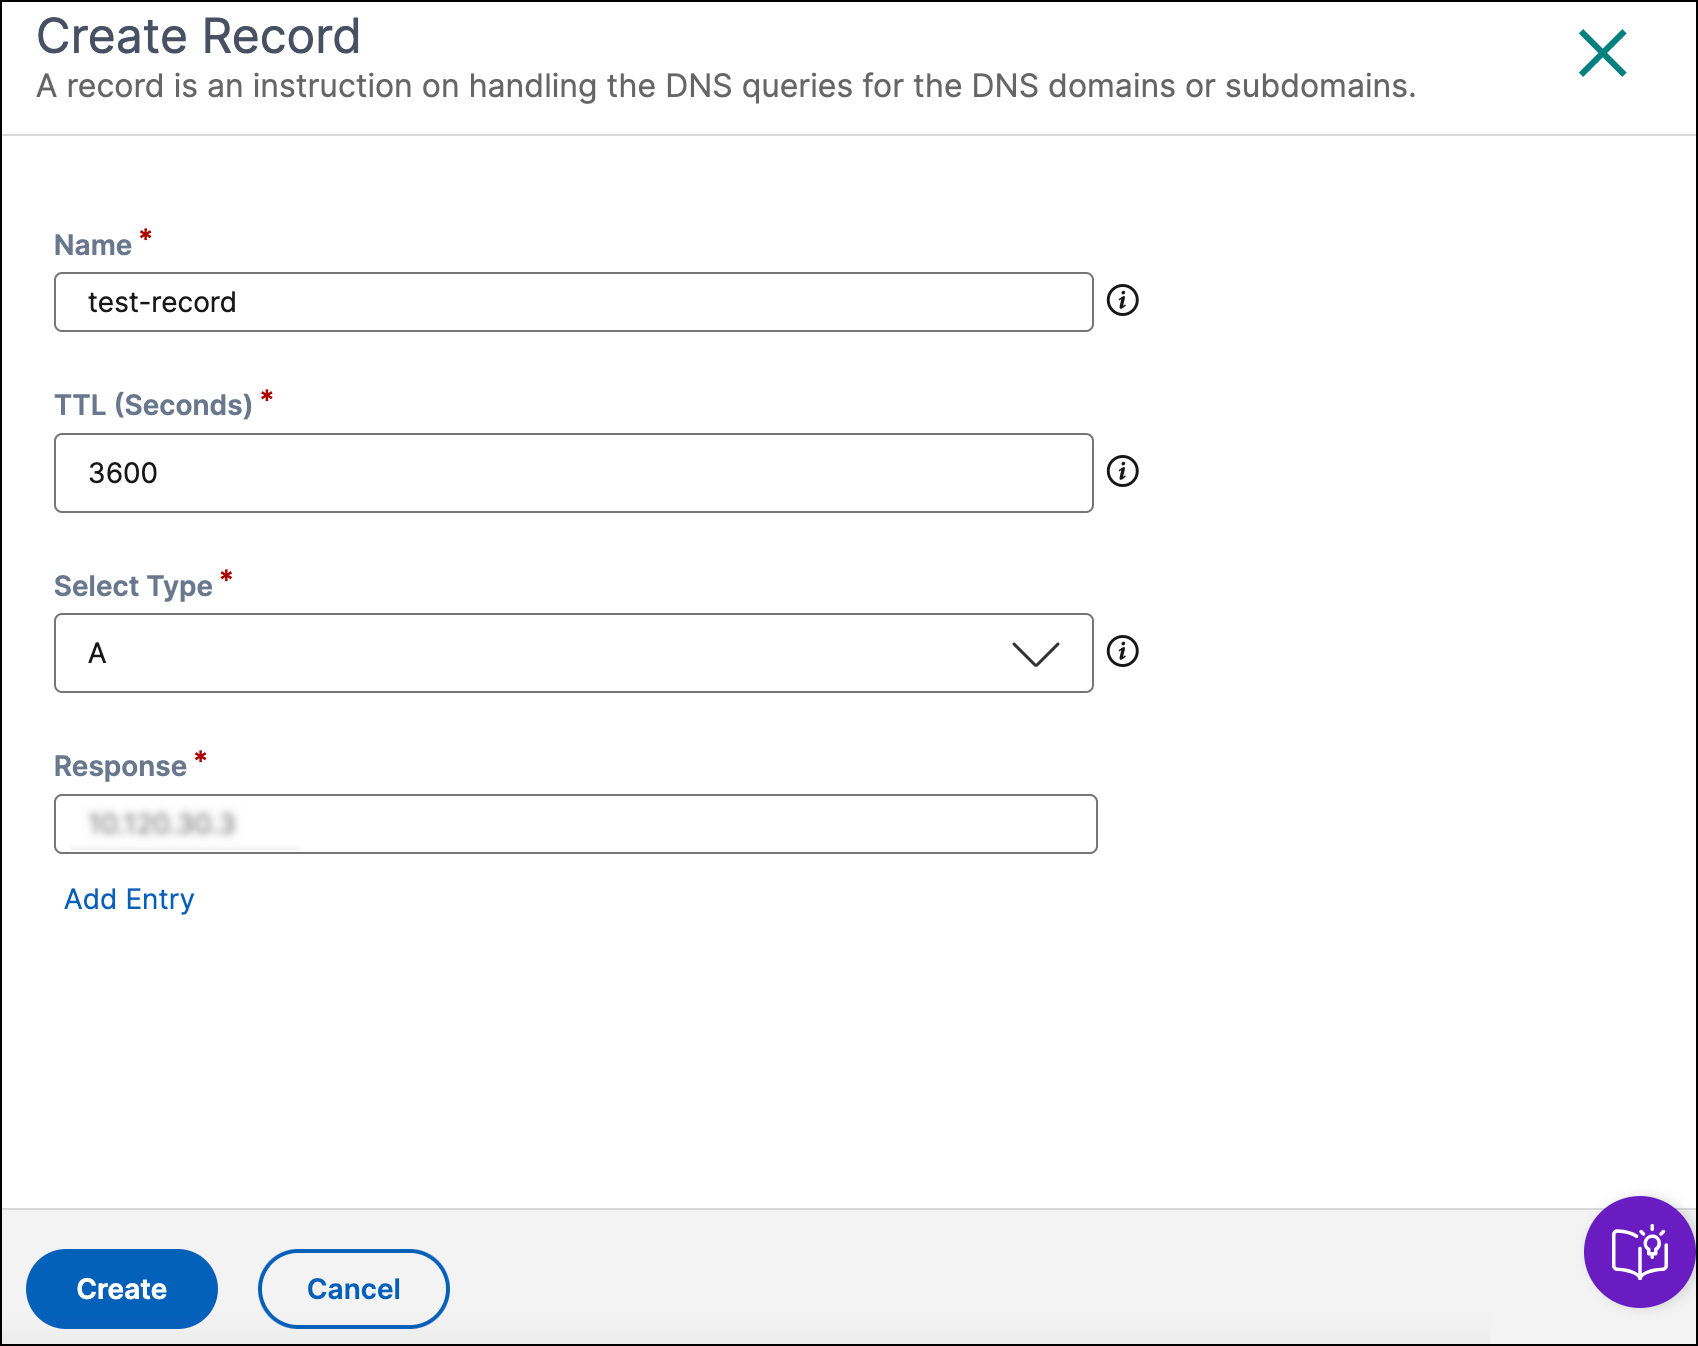
Add a record
To add a record:
-
Navigate to Intelligent Traffic Management > Authoritative DNS.
-
Click a multi-site application listed on the DNS Zones page.
-
Click Create and fill in the following details:
-
Name: Name of the DNS record. If you leave this field empty, a record is created at the apex of the zone. For example, if your zone is
testzone.comand you want anArecord at the root of this domain, specify this record as a nameless record in thetestzone.com zone. Some specifications and vendors refer to this record as the @ record. - TTL (Seconds): The time in seconds up to which the DNS recursive resolvers or clients cache the record details. If you specify a longer value (for example, 172,800 seconds, or two days), resolvers reuse a previous response and send requests to the authoritative DNS server less often. However, this means it takes longer for changes to the record to take effect because recursive resolvers use the values in their cache for longer periods instead of asking for the latest information.
- Select Type: Type of DNS record. For details on the types of records, see Record Types.
- Response: The response that the DNS provides for the DNS queries that match the name and type. For all types except CNAME, you can enter more than one response value. Enter multiple response values by clicking Add Entry. If multiple values are entered, all the specified responses are returned for each request of that type and name.
-
Name: Name of the DNS record. If you leave this field empty, a record is created at the apex of the zone. For example, if your zone is
-
Click Create.
Edit Record
To edit a record:
-
Navigate to Intelligent Traffic Management > Authoritative DNS.
-
Click a multi-site application listed on the DNS Zones page to view the list of records within a zone.
-
Click … under the Actions column corresponding to the required multi-site application and click Edit.
-
Change the settings as required.
-
Click Update to save your changes.
Delete Record
To delete a record:
-
Navigate to Intelligent Traffic Management > Authoritative DNS.
-
Click … under the Actions column corresponding to the required multi-site application and click Delete.
-
Click Delete.
Note:
NS and SOA records are the default record types and can’t be deleted. These records are removed only if the zone is deleted.
Configure Authoritative DNS
Configuring Authoritative DNS involves the following steps:
Step 1: Create a zone
To begin, create a zone with the same name as your company’s domain name. A zone represents a single parent domain with a collection of records within it. It provides information on how you want to route traffic for your domain and its subdomains. If you have a zone file from your current DNS provider, import it. With an imported zone file, you can quickly create all of the records for your zone.
Navigate to the Authoritative DNS menu to create your zone. For detailed information on how to create a zone, see Create a DNS Zone.
Step 2: Add DNS records
You can create records for the zone manually or import a zone file with all its records. When you import a zone file, authoritative DNS replicates your original zone definition migrating all existing records within it.
For detailed information on how to add DNS records, see Add Record.
You can map an existing multi-site application to a CNAME or A/AAAA record. To test the records in your zone, you can use a tool called dig (domain information groper) that queries DNS servers directly. Run dig with your zone name as the parameter. For example:
dig @ns1.ourdomain.net NS testzone.com
dig @ns1.ourdomain.net A host.testzone.com
The @ns1.ourdomain.net makes a request to the NetScaler Console and the record type (NS or A) indicates which record to ask for. The NS command asks for the NS records for the testzone.com zone, and the second command @ns1.ourdomain.net A host.testzone.com would be an A record for the host in the testzone.com zone.
Step 3: Assign the NetScaler Console as the authoritative DNS by updating your name servers
To assign the NetScaler Console as the authoritative DNS to manage your domain name, update the name servers that are responsible for responding to your DNS queries to our name servers as these are indicated by the NS record(s). For example, ns1.test.example.net, ns2.test.example.net, ns3.test.example.net, and ns4.test.example.net. The new NetScaler Console name servers will then respond authoritatively for your company.
Step 4: Validate the traffic flow appropriately
Initially, you see traffic running between both systems (your previous DNS service and NetScaler managed authoritative DNS), depending on the length of the TTL in the previous system. It can take a while for the traffic to fully migrate. If you experience any errors during migration, go back to the name servers provided by your previous DNS service, and then determine what went wrong. If you see traffic flowing as expected, you have successfully migrated to NetScaler managed authoritative DNS. The default TTL is 3600 seconds. You might want to lower the TTL initially until you make sure that the migration is successful. Once you’re satisfied with the traffic flow, you can increase the TTL to a longer duration.