Deliver a multi-site application
The multi-site application feature enables you to create, configure, and deliver an application in multiple sites.
Prerequisites
Before you deliver a multi-site application, ensure that you have the following:
-
For user-defined multi-site applications, one of the following:
-
multi-site application authoritative DNS zone. Configure authoritative DNS if you want to have your DNS records in a NetScaler managed authoritative DNS zone. Authoritative DNS helps you manage both static records and multi-site app records through Citrix Cloud.
-
Cloud Access Profile.
-
Step 1: Create a multi-site application
Follow the steps to create a multi-site application and define the application endpoints.
- Navigate to Inteliigent Traffic Management > Multi-Site Applications > New Multi-Site Application.
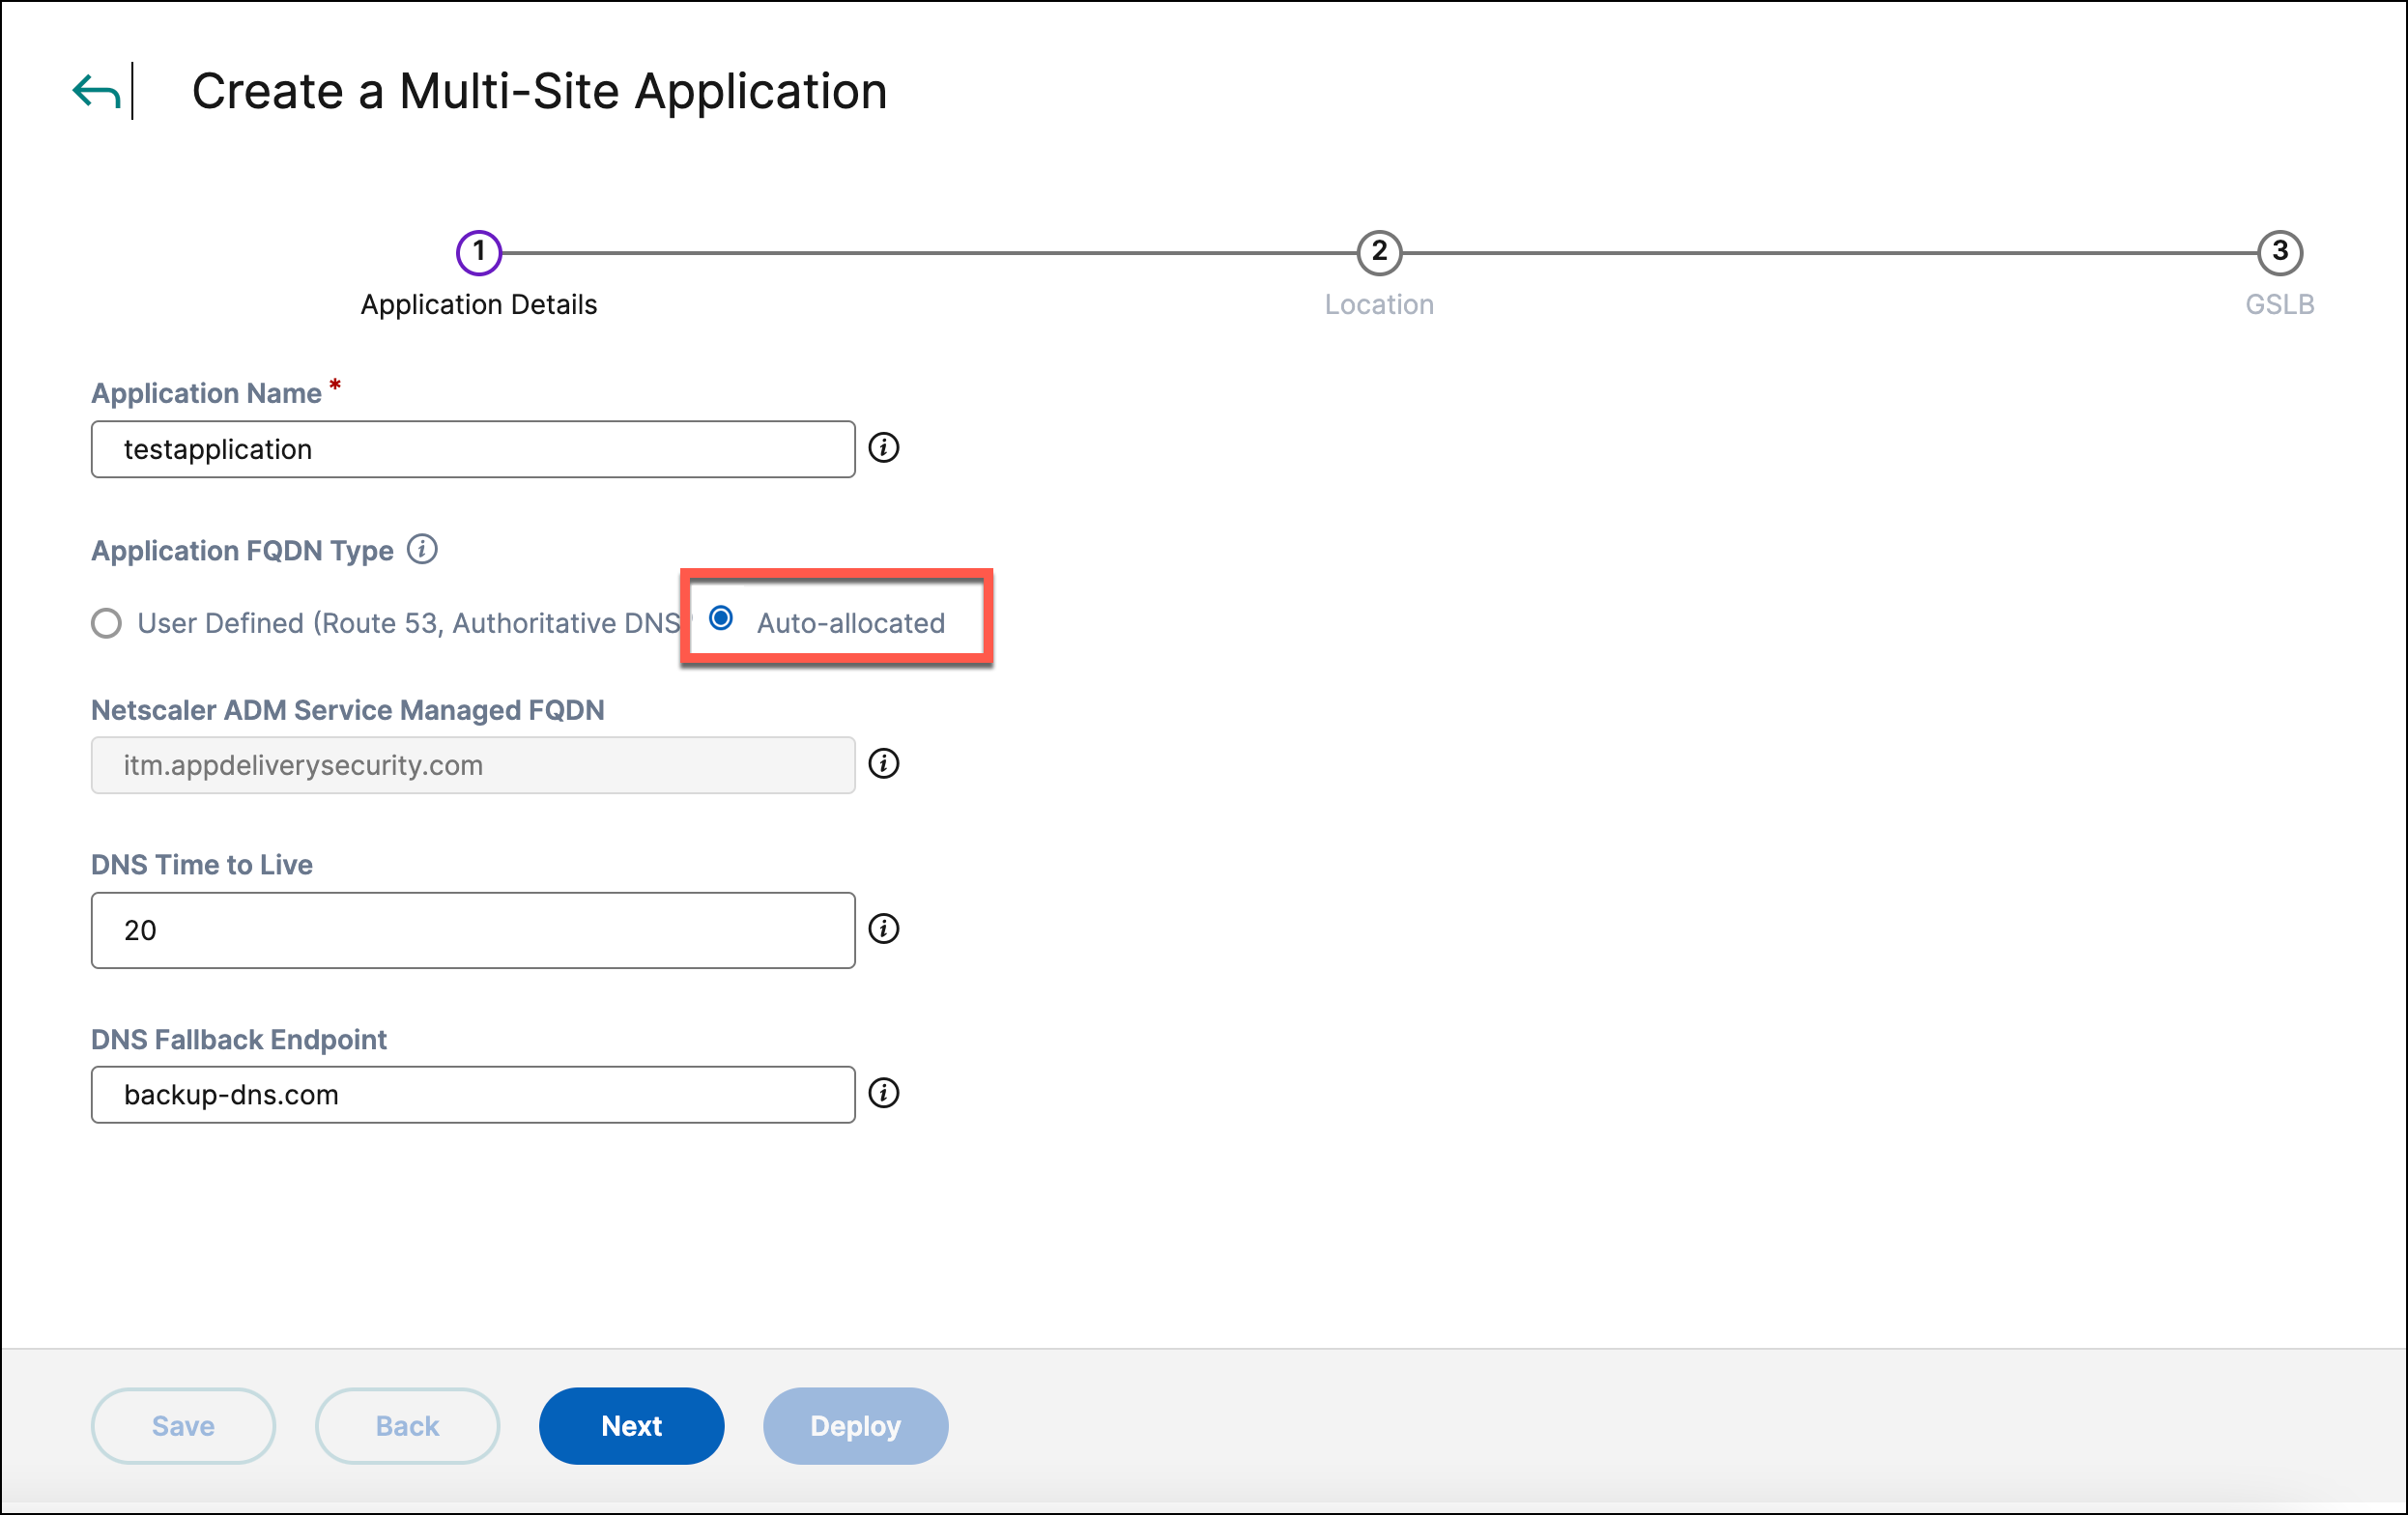
- In the Create a Multi-Site Application page, type the application name in Application Name.
- Select an Application FQDN Type:
-
Select Auto-allocated if you want to use a DNS provider other than cloud providers or Authoritative DNS to host the application FQDN. The multi-site application feature handles the creation of FQDN. It displays the FQDN details in the Multi-Site Applications summary page after the deployment. You can configure the FQDN as a CNAME record in your DNS provider.
-
Select User Defined if you want to use a cloud provider or authoritative DNS as the DNS provider to host the application FQDN and do the following:
- Select a Cloud Access Profile that is already configured.
- Type the domain name for the application in Domain of Application FQDN.
-
Select a DNS zone from the Hosted DNS Zone list. The NetScaler Console multi-site application feature handles the creation of FQDN. A CNAME for this FQDN is automatically created in your cloud provider’s DNS zone. If you have configured authoritative DNS, then select a DNS zone from the list of authoritative DNS zones.

-
-
Type a value in DNS Time to Live. The value indicates how long the DNS response is cached for the application.
- Type an IP address or a host name in DNS Fallback Endpoint. This endpoint acts as a backup endpoint and responds to DNS queries when there are no healthy sites available for the multi-site application. If the field is left blank, the multi-site application sends an empty DNS response.
You’ve completed the steps to define the endpoint details for the multi-site application.
Click Next, to add a site.
Step 2: Add a site
Sites are locations that are load balanced by GSLB. You can either create a User Defined or a Managed site. Follow these steps to add and configure a site.
- Click Add Site.
- In the Add a New Site page, do one of the following:
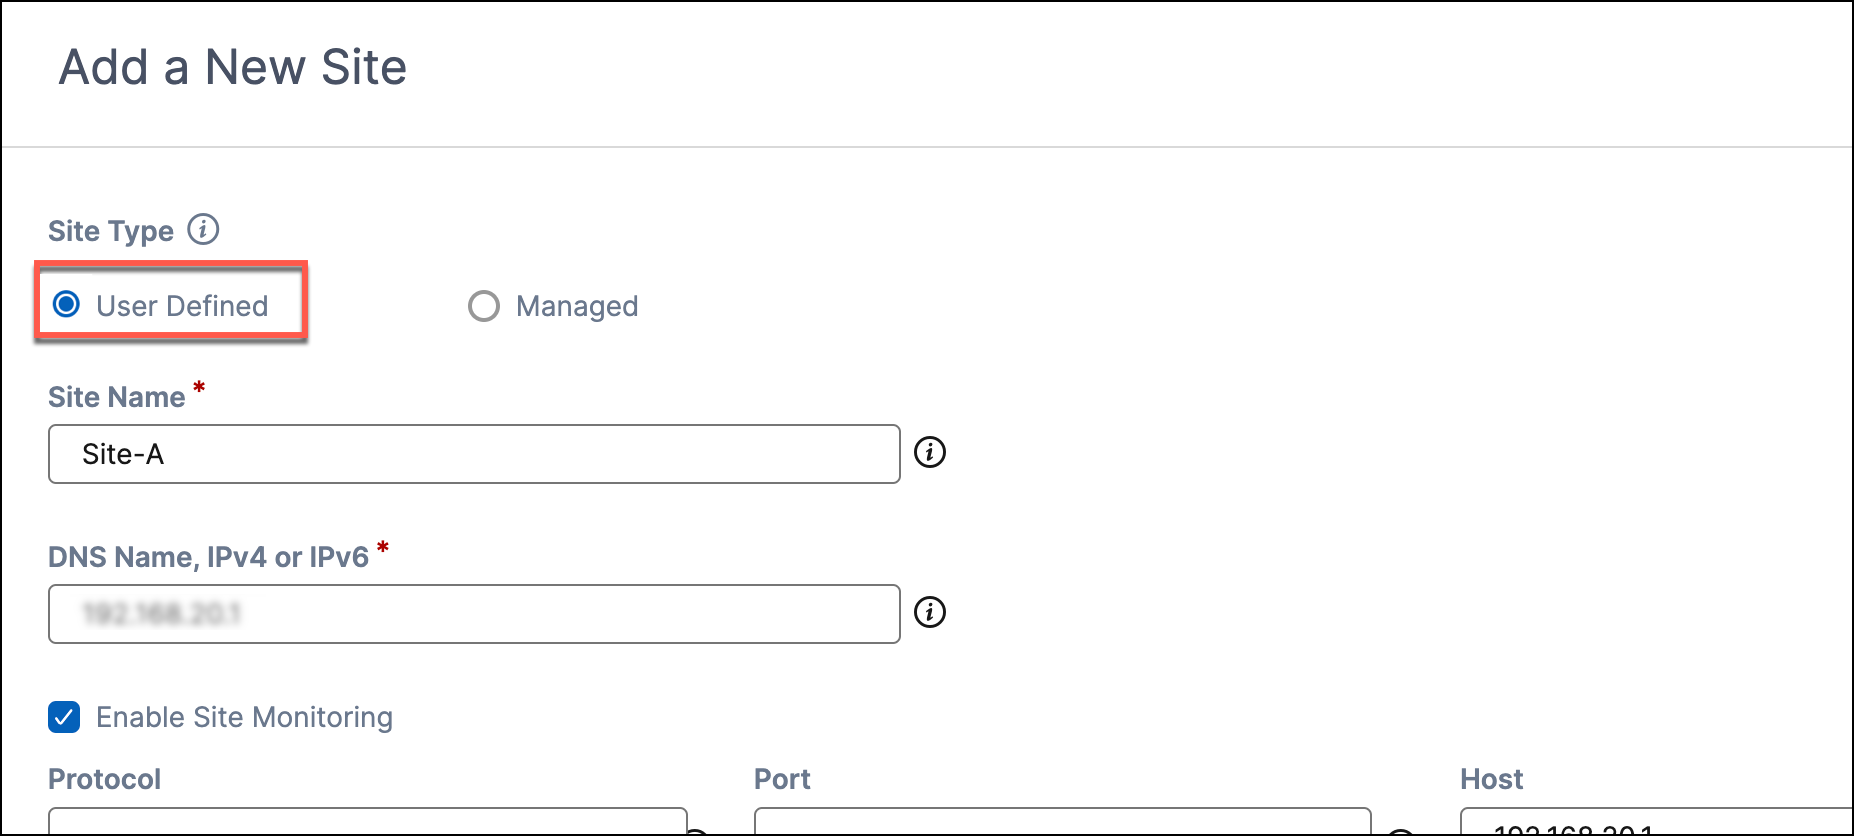
- Select User Defined if your site is an on-premises data center, cloud, CDN, or any external platform not managed by the NetScaler Console. Do the following:
- Type the name of the site in Site Name.
-
Type an IPv4 address (32-bit), a DNS name, or an IPv6 address (128-bit hexadecimal) in the DNS Name, IPv4, or IPv6 field for the application hosted on the user-defined site.
Note:
A combination of sites configured with IPv4 address (or DNS name) and IPv6 address isn’t supported. This combination might lead to inconsistent behavior of the multi-site application.
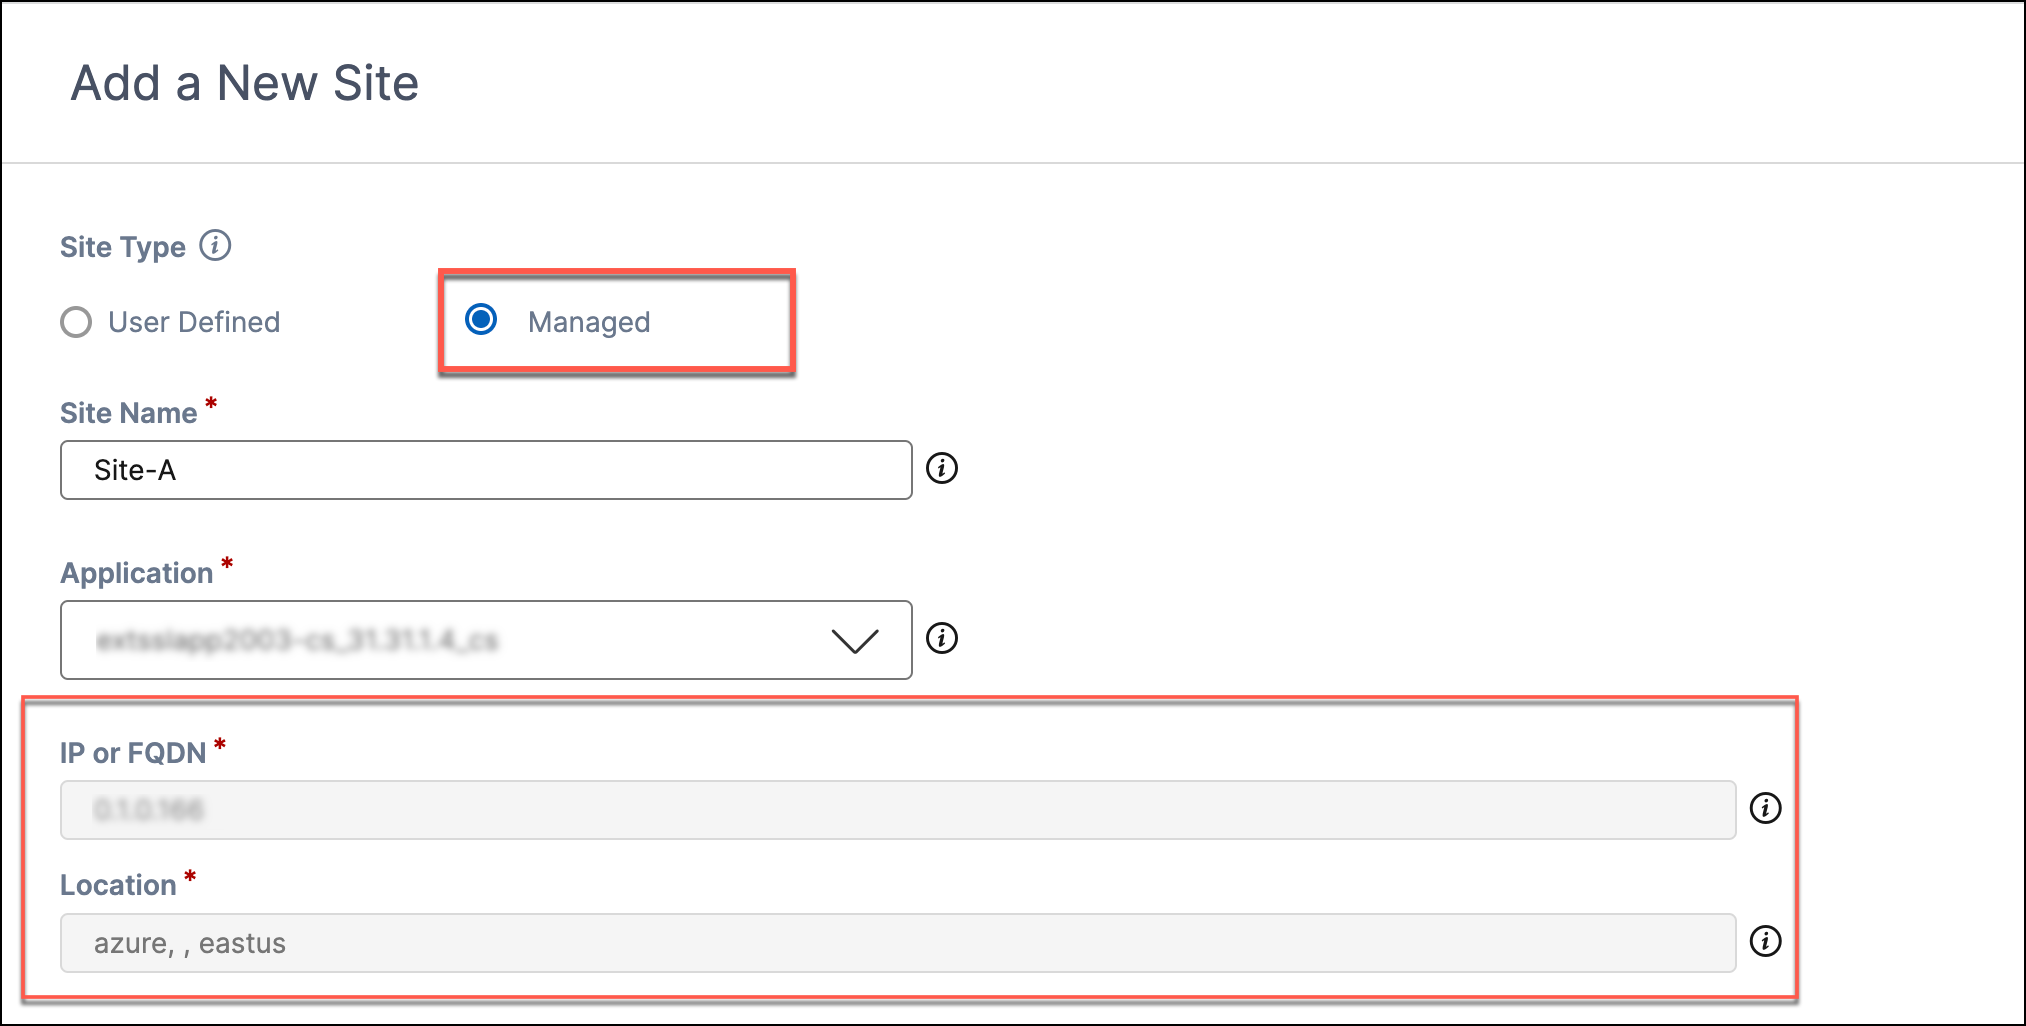
- Select Managed if your NetScaler Console manages the site. Do the following:
- Type the name of the site in Site Name. You’re presented with a list of modern applications and managed applications to choose from.
-
Select an application that is delivered. The FQDN or IP and the location of the delivered application is automatically delivered. For managed applications, this entry might correspond to an internal IP address. Review and update this entry with the external FQDN or IP address.
- Select User Defined if your site is an on-premises data center, cloud, CDN, or any external platform not managed by the NetScaler Console. Do the following:
- Optionally, configure a monitor to send health probes to the site to verify if they’re healthy. Do the following:
-
Select a protocol. You can select HTTP, HTTPS, or TCP.
If you select HTTP or HTTPS, the port number gets populated automatically. If needed, you can change the port number. Enter the Host and Path.
You can select TCP only for user-defined sites. If you select TCP, enter the port number manually.
Note:
The protocol type is automatically populated for the managed site.
- Type a TCP port number in Port, which is used by the application hosted on the site.
Note:
The port number is automatically populated for the managed site.
- FQDN is automatically populated in Host. Optionally, you can type a custom FQDN and path in Host. For example, type
hostname1/path/testif you want to override the health probes URL tohttp://hostname1/path/testorhttps://hostname1/path/testinstead. Modifying the monitor’s FQDN is necessary if there’s HTTPS endpoints, since the installed certificate might result in SSL failures (that is, if there’s a user-defined site with an IP address1.1.1.1,https://1.1.1.1/would fail, whereashttps://hostname1/would succeed) and mark the site as unhealthy.
-
- Select the location type of the user-defined site. You can host your site either in a public cloud provider network or in your private data center. Choose one of the following:
- AWS/Azure/GCP: Select AWS/Azure/GCP if you’re hosting the site in a Point of Presence (POP) belonging to AWS, Azure, or Google Cloud Platform. Select the POP or Availability Zone (AZ).
- CDN: Select CDN if you’re hosting the site in a Content Delivery Network (CDN). A CDN has a globally distributed set of servers that proxies and caches web data at edge locations closest to the users. Select the CDN.
- Private Data Center: Select Private Data Center if you’re hosting the site in your private data center. Type the geographical location where the site is hosted. This field is integrated with Google maps.
Note:
The location is automatically populated for managed sites and user-defined sites hosted in a public cloud or a CDN.
- Toggle to enable Configure Radar if you have chosen Private Data Center as the site location type. Type the URL path to retrieve the radar object to measure the RTT of the site. For example, type
http(s)://<ip-or-dns-name>/path/to/.Note:
- The extension,
/r20.gifis automatically appended to the given URL. - If you don’t select the Configure Radar option and successfully complete the radar object configuration, the Optimal RTT algorithm is disabled while configuring GSLB methods.
- For successful multi-site application delivery, the radar probe URL must be reachable.
- For managed sites and public cloud provider site location types, radar measurements are automatically collected.
- Radar must be activated for the selected private data center. For more information, see Activate radar for a private data center.
- The extension,
-
Select continents and countries in Geo Fencing that can access your site. By default, all the continents are selected. For example, to select a particular continent, clear Select All and select Asia. Only users from the Asia continent are serviced from this site. You can also search for a location.
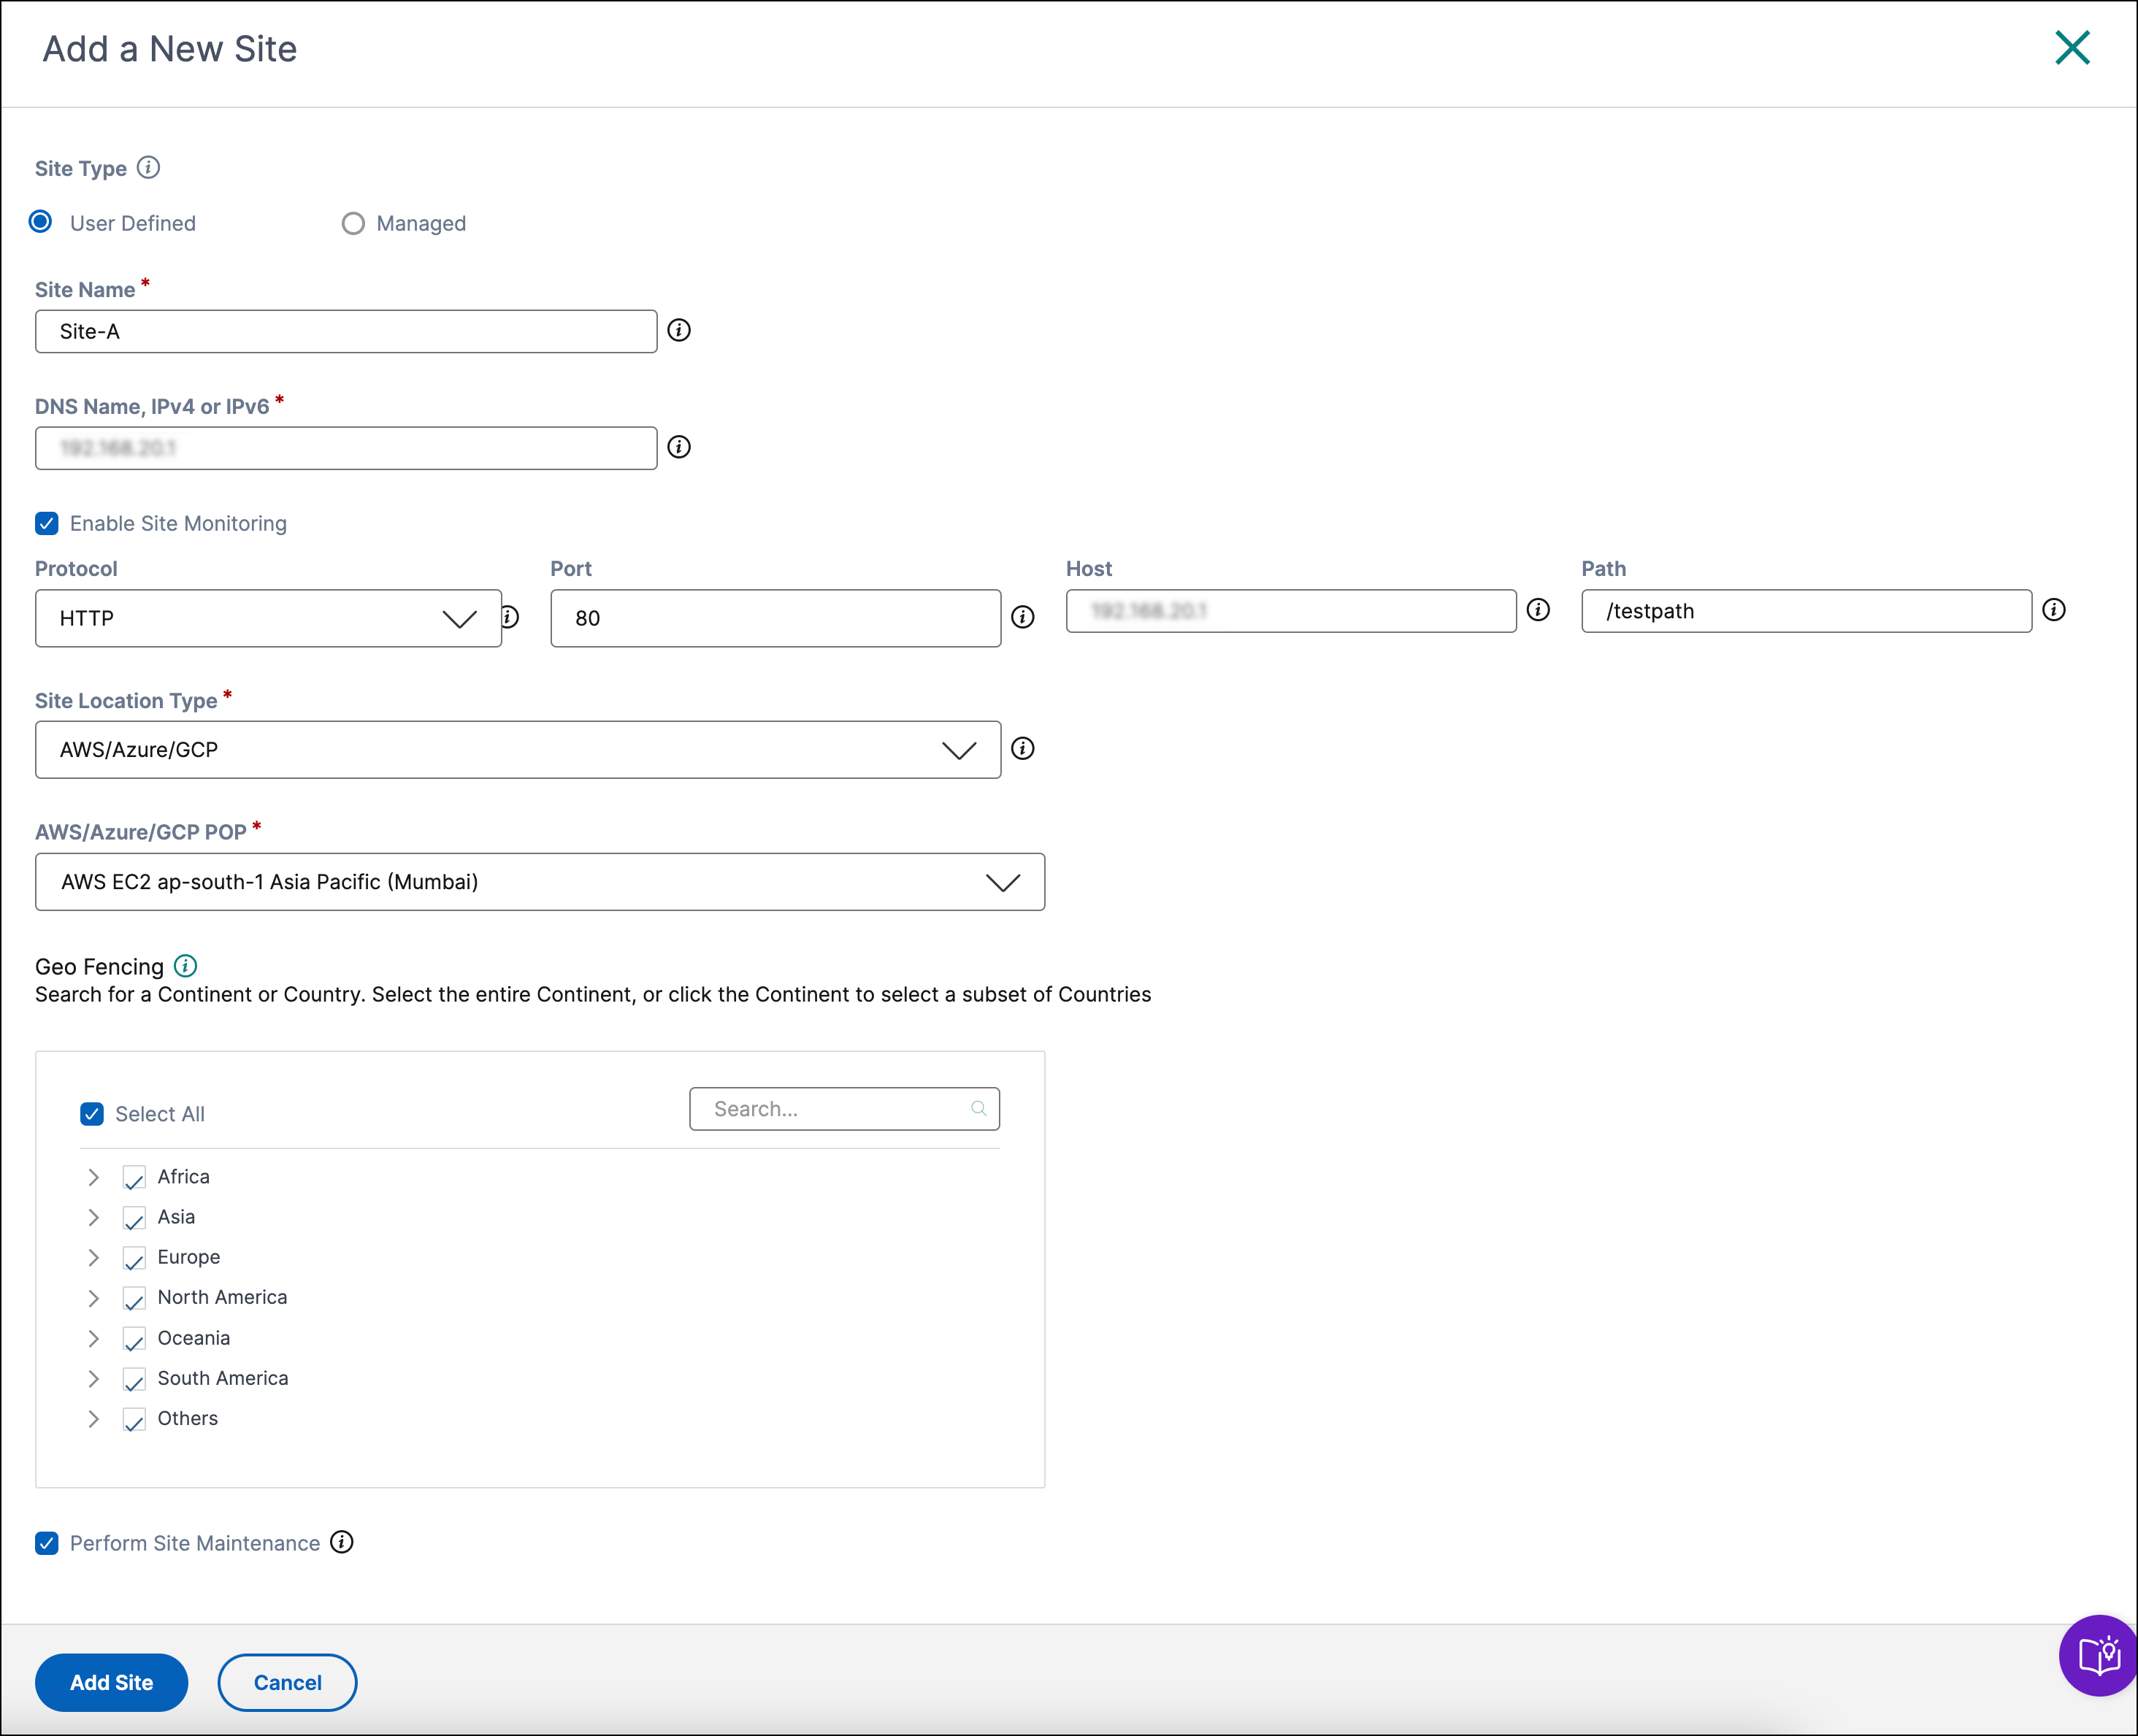
- Select the Perform Site Maintenance checkbox to mark your site in the maintenance mode.
Note:
For sites in the maintenance mode, the multi-site application in the Analytics dashboard is marked as under maintenance.
-
Click Add Site. The site is added, and its details are displayed.
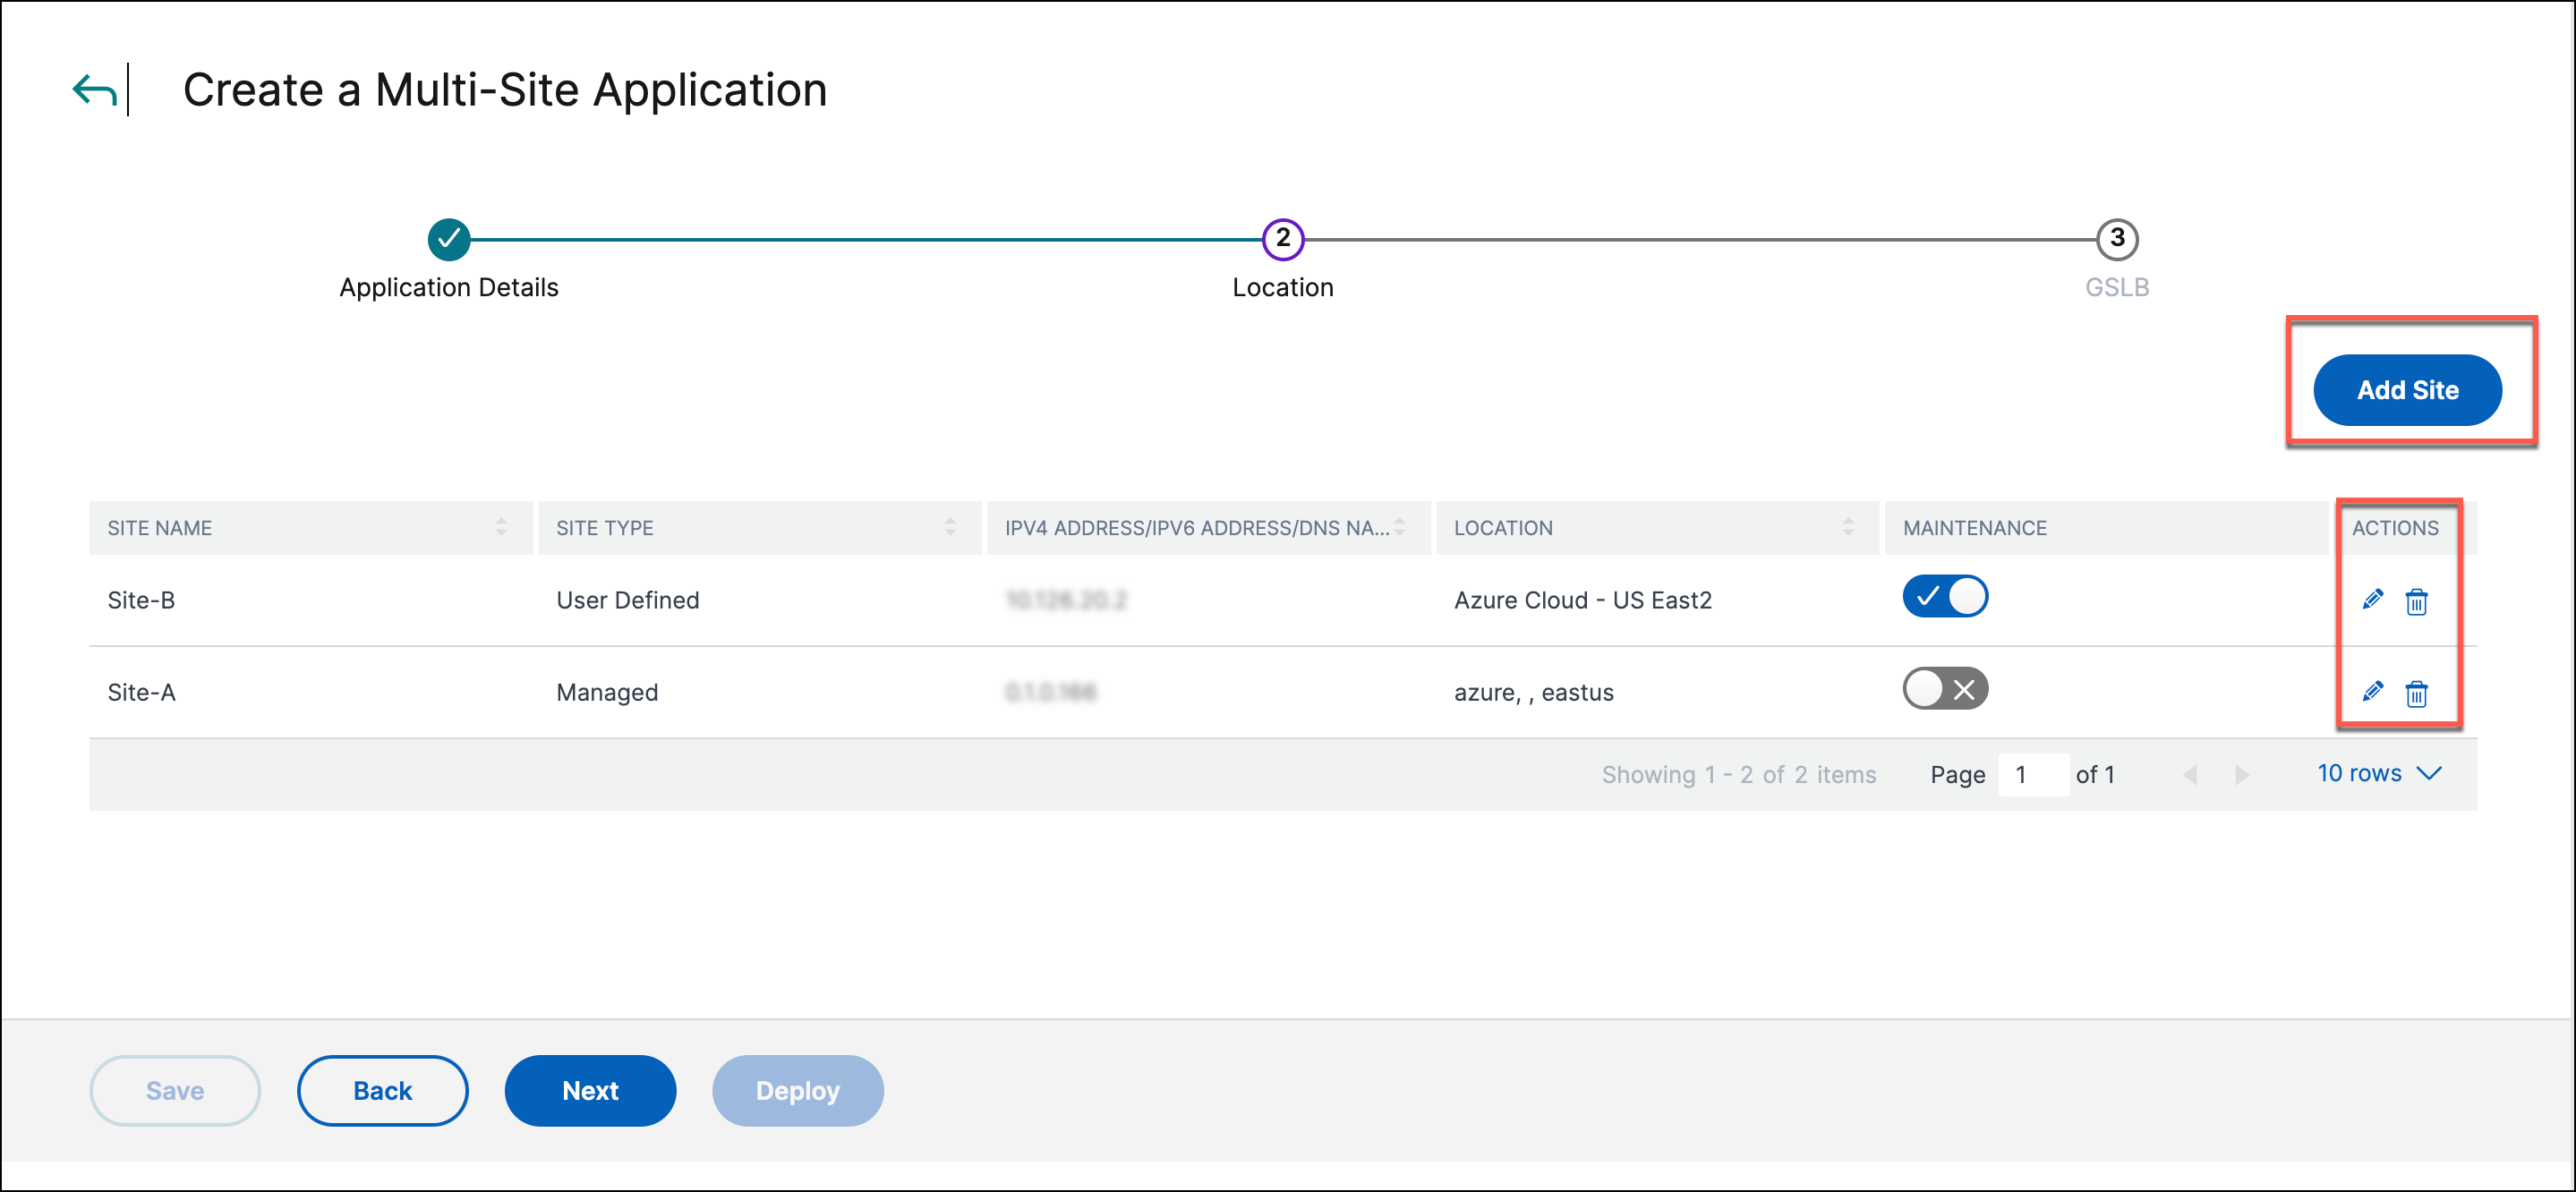
- Click Add Site and repeat steps 1–8 if you want to add another site.
You’ve completed the steps to add and configure sites.
Click the Edit or Delete icon in the ACTIONS column to edit the site details or delete a site, respectively.
Note:
After you create a site, you can’t edit the Site Type.
To configure GSLB and deliver the multi-site application, click Next.
Step 3: Configure GSLB and deliver the multi-site application
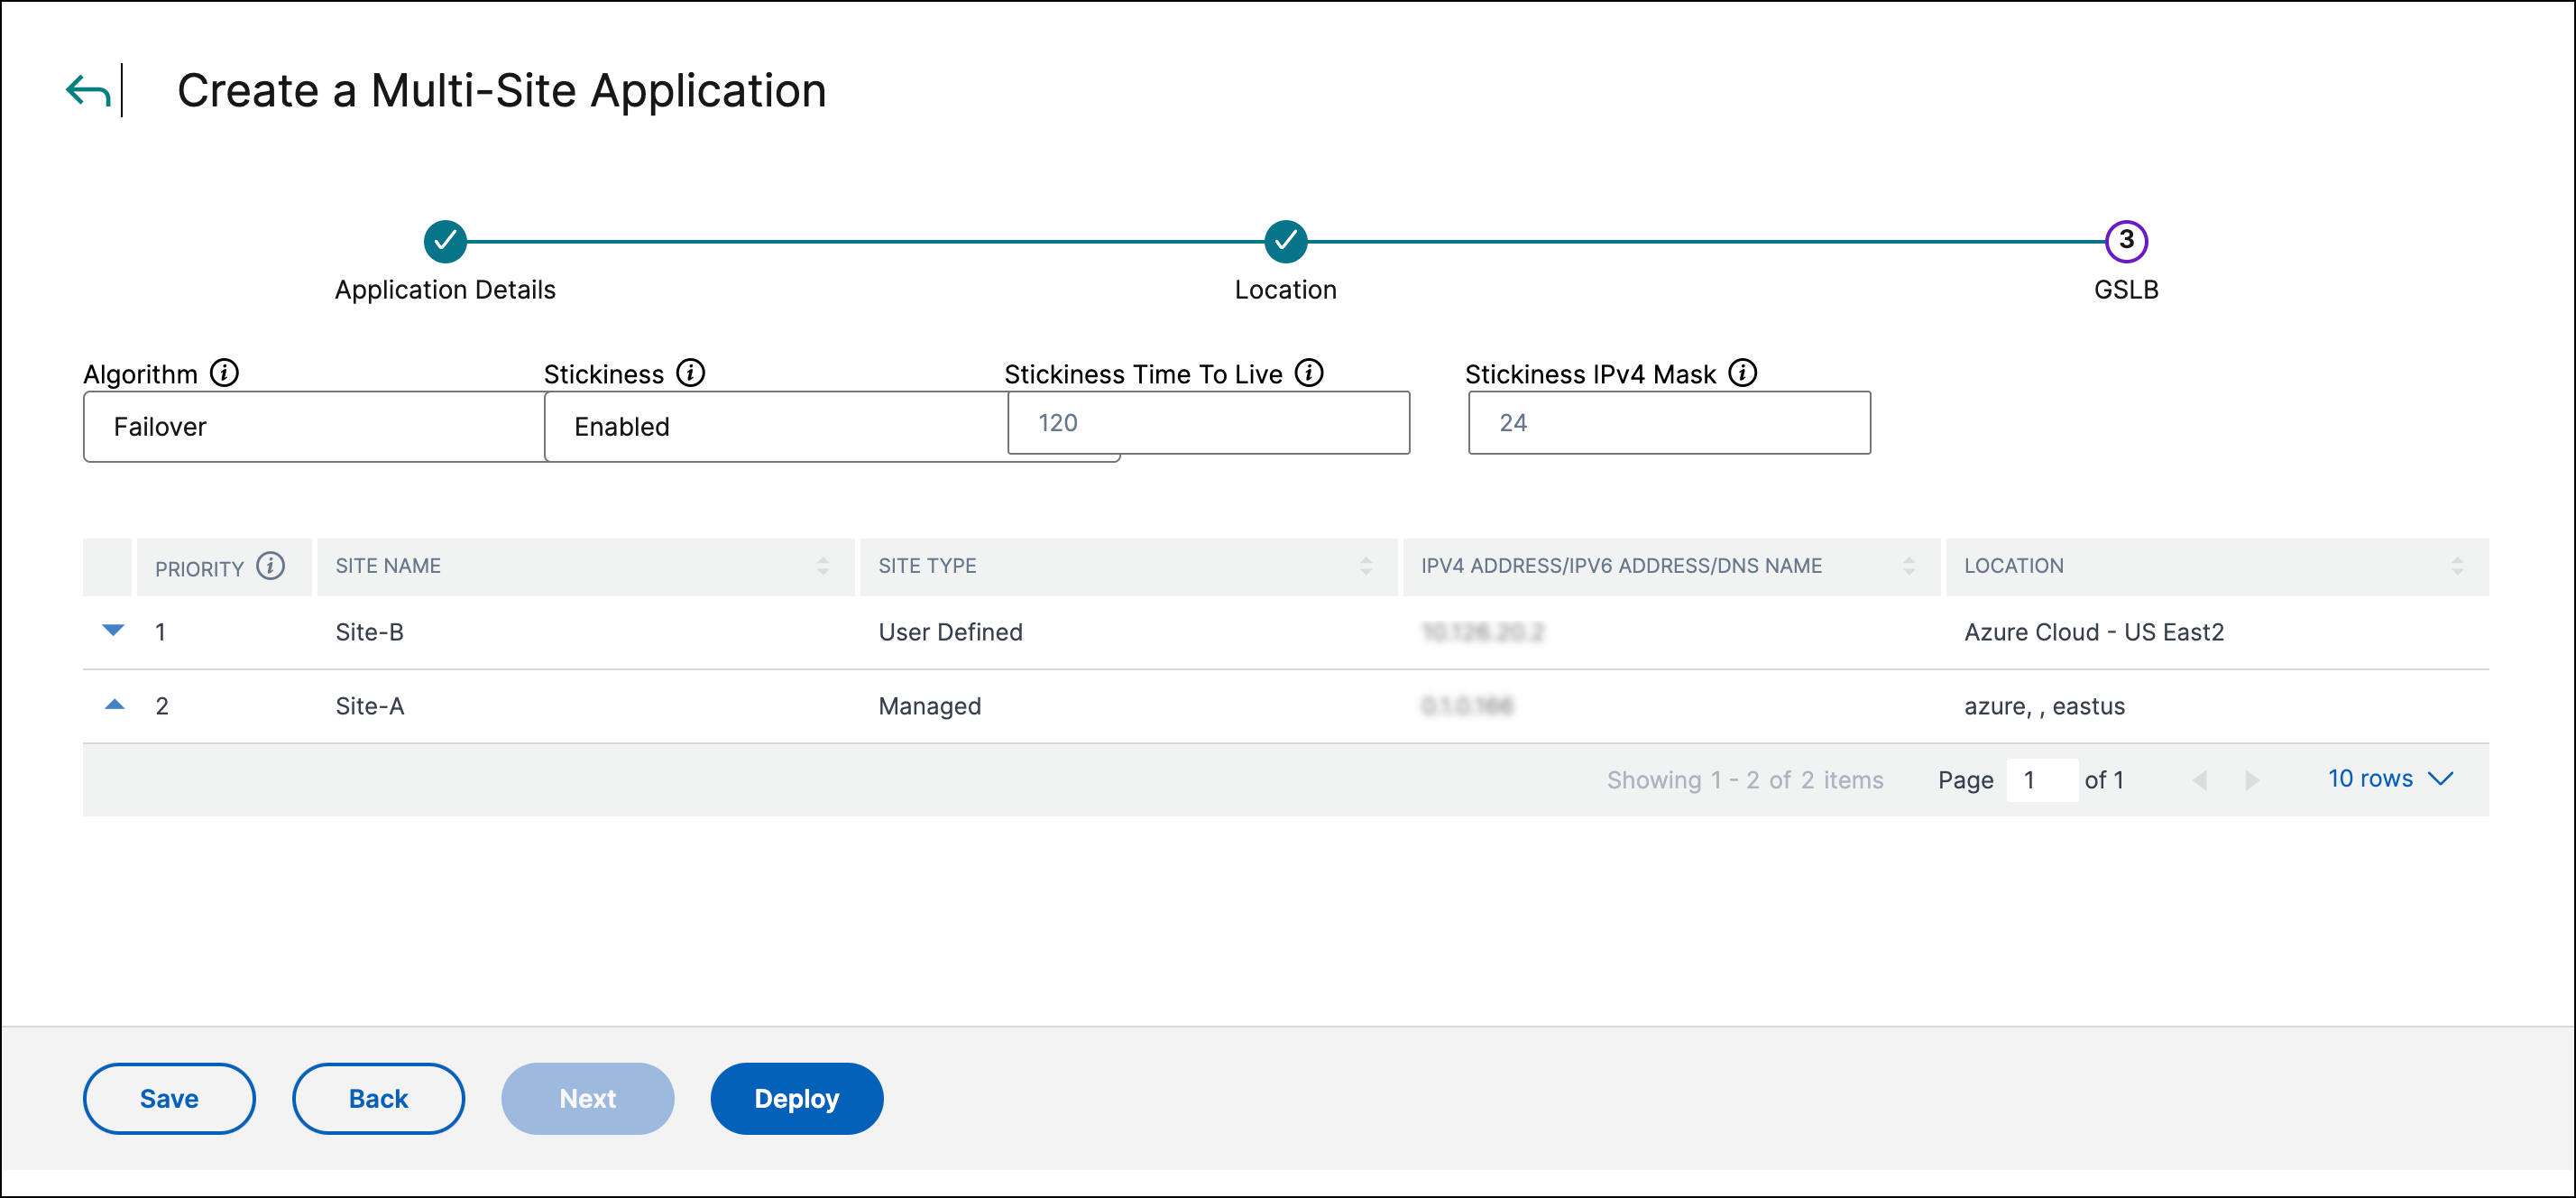
Follow these steps to configure the GSLB algorithm to route the network traffic intelligently across sites, configure stickiness, and deliver the multi-site application.
- Select an algorithm to route the client traffic to sites. For more information about supported algorithms, see Algorithms.
- Select Failover and type a value in PRIORITY for each site. For example, assign a priority of 1 to site A and an increasing priority of 2 and above to the standby sites.
- Select Round Robin and type a value in WEIGHT to distribute the traffic to each GSLB site. For example, assign a weight of nine (9) to site A and weight of one (1) to site B.
- Select Optimal RTT and type a value in PENALTY.
- Select Static Proximity.
-
Select Enabled in Stickiness to enable stickiness if necessary. If not required, continue to step 5.
Note:
The FQDN for a multi-site application is auto-generated under the itms.appdeliverysecurity.com top level domain (TLD) for sticky applications, rather than the default itms.appdeliverysecurity.com.
Changing stickiness for an existing multi-site application takes some time to propagate. The time taken to propagate depends on the TTL of the CNAME record pointing to the itm(s).appdeliverysecurity.com autogenerated record. The TTL for a multi-site application with user-defined FQDN is 10 minutes and therefore the change propagation takes around 10 minutes. The TTL for a multi-site application with auto-allocated FQDN depends on the TTL duration configured by the application admin for the respective CNAME record.
The previously auto-generated FQDN remains active while the CNAME change propagates. Users hitting a cached CNAME record before propagation completion can still access the multi-site application with the previous stickiness settings.
-
Type a value in Stickiness Time To Live. If stickiness is enabled, its TTL controls the time duration within which subsequent client requests for the multi-site application are sent to the same site.
-
Enter Stickiness IPv4 Mask. If stickiness is enabled, the client requests coming to the multi-site application are identified using this IPv4 subnet mask and sent to the same site.
-
Click Deploy.
The multi-site application is deployed successfully.
To view the summary and manage the multi-site application, click Manage Multi-Site Applications.
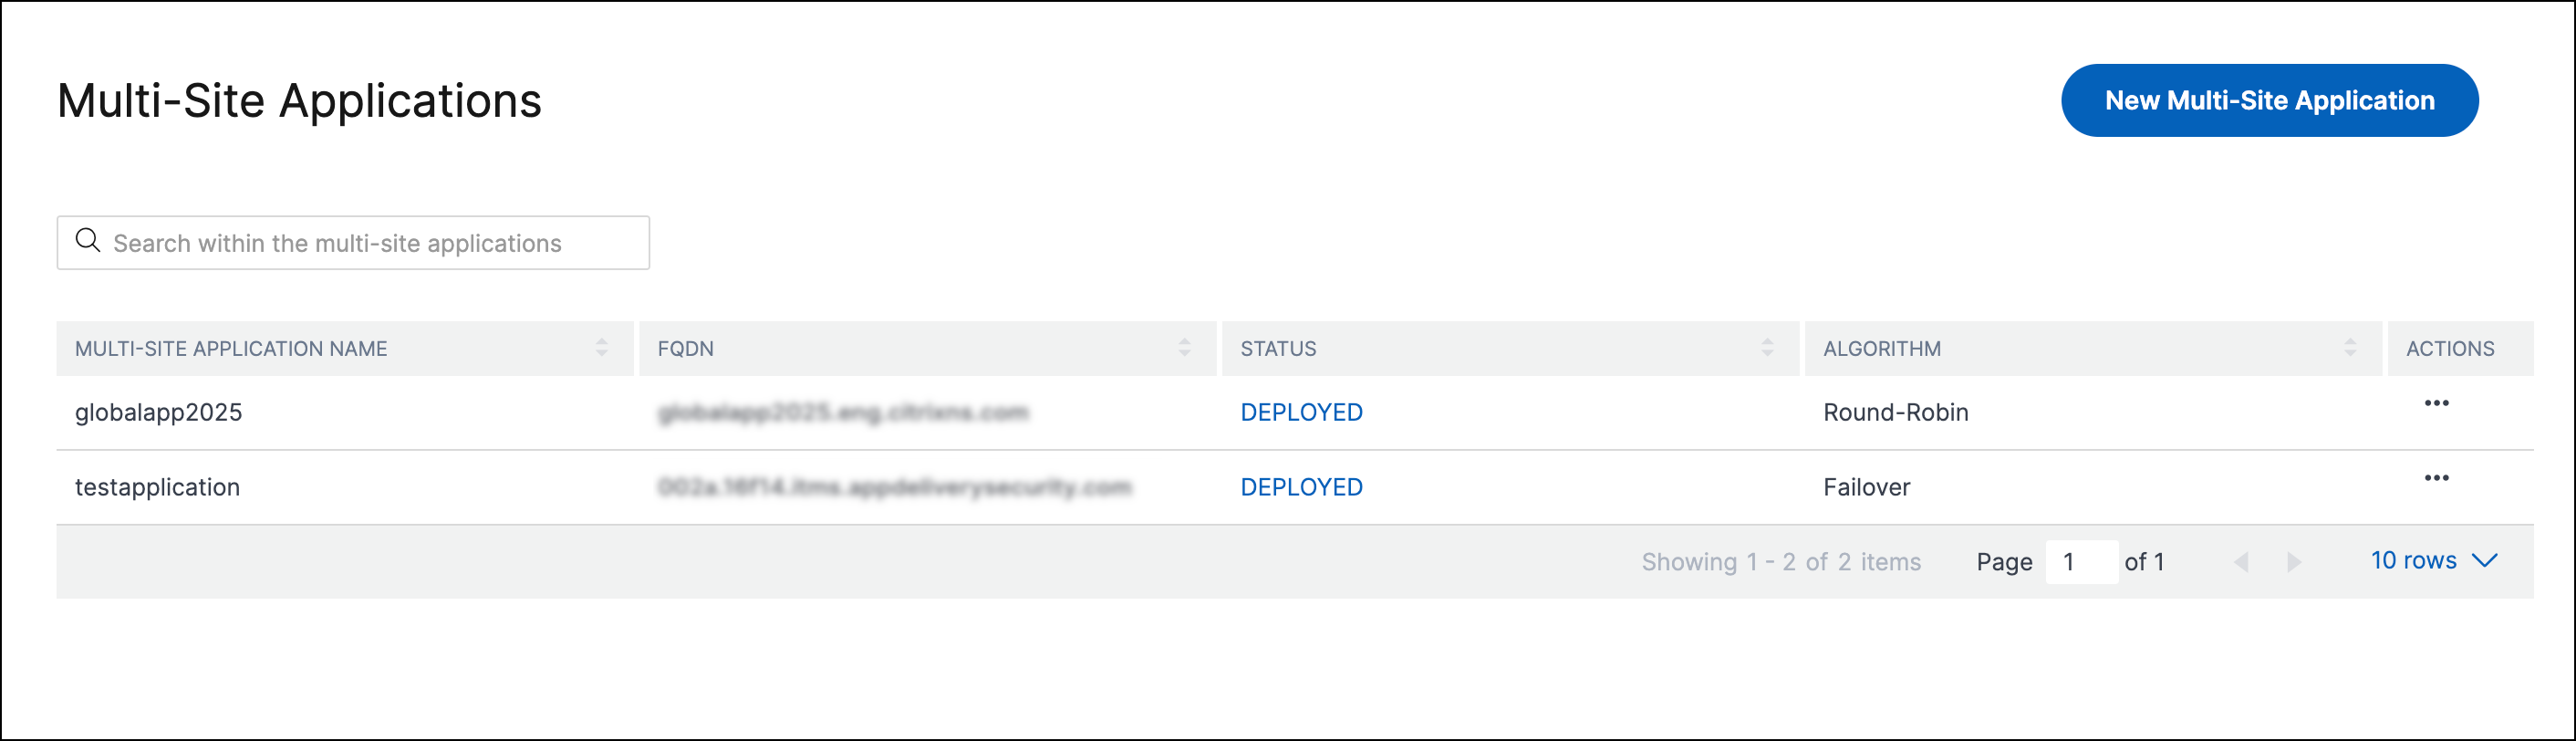
Multi-site applications summary
The Multi-Site Applications summary page lists the total number of created multi-site applications and lists the following details about each application:
-
MULTI-SITE APPLICATION NAME - Name of the multi-site application.
-
FQDN - Fully qualified domain name (FQDN) of the multi-site application.
-
STATUS - The current deployment status of the multi-site application. One of the following values is displayed:
-
INDRAFT — The multi-site application is created, but the back-end resources aren’t deployed.
-
ERROR — The multi-site application deployment failed.
-
DEPLOYED — The multi-site application is successfully deployed.
-
IN PROGRESS — The multi-site application deployment is in progress.
-
-
ALGORITHM - GSLB method such as failover, round robin, and optimal RTT used to configure the multi-site application. The method specified is used to determine the site that is selected (DNS response) for client requests.
-
ACTIONS - Enables you to either modify, redeploy, undeploy, or delete a multi-site application. For more information, see Manage multi-site applications.