-
Low-touch onboarding of NetScaler instances using Console Advisory Connect
-
-
Scenarios for Flexed or Pooled license expiry and connectivity issues behavior
-
Configure NetScaler Console server only as the Flexed or Pooled license server
-
-
Upgrading a perpetual license in NetScaler MPX to ADC Pooled capacity
-
Upgrade a perpetual license in NetScaler SDX to ADC Pooled capacity
-
NetScaler VPX check-in and check-out licensing
This content has been machine translated dynamically.
Dieser Inhalt ist eine maschinelle Übersetzung, die dynamisch erstellt wurde. (Haftungsausschluss)
Cet article a été traduit automatiquement de manière dynamique. (Clause de non responsabilité)
Este artículo lo ha traducido una máquina de forma dinámica. (Aviso legal)
此内容已经过机器动态翻译。 放弃
このコンテンツは動的に機械翻訳されています。免責事項
이 콘텐츠는 동적으로 기계 번역되었습니다. 책임 부인
Este texto foi traduzido automaticamente. (Aviso legal)
Questo contenuto è stato tradotto dinamicamente con traduzione automatica.(Esclusione di responsabilità))
This article has been machine translated.
Dieser Artikel wurde maschinell übersetzt. (Haftungsausschluss)
Ce article a été traduit automatiquement. (Clause de non responsabilité)
Este artículo ha sido traducido automáticamente. (Aviso legal)
この記事は機械翻訳されています.免責事項
이 기사는 기계 번역되었습니다.책임 부인
Este artigo foi traduzido automaticamente.(Aviso legal)
这篇文章已经过机器翻译.放弃
Questo articolo è stato tradotto automaticamente.(Esclusione di responsabilità))
Translation failed!
NetScaler VPX check-in and check-out licensing
Important:
File-based licensing system (also referred to as manually managed entitlements), traditionally used for activating various on-premises components, will be End of Life (EOL) on April 15, 2026. License Activation Service (LAS) is the next generation technology for product activations across the suite of Citrix products. LAS will be the only way to activate and license NetScaler instances after April 15, 2026, supporting NetScaler Flexed licenses (CPL/UHMC), legacy NetScaler Pooled licenses, and NetScaler Fixed term Bandwidth licenses. To remain supported, your NetScaler and NetScaler Console deployments must be on a LAS compatible version.
The minimum required NetScaler® versions that are LAS compatible are:
NetScaler ADCs: 14.1-51.x, 13.1-60.x, 13.1-37.246 (FIPS), 14.1-66.68 (FIPS)
NetScaler SVM: 14.1-51.x, 13.1-60.x
NetScaler Console Service: Supported from early September 2025.
NetScaler Console on-prem: 14.1-51.x
Note: LAS support for Console on-prem is from release 14.1-51.x onwards. However, file-based licensing is deprecated as of April 15 2026 from Console on-prem releases 14.1-51.x onwards and 13.1-60.x onwards. If you upgrade to Console on-prem release 14.1-51.x or release 13.1-60.x or later, you can continue using file-based licensing until 15th April 2026. However you must upgrade to Console on-prem release 14.1-51.x or later, and switch to LAS before 15th April 2026 because Console on-prem 13.1 does not support LAS.
All the other forms of legacy NetScaler licenses such as Pooled vCPU, CICO, perpetual will not be supported with LAS. NetScaler instances leveraging perpetual licenses without an active maintenance will become unlicensed upon upgrade to the above mentioned software versions.
LAS based licenses may not be available to customers where prohibited by law or regulations.
If you have questions or concerns, contact Customer Care. Citrix may limit or suspend your Citrix Maintenance for non-compliance with these requirements without liability in addition to any other remedies Citrix may have at law or equity. These requirements don’t apply where prohibited by law or regulation.
You can allocate NetScaler VPX licenses to NetScaler VPX instances on demand from NetScaler Console. The licenses are stored and managed by NetScaler Console, which has a licensing framework that provides scalable and automated license provisioning. A NetScaler VPX instance, when provisioned, can check out the license from the NetScaler Console, or check back in its license to NetScaler Console when an instance is removed or destroyed.
Install licenses in NetScaler Console
To install license files on the NetScaler Console:
- Navigate to NetScaler Licensing > License Management.
- In the License Files section, click Add License File and select one of the following options:
- Upload license files from a local computer: If a license file is already present on your local computer, you can upload it to the Console.
- Use license access code: Specify the license access code for the license that you have purchased from Citrix. Click Get Licenses and then click Finish.
-
Click Finish. The license files are added to NetScaler Console.
Note
Make sure you are connected to the internet before using the license access code for installing the licenses.
Allocate NetScaler VPX license to a NetScaler VPX instance by using the NetScaler GUI
-
Log in to the NetScaler VPX instance and navigate to System > Licenses > Manage Licenses, click Add New License, and select Use remote licensing.
-
Enter the details of the license server in the Server Name/IP Address field.
Note
If you want to manage your instance’s NetScaler VPX licenses through the NetScaler Console, select the Register with NetScaler MA Service checkbox and enter the NetScaler Console credentials.
-
Click Continue.
-
In the Allocate licenses window, select the type of license. The window displays the total and the available virtual CPUs and also the CPUs that can be allocated. Click Get Licenses.
-
Click Reboot on the next page to apply for the license.
Note
You can also release the current license and check out from a different edition. For example, you are already running a Standard edition license on your instance. You can release that license and then check out from Advanced edition.
-
You can change or release the license allocation by navigating to System > Licenses > Manage Licenses, and selecting Change allocation or Release allocation.
-
If you click Change allocation, a pop-up window shows the licenses available on the license server. Select the required license, click Get Licenses.
Allocate a NetScaler VPX license to a NetScaler VPX instance by using the NetScaler CLI
-
In an SSH client, enter the IP address of the NetScaler instance, and log on by using administrator credentials.
-
To add a licensing server, enter the following command:
add ns licenseserver (<licenseServerIP> | <serverName>) [-port <port number >]
<!--NeedCopy-->
-
To show the available licenses on the licensing server, enter the following command:
sh licenseserverpool
<!--NeedCopy-->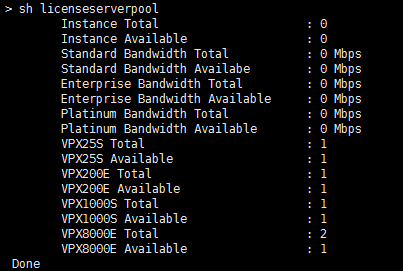
-
To assign a license to a NetScaler VPX instance, enter the following command:
set capacity –platform V\[S/E/P\]\[Bandwidth\]
<!--NeedCopy-->
Configure expiry checks for NetScaler VPX check-in/check-out licenses
You can now configure the license expiry threshold for NetScaler VPX licenses. By setting thresholds, NetScaler Console sends notifications via email or SMS when a license is due to expire. An SNMP trap and a notification are also sent when the license has expired on NetScaler Console.
An event is generated when a license expiry notification is sent and this event can be viewed on NetScaler Console.
For more information, see License management.
Share
Share
This Preview product documentation is Cloud Software Group Confidential.
You agree to hold this documentation confidential pursuant to the terms of your Cloud Software Group Beta/Tech Preview Agreement.
The development, release and timing of any features or functionality described in the Preview documentation remains at our sole discretion and are subject to change without notice or consultation.
The documentation is for informational purposes only and is not a commitment, promise or legal obligation to deliver any material, code or functionality and should not be relied upon in making Cloud Software Group product purchase decisions.
If you do not agree, select I DO NOT AGREE to exit.