-
Overview
-
Low-touch onboarding of NetScaler instances using Console Advisory Connect
This content has been machine translated dynamically.
Dieser Inhalt ist eine maschinelle Übersetzung, die dynamisch erstellt wurde. (Haftungsausschluss)
Cet article a été traduit automatiquement de manière dynamique. (Clause de non responsabilité)
Este artículo lo ha traducido una máquina de forma dinámica. (Aviso legal)
此内容已经过机器动态翻译。 放弃
このコンテンツは動的に機械翻訳されています。免責事項
이 콘텐츠는 동적으로 기계 번역되었습니다. 책임 부인
Este texto foi traduzido automaticamente. (Aviso legal)
Questo contenuto è stato tradotto dinamicamente con traduzione automatica.(Esclusione di responsabilità))
This article has been machine translated.
Dieser Artikel wurde maschinell übersetzt. (Haftungsausschluss)
Ce article a été traduit automatiquement. (Clause de non responsabilité)
Este artículo ha sido traducido automáticamente. (Aviso legal)
この記事は機械翻訳されています.免責事項
이 기사는 기계 번역되었습니다.책임 부인
Este artigo foi traduzido automaticamente.(Aviso legal)
这篇文章已经过机器翻译.放弃
Questo articolo è stato tradotto automaticamente.(Esclusione di responsabilità))
Translation failed!
Overview
NetScaler Console service (Formerly known as NetScaler ADM service) is a web-based solution for managing all NetScaler deployments that include NetScaler MPX, NetScaler VPX, NetScaler SDX, NetScaler CPX, NetScaler BLX, and NetScaler Gateway that are deployed on-premises or on the cloud.
You can use this cloud solution to manage, monitor, and troubleshoot the entire global application delivery infrastructure from a single, unified, and centralized cloud-based console. NetScaler Console provides all the capabilities required to quickly set up, deploy, and manage application delivery in NetScaler deployments and with rich analytics of application health, performance, and security.
NetScaler Console provides the following benefits:
-
Agile – Easy to operate, update, and consume. The service model of NetScaler Console is available over the cloud, making it is easy to operate, update, and use the features provided by NetScaler Console. The frequency of updates, combined with the automated update feature, quickly enhances your NetScaler deployment.
-
Faster time to value – Quicker business goals achievement. Unlike with the traditional on-premises deployment, you can use your NetScaler Console with a few clicks. You not only save the installation and configuration time, but also avoid wasting time and resources on potential errors.
-
Multi-Site Management – Single pane of glass for instances across multi-site data centers. With the NetScaler Console, you can manage and monitor NetScalers that are in various types of deployments. You have one-stop management for NetScalers deployed on-premises and in the cloud.
-
Operational Efficiency – Optimized and automated way to achieve higher operational productivity. With the NetScaler Console, your operational costs are reduced by saving your time, money, and resources on maintaining and upgrading the traditional hardware deployments.
-
Visibility into real-time internet traffic - Enhanced user experience with the real-time internet traffic analysis. With the NetScaler Console, you can gather real user monitoring data from clients as they access applications across clouds, data centers, and CDNs, and build a holistic picture of internet health. Traffic is directed to locations with the lowest latency and best availability to ensure an optimal user experience.
-
Multi-site applications - Create, configure, and deliver an application in multiple sites. With the NetScaler Console, you can configure, deliver, and manage applications across multiple cloud environments for high availability and reliability.
How NetScaler Console works
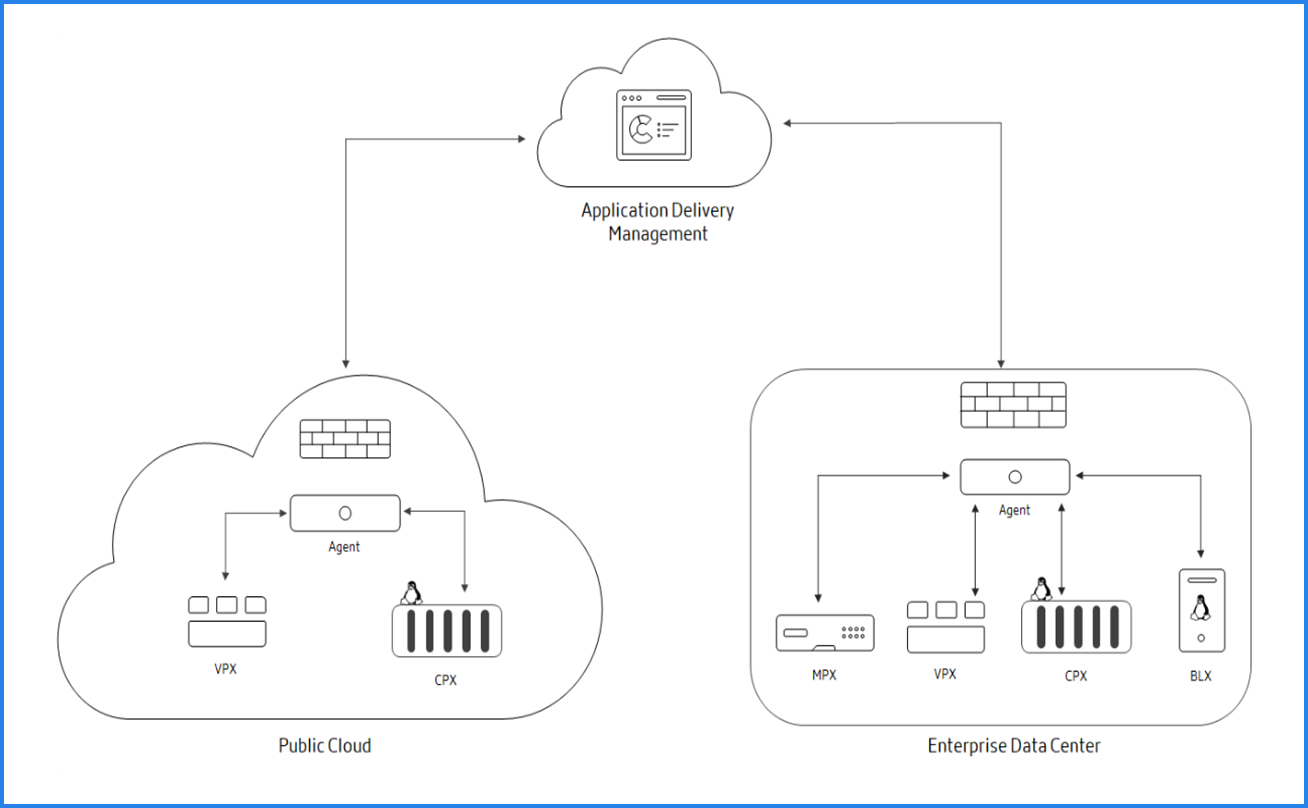
NetScaler Console is available as a service on the Citrix Cloud. After you sign up for Citrix Cloud and start using the service, install agents in your network environment or initiate the built-in agent in the instances. Then, add the instances you want to manage to the service.
An agent enables communication between the NetScaler Console and the managed instances in your data center. The agent collects data from the managed instances in your network and sends it to the NetScaler Console.
When you add an instance to NetScaler Console, it implicitly adds itself as a trap destination and collects an inventory of the instance.
The service collects instance details such as:
-
Host name
-
Software version
-
Running and saved configuration
-
Certificates
-
Entities configured on the instance, and so on.
NetScaler Console periodically polls managed instances to collect information. For more information, see Data governance.
The following image illustrates the communication between the service, agents, and instances (MPX, VPX, CPX, BLX):
To onboard to NetScaler Console and see how it works, see Getting Started and its subtopics.
Share
Share
In this article
This Preview product documentation is Cloud Software Group Confidential.
You agree to hold this documentation confidential pursuant to the terms of your Cloud Software Group Beta/Tech Preview Agreement.
The development, release and timing of any features or functionality described in the Preview documentation remains at our sole discretion and are subject to change without notice or consultation.
The documentation is for informational purposes only and is not a commitment, promise or legal obligation to deliver any material, code or functionality and should not be relied upon in making Cloud Software Group product purchase decisions.
If you do not agree, select I DO NOT AGREE to exit.