Configure license
Important:
File-based licensing system (also referred to as manually managed entitlements), traditionally used for activating various on-premises components, will be End of Life (EOL) on April 15, 2026. License Activation Service (LAS) is the next generation technology for product activations across the suite of Citrix products. LAS will be the only way to activate and license NetScaler instances after April 15, 2026, supporting NetScaler Flexed licenses (CPL/UHMC), legacy NetScaler Pooled licenses, and NetScaler Fixed term Bandwidth licenses. To remain supported, your NetScaler and NetScaler Console deployments must be on a LAS compatible version.
The minimum required NetScaler versions that are LAS compatible are:
NetScaler ADCs: 14.1-51.x, 13.1-60.x, 13.1-37.246 (FIPS), 14.1-66.68 (FIPS)
NetScaler SVM: 14.1-51.x, 13.1-60.x
NetScaler Console Service: Supported from early September 2025.
NetScaler Console on-prem: 14.1-51.x
Note: LAS support for Console on-prem is from release 14.1-51.x onwards. However, file-based licensing is deprecated as of April 15 2026 from Console on-prem releases 14.1-51.x onwards and 13.1-60.x onwards. If you upgrade to Console on-prem release 14.1-51.x or release 13.1-60.x or later, you can continue using file-based licensing until 15th April 2026. However you must upgrade to Console on-prem release 14.1-51.x or later, and switch to LAS before 15th April 2026 because Console on-prem 13.1 does not support LAS.
All the other forms of legacy NetScaler licenses such as Pooled vCPU, CICO, perpetual will not be supported with LAS. NetScaler instances leveraging perpetual licenses without an active maintenance will become unlicensed upon upgrade to the above mentioned software versions.
LAS-based licenses may not be available to customers where prohibited by law or regulations.
If you have questions or concerns, contact Customer Care. Citrix may limit or suspend your Citrix Maintenance for non-compliance with these requirements without liability in addition to any other remedies Citrix may have at law or equity. These requirements don’t apply where prohibited by law or regulation.
Read the following note before proceeding further.
Note:
If you have pooled licenses, and have now purchased and applied Flexed licenses, the combined entitlement appears in the Flexed license dashboard.
NetScaler Flexed licensing allows you to share bandwidth or instance licenses across different NetScaler form factors. Use this Flexed capacity for the instances that are in the data center or public clouds. When an instance no longer requires the resources, it checks the allocated capacity back into the common pool. Reuse the released capacity on other NetScaler instances that need resources.
You can use Flexed licensing to maximize the bandwidth utilization by ensuring the necessary bandwidth allocation to an instance and not more than its need. Increase or decrease the bandwidth allocated to an instance at run time without affecting the traffic.
You can perform the following tasks in NetScaler Console:
-
For LAS:
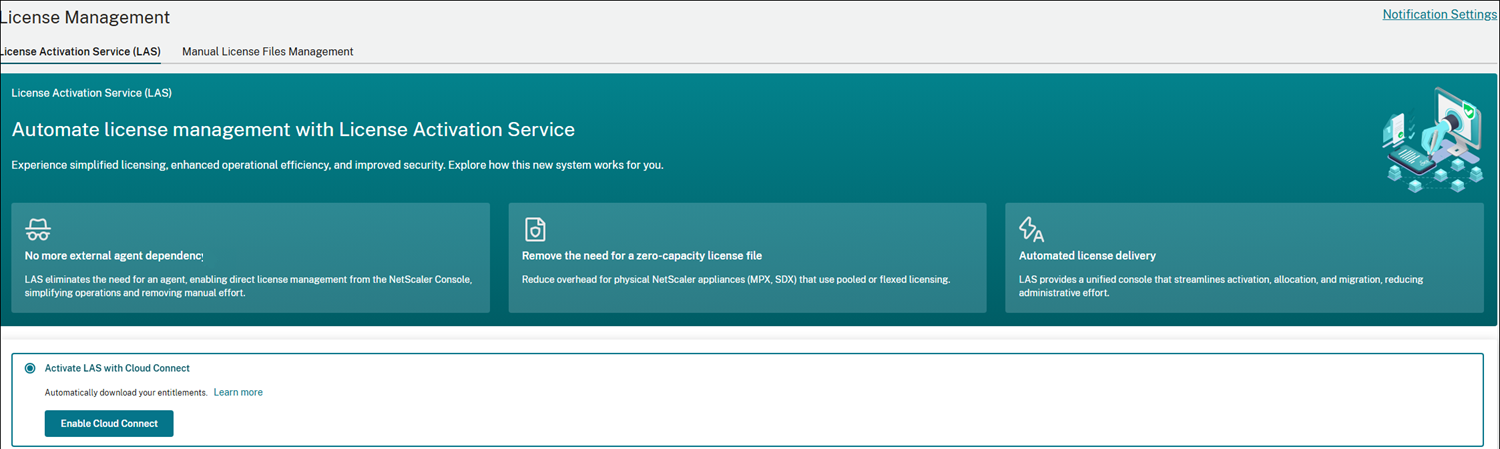
- Activate the License Activation Service (LAS) using Cloud Connect.
- Once the license entitlements appear on the Console on-prem license server, check out licenses for NetScaler instances.
- Ensure that the licenses are based on the minimum and maximum capacity of each instance.
-
For file-based licensing:
-
Upload your Flexed licenses, which include bandwidth and software instance pools, to the NetScaler Console on-prem license server.
-
Upload the SDX or MPX zero-capacity licenses directly to their respective hardware.
-
Allocate licenses from the license pool to your NetScaler instances on demand. When checking out licenses, ensure that they are based on the minimum and maximum capacity of the instance.
You can download all Flexed licenses, including bandwidth, instance, and zero-capacity (Z-cap) licenses, from the citrix.com website. For more information, see Licensing guide for NetScaler®.
-
LAS-based licensing
When using LAS, an external agent is optional. Ensure port 443 is available for instances to check out licenses from NetScaler Console. For more information, see System requirements.
Step 1: Activate LAS and fetch entitlements
-
Activate LAS using Cloud Connect.
For more information, see Activate License Activation Service.
Once activated, your Flexed and Pooled license entitlements appear in the License Management > LAS.
 .
.
Step 2: Add NetScaler Instances to NetScaler Console On-prem
Ensure that you add your NetScaler instances to NetScaler Console On-prem so they can receive licenses. For more information about adding instances, see Add NetScaler instances to NetScaler Console On-prem.
Step 3: License or Migrate NetScaler Instances
-
Navigate to Licensing management > LAS.
-
Click License with LAS or Migrate to LAS.
For more information, see License Activation Service.
Step 4: Edit Flexed Throughput Capacity
After licensing an instance, modify its allocated throughput capacity.
-
Navigate to NetScaler Licensing > Flexed Licensing > Dashboard.
-
Select the LAS managed entitlements tab.
-
In the Licensed NetScalers section, select an instance and click Edit Throughput Capacity.
-
Enter the new capacity in the Allocate column and click Submit.
Special Licensing for Unlicensed MPX Appliances
When using an external agent with an unlicensed MPX, HTTPS connections to the Console Service are not supported. As a result, step 2 is not feasible. Instead navigate to the NetScaler to complete the following steps.
-
Log in to the NetScaler GUI.
-
Navigate to System > Licenses > ADC License > Manage Licenses > Add New License.
-
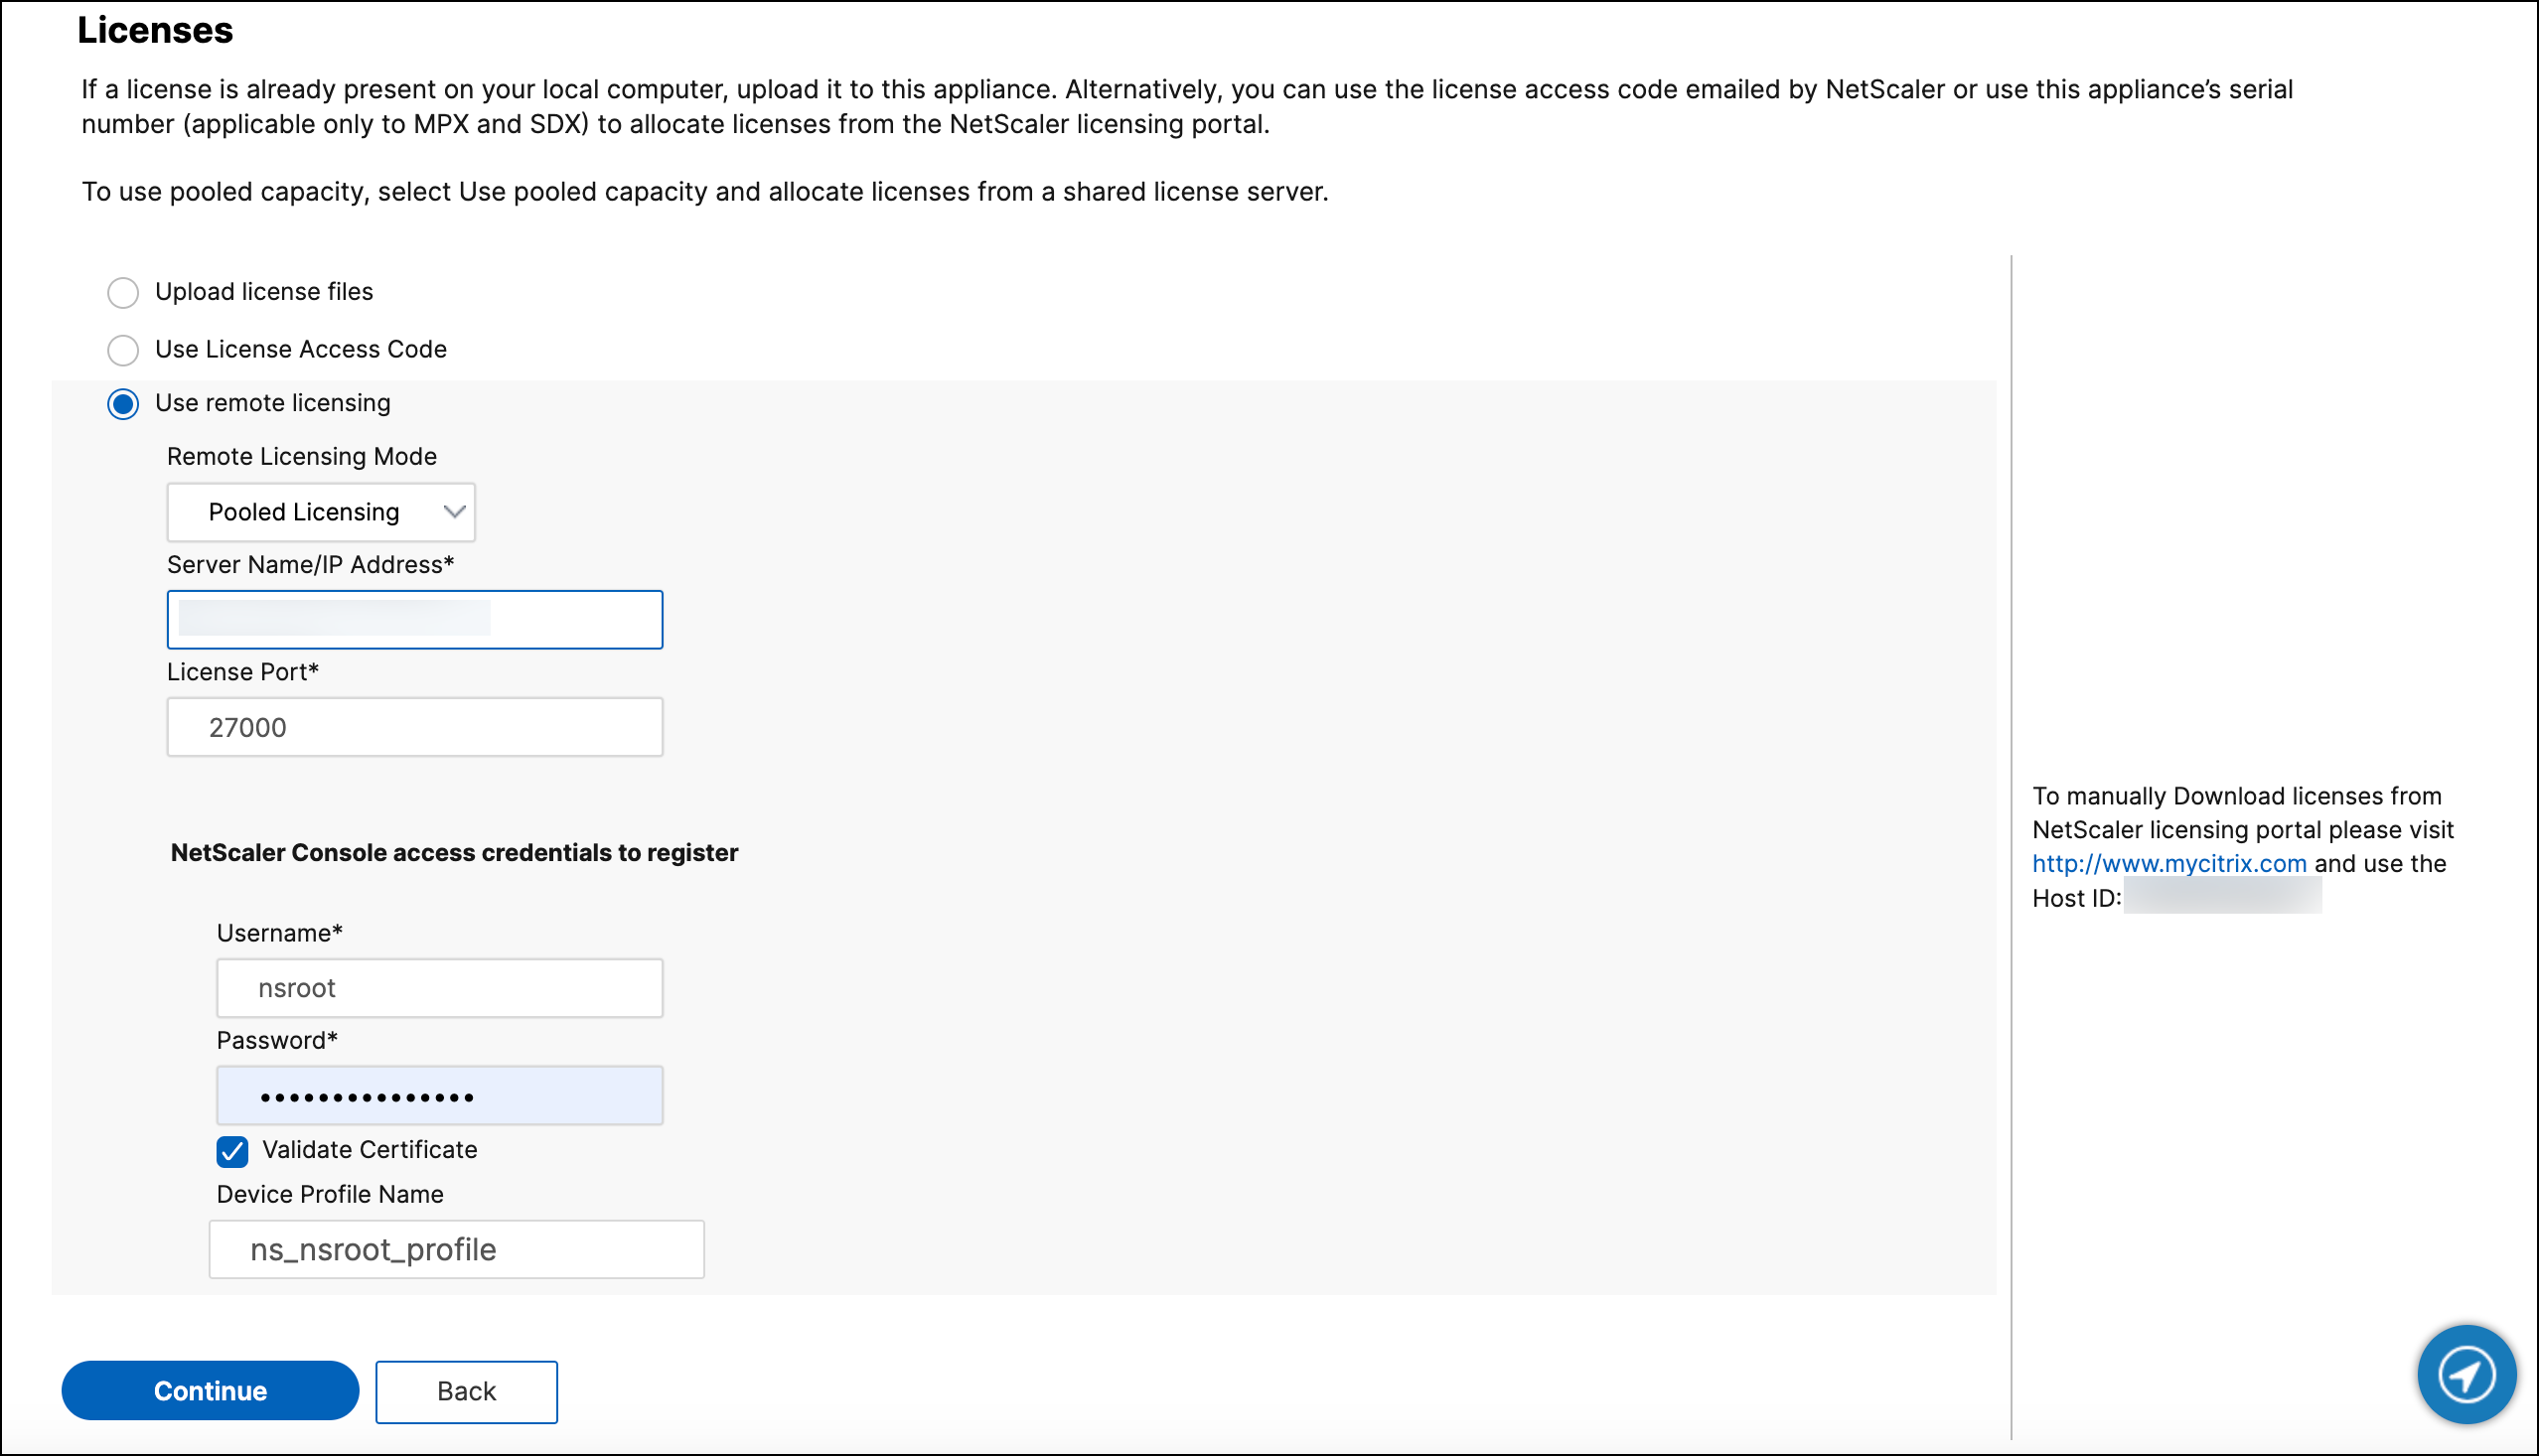
In the Licenses page, select the Use remote licensing radio button, and choose LAS mode from Remote Licensing Mode.
-
In the Server Name/IP address field, enter the IP address of the NetScaler Console external agent.
-
Enter your credentials to register the instance with NetScaler Console, then click Continue.
Note: Select the Validate Certificate checkbox if you have a digital certificate for validation.
-
In the Device Profile Name field, provide the instance profile that NetScaler Console uses to access the instance. This profile holds the user name and password for the instances you want to add. The default profile is ns_nsroot_profile. However, if you have changed the default administrator credentials, ensure to define a custom instance profile name.
-
Under Allocate licenses, select the license edition and specify the required bandwidth. The first time you allocate licenses in NetScaler, you can later modify or release the allocation directly from the NetScaler Console GUI.
-
Click Get Licenses.
Note:
Perform a warm restart of the instance after changing the license edition for the changes to take effect.
License Activation Blob Behavior
The license activation blobs that NetScaler instances get from Console on-prem as part of License with LAS or Migrate to LAS are valid for 30 days. If a NetScaler loses and then regains connectivity with Console on-prem, the license activation blob is immediately restored.
When a NetScaler is unable to connect back to Console on-prem for up to 24 hours, it enters a grace period. By default, license activation blobs refresh every 8 hours. If three consecutive 8-hour refresh attempts fail over 24 hours, the NetScaler enters a grace period.
License grace period alert
The following are the touch points for the license grace period alert:
-
On the Flexed dashboard, a warning icon appears that the instance is in the grace period and the remaining days before the license activation blob expires.
-
Every time an admin logs in to the NetScaler instance GUI, a pop-up message appears indicating that the instance is in the grace period and the remaining days before the license activation blob expires.
-
Email notifications are sent to the email address configured. For more information, see Configure email settings.
Note: Ensure to select Licenses for System Event Category to receive license-related email notifications.
Manually managed entitlement (File-Based licensing)
Before you begin
Ensure that the following prerequisite is met before you configure Flexed licensing:
- The
27000and7279ports are reachable from NetScaler to NetScaler Console, to check out licenses. See, System requirements.
Step 1 - Apply licenses in NetScaler Console
-
Navigate to NetScaler® Licensing > License Management.
-
In the License Files section, select Add License File and select one of the following options:
-
Upload license files from a local computer. If a license file is already present on your local computer, you can upload it to NetScaler Console.
-
Use license access code. Specify the license access code for the license that you have purchased from Citrix. Then, select Get Licenses. Then select Finish.
Note:
At any time, you can add more licenses to NetScaler Console from License Settings.
-
-
Click Finish.
The license files are added to NetScaler Console. The License Expiry Information section lists the licenses present in the NetScaler Console and the remaining days to expiry.
-
In License Files, select a license file that you want to apply and click Apply licenses.
This action enables NetScaler instances to use the selected license as a Flexed license.
Step 2 - Register NetScaler Console as a license server and allocate licenses
You can register the NetScaler Console as a license server to a NetScaler instance.
Register a NetScaler Console server using the GUI
In the NetScaler Console GUI, register the NetScaler Console server associated with a NetScaler instance.
-
Log in to NetScaler GUI.
-
Navigate to System > Licenses > Manage Licenses.
-
Click Add New License.
-
Select Use remote licensing and under Remote Licensing Mode, select Pooled Licensing from the list.
-
In the Server Name/IP address field, specify the NetScaler Console server IP address.
-
The default license port is 27000.
-
Enter your NetScaler Console server credentials to register an instance with NetScaler Console and click Continue. In NetScaler Console, one of the servers is the license server.
Note:
Select the Validate Certificate checkbox only if you have a digital Certificate Authority (CA) certificate for validation.
-
Under Device Profile Name, specify the instance profile that NetScaler Console can use to access the instance. This instance profile contains the user name and password of the instances that you want to add to NetScaler Console. The default profile is ns_nsroot_profile. If you have changed the default admin credentials of your instances, you can define a custom instance profile name.
-
In Allocate licenses, select the license edition and specify the required bandwidth.
For the first time, allocate licenses in NetScaler. You can later change or release the license allocation from the NetScaler Console GUI.

Click Get Licenses.
Important
Warm restart the instance if you change the license edition. The configuration changes do not take effect until you restart the instance.
Add a NetScaler Console server using the CLI
If a NetScaler instance has no GUI, use the following CLI commands to add a NetScaler Console server associated with an instance:
-
Log in to the NetScaler console.
-
Add the associated NetScaler Console server’s IP address that is registered with NetScaler Console. The default license port is 27000.
> add ns licenseserver <adm-server-IP-address> -port <adm-server-license-port-number> <!--NeedCopy--> -
View the license bandwidth available in the license server:
> sh ns licenseserverpool <!--NeedCopy--> -
Allocate the license bandwidth from the required license edition:
> set ns capacity -unit gbps -bandwidth <specify-license-bandwidth> edition <specify-license-edition>
<!--NeedCopy-->
Important
Warm restart the instance if you change the license edition.
reboot -wThe configuration changes do not take effect until you restart the instance.
Step 3 - Edit Flexed Throughput Capacity for NetScaler instances
- Navigate to NetScaler Licensing > Flexed Licensing > Dashboard.
- In the Licensed NetScalers section, select an instance and click Edit Throughput Capacity.
- In the Edit Throughput Capacity page, enter a number in the Allocate column.
- Click Submit.
NetScaler MPX-Z
MPX-Z is the Flexed-capacity enabled NetScaler MPX appliance. MPX-Z supports bandwidth pool for only Premium edition licenses.
MPX-Z requires a license before it can connect to the License Server. You can install the MPX-Z license by using one of the following ways:
- Uploading the license file from a local computer.
- Using the instance’s hardware serial number.
- The License Access Code from the System > Licenses section of the instance’s GUI.
If you remove the MPX-Z license, MPX becomes unlicensed. The licenses are released to the license server.
You can dynamically modify the bandwidth of an MPX-Z instance without a restart. A restart is required only if you want to change the license edition.
Note:
When you restart the instance, it automatically checks out the Flexed licenses required for its configured capacity.
NetScaler SDX-Z
SDX-Z is the Flexed-capacity enabled NetScaler SDX appliance. SDX-Z supports bandwidth and instance pool for the Premium edition licenses.
SDX-Z requires a license before it can connect to the License Server. You can install the SDX-Z license by using one of the following ways:
- Uploading the license file from a local computer.
- Using the instance’s hardware serial number.
- The License Access Code from the System > Licenses section of the instance’s GUI.
If you remove the SDX-Z license, SDX becomes unlicensed. The licenses are released to the license server.
You can dynamically modify the bandwidth of an SDX-Z instance without a restart.
Note:
When you restart the instance, it automatically checks out the Flexed licenses required for its configured capacity.
License requirements for NetScaler high-availability pair (Common for both LAS and file-based licensing)
Before you begin, ensure that the NetScaler Console server is configured as a license server. For more information, see Configure NetScaler Console as a license server
When you allocate the bandwidth to a NetScaler HA pair, the NetScaler Console checks out the allocated bandwidth to the primary instance. You must repeat the process for the secondary instance.
To allocate pool licenses to a NetScaler HA pair, see Allocate Flexed licenses to NetScaler instances
The Flexed Capacity page displays the instances and their allocated capacity separately.
NetScaler Flexed licensing states (Common for both LAS and file-based licensing)
The Flexed licensing states indicate the license requirement on a NetScaler instance. The NetScaler instances configured with Flexed licensing display one of the following states:
-
Allocated: Instance is running with proper license capacity.
-
Grace: The instance is running in a grace period. The grace period is of 30 days, after which the instance becomes unlicensed.