Create event rules
You can configure rules to monitor specific events. Rules make it easier to filter the events generated across your infrastructure.
You can filter a set of events by configuring rules with specific conditions and assigning actions to the rules. When the events generated meet the filter criteria in the rule, the action associated with the rule is run.
You can create filters for the following conditions:
- Severity
- Citrix Application Delivery Controller (NetScaler) instances
- Category
- Failure objects
- Configuration commands
- Messages
After you create events, you can assign actions to the events. For more information, see Add event rule actions.
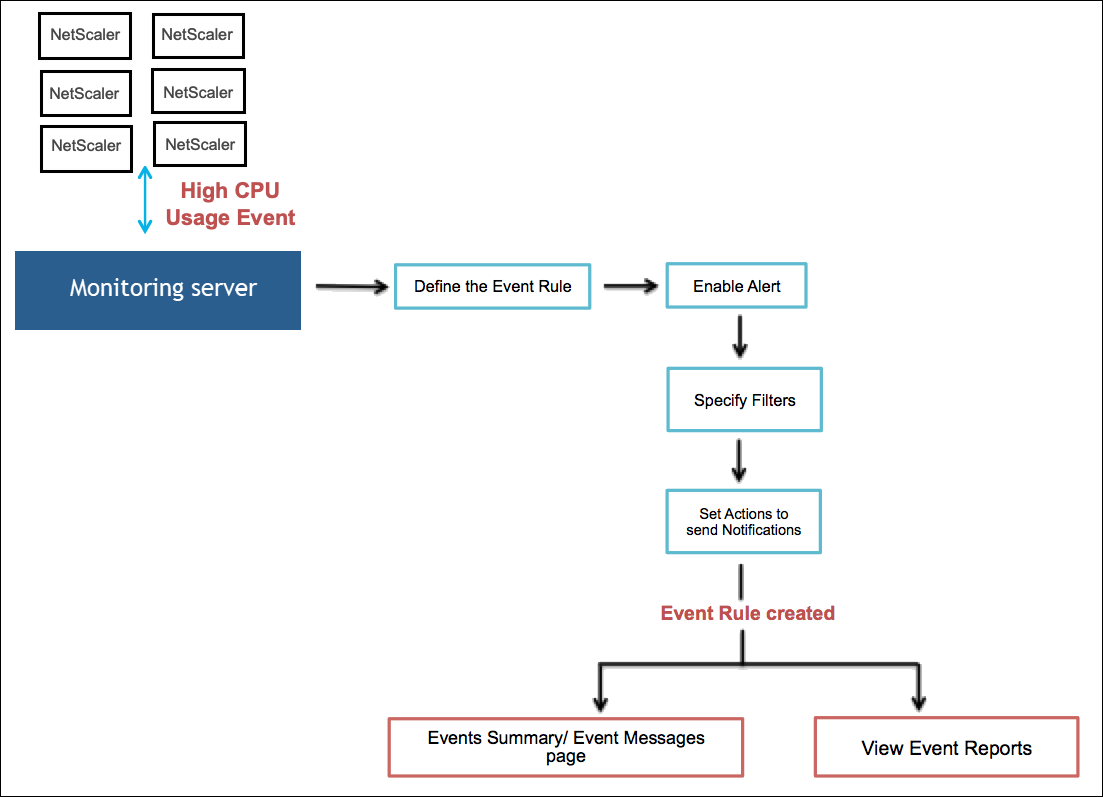
For example, as an administrator you might want to monitor “high CPU usage” events on NetScaler instances which might lead to an outage. You can do any of the following actions to receive notifications:
-
Create a rule to monitor instances and add an action to the rule to receive notifications when such events occur.
-
Schedule a rule to monitor instances at a specific interval. So, you receive notifications when such events occur within that interval.
The following image explains the workflow of how event rules work.
Configure an event rule
To configure a event rule, navigate to Infrastructure > Events > Rules, and click Add. In the Create Rule page, do the following tasks:
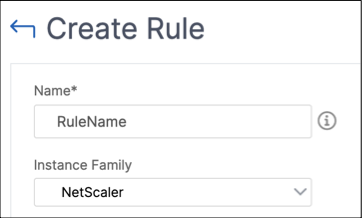
Step 1 - Specify name and instance family
-
Name. Enter a name for the event rule.
-
Instance Family. Select an instance family from the Instance Family drop-down list.
You can filter event rules by Instance Family to track the NetScaler instance from which NetScaler Console receives an event.
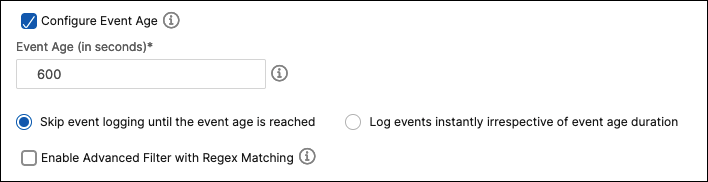
Step 2 - Configure event age
-
Event Age. Specify the time interval (in seconds) after which NetScaler Console refreshes an event rule.
For example, you want an email to be sent every time your NetScaler instance has a “high CPU usage” event for 60 seconds or longer. You can set the event age to 60 seconds. Now whenever your NetScaler instance has a “high CPU usage” event for 60 seconds or more, you receive an email notification.
Note:
Event Age is a mandatory field. The minimum value for the event age is 60 seconds. If you keep the Event Age field blank, the event rule is applied immediately after the event occurs.
-
Choose one of the following options to track your events:
-
Skip event logging until the event age is reached. Events that occur before the specified event age aren’t logged in the NetScaler Console server database. When the event age is reached, events are logged in the database and configured event actions are triggered.
-
Log events instantly irrespective of event age duration. All events are logged in the NetScaler Console server database regardless of the specified event age. After the event age is reached, configured event actions are triggered.
-
-
Enable Advanced Filter with Regex Matching. Select this option to include a regular expression other than asterisk (*) pattern matching. This option is applicable for failure objects, configuration commands, and messages.
Step 3 - Choose severity of event
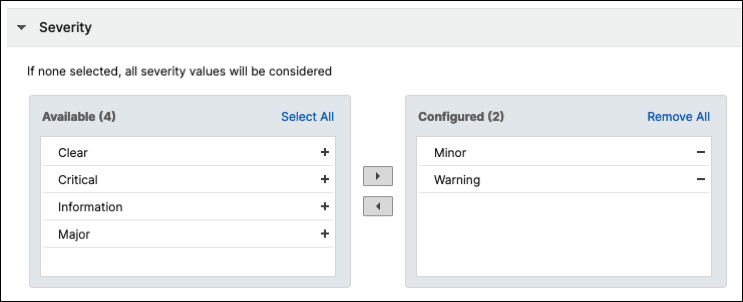
-
In Severity section, select a severity for your event rule.
You can define the following levels of severity: Critical, Major, Minor, Warning, Clear, and Information.
Note:
You can configure severity for both generic and Advanced-specific events. To modify event severity for NetScaler instances managed on NetScaler Console, navigate to Infrastructure > Events > Event Settings. Choose the Category for which you want to configure event severity and click Configure Severity. Assign a new severity level and click OK.
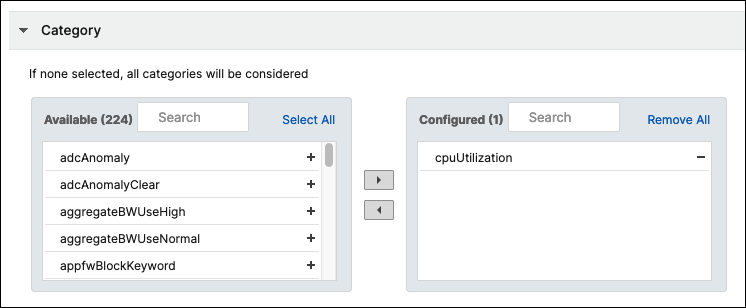
Step 4 - Specify event category
You can specify the category or categories of the events generated by your NetScaler instances. All categories are created on NetScaler instances. These categories are then mapped with the NetScaler Console that can be used to define event rules.
-
Select the category that you want to consider and move it from the Available table to the Configured table.
In the example, you must choose “cpuUtilization” as the event category from the table displayed.
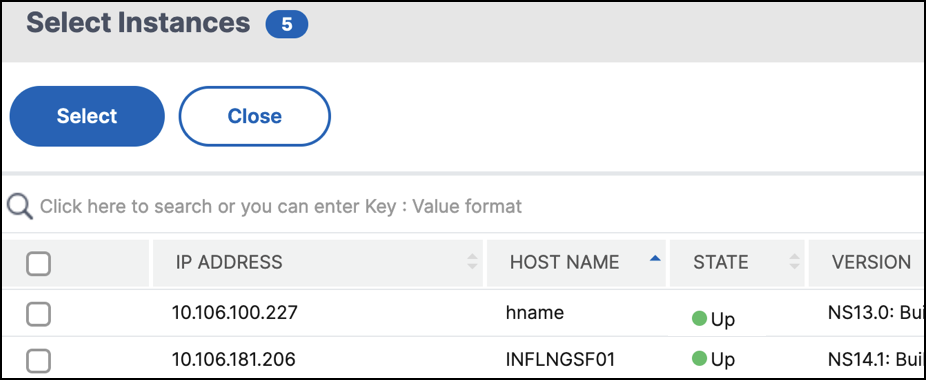
Step 5 - Specify NetScaler instances
In the Instances section, do the following:
-
Click Select Instances. In the Select Instances page, select the IP addresses of the NetScaler instances for which you want to define the event rule.
-
Click Select.
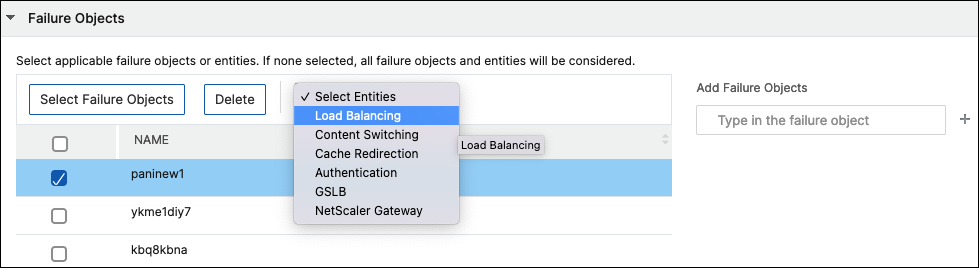
Step 6 - Select failure objects
Failure objects are entity instances or counters for which an event has been generated.
-
Click Select Failure Objects.
-
In the Failure Objects page, select a failure object from the list. Click Select.
-
To add a failure object, enter a regular expression in Add Failure Objects. Depending on the specified regular expression, the failure objects are automatically added to the list.
Important:
To list failure objects using regular expression, select Enable Advanced Filter with Regex Matching in Step 1.
The advanced filter allows you to track issues on the failure objects quickly and identify the cause for an issue. For example, if a user has login issues, then the failure object is the user name or password, such as
nsroot. -
To add entities, choose an entity from Select Entities.
This list can have counter names for all threshold‐related events, entity names for all entity‐related events, certificate names for certificate‐related events, and so on.
Step 7 - Specify advanced filters
You can further filter an event rule with advanced filters. Select one of the following filters:
-
Configuration Commands - Specify the complete configuration command, or specify a regular expression to filter events.
You can also filter the event rules by the command’s authentication status and its execution status. For example, for a
NetscalerConfigChange event, type[.]*bind system global policy_name[.]*.
-
Messages - Specify the complete message description, or specify a regular expression to filter the events.
For example, for a
NetscalerConfigChangeevent, type[.]*ns_client_ipaddress :10.122.132.142[.]* or ns_client_ipaddress :^([.]*10.122.132.142[.]*).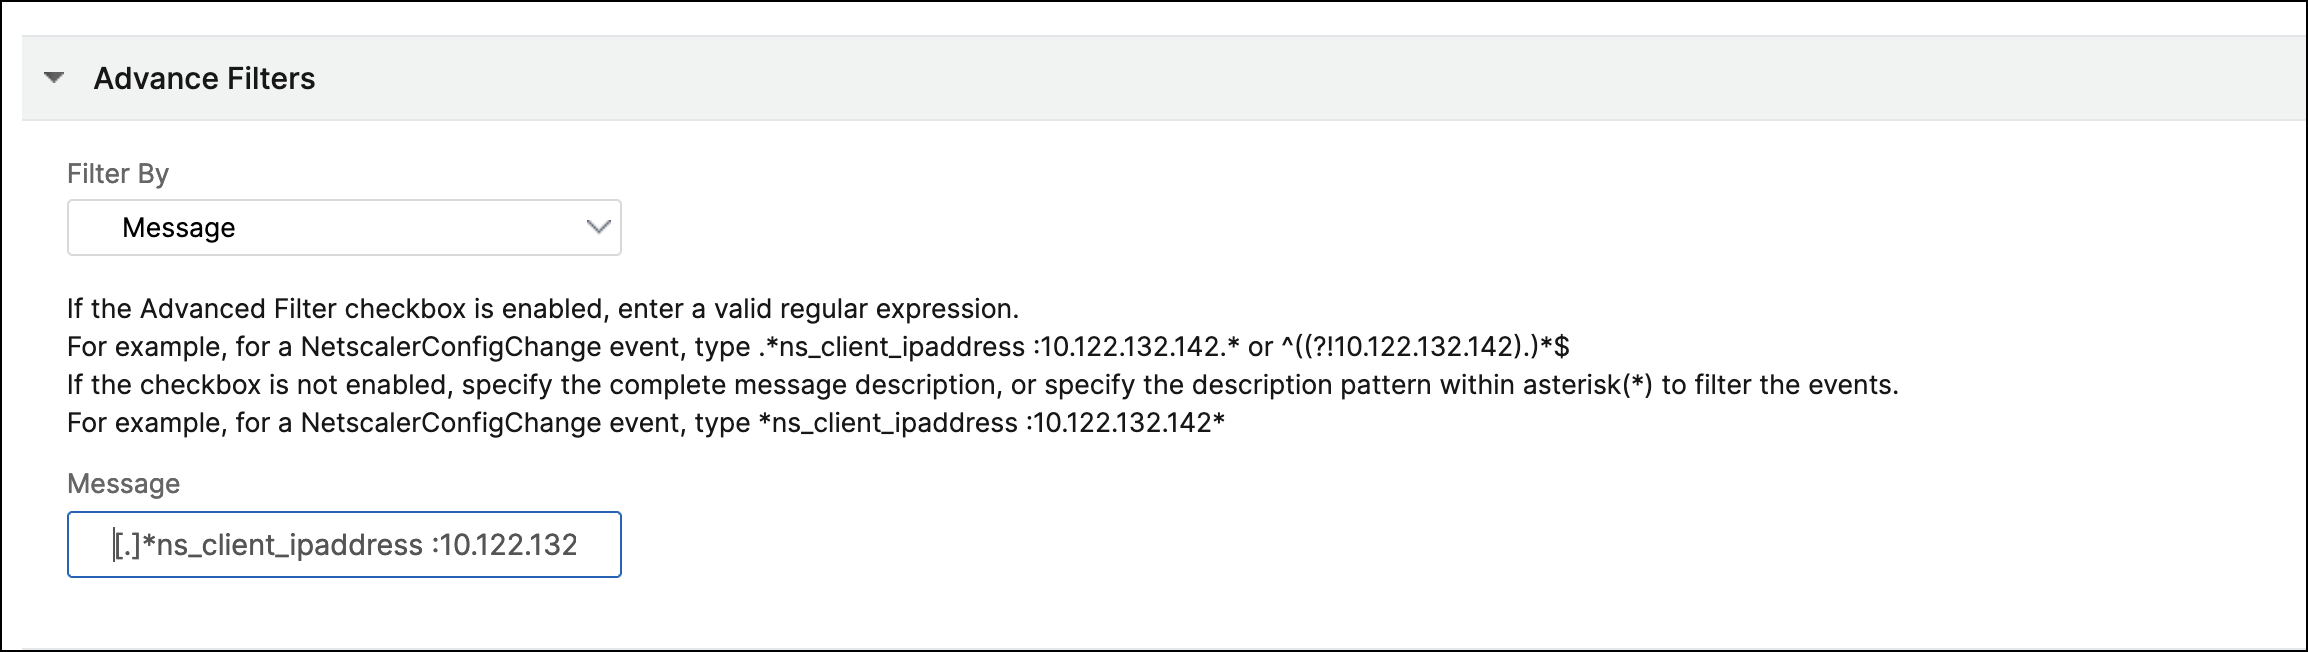
Important:
To filter configuration commands and messages using regular expression other than asterisk (*) pattern matching, select Enable Advanced Filter with Regex Matching in Step 1.
Step 8 - Add event rule actions
You can add event rule actions to assign notification actions for an event. These notifications are sent or done when an event meets the defined filter criteria that you’ve set in Step 7.
-
Click Add Action.
-
In the Add Event Action page, you can add the following event actions:
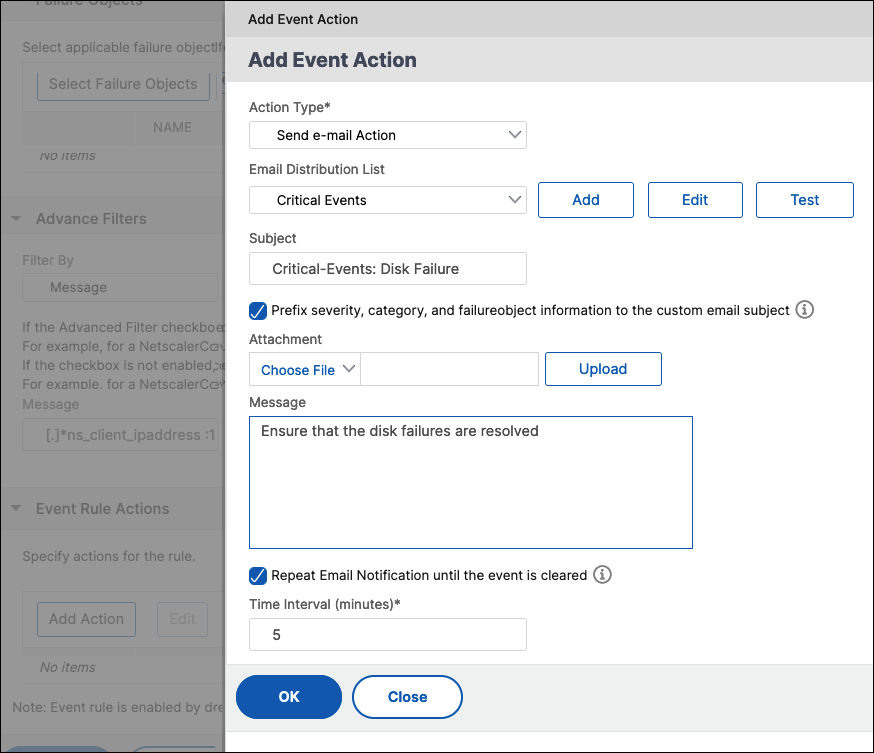
Send email Action
When you choose Send e-mail Action, an email is triggered when the events meet the defined filter criteria.
-
Email Distribution List. Select an email distribution list. To add a distribution list, click Add.
-
In the Create Email Distribution List page, do the following:
-
Name. Add a name for the distribution list.
-
Email Servers. Select an email server. You can also add a server or edit an existing one.
-
From. Add the sender’s email address.
-
To. Add the recipients email addresses. You can also specify the email addresses be included in the CC and Bcc list.
-
Click Create.
-
-
-
Subject. Add a subject line for your emails, like the name of the affected entity, that is, the name of the failure object. This subject line provides information about the virtual server where these events occur.
Note:
If you do not add a subject line, a default subject line is displayed. The default subject line provides information only about the severity of the event, the category of the event, and the failure object. The name of the virtual server where the event occurred is not available.
-
Attachment. Upload an attachment to your email. This attachment is sent when an incoming event matches the configured rule.
-
Test. Click this button to send a test email after configuring an email server, associated distributed lists, and other settings. This option allows you to test the configured settings
-
Repeat Email Notification until the event is cleared. Select this option to make sure that email notifications are not missed for critical events. This option sends repeated emails for event rules that meet the criteria you’ve selected. For example, you’ve created an event rule for instances that involve disk failures. If you want to be notified until the issue is resolved, opt to receive repeated email notifications about those events.
-
Click OK.
Note:
You can also add the email distribution lists by navigating to Settings > Notifications > Email. Click Add and create the list.
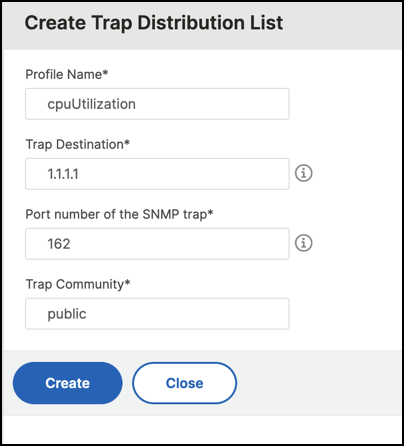
Send Trap Action
When you choose the Send Trap Action event action type, SNMP traps are sent or forwarded to an external trap destination. The trap messages are sent to the specific trap listener when events meet the defined filter criteria.
-
Trap Distribution List. Select a trap distribution list (or a trap destination and trap profile details). To create a trap distribution list, click Add.
-
In the Create Trap Distribution List page, do the following:
-
Profile Name. Enter the profile name.
-
Trap Destination. Enter the name or IP address of the instance that should receive the trap messages.
-
Port number of the SNMP trap. Enter the port number.
-
Trap Community. Enter the group to which the instance belongs.
-
Click Create.
-
-
Click OK.
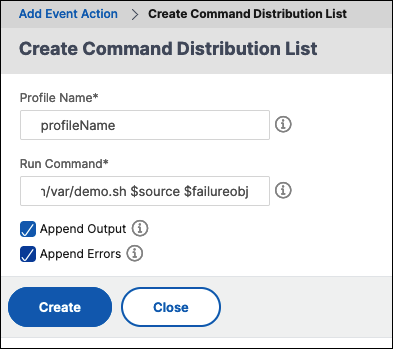
Run Command Action
When you choose the Run Command Action event action, you can create a command or a script that can be run on NetScaler Console for events matching a particular filter criterion.
You can also set the following parameters for the Run Command Action script:
| Parameter | Description |
| $source | This parameter corresponds to the source IP address of the received event. |
| $category | This parameter corresponds to the type of traps defined under the category of the filter |
| $entity | This parameter corresponds to the entity instances or counters for which an event has been generated. It can include the counter names for all threshold-related events, entity names for all entity-related events, and certificate names for all certificate-related events. |
| $severity | This parameter corresponds to the severity of the event. |
| $failureobj | The failure object affects the way that an event is processed and ensures that the failure object displays the exact problem as notified. This can be used to track down problems quickly and to identify the reason for failure, instead of simply reporting raw events. |
Note:
During command execution, these parameters are replaced with actual values.
For example, consider that you want to set a run command action when a load balancing virtual server status is Down. As an administrator, you might want to provide a quick workaround by adding another virtual server. In NetScaler Console, you can:
-
Write a script (.sh) file.
The following is a sample script (.sh) file:
#!/bin/sh source=$1 failureobj=$2 payload='{"params":{"warning":"YES"},"lbvserver":{"name":"'$failureobj'","servicetype":"HTTP","ipv46":"x.x.x.x","port":"80","td":"","m":"IP","state":"ENABLED","rhistate":"PASSIVE","appflowlog":"ENABLED"," bypassaaaa":"NO","retainconnectionsoncluster":"NO","comment":""}}' url="http://$source/nitro/v1/config/lbvserver" curl --insecure -basic -u nsroot:nsroot -H "Content-type: application/json" -X POST -d $payload $url <!--NeedCopy--> -
Save the .sh file in any persistent location on the agent. For example,
/var. -
Provide the .sh file location in NetScaler Console to run when the rule criteria are met.
-
In Command Execution List, click Add.
The Create Command Distribution List page is displayed.
-
Profile Name. Specify a name of your choice
-
Run Command. Specify the agent location where the script has to run. For example:
sh/var/demo.sh $source $failureobj. -
Select Append Output and Append Errors
Note:
You can enable the Append Output and Append Errors options if you want to store the output and errors generated (if any) when you run a command script in the NetScaler Console server log files. If you do not enable these options, NetScaler Console discards all outputs and errors generated while running the command script.
-
Click Create.
-
-
In the Add Event Action page, click OK.
Note:
You can enable the Append Output and Append Errors options if you want to store the output and errors generated (if any) when you run a command script in the NetScaler Console server log files. If you do not enable these options, NetScaler Console discards all outputs and errors generated while running the command script.
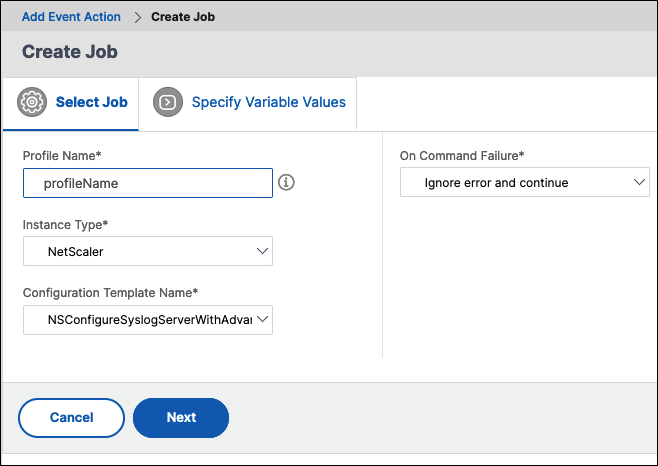
Execute Job Action
When you create a profile with configuration jobs, a job is run as a built-in job or a custom job for NetScaler and NetScaler SDX instances for events and alarms that match the filter criteria you’ve specified.
-
In Job Profile List, select a job profile. To add a list, click Add.
-
In the Create Job page, do the following:
-
Select Job. Create a profile with a job that you want to run when the events meet the defined filter criteria. Specify a profile name, the instance type, the configuration template, and the action to be done if the commands on the job fail.
-
Specify Variable Values. Based on the instance type selected and the configuration template chosen, specify your variable values.
-
Click Finish to create the job.
-
-
Click OK.
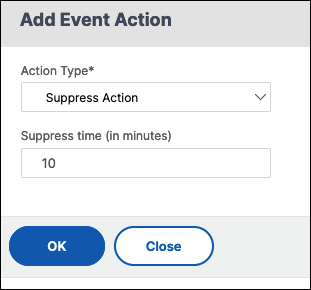
Suppress Action
-
In Suppress time, enter a time period, in minutes, for which an event is suppressed or dropped. You can suppress the event for a minimum of 1 minute.
Note:
You can also configure the suppress time as 0 minutes and it means infinite time. If you do not specify any time duration, then NetScaler Console considers the suppress time as zero and it never expires.
Send Slack notifications
When you configure a Slack channel, the event notifications are sent to this channel. You can configure many Slack channels to receive these notifications
-
In Slack Profile List, select a Slack profile. To add a Slack profile, click Add.
-
In the Create Slack Profile page, do the following:
-
Profile Name. Type a name for the profile list to be configured on NetScaler Console
-
Channel Name. Type the name of the Slack channel to which the event notifications are to be sent.
-
Webhook URL. Type the Webhook URL of the channel that you entered. Incoming Webhooks are a simple way to post messages from external sources into Slack. The URL is internally linked to the channel name. All event notifications are sent to this URL and then posted to the chosen Slack channel. An example of a webhook is as follows: https://hooks.slack.com/services/T0******E/B9X55DUMQ/c4tewWAiGVTT51Fl6oEOVirK
-
Click Create.
-
-
Click OK.
Note:
You can also add the Slack profiles by navigating to Settings > Notifications > Slack Profiles. Click Add and create the profile.
Send PagerDuty notifications
You can add a PagerDuty profile as an option in NetScaler Console to monitor the incident notifications based on your PagerDuty configurations. PagerDuty enables you to configure notifications through email, SMS, push notification, and phone call on a registered number.
-
In PagerDuty Profile list, select a PagerDuty profile. To add a profile, click Add.
-
In the Create PagerDuty Profile page:
-
Profile Name. Enter a profile name of your choice.
-
Integration Key. Enter the Integration Key.
You can get the Integration Key from your PagerDuty portal.
-
Click Create.
-
Before you add a PagerDuty profile in NetScaler Console, make sure you’ve completed the required configurations in PagerDuty. For more information, see the PagerDuty documentation.
You can select your PagerDuty profile as one of the options to get notifications for the following features:
-
Events – List of events that are generated for NetScaler instances.
-
Licenses – List of licenses that are currently active, about to expire, and so on.
-
SSL Certificates – List of SSL certificates that are added to NetScaler instances.
Use case:
Consider a scenario where you want to:
-
Send notifications to your PagerDuty profile.
-
Configure a phone call as an option in PagerDuty to receive notifications.
-
Get phone call alerts for NetScaler events.
Create the PagerDuty configuration. After the configuration is complete, whenever a new event is generated for the NetScaler instance, you’ll receive a phone call. From the phone call, you can decide to:
-
Acknowledge the event
-
Mark it as resolved
-
Escalate to another team member
Send ServiceNow notifications
You can auto-generate ServiceNow incidents for NetScaler Console events by selecting the ServiceNow profile on the NetScaler Console GUI. You must choose the ServiceNow profile in NetScaler Console to configure an event rule.
Before you configure an event rule to auto-generate ServiceNow incidents, integrate the NetScaler Console with the ServiceNow instance. For more information, see Configure ITSM adapter for ServiceNow.
-
In ServiceNow Profile, select the Citrix_Workspace_SN profile from the list.
-
Click OK.