-
-
-
-
Scenarios for Flexed or Pooled license expiry and connectivity issues behavior
-
Configure NetScaler Console as the Flexed or Pooled license server
This content has been machine translated dynamically.
Dieser Inhalt ist eine maschinelle Übersetzung, die dynamisch erstellt wurde. (Haftungsausschluss)
Cet article a été traduit automatiquement de manière dynamique. (Clause de non responsabilité)
Este artículo lo ha traducido una máquina de forma dinámica. (Aviso legal)
此内容已经过机器动态翻译。 放弃
このコンテンツは動的に機械翻訳されています。免責事項
이 콘텐츠는 동적으로 기계 번역되었습니다. 책임 부인
Este texto foi traduzido automaticamente. (Aviso legal)
Questo contenuto è stato tradotto dinamicamente con traduzione automatica.(Esclusione di responsabilità))
This article has been machine translated.
Dieser Artikel wurde maschinell übersetzt. (Haftungsausschluss)
Ce article a été traduit automatiquement. (Clause de non responsabilité)
Este artículo ha sido traducido automáticamente. (Aviso legal)
この記事は機械翻訳されています.免責事項
이 기사는 기계 번역되었습니다.책임 부인
Este artigo foi traduzido automaticamente.(Aviso legal)
这篇文章已经过机器翻译.放弃
Questo articolo è stato tradotto automaticamente.(Esclusione di responsabilità))
Translation failed!
NetScaler Console on VMware ESXi
This document describes how to install NetScaler Console virtual appliances on VMware ESXi, using the VMware vSphere client.
Prerequisites
Before you begin installing a virtual appliance, verify that the following requirements:
-
Install a supported VMware ESXi version. For the list of supported versions, see Supported hypervisors.
-
Install VMware Client on a management workstation that meets the minimum system requirements.
-
Download the NetScaler Console setup files.
Note
VMotion is supported only from NetScaler Console 13.0 Build 47.22 or later. You can schedule and automate migration of the NetScaler Console server deployed on an ESXi hypervisor, including vSphere high availability and vSphere DRS setups.
VMware Tools for NetScaler Console are delivered as part of the software build and they cannot be upgraded or modified separately.
To install NetScaler Console
Follow these steps to install a NetScaler Console virtual appliance on VMware ESXi.
Note
The steps and screen captures are based on VMware ESXi version 6.0. The GUI might differ in other ESXi versions. VMware ESXi version 7.0.1c build number 17325551 with VMXNET3 adapter is supported in NetScaler Console 13.0 71.40 or later. Refer to the VMware documentation for version-specific steps.
-
Start the VMware vSphere client on your workstation.
-
In the IP address / Name text box, type the IP address of the VMware ESXi server that you want to connect to.
-
In the User Name and Password text boxes, type the administrator credentials, and then click Login.
-
On the File menu, click Deploy OVF Template.
-
In the Deploy OVF Template dialog box, in Deploy from a file or URL, select the .ovf file, and click Next.
Note
If a warning message appears with the following text: “The operating system identifier is not supported on the selected host, check to see if the VMware server supports the FreeBSD operating system.” Click Yes.
-
On the OVF Template Details page, click Next.
-
Type a name for the NetScaler Console virtual appliance, and then click Next.
-
Specify the Disk Format by selecting either Thin provisioned format or Thick provisioned format.
Note
We recommend you to select Thick provisioned format.
-
Click Finish to start the installation process.

-
You are now ready to start the NetScaler Console virtual appliance.
-
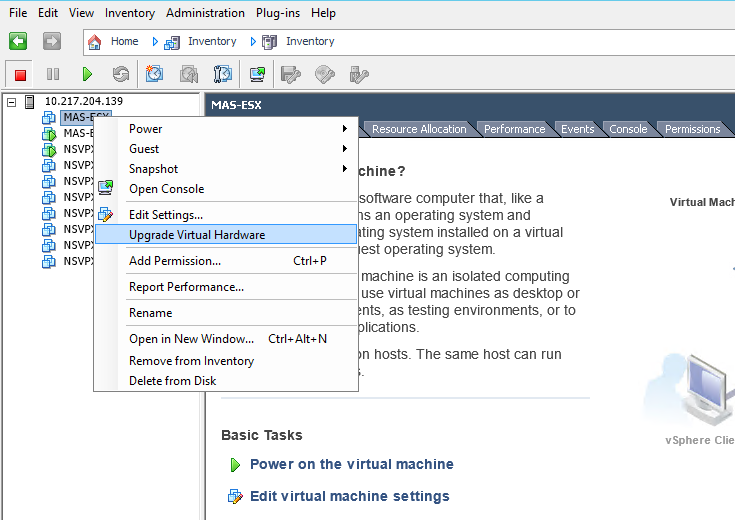
In the navigation pane, select the virtual appliance that you installed. From the Inventory menu, right-click on the Virtual Machine, and then click Upgrade Virtual Hardware. In the Confirm Virtual Machine dialog box, click Yes.
-
In the Inventory menu, click Virtual Machine, and then click Edit Settings.
-
In the Virtual Machine Properties dialog box, on the Hardware tab, click Memory, and then in the right pane specify the Memory Size as 32 GB.
-
Click CPUs, and then in the right pane, specify the CPUs as 8. Click OK.
-
Add an extra disk as per your requirement.

-
In the navigation pane, select the virtual appliance that you installed. From the Inventory menu, click Virtual Machine, click Power, and then click Power On.
-
Click the Console tab to display the NetScaler Console Initial Network Configuration options.

-
After specifying the required IP addresses, save the configuration settings.
-
When prompted, log on using nsrecover/nsroot credentials.

Note
After you log on, if you want to update the initial network configuration, type
networkconfig, update the configuration, and save the configuration. -
Run the deployment script by typing the command at the shell prompt:
deployment_type.py
<!--NeedCopy-->
-
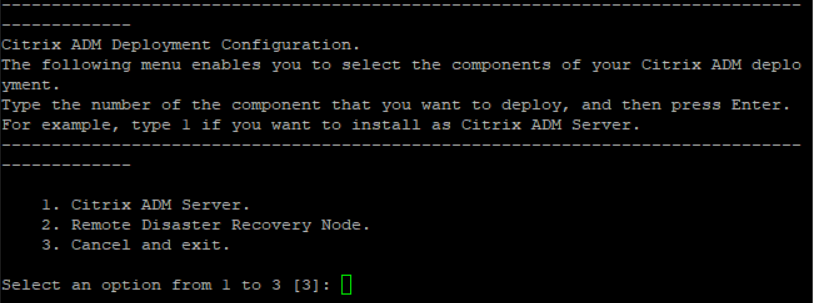
Select the deployment type as NetScaler Console Server. If you do not select any option, by default, it is deployed as a server.
-
Type Yes to deploy NetScaler Console as a standalone deployment.
-
Type Yes to restart the NetScaler Console server.
Note
After you install NetScaler Console, you can update the initial configuration settings later.
Verification
After the server is installed, you can access the GUI by typing the IP address of the NetScaler Console server in the browser. The default administrator credentials to log on to the server are nsroot/nsroot.
The browser displays the NetScaler Console configuration utility.
Note
Typical NetScaler Console installation time is around 10 minutes on VMware ESXi but might take longer on some systems.
Share
Share
In this article
This Preview product documentation is Cloud Software Group Confidential.
You agree to hold this documentation confidential pursuant to the terms of your Cloud Software Group Beta/Tech Preview Agreement.
The development, release and timing of any features or functionality described in the Preview documentation remains at our sole discretion and are subject to change without notice or consultation.
The documentation is for informational purposes only and is not a commitment, promise or legal obligation to deliver any material, code or functionality and should not be relied upon in making Cloud Software Group product purchase decisions.
If you do not agree, select I DO NOT AGREE to exit.