
Internet Protocol version 6 (IPv6)
A NetScaler appliance supports both server-side and client-side IPv6 and can therefore function as an IPv6 node. It can accept connections from IPv6 nodes (both hosts and routers) and from IPv4 nodes, and can perform Protocol Translation (RFC 2765) before sending traffic to the services.
The following table lists some of the IPv6 features that the NetScaler appliance supports.
Table 1. Some Supported IPv6 Features
| IPv6 features |
|---|
| IPv6 addresses for SNIPs (NSIP6, VIP6, and SNIP6) |
| Neighbor Discovery (Address Resolution, Duplicated Address Detection, Neighbor Unreachability Detection, Router Discovery) |
| Management Applications (ping6, telnet6, ssh6) |
| Static Routing and Dynamic routing (OSPF, BGP, RIPng, and ISIS) |
| Port Based VLANs |
| Access Control Lists for IPv6 addresses (ACL6) |
| IPv6 Protocols (TCP6, UDP6, ICMP6) |
| Server Side Support (IPv6 addresses for vservers, services) |
| USIP (Use source IP) and DSR (Direct Server Return) for IPv6 |
| SNMP and CVPN for IPv6 |
| HA with native IPv6 node address |
| IPv6 addresses for MIPs |
| Path-MTU discovery for IPv6 |
Implementing IPv6 Support
You must enable IPv6 feature on a NetScaler appliance before you can use or configure it. If IPv6 is disabled, the NetScaler does not process IPv6 packets. It displays the following warning when you run an unsupported command:
"Warning: Feature(s) not enabled [IPv6PT]"
Use either of the following procedures to enable or disable IPv6.
CLI procedures
To enable or disable IPv6 by using the CLI:
At the command prompt, type one of the following commands:
-
enable ns feature ipv6pt
-
disable ns feature ipv6pt
GUI procedures
To enable or disable IPv6 by using the GUI:
-
Navigate to System > Settings, in the Modes and Features group, click Configure Advanced Features.
-
Select or clear the IPv6 Protocol Translation option.
VLAN Support
If you need to send broadcast or multicast packets without identifying the VLAN (for example, during DAD for NSIP, or ND6 for the next hop of the route), you can configure the NetScaler appliance to send the packet on all the interfaces with appropriate tagging. The VLAN is identified by ND6, and a data packet is sent only on the VLAN. For more information about ND6 and VLANs, see Configuring Neighbor Discovery.
Port-based VLANs are common for IPv4 and IPv6. Prefix-based VLANs are supported for IPv6.
Simple Deployment Scenario
Following is an example of a simple load balancing set-up consisting of an IPv6 vserver and IPv4 services, as illustrated in the following topology diagram.
Figure 1. IPv6 Sample Topology
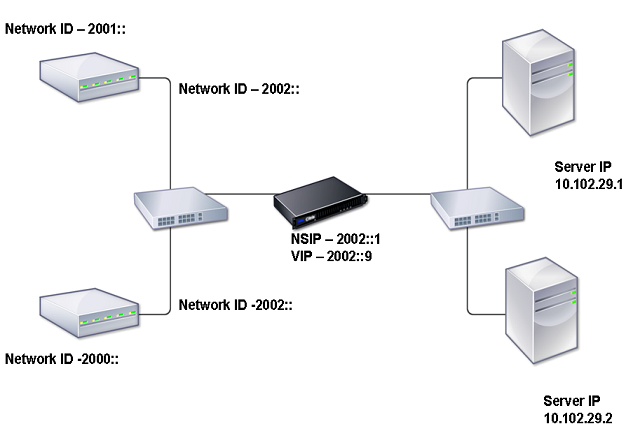
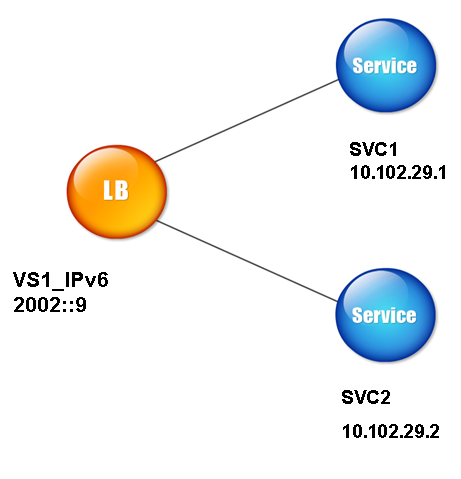
The following table summarizes the names and values of the entities that must be configured on the NetScaler.
Table 2. Sample Values for Creating Entities
| Entity type | Name | Value |
|---|---|---|
| LB Vserver | VS1_IPv6 | 2002::9 |
| Services | SVC1 | 10.102.29.1 |
| SVC2 | 10.102.29.2 |
The following figure shows the entities and values of the parameters to be configured on the NetScaler.
Figure 2. IPv6 Entity Diagram
To configure this deployment scenario, you need to do the following:
-
Create an IPv6 service.
-
Create an IPv6 LB vserver.
-
Bind the services to the vserver.
CLI procedures
To create IPv4 services by using the CLI:
At the command prompt, type:
-
add service \<Name> \<IPAddress> \<Protocol> \<Port>
-
sh service \<Name>
Example:
> add service SVC1 10.102.29.1 HTTP 80
 Done

 >add service SVC2 10.102.29.2 HTTP 80
 Done
To create IPv6 vserver by using the CLI:
At the command prompt, type:
-
add lb vserver \<Name> \<IPAddress> \<Protocol> \<Port>
-
sh lb vserver \<Name>
Example:
add lb vserver VS1_IPv6 HTTP 2002::9 80
To bind a service to an LB vserver by using the CLI:
At the command prompt, type:
-
bind lb vserver \<name> \<service>
-
sh lb vserver \<name>
Example:
> bind lb vserver VS1_IPv6 SVC1
 Done
GUI procedures
To create IPv4 services by using the GUI:
Navigate to Traffic Management > Load Balancing > Services, click Add, and then set the following parameters:
-
Service Name
-
IP Address
-
Protocol
-
Port
To create IPv6 vserver by using the GUI:
-
Navigate to Traffic Management > Load Balancing > Virtual Servers, click Add, and select the IPv6 check box.
-
Set the following parameters:
-
Name
-
Protocol
-
IP Address Type
-
IP Address
-
Port
-
To bind a service to an LB vserver by using the GUI:
-
Navigate to Traffic Management > Load Balancing > Virtual Servers.
-
In the Load Balancing Virtual Servers page, select the vserver for which you want to bind the service (for example, VS1_IPv6).
-
Click Open.
-
In the Configure Virtual Server (Load Balancing) dialog box, on the Services tab, select the Active check box corresponding to the service that you want to bind to the vserver (for example, SVC1).
-
Click OK.
-
Repeat steps 1-4 to bind the service (for example, SVC2 to the vserver).
Host Header Modification
When an HTTP request has an IPv6 address in the host header, and the server does not understand the IPv6 address, you must map the IPv6 address to an IPv4 address. The IPv4 address is then used in the host header of the HTTP request sent to the vserver.
CLI procedures
To change the IPv6 address in the host header to an IPv4 address by using the CLI:
At the command prompt, type:
-
set ns ip6 \<IPv6Address> -map \<IPAddress>
-
sh ns ip6 \<IPv6Address>
Example:
> set ns ip6 2002::9 -map 200.200.200.200
 Done
GUI procedures
To change the IPv6 address in the host header to an IPv4 address by using the GUI:
-
Navigate to System > Network > IPs and, on the IPV6s tab, select the IP address for which you want to configure a mapped IP address, for example, 2002:0:0:0:0:0:0:9, and click Edit.
-
In the Mapped IP text box, type the mapped IP address that you want to configure, for example, 200.200.200.200.
VIP Insertion
If an IPv6 address is sent to an IPv4-based server, the server may not understand the IP address in the HTTP header, and may generate an error. To avoid this, you can map an IPv4 address to the IPv6 VIP. Then, you can enable VIP insertion to enable insertion of the IPv4 VIP address and port number in the HTTP requests sent to the servers.
CLI procedures
To configure a map IPv6 address by using the CLI:
At the command prompt, type:
set ns ip6 \<IPv6Address> -map \<IPAddress>
Example:
 > set ns ip6 2002::9 -map 200.200.200.200
  Done
To enable VIP insertion by using the CLI:
At the command prompt, type:
-
set lb vserver \<name> -insertVserverIPPort \<Value>
-
sh lb vserver \<name>
Example:
 > set lb vserver VS1_IPv6 -insertVserverIPPort ON
  Done
GUI procedures
To configure a map IPv6 address by using the GUI:
-
Navigate to System > Network > IPs, on the IPV6s tab, select the IP address for which you want to configure a map IP address, for example, 2002:0:0:0:0:0:0:9, and click Edit.
-
In the Mapped IP text box, type the map IP address that you want to configure, for example, 200.200.200.200.
To enable VIP insertion by using the GUI:
-
Navigate to Traffic Management > Load Balancing > Virtual Servers, select the virtual server that you want to enable port insertion, and click Edit.
-
In the Advanced tab, under Traffic Settings, in the Vserver IP Port Insertion drop-down list box, select VIPADDR.
-
In the Vserver IP Port Insertion text box, type the vip header.