-
Getting Started with NetScaler
-
Solutions for Telecom Service Providers
-
Load Balance Control-Plane Traffic that is based on Diameter, SIP, and SMPP Protocols
-
Provide Subscriber Load Distribution Using GSLB Across Core-Networks of a Telecom Service Provider
-
Authentication, authorization, and auditing application traffic
-
Basic components of authentication, authorization, and auditing configuration
-
-
Web proxy support for outbound calls to IDP or third party endpoints
-
Web Application Firewall protection for VPN virtual servers and authentication virtual servers
-
On-premises NetScaler Gateway as an identity provider to Citrix Cloud™
-
Authentication, authorization, and auditing configuration for commonly used protocols
-
Troubleshoot authentication and authorization related issues
-
-
-
-
Configure bot profile setting
-
-
-
-
-
Configure DNS resource records
-
Configure NetScaler as a non-validating security aware stub-resolver
-
Jumbo frames support for DNS to handle responses of large sizes
-
Caching of EDNS0 client subnet data when the NetScaler appliance is in proxy mode
-
Use case - configure the automatic DNSSEC key management feature
-
Use Case - configure the automatic DNSSEC key management on GSLB deployment
-
-
-
Source IP address whitelisting for GSLB communication channels
-
Use case: Deployment of domain name based autoscale service group
-
Use case: Deployment of IP address based autoscale service group
-
-
Persistence and persistent connections
-
Advanced load balancing settings
-
Gradually stepping up the load on a new service with virtual server–level slow start
-
Protect applications on protected servers against traffic surges
-
Retrieve location details from user IP address using geolocation database
-
Use source IP address of the client when connecting to the server
-
Use client source IP address for backend communication in a v4-v6 load balancing configuration
-
Set a limit on number of requests per connection to the server
-
Configure automatic state transition based on percentage health of bound services
-
-
Use case 2: Configure rule based persistence based on a name-value pair in a TCP byte stream
-
Use case 3: Configure load balancing in direct server return mode
-
Use case 6: Configure load balancing in DSR mode for IPv6 networks by using the TOS field
-
Use case 7: Configure load balancing in DSR mode by using IP Over IP
-
Use case 10: Load balancing of intrusion detection system servers
-
Use case 11: Isolating network traffic using listen policies
-
Use case 12: Configure Citrix Virtual Desktops for load balancing
-
Use case 13: Configure Citrix Virtual Apps and Desktops for load balancing
-
Use case 14: ShareFile wizard for load balancing Citrix ShareFile
-
Use case 15: Configure layer 4 load balancing on the NetScaler appliance
-
-
-
-
Authentication and authorization for System Users
-
-
-
Configuring a CloudBridge Connector Tunnel between two Datacenters
-
Configuring CloudBridge Connector between Datacenter and AWS Cloud
-
Configuring a CloudBridge Connector Tunnel Between a Datacenter and Azure Cloud
-
Configuring CloudBridge Connector Tunnel between Datacenter and SoftLayer Enterprise Cloud
-
Configuring a CloudBridge Connector Tunnel Between a NetScaler Appliance and Cisco IOS Device
-
CloudBridge Connector Tunnel Diagnostics and Troubleshooting
This content has been machine translated dynamically.
Dieser Inhalt ist eine maschinelle Übersetzung, die dynamisch erstellt wurde. (Haftungsausschluss)
Cet article a été traduit automatiquement de manière dynamique. (Clause de non responsabilité)
Este artículo lo ha traducido una máquina de forma dinámica. (Aviso legal)
此内容已经过机器动态翻译。 放弃
このコンテンツは動的に機械翻訳されています。免責事項
이 콘텐츠는 동적으로 기계 번역되었습니다. 책임 부인
Este texto foi traduzido automaticamente. (Aviso legal)
Questo contenuto è stato tradotto dinamicamente con traduzione automatica.(Esclusione di responsabilità))
This article has been machine translated.
Dieser Artikel wurde maschinell übersetzt. (Haftungsausschluss)
Ce article a été traduit automatiquement. (Clause de non responsabilité)
Este artículo ha sido traducido automáticamente. (Aviso legal)
この記事は機械翻訳されています.免責事項
이 기사는 기계 번역되었습니다.책임 부인
Este artigo foi traduzido automaticamente.(Aviso legal)
这篇文章已经过机器翻译.放弃
Questo articolo è stato tradotto automaticamente.(Esclusione di responsabilità))
Translation failed!
Configure bot profile setting
You can configure the following settings in the bot profile:
-
Configure bot rate limit technique
-
Configure bot log expression
-
Configure bot trap technique
-
Configure device fingerprint technique for mobile (Android) applications
-
Bot detection based on mouse and keyboard dynamics
-
Verbose logging for bot traffic
-
Configure an action for spoofed bot requests
Configure bot rate limit technique
The bot rate limit technique enables you to limit bot traffic within certain timeframe based on the user’s geolocation, client IP address, session, cookie, or configured resource (URL). By configuring the bot rate limit technique, you can ensure the following:
- Block malicious bot activity.
- Reduce traffic strain to web servers.
Configure bot rate limit by using NetScaler CLI
At the command prompt, type:
bind bot profile <name>... -ratelimit  -type <type> Geolocation -countryCode <countryName> -rate  <positive_integer> -timeSlice <positive_integer> [-action <action> ...] [-limitType ( BURSTY | SMOOTH )] [-condition <expression>] [-enabled ( ON | OFF )]
<!--NeedCopy-->
Possible values - SESSION, SOURCE_IP, URL, GEOLOCATION, JA3_FINGERPRINT.
Where,
-
SOURCE_IP- Rate-limiting based on the client IP address. -
SESSION- Rate-limiting based on the configured cookie name. -
URL- Rate-limiting based on the configured URL. -
GEOLOCATION- Rate-limiting based on the configured country name. -
JA3_FINGERPRINT- Rate-limiting based on the client SSL JA3_FINGERPRINT.
Example:
 bind bot profile geo_prof -ratelimit -type Geolocation -countryCode IN -rate 100 -timeSlice 1000 -limitType SMOOTH -condition HTTP.REQ.HEADER("User-Agent").contains("anroid") -action log,drop -enabled on
<!--NeedCopy-->
Configure bot rate limit by using NetScaler GUI
Complete the following steps to configure the bot rate limit detection technique:
- Navigate to Security > NetScaler® Bot Management and Profiles.
- In the NetScaler Bot Management Profiles page, select a profile and click Edit.
- In the NetScaler Bot Management Profile page, go to the Profile Settings section and click Rate Limit.
-
In the Rate Limit section, set the following parameters:
- Enabled. Select the checkbox to validate the incoming bot traffic as part of the detection process.
- Click Add to configure rate limit bindings.
-
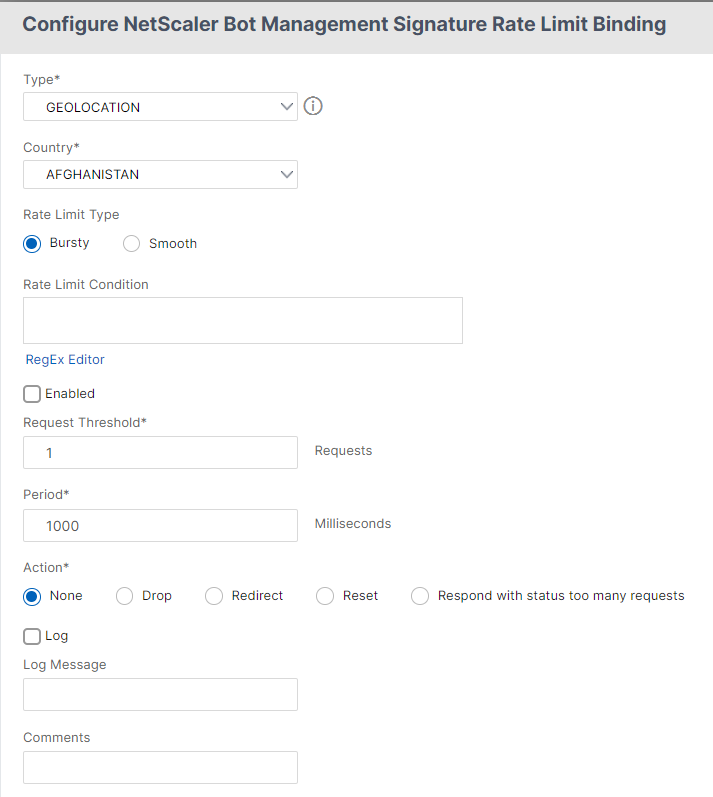
In the Configure NetScaler Bot Management Rate Limit page, set the following parameters.
-
Type - Rate limit bot traffic is based on the following parameters:
- Geolocation - Rate limit based on the user’s geographic location.
- Source_IP - Rate limit traffic based on client IP address.
- Session - Rate limit bot traffic based on session or cookie name.
- URL - Rate limit bot traffic based on the configured URL.
- Country - Select a geolocation as country or region.
- Rate Limit Type – Limits the type of traffic based on the following types.
- Bursty – Forward all requests that are within the set threshold and specified time period.
- Smooth – Forward the requests evenly across the specified time period.
- Rate Limit Connection - Allows you to create multiple rules for a condition.
- Enabled - Select the checkbox to validate the incoming bot traffic.
- Request Threshold - Maximum number of requests allowed within a certain timeframe.
- Period - Timeframe in milliseconds.
- Action - Select one of the following options:
- None - Allows the request.
- Drop - Drop the request.
- Redirect - Redirect the request to the URL specified.
- Reset - Blocks the request and resets the connection.
- Respond with status too many requests - Responds with an error message when the volume of incoming requests is high.
- Log - Select to store the log entries.
- Log Message - Brief description of the log.
- Comments - Brief description about the bot category.
-
- Click OK.
- Click Update.
- Click Done.
Configure bot log expression
If the client is identified as a bot, the NetScaler bot management enables you to capture additional information as log messages. The data can be the name of the user who requested the URL, the source IP address, and the source port from which the user sent the request or data generated from an expression. To perform custom logging, you must configure a log expression in the bot management profile.
Bind the log expression in the bot profile by using the CLI
At the command prompt, type:
bind bot profile <name> (-logExpression -name <string> -expression <expression> [-enabled ( ON | OFF )]) -comment <string>
<!--NeedCopy-->
Example:
bind bot profile profile1 –logExpression exp1 –expression HTTP.REQ.URL –enabled ON -comment "testing log expression"
Bind log expression to bot profile by using the GUI
- Navigate to Security > NetScaler Bot Management > Profiles.
- On the NetScaler Bot Management Profiles page, select Bot Log Expressions from the Profile Settings section.
- In the Bot Log Expression Settings* section, click **Add.
- In the Configure NetScaler Bot Management Profile Bot Log Expression Binding page, set the following parameters.
- Log Expression Name. Name of the log expression.
- Expression. Enter the log expression.
- Enabled. Enable or disable the log expression binding.
- Comments. A brief description about the bot log expression binding.
- ClickOK and Done.
Client IP policy expression for bot detection
The NetScaler bot management now enables you to configure an advanced policy expression to extract the client IP address from an HTTP request header, HTTP request body, HTTP request URL, or using an advanced policy expression. The extracted values are used by a bot detection mechanism (such as TPS, bot trap, or rate limit) to detect if the incoming request is a bot.
Note:
If you have not configured a client IP expression, the default or existing source client IP address is used for bot detection. If an expression is configured, then the evaluation result provides the client IP address that can be used for bot detection.
You can configure and use the client IP expression to extract the actual client IP address if the incoming request is coming through a proxy server and if the client IP address is present in the header. By adding this configuration, the appliance can use the bot detection mechanism in providing more security to software clients and servers.
Configure client IP policy expression in bot profile by using the CLI
At the command prompt, type:
add bot profile <name> [-clientIPExpression <expression>]
<!--NeedCopy-->
Example:
add bot profile profile1 –clientIPExpression 'HTTP.REQ.HEADER("X-Forwarded-For") ALT CLIENT.IP.SRC.TYPECAST_TEXT_T'
add bot profile profile1 –clientIPExpression 'HTTP.REQ.HEADER("X-Forwarded-For") ALT CLIENT.IPv6.SRC.TYPECAST_TEXT_T'
Configure client IP policy expression in bot profile by using the GUI
- Navigate to Security > NetScaler Bot Management > Profiles.
- In the details pane, click Add.
- In the Create NetScaler Bot Management Profile page, set the Client IP Expression.
- Click Create and Close.
Configure bot trap technique
NetScaler bot trap technique randomly or periodically inserts a trap URL in the server response. You can also create a trap URL list and add URLs for that The URL appears invisible and not accessible if the client is a human user. However, if the client is an automated bot, the URL is accessible and when accessed, the attacker is categorized as bot and any subsequent request from the bot is blocked. The trap technique is effective in blocking attacks from bots.
The trap URL is an alpha-numeric URL of configurable length and it is auto-generated at configurable interval. Also the technique allows you to configure a trap insertion URL for top visited websites or frequently visited websites. By doing this, you can mandate the purpose of inserting the bot trap URL for requests matching the trap insertion URL.
Note:
Although the bot trap URL is auto-generated, the NetScaler bot management still allows you to configure a customized trap URL in the bot profile. This is done to strengthen the bot detection technique and make it harder for attackers to access the trap URL.
To complete the bot trap configuration, you must complete the following steps.
- Enable bot trap URL
- Configure bot trap URL in bot profile
- Bind bot trap insertion URL to bot profile
- Configure bot trap URL length and interval in bot settings
Enable bot trap URL protection
Before you can begin, you must ensure that the Bot trap URL protection is enabled on the appliance. At the command prompt, type:
enable ns feature Bot
Configure bot trap URL in bot profile
You can configure the bot trap URL and specify a trap action in the bot profile.
At the command prompt, type:
add bot profile <name> -trapURL <string> -trap ( ON | OFF ) -trapAction <trapAction>
Where,
-
trapURLis the URL that Bot protection uses as the Trap URL. Maximum Length: 127 -
trapis to enable bot trap detection. Possible values: ON, OFF. Default value: OFF -
trapActionis an action to be taken based on bot detection. Possible values: NONE, LOG, DROP, REDIRECT, RESET, MITIGATION. Default value: NONE
Example:
add bot profile profile1 -trapURL www.bottrap1.com trap ON -trapAction RESET
Bind bot trap insertion URL to bot profile
You can configure the bot trap insertion URL and bind it to the bot profile. At the command prompt, type:
bind bot profile <profile_name> trapInsertionURL –url <url> -enabled ON|OFF -comment <comment>
Where,
URL - The request URL regex pattern for which the bot trap URL is inserted. Maximum Length: 127
Example:
bind bot profile profile1 trapInsertionURL –url www.example.com –enabled ON –comment insert a trap URL randomly
Configure bot trap URL length and interval in bot settings
You can configure the bot trap URL length and also set the interval to auto generate the bot trap URL. At the command prompt, type:
set bot settings -trapURLAutoGenerate ( ON | OFF ) –trapURLInterval <positive_integer> -trapURLLength <positive_integer>
Where,
-
trapURLIntervalis the time in seconds after which the bot trap URL is updated. Default value: 3600, Minimum value: 300, Maximum value: 86400 -
trapURLLength. Length of the auto-generated bot trap URL. Default value: 32, Minimum value: 10, Maximum value: 255
Example:
set bot settings -trapURLAutoGenerate ON –trapURLInterval 300 -trapURLLength 60
Configure bot trap URL by using the GUI
- Navigate to Security > NetScaler Bot Management > Profiles.
- In the NetScaler Bot Management Profiles page, click Edit to configure the bot trap URL technique.
- In the Create NetScaler Bot Management Profile page, edit basic settings to enter the trap URL and click OK.
- In the NetScaler Bot Management Profile page, click Bot Trap under Profile Settings.
-
In the Bot Trap section, set the following parameters.
- Enabled. Select the checkbox to enable bot trap detection.
- Description. Brief description about the URL.
-
In the Configure Action section, set the following parameters.
- Action. Action to be taken for bot detected by bot trap access.
- Log. Enable or disable logging for bot trap binding.
- In the Configure Trap Insertion URLs section, click Add.
-
In the Configure NetScaler Bot Management Profile Bot Trap Binding page, set the following parameters.
- URL. Type the URL that you want to confirm as the bot trap insertion URL.
- Enabled. Enable or disable bot trap insertion URL.
- Comment. A brief description about the trap insertion URL.
- Click OK.
- Click Update and Done.
Configure bot trap URL settings
Complete the following steps to configure bot trap URL settings:
- Navigate to Security > NetScaler Bot Management.
- In the details pane, under Settings click Change NetScaler Bot Management Settings.
-
In the Configure NetScaler Bot Management Settings, set the following parameters.
- Trap URL Interval. Time in seconds after which the bot trap URL is updated.
- Trap URL Length. Length of the auto-generated bot trap URL.
- Click OK and Done.
Configure device fingerprint technique for mobile (Android) applications
Device fingerprint technique detects an incoming traffic as a bot by inserting a JavaScript script in the HTML response to the client. The JavaScript script when invoked by the browser, it collects browser and client attributes and sends a request to the appliance. The attributes are examined to determine whether the traffic is a Bot or a human.
The detection technique is further extended to detect bots on a mobile (Android) platform. Unlike web applications, in mobile (Android) traffic, bot detection based on JavaScript script do not apply. To detect bots in a mobile network, the technique uses a bot mobile SDK which is integrated with mobile applications on the client-side. The SDK intercepts the mobile traffic, collects device details, and sends the data to the appliance. On the appliance side, the detection technique examines the data and determines whether the connection is from a Bot or a human.
How the device fingerprint technique for the mobile application works
The following steps explain the bot detection workflow to detect if a request from a mobile device is from a human or a bot.
- When a user interacts with a mobile application, the bot mobile SDK records the device’s behavior.
- Client sends a request to NetScaler appliance.
- When sending the response, the appliance inserts a bot session cookie with session details, and parameters to collect client parameters.
- When the mobile application receives the response, the NetScaler bot SDK that is integrated with the mobile application validates the response, retrieves the recorded device fingerprint parameters, and sends it to the appliance.
- The device fingerprint detection technique on the appliance side validates the device details and updates the bot session cookie if it is a suspected bot or not.
- When the cookie is expired or device fingerprint protection prefers to validate and collect device parameters periodically, the whole procedure or challenge is repeated.
Pre-requisite
To get started with the NetScaler device fingerprint detection technique for mobile applications, you must download and install the bot mobile SDK in your mobile application.
Configure fingerprint detection technique for mobile (Android) applications by using the CLI
At the command prompt, type:
set bot profile <profile name> -deviceFingerprintMobile ( NONE | Android )
Example:
set bot profile profile 1 –deviceFingerprintMobile Android
Configure device fingerprint detection technique for mobile (Android) applications by using the GUI
- Navigate to Security > NetScaler Bot Management and Profiles.
- On the NetScaler Bot Management Profiles page, select a file and click Edit.
- On the NetScaler Bot Management Profile page, click Device Fingerprint under Profile Settings.
- In the Configure Bot Mobile SDK section, select the mobile client type.
- Click Update and Done.
Configure device fingerprint technique by using NetScaler GUI
This detection technique sends a Java script challenge to the client and extracts the device information. Based on device information, the technique drops or bypasses the bot traffic. Follow the steps to configure the detection technique.
- Navigate to Security > NetScaler Bot Management and Profiles.
- On the NetScaler Bot Management Profiles page, select a signature file and click Edit.
-
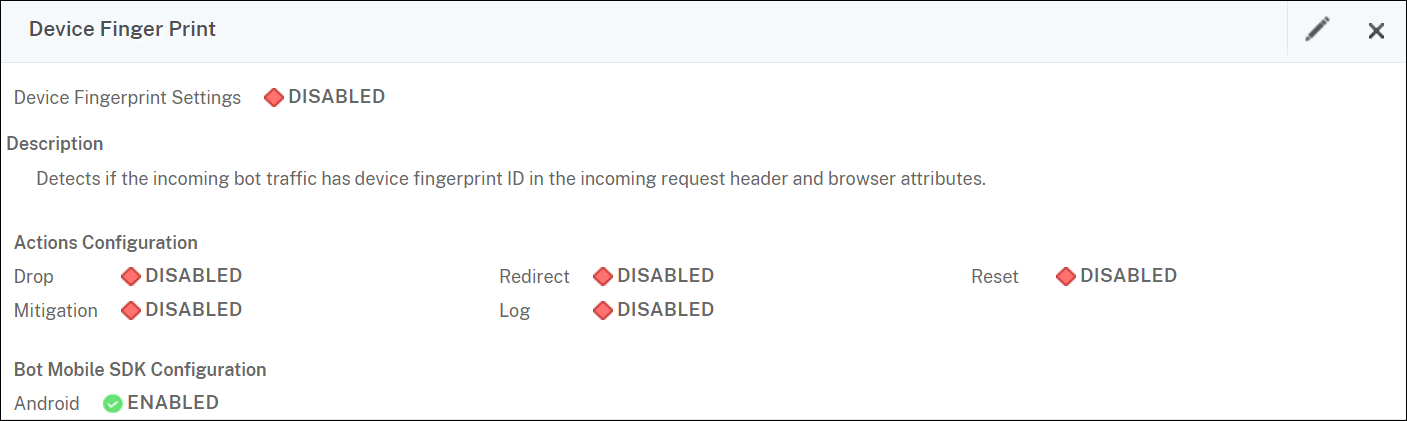
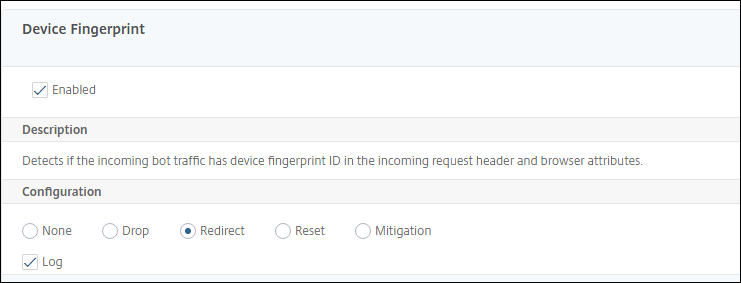
On the NetScaler Bot Management Profile page, go to the Signature Settings section and click Device Fingerprint. In the Device Fingerprint section, set the following parameters:
- Enabled - Select to enable the rule.
- Configuration - Select one of the following options:
- None - Allows the traffic.
- Drop - Drop the traffic.
- Redirect - Redirects the traffic to an error URL.
-
Mitigation, or CAPTCHA - Validates and allows the traffic.
Note:
During session replay attacks using the device fingerprint cookies, requests are dropped even if the device fingerprint configuration is set to Mitigation.
- Click Update.
- Click Done.
Bot detection based on mouse and keyboard dynamics
To detect bots and mitigate web scraping anomalies, the NetScaler bot management uses an enhanced bot detection technique based on mouse and keyboard behavior. Unlike conventional bot techniques that require direct human interaction (for example, CAPTCHA validation), the enhanced technique passively monitors the mouse and the keyboard dynamics. The NetScaler appliance then collects the real-time user data and analyses the behavioral between a human and a bot.
The passive bot detection using mouse and keyboard dynamics has the following benefits over existing bot detection mechanisms:
- Provides continuous monitoring throughout the user session, and eliminates single checkpoint.
- Requires no human interaction and it is transparent to users.
How bot detection using mouse and keyboard dynamics works
The bot detection technique using keyboard and mouse dynamics consists of two components, a webpage logger and bot detector. The webpage logger is a JavaScript that records keyboard and mouse movements when a user is performing a task on the webpage (for example, filling a registration form). The logger then sends the data in batches to the NetScaler appliance. The appliance then stores the data as a KM record and sends it to the bot detector on the NetScaler Console server, which analyses if the user is a human or bot.
The following steps explain how the components interact with each other:
- The NetScaler admin configures policy expression through the ADM StyleBook, CLI, or NITRO or any other method.
- The URL is set in the bot profile when the admin enables the feature on the appliance.
- When a client sends a request, the NetScaler appliance tracks the session and all requests in the session.
- The appliance inserts a JavaScript (webpage logger) in the response if the request matches the configured expression on the bot profile.
- The JavaScript then collects all the keyboard, mouse activity and sends the KM data in a POST URL (transient).
- The NetScaler appliance stores the data and sends it to the NetScaler Console server at the end of the session. Once the appliance receives the complete data of a POST request, the data is sent it to the ADM server.
- The NetScaler Console Service analyses the data and based on the analysis, the result is available on the NetScaler Console service GUI.
The JavaScript logger records the following mouse and keyboard movements:
- Keyboard events – all events
- Mouse events - mouse move, mouse up, mouse down
- Clipboard events - paste
- Custom events - autofill, autofill cancel
- timestamp of each event
Configure bot detection using mouse and keyboard dynamics
The NetScaler bot management configuration includes enabling or disabling the keyboard and mouse-based detection feature, and configures the JavaScript URL in the bot profile. Complete the following steps to configure bot detection using mouse and keyboard dynamics:
- Enable keyboard and mouse-based detection
- Configure an expression to decide when the JavaScript can be injected in the HTTP response
Enable keyboard mouse-based bot detection
Before you begin the configuration, ensure you have enabled the keyboard and mouse-based bot detection feature on the appliance.
At the command prompt, type:
add bot profile <name> -KMDetection ( ON | OFF )
<!--NeedCopy-->
Example:
add bot profile profile1 –KMDetection ON
Configure bot expression for JavaScript insertion
Configure bot expression to evaluate the traffic and insert JavaScript. The JavaScript is inserted only if the expression is evaluated as true.
At the command prompt, type:
bind bot profile <name> -KMDetectionExpr -name <string> -expression <expression> -enabled ( ON | OFF ) –comment <string>
<!--NeedCopy-->
Example:
bind bot profile profile1 -KMDetectionExpr -name test -expression http.req.url.startswith("/testsite") -enabled ON
Configure JavaScript file name inserted in the HTTP response for keyboard-mouse based bot detection
To collect the user action details, the appliance sends a JavaScript file name in the HTTP response. The JavaScript file collects all the data in a KM record and sends it to the appliance.
At the command prompt, type:
set bot profile profile1 – KMJavaScriptName <string>
<!--NeedCopy-->
Example:
set bot profile profile1 –KMJavaScriptName script1
Configure behavior biometrics size
You can configure the maximum size of mouse and keyboard behavior data that can be sent as KM record to the appliance and processed by the ADM server.
At the command prompt, type:
set bot profile profile1 -KMEventsPostBodyLimit <positive_integer>
<!--NeedCopy-->
Example:
set bot profile profile1 – KMEventsPostBodyLimit 25
After you have configured the NetScaler appliance to configure the JavaScript and collect keyboard and mouse behavior biometrics, the appliance sends the data to the NetScaler Console server. For more information on how the NetScaler Console server detects bots from behavior biometrics, see Bot Violations topic.
Configure keyboard and mouse bot expression settings by using the GUI
- Navigate to Security > NetScaler Bot Management and Profiles.
- On the NetScaler Bot Management Profiles page, select a profile and click Edit.
- In the Keyboard and mouse based bot detection section, set the following parameters:
- Enable detection. Select the checkbox to detect the bot based keyboard and mouse dynamics behavior.
- Event post body limit. Size of the keyboard and mouse dynamics data sent by the browser to be processed by the NetScaler appliance.
-
Click OK.
- On the NetScaler bot Management Profile page, go to the Profile Settings section and click Keyboard and Mouse Based Bot Expression Settings.
- In the Keyboard and Mouse Based Bot Expression Settings section, click Add.
- In the Configure NetScaler bot Management Profile Bot Keyboard and Mouse Expression Binding page, set the following parameters:
- Expression Name. Name of the bot policy expression for detection keyboard and mouse dynamics.
- Expression. Bot policy expression.
- Enabled. Select the checkbox to enable the keyboard and bot keyboard and mouse expression binding.
- Comments. A brief description about the bot policy expression and its binding to the bot profile.
- Click OK and Close.
- In the Keyboard and Mouse Based Bot Expression Settings section, click Update.
Verbose logging for bot traffic
When an incoming request is identified as a bot, the NetScaler appliance logs more HTTP header details for monitoring and troubleshooting. The bot verbose logging capability is similar to the verbose logging in the Web App Firewall module.
Consider an incoming traffic from a client. If the client is identified as a bot, the NetScaler appliance uses the verbose logging functionality to log full HTTP header information such as domain address, URL, user-agent header, cookie header. The log details are then sent to the ADM server for monitoring and troubleshooting the purpose. The verbose log message is not stored in the “ns.log” file.
Configure bot verbose logging by using the CLI
To capture detailed HTTP header information as logs, you can configure the verbose logging parameter in the bot profile. At the command prompt, type:
set bot profile <name> [-verboseLogLevel ( NONE | HTTP_FULL_HEADER ) ]
<!--NeedCopy-->
Example:
set bot profile p1 –verboseLogLevel HTTP_FULL_HEADER
Configure bot verbose logging by using the NetScaler GUI
Follow the procedure to configure the verbose log level in the bot profile.
- On the navigation pane, navigate to Security > NetScaler Bot Management.
- In the NetScaler Bot Management Profiles page, click Add.
- In the Create NetScaler Bot Management Profile page, select a verbose log level as HTTP Full Header.
- Click OK and Done.
Configure an action for spoofed bot requests
An attacker might attempt to impersonate a good bot and send requests to your application server. Such bots are identified as spoofed bots using the bot signature. Configure the following actions against spoofed bots to protect your application server:
- DROP
- NONE
- REDIRECT
- RESET
Note:
Requests identified as good bots are further evaluated for spoofing. Client IP addresses with RDNS errors during client host validation are treated as spoof requests.
Configure an action for spoofed bot requests using CLI
Run the following command to configure an action for spoofed bot requests:
set bot profile <bot-profile-name> -spoofedReqAction <action> LOG
<!--NeedCopy-->
Example:
set bot profile bot_profile -spoofedReqAction DROP LOG
<!--NeedCopy-->
In this example, the requests from spoofed bots are dropped and logged in a NetScaler appliance.
Tip
To log events from the spoofed bots, specify
LOGin the command.
Configure an action for spoofed bot requests using GUI
Follow the steps to configure an action for the spoofed bot requests:
-
Navigate to Security > NetScaler Bot Management.
-
In the NetScaler Bot Management Profiles page, click Add.
-
Select an action from the Spoofed Request Action list.
-
Select Log Spoofed Request.
This action logs the events from spoofed bots.
-
Click Create.
Configure CAPTCHA
CAPTCHA is a security measure that helps to protect web applications from automated bots by presenting challenges that are easy for humans to solve, but difficult for bots.
Configuring CAPTCHA provides the following benefits:
-
Enhanced security: Adds an extra layer of protection to your web application.
-
Protection of business-critical content: Prevents bots from automatically extracting sensitive information.
Configure CAPTCHA by using the CLI
At the command prompt, type:
add bot profile <name> [-deviceFingerprint ( ON | OFF )][-deviceFingerprintAction ( mitigation )]

bind bot profile <Name> -captchaResource <URL> - waitTime <time> -gracePeriod <time> -mutePeriod <value> -requestSizeLimit <value> -retryAttempts <value> -action <None| DROP|Redirect|Reset> -enabled <ON|OFF>
<!--NeedCopy-->
Where:
- URL. Bot URL for which the CAPTCHA action is applied during IP reputation and device fingerprint detection techniques.
- Enabled. Set this option to enable CAPTCHA support.
- Grace time. The duration until the next CAPTCHA challenge is sent, after a valid CAPTCHA response has been received.
- Wait time. Duration taken for the ADC appliance to wait until the client sends the CAPTCHA response.
- Mute Period. The duration for which a client that submits an incorrect CAPTCHA response must wait before their next attempt. During this period, NetScaler blocks all requests.
- Request Length limit. The length of the request that triggers a CAPTCHA challenge. If the request exceeds the specified limit, it is automatically dropped. Default value is 10–3000 bytes.
- Retry Attempts. The number of times that a client can attempt to solve the CAPTCHA challenge. Range: 1–10, Recommended: 5.
- No Action/Drop/Redirect. An action that must be taken if the client does not pass the CAPTCHA validation.
Example:
add bot profile bot_captcha_config -deviceFingerprint ON -deviceFingerprintAction MITIGATION

bind bot profile bot_captcha_config  -captchaResource -url /datap -waitTime 60 -gracePeriod 500 -mutePeriod 300 -requestSizeLimit 600 -retryAttempts 10 -action loG -enabled ON
<!--NeedCopy-->
Configure CAPTCHA by using the GUI
- In the NetScaler Bot Management Profiles page, select a profile and click Edit.
- In the NetScaler Bot Management Profile page, go to the Profile Settings section and click CAPTCHA.
- Under Configure Resources, click Add.
- In the Configure NetScaler Bot Management Profile CAPTCHA Binding page, update the parameters.
- Click OK.
Share
Share
In this article
- Configure bot rate limit technique
- Configure bot log expression
- Configure bot trap technique
- Configure device fingerprint technique for mobile (Android) applications
- Bot detection based on mouse and keyboard dynamics
- Verbose logging for bot traffic
- Configure an action for spoofed bot requests
- Configure CAPTCHA
This Preview product documentation is Cloud Software Group Confidential.
You agree to hold this documentation confidential pursuant to the terms of your Cloud Software Group Beta/Tech Preview Agreement.
The development, release and timing of any features or functionality described in the Preview documentation remains at our sole discretion and are subject to change without notice or consultation.
The documentation is for informational purposes only and is not a commitment, promise or legal obligation to deliver any material, code or functionality and should not be relied upon in making Cloud Software Group product purchase decisions.
If you do not agree, select I DO NOT AGREE to exit.