-
Getting Started with NetScaler
-
Solutions for Telecom Service Providers
-
Load Balance Control-Plane Traffic that is based on Diameter, SIP, and SMPP Protocols
-
Provide Subscriber Load Distribution Using GSLB Across Core-Networks of a Telecom Service Provider
-
Authentication, authorization, and auditing application traffic
-
Basic components of authentication, authorization, and auditing configuration
-
-
Web proxy support for outbound calls to IDP or third party endpoints
-
Web Application Firewall protection for VPN virtual servers and authentication virtual servers
-
On-premises NetScaler Gateway as an identity provider to Citrix Cloud™
-
Authentication, authorization, and auditing configuration for commonly used protocols
-
Troubleshoot authentication and authorization related issues
-
-
-
-
-
-
-
Configure DNS resource records
-
Configure NetScaler as a non-validating security aware stub-resolver
-
Jumbo frames support for DNS to handle responses of large sizes
-
Caching of EDNS0 client subnet data when the NetScaler appliance is in proxy mode
-
Use case - configure the automatic DNSSEC key management feature
-
Use Case - configure the automatic DNSSEC key management on GSLB deployment
-
-
-
Source IP address whitelisting for GSLB communication channels
-
Use case: Deployment of domain name based autoscale service group
-
Use case: Deployment of IP address based autoscale service group
-
-
Persistence and persistent connections
-
Advanced load balancing settings
-
Gradually stepping up the load on a new service with virtual server–level slow start
-
Protect applications on protected servers against traffic surges
-
Retrieve location details from user IP address using geolocation database
-
Use source IP address of the client when connecting to the server
-
Use client source IP address for backend communication in a v4-v6 load balancing configuration
-
Set a limit on number of requests per connection to the server
-
Configure automatic state transition based on percentage health of bound services
-
-
Use case 2: Configure rule based persistence based on a name-value pair in a TCP byte stream
-
Use case 3: Configure load balancing in direct server return mode
-
Use case 6: Configure load balancing in DSR mode for IPv6 networks by using the TOS field
-
Use case 7: Configure load balancing in DSR mode by using IP Over IP
-
Use case 10: Load balancing of intrusion detection system servers
-
Use case 11: Isolating network traffic using listen policies
-
Use case 12: Configure Citrix Virtual Desktops for load balancing
-
Use case 13: Configure Citrix Virtual Apps and Desktops for load balancing
-
Use case 14: ShareFile wizard for load balancing Citrix ShareFile
-
Use case 15: Configure layer 4 load balancing on the NetScaler appliance
-
-
-
-
Authentication and authorization for System Users
-
User Account and Password Management
-
-
-
Configuring a CloudBridge Connector Tunnel between two Datacenters
-
Configuring CloudBridge Connector between Datacenter and AWS Cloud
-
Configuring a CloudBridge Connector Tunnel Between a Datacenter and Azure Cloud
-
Configuring CloudBridge Connector Tunnel between Datacenter and SoftLayer Enterprise Cloud
-
Configuring a CloudBridge Connector Tunnel Between a NetScaler Appliance and Cisco IOS Device
-
CloudBridge Connector Tunnel Diagnostics and Troubleshooting
This content has been machine translated dynamically.
Dieser Inhalt ist eine maschinelle Übersetzung, die dynamisch erstellt wurde. (Haftungsausschluss)
Cet article a été traduit automatiquement de manière dynamique. (Clause de non responsabilité)
Este artículo lo ha traducido una máquina de forma dinámica. (Aviso legal)
此内容已经过机器动态翻译。 放弃
このコンテンツは動的に機械翻訳されています。免責事項
이 콘텐츠는 동적으로 기계 번역되었습니다. 책임 부인
Este texto foi traduzido automaticamente. (Aviso legal)
Questo contenuto è stato tradotto dinamicamente con traduzione automatica.(Esclusione di responsabilità))
This article has been machine translated.
Dieser Artikel wurde maschinell übersetzt. (Haftungsausschluss)
Ce article a été traduit automatiquement. (Clause de non responsabilité)
Este artículo ha sido traducido automáticamente. (Aviso legal)
この記事は機械翻訳されています.免責事項
이 기사는 기계 번역되었습니다.책임 부인
Este artigo foi traduzido automaticamente.(Aviso legal)
这篇文章已经过机器翻译.放弃
Questo articolo è stato tradotto automaticamente.(Esclusione di responsabilità))
Translation failed!
User account and password management
NetScaler enables you to manage user accounts and password configuration. Following are some of the activities that you can perform using a system user account or nsroot administrative user account.
- System user account lockout
- Lock system user account for management access
- Unlock a locked system user account for management access
- Disable management access for system user account
- Force passwords change for
nsrootadministrative users - Remove sensitive files in a system user account
- Strong password configuration for system users
- Enforce password rotation and password history for local accounts
System user account lockout
To prevent brute force security attacks, you can configure the user lockout configuration. The configuration enables a network administrator to prevent a system user to log on to NetScaler. Also, unlock the user account before the lock period expires.
To get the details of the unsuccessful user login attempts across reboots, the persistentLoginAttemptsparameter can be enabled.
At the command prompt, type:
set aaa parameter -maxloginAttempts <value> -failedLoginTimeout <value> -persistentLoginAttempts (ENABLED | DISABLED)
Example:
set aaa parameter -maxloginAttempts 3 -failedLoginTimeout 10 -persistentLoginAttempts ENABLED
Note:
For the
aaa.user.login_attemptsexpression to take effect, you must disable the “Persistent Login Attempts” parameter.Run the
unset aaa parameter -persistentLoginAttemptscommand to disable (if enabled) the persistent login attempts.For details about the login attempt functionality, see Support to retrieve current login attempts for a user.
The following show command output displays the configuration status of the authentication, authorization, and auditing parameters:
show aaaparameter

Configured AAA parameters

EnableStaticPageCaching: YES

EnableEnhancedAuthFeedback: NO

DefaultAuthType: LOCAL MaxAAAUsers: Unlimited

AAAD nat ip: None

EnableSessionStickiness : NO

aaaSessionLoglevel: INFORMATIONAL

AAAD Log Level: INFORMATIONAL

...

Persistent Login Attempts: DISABLED

<!--NeedCopy-->
Configure system user account lockout by using the GUI
- Navigate to Configuration > Security > AAA-Application Traffic > Authentication Settings > Change authentication AAA Settings.
-
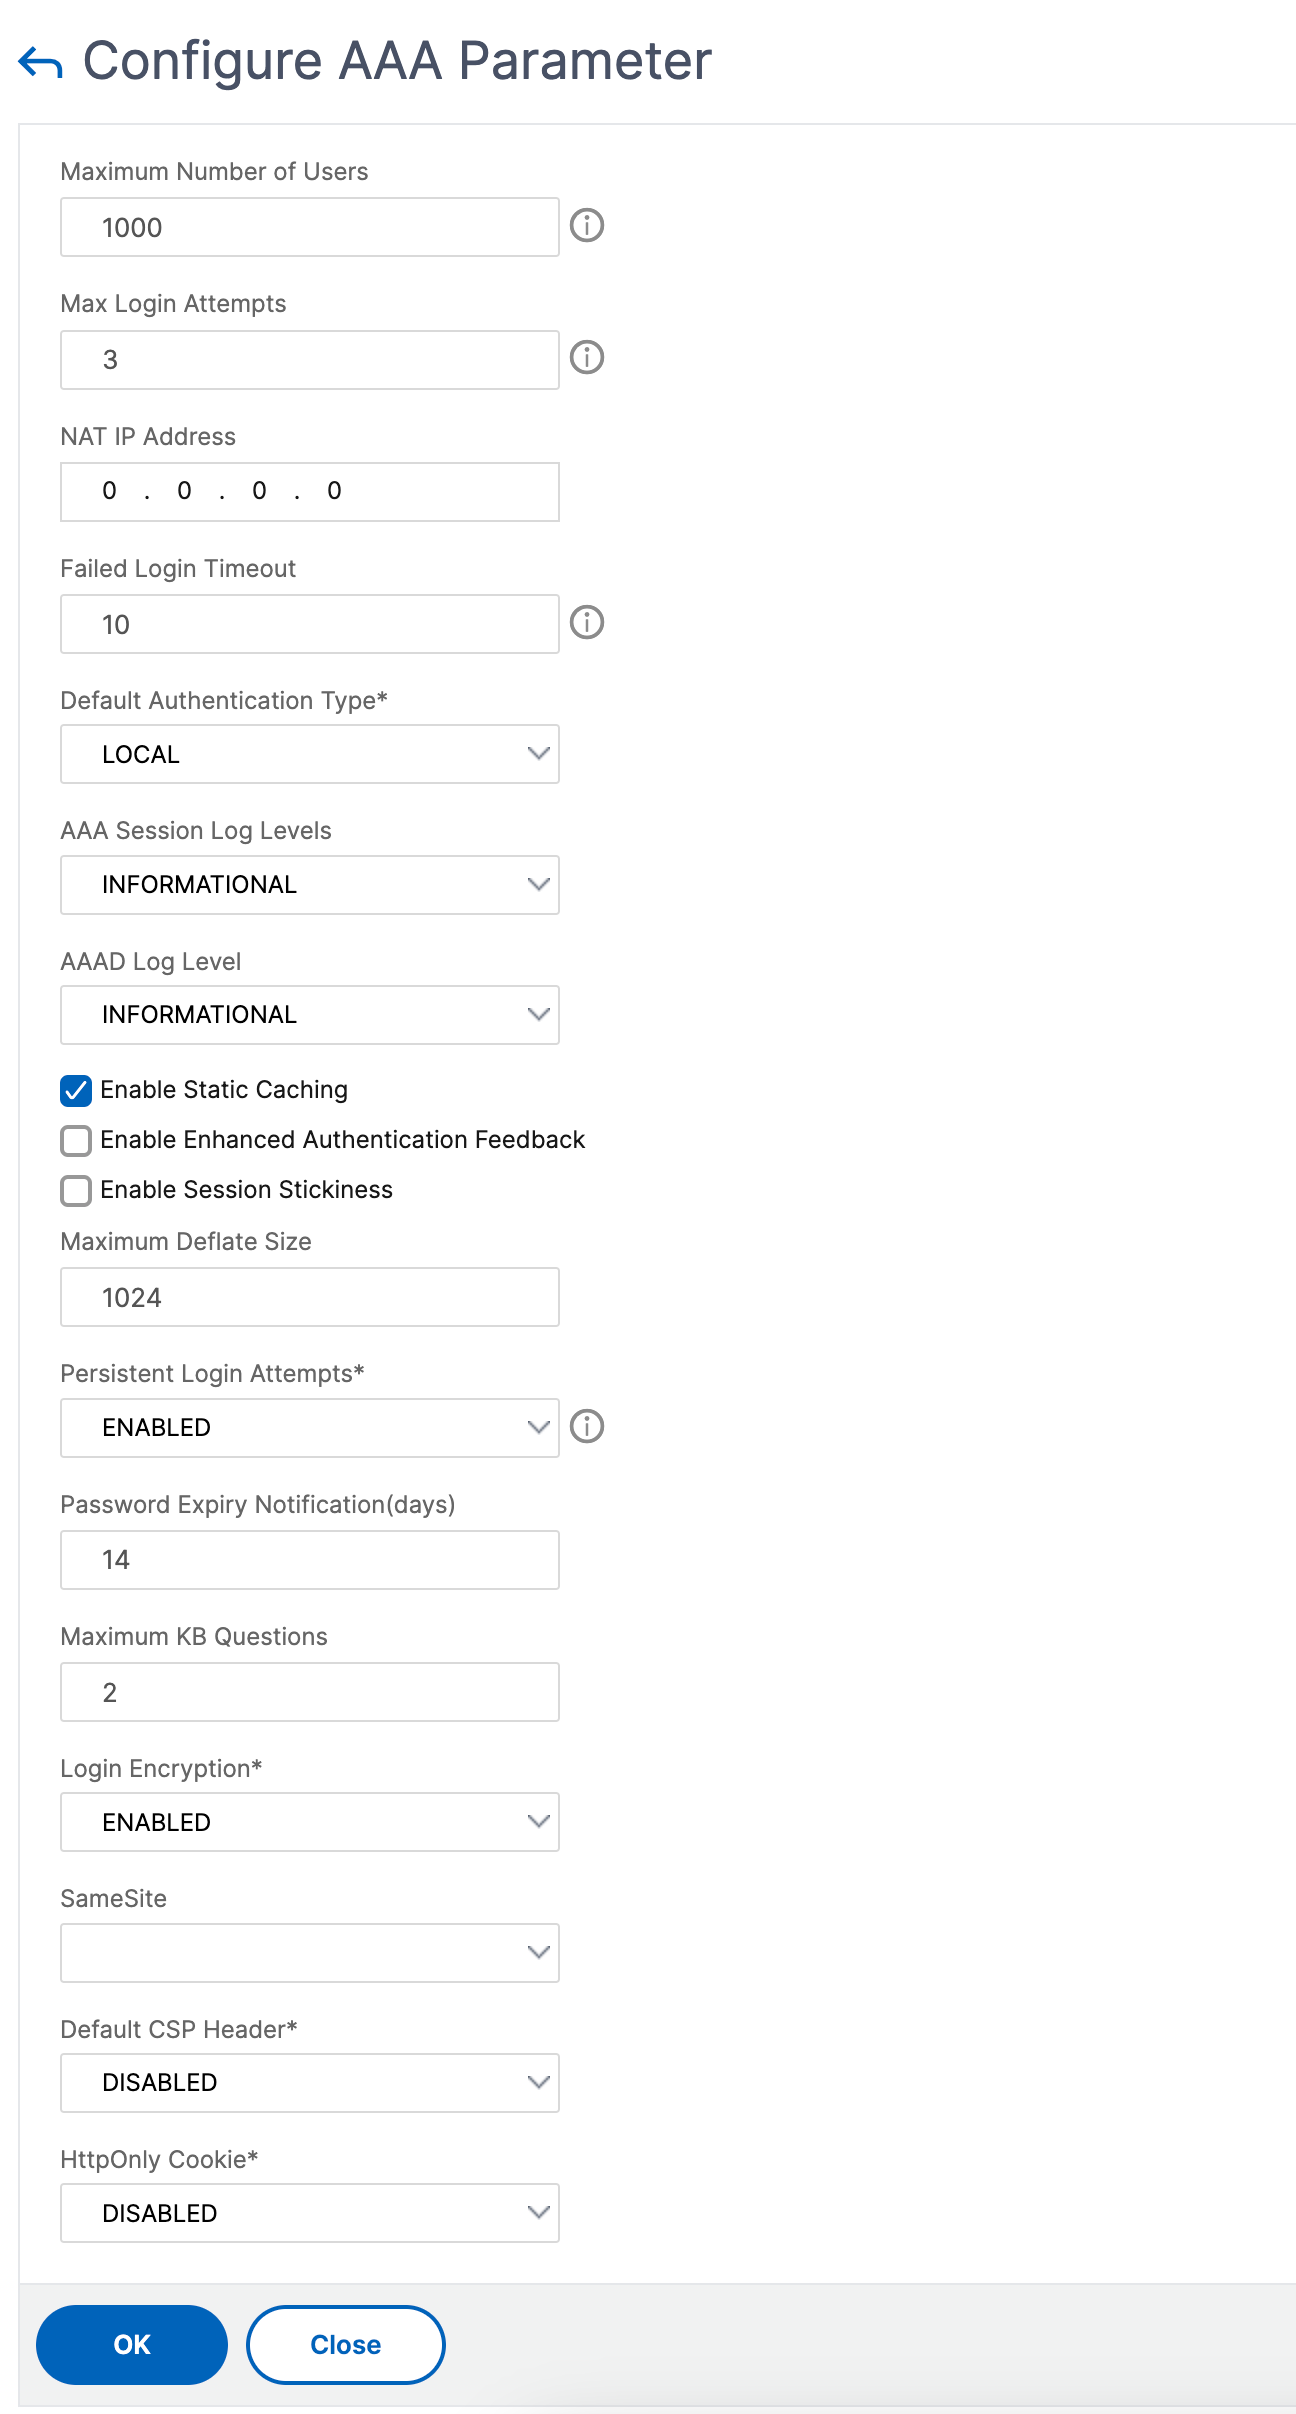
In the Configure AAA Parameter page, set the following parameters:
- Max Login Attempts. The maximum number of logon attempts allowed for the user to try.
- Failed Login Timeout. The maximum number of invalid logon attempts by the user.
- Persistent Login Attempts. Persistent storage of unsuccessful user login attempts across reboots.
-
Click OK.
When you set the parameters, the user account gets locked for 10 minutes for three or more invalid login attempts. Also, the user cannot log on even with valid credentials for 10 minutes.
Note
If a locked user tries to log on to NetScaler, an error message,
RBA Authentication Failure: maxlogin attempt reached for test.appears.
Lock system user account for management access
NetScaler enables you to lock a system user for 24 hours and deny access to the user.
NetScaler supports the configuration for both system user and external users.
Note
The feature is supported only if you disable the
persistentLoginAttemptsoption in theaaaparameter.
At the command prompt type:
set aaa parameter –persistentLoginAttempts DISABLED
Now, to lock a user account, at the command prompt, type:
lock aaa user test
Lock a system user account by using the GUI
- Navigate to Configuration > Security > AAA-Application Traffic > Authentication Settings > Change authentication AAA Settings.
- In Configure AAA Parameter, in the Persistent Login Attempts list, select DISABLED.
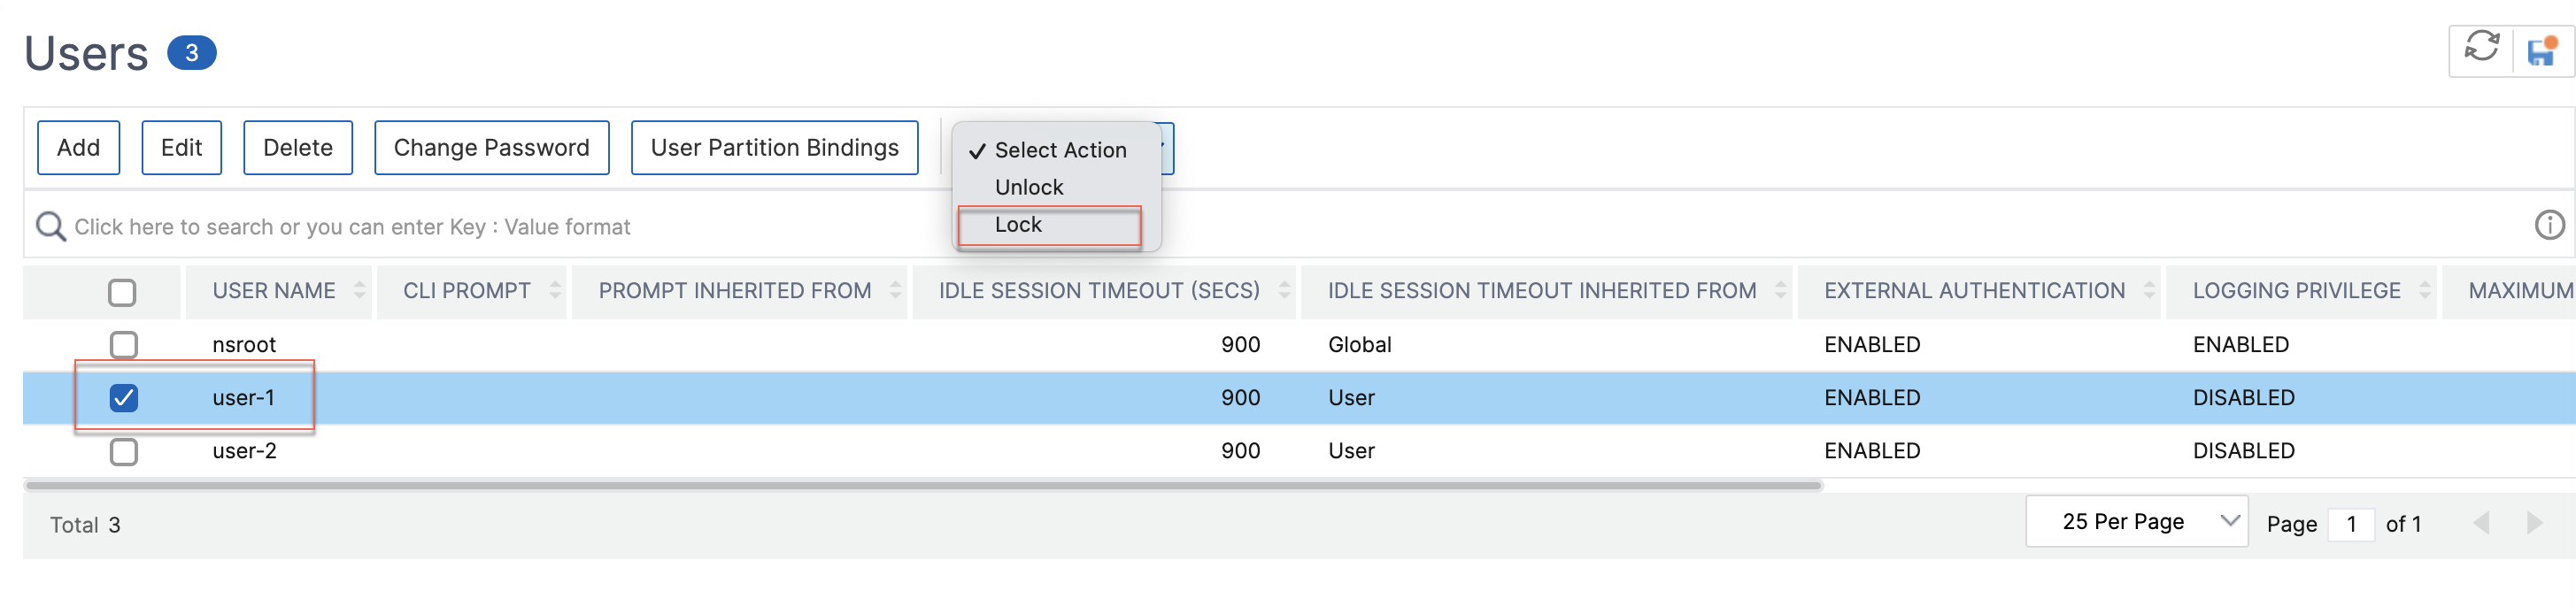
- Navigate to System > User Administration > Users.
- Select a user.
-
In the Select Action list, select Lock.
Note
The NetScaler GUI does not provide a way to lock external users. To lock an external user, the ADC administrator must use the CLI.
When a locked system user (locked with lock authentication, authorization, and auditing user command) attempts to log in to NetScaler, an error message, “RBA Authentication Failure: User test is locked down for 24 hours.” appears.
When a user is locked from management access, they can still log in through the console.
Unlock a locked system user account for management access
System users and external users can be locked for 24 hours using the lock authentication, authorization, and auditing user command.
Note
NetScaler allows admins to unlock the locked user and the feature does not require any settings in the “persistentloginAttempts” command.
At the command prompt, type:
unlock aaa user test
Configure system user unlock by using the GUI
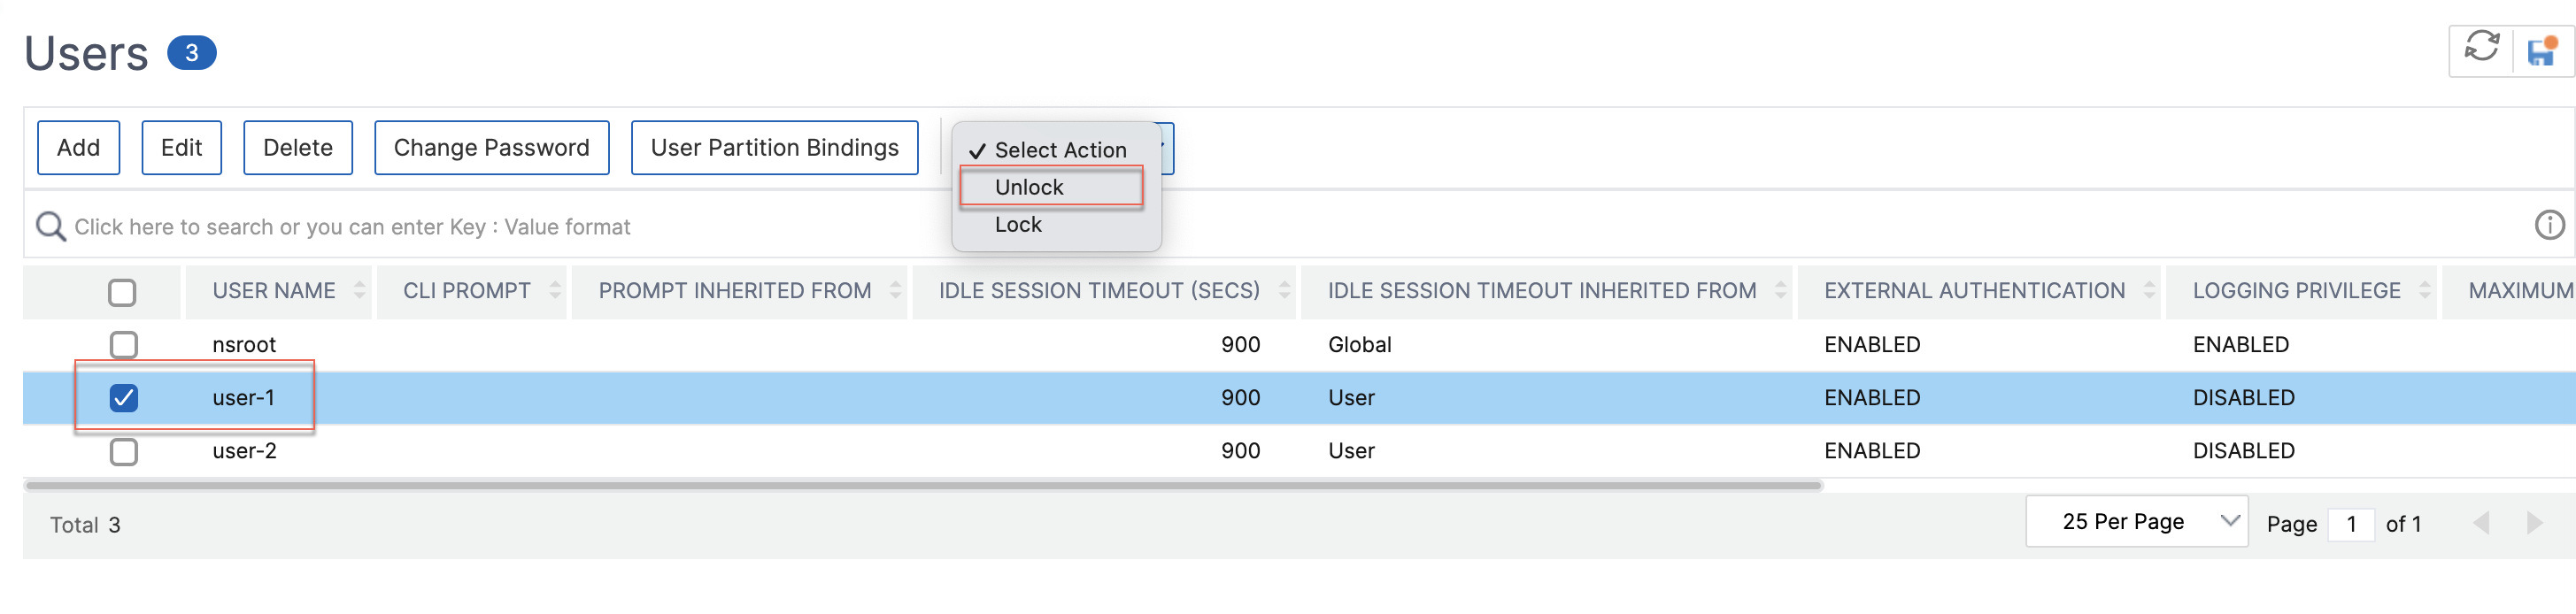
- Navigate to System > User Administration > Users.
- Select a user.
-
Click Unlock.
The NetScaler GUI only lists system users created in NetScaler, so there is no option in the GUI to unlock external users. To unlock an external user, the nsroot administrator must use the CLI.
Disable management access for system user account
When external authentication is configured on NetScaler and as an admin, if you prefer to deny access to system users to log on to management access, you must disable the localAuth option in the system parameter.
At the command prompt, type the following:
set system parameter localAuth <ENABLED|DISABLED>
Example:
set system parameter localAuth DISABLED
Disable management access to system user by using the GUI
- Navigate to Configuration > System > Settings > Change Global System Settings.
- In Command Line Interface (CLI) section, unselect the Local Authentication checkbox.
By disabling the option, local system users cannot log on to ADC management access.
Note
External authentication server must be configured and reachable to disallow local system user authentication in the system parameter. If an external server configured in ADC for management access is unreachable, local system users can log on to NetScaler. The behavior is set up for recovery purpose.
Force passwords change for administrative users
For nsroot secured authentication, NetScaler prompts the user to change the default password to a new one if the forcePasswordChange option is enabled in the system parameter. You can change your nsroot password either from CLI or GUI, on your first login with the default credentials.
At the command prompt, type:
set system parameter -forcePasswordChange ( ENABLED | DISABLED )
SSH session example for NSIP:
ssh nsroot@1.1.1.1
Connecting to 1.1.1.1:22...
Connection established.
To escape to local shell, press Ctrl+Alt+].
###############################################################################
WARNING: Access to this system is for authorized users only #
Disconnect IMMEDIATELY if you are not an authorized user! #

###############################################################################
Please change the default NSROOT password.
Enter new password:
Please re-enter your password:
Done
<!--NeedCopy-->
Remove sensitive files in a system user account
To manage sensitive data such as authorized keys and public keys for a system user account, you must enable the removeSensitiveFiles option. The commands that remove sensitive files when the system parameter is enabled are:
- rm cluster instance
- rm cluster node
- rm high availability node
- clear config full
- join cluster
- add cluster instance
At the command prompt, type:
set system parameter removeSensitiveFiles ( ENABLED | DISABLED )
Example:
set system parameter -removeSensitiveFiles ENABLED
Strong password configuration for system users
For secured authentication, NetScaler prompts system users and administrators to set strong passwords to log on to the console. The password must be long and must be a combination of:
- One lower case character
- One upper case character
- One numeric character
- One special character
At the command prompt, type:
set system parameter -strongpassword <value> -minpasswordlen <value>
Where,
Strongpassword. After enabling strong password (enable all / enablelocal) all the passwords or sensitive information must have the following:
- At least 1 lower case character
- At least 1 upper case character
- At least 1 numeric character
- At least 1 special character
Exclude the list in enablelocal is - NS_FIPS, NS_CRL, NS_RSAKEY, NS_PKCS12, NS_PKCS8, NS_LDAP, NS_TACACS, NS_TACACSACTION, NS_RADIUS, NS_RADIUSACTION, NS_ENCRYPTION_PARAMS. So no Strong Password checks are performed on these ObjectType commands for the system user.
Possible values: enableall, enablelocal, disabled
Default value: disabled
minpasswordlen. Minimum length of the system user password. When the strong password is enabled by default, the minimum length is 4. User entered value can be greater than or equal to 4. The default minimum value is 1 when the strong password is disabled. The maximum value is 127 in both cases.
Minimum value: 1 Maximum value: 127
Example:
set system parameter -strongpassword enablelocal -minpasswordlen 6
Enforce password rotation and password history for local accounts
NetScaler® includes improved password security features for local user accounts. This feature allows administrators to:
- Force users to change their passwords regularly
- Remember previous passwords to prevent users from reusing old ones
- Set how often passwords must be changed
These features help keep user accounts more secure by ensuring passwords stay fresh and can’t be reused. This helps organizations meet security standards and prevents problems from weak or old passwords.
Configuration and applicability
This feature is available when the passwordhistorycontrol parameter in system settings is enabled. After you enable this feature, the following default values are applied to system parameters:
- Daystoexpire: 30 (Number of days before the password expires)
- Warnpriorndays: 5 (Number of days before password expiration when users are warned)
- pwdhistoryCount: 6 (Number of passwords retained in the history)
Configurability:
-
DaystoexpireandWarnpriorndayscan be configured for system groups and can be set or unset whenPasswordhistorycontrolis enabled. - Once
Passwordhistorycontrolis enabled,Daystoexpire,Warnpriorndays, andpwdhistoryCountvalues in the system parameters cannot be unset. - These values cannot be set or unset in system groups or system parameters when the
passwordhistorycontroloption is disabled.
Important notes for applying changes
- To apply changes after enabling
Passwordhistorycontrol, you must save the configuration. - Once saved, the current user password history is recorded for each partition.
- After users are required to change their passwords, the new passwords must also be saved to update the password history.
- If the configuration is saved while
Passwordhistorycontrolis disabled, all previous user password history is erased.
Limitation
NetScaler does not support the Password History Control feature when multifactor authentication (MFA) is configured. We recommend you to disable this feature when using MFA.
When attempting to log in through CLI with MFA, the following error is returned if the user name matches a local system user name with an expired password.
“Session Expired or killed. Please log in again.”
However, logging in with the same user name through the GUI is successful.
How to configure and use the password rotation and history feature
This section details the steps to configure and manage the password rotation and history feature using both the Command Line Interface (CLI) and the GUI.
Configuration by using the CLI
Enable password history control:
At the command prompt, type:
set system parameter -passwordhistorycontrol ENABLED
<!--NeedCopy-->
Note:
When
passwordhistorycontrolis ENABLED,daystoexpire,warnpriorndays, andpwdhistorycountparameters are updated with their default values (30, 5, and 6 respectively).
Update system-wide password parameters (optional):
You can customize the default values for password expiration and history count.
At the command prompt, type:
set system parameter -daystoexpire <days> -warnpriorndays <days> -pwdhistorycount <count>
<!--NeedCopy-->
Example:
set system parameter -daystoexpire 60 -warnpriorndays 10 -pwdhistorycount 3
<!--NeedCopy-->
Note:
After
passwordhistorycontrolis ENABLED,daystoexpire,warnpriorndays, andpwdhistorycountvalues in the system parameters cannot be unset. These values cannot be set or unset whenpasswordhistorycontrolis DISABLED.
Configure parameters for system groups (optional):
You can also apply password parameters at the system group level.
To add values to a new group:
add system group <group_name> -daystoexpire <days> -warnpriorndays <days>
<!--NeedCopy-->
Example:
add system group sg -daystoexpire 45 -warnpriorndays 15
<!--NeedCopy-->
To update an existing group:
set system group <group_name> -daystoexpire <days> -warnpriorndays <days>
<!--NeedCopy-->
Example:
set system group sg -daystoexpire 30 -warnpriorndays 10
<!--NeedCopy-->
Note:
Values set for a system group apply to system users bound to that group.
Save the configuration:
Once all required configuration changes are made, save the configuration to ensure that the feature begins maintaining user password history for local system users.
Note:
If the user does not have sufficient permission to save the configuration, an administrator must save the changes.
Check user password expiry inheritance:
To see if a user’s password expiry parameters are inherited from GLOBAL (system parameter) or GROUP (system group), run:
sh system user
<!--NeedCopy-->
User login behavior:
- If a user’s password is about to expire, a warning message is displayed upon login.
- Once a user’s password has expired, they are forced to change their password during login.
- If a password being set is a reuse of a previous password (within the history count), a password reuse error message is returned.
- Upon a successful password change, the user can log in to the command prompt.
Disable the feature:
At the command prompt, type:
set system parameter -passwordhistorycontrol DISABLED
<!--NeedCopy-->
Note:
If the configuration is saved while the feature is DISABLED, all stored user password history is erased.
Configuration by using the GUI
Enable password history control:
- Navigate to Configuration > System > Settings.
- Click Change Global System Settings.
- In the Other Settings section, enable Passwordhistorycontrol.
Set system-wide password parameters (optional):
-
After enabling
Passwordhistorycontrol, configure the following parameters in the Other Settings section:- Days to Expire
- Warn Prior N Days
- Password History Count
- Click OK.
- Save the configuration.
Note:
If these parameters are not explicitly updated, default values are applied.
Update parameters for system groups (optional):
- Navigate to Configuration > System > User Administration > Groups.
- Click Add to create a new group, or Edit to modify an existing one.
- Configure the Days to Expire and Warn Prior N Days for the group.
- Click Create or OK.
Note:
Values set for a system group apply to system users bound to that group.
Check user password expiry inheritance:
- Navigate to Configuration > System > User Administration > Users.
- Scroll to the right to find details under Password Expiration Parameters Inherited From.
User login behavior:
- If a user’s password has expired, they are forced to change the password from the GUI during login.
- If the new password is a reuse of a previous one, the user is redirected to the same page with a password reuse error.
- Once the new password is accepted, the GUI login is successful.
Note:
If the user does not have sufficient permission to save the configuration after changing their password, an administrator will need to save the changes to maintain the password history.
Disable the feature:
- Navigate to Configuration > System > Settings.
- Click Change Global System Settings.
- In the Other Settings section, select DISABLED for Passwordhistorycontrol.
- Click OK.
Important:
If the configuration is saved when the feature is DISABLED, all stored user password history is erased.
Default user account
The nsrecover user account is used by the administrator to recover the NetScaler appliance. You can log on to NetScaler using nsrecover if the default system users (nsroot) are unable to log in due to any unforeseen issues. The nsrecover login is independent of user configurations and lets you access the shell prompt directly. You are always allowed to log in through the nsrecover irrespective of whether the maximum configuration limit is reached.
Share
Share
In this article
- System user account lockout
- Lock system user account for management access
- Unlock a locked system user account for management access
- Disable management access for system user account
- Force passwords change for administrative users
- Remove sensitive files in a system user account
- Strong password configuration for system users
- Enforce password rotation and password history for local accounts
- Default user account
This Preview product documentation is Cloud Software Group Confidential.
You agree to hold this documentation confidential pursuant to the terms of your Cloud Software Group Beta/Tech Preview Agreement.
The development, release and timing of any features or functionality described in the Preview documentation remains at our sole discretion and are subject to change without notice or consultation.
The documentation is for informational purposes only and is not a commitment, promise or legal obligation to deliver any material, code or functionality and should not be relied upon in making Cloud Software Group product purchase decisions.
If you do not agree, select I DO NOT AGREE to exit.