
Authentication policies
When users log on to NetScaler or NetScaler Gateway, they are authenticated according to a policy that you create. An authentication policy comprises an expression and an action. Authentication policies use NetScaler expressions.
After creating an authentication action and an authentication policy, bind it to an authentication virtual server and assign a priority to it. When binding it, also designate it as either a primary or a secondary policy. Primary policies are evaluated before secondary policies. In configurations that use both types of policy, primary policies are normally more specific policies while secondary policies are normally more general policies. It is intended to handle authentication for any user accounts that do not meet the more specific criteria. The policy defines the authentication type. A single authentication policy can be used for simple authentication needs and is typically bound at the global level. You can also use the default authentication type, which is local. If you configure local authentication, you must also configure users and groups on NetScaler.
You can configure multiple authentication policies and bind them to create a detailed authentication procedure and virtual servers. For example, you can configure cascading and two-factor authentication by configuring multiple policies. You can also set the priority of the authentication policies to determine which servers and the order in which NetScaler checks user credentials. An authentication policy includes an expression and an action. For example, if you set the expression to True value, when users log on, the action evaluates user logon to true and then users have access to network resources.
After you create an authentication policy, you bind the policy at either the global level or to virtual servers. When you bind at least one authentication policy to a virtual server, any authentication policies that you bound to the global level are not used when users log on to the virtual server, unless the global authentication type has a higher precedence than the policy bound to the virtual server.
When a user logs on to NetScaler, authentication is evaluated in the following order:
-
The virtual server is checked for any bound authentication policies.
-
If authentication policies are not bound to the virtual server, NetScaler checks for global authentication policies.
-
If an authentication policy is not bound to a virtual server or globally, the user is authenticated through the default authentication type.
If you configure LDAP and RADIUS authentication policies and want to bind the policies globally for two-factor authentication, you can select the policy in the configuration utility and then select if the policy is the primary or secondary authentication type. You can also configure a group extraction policy.
Note:
NetScaler or NetScaler Gateway encodes only UTF-8 characters for authentication, and it is not compatible with servers that use ISO-8859-1 characters.
On the GUI
Create or modify an advanced authentication policy
-
Navigate to Security > AAA - Application Traffic > Policies > Authentication > Advanced Policies > Policy.
-
On the Authentication Policies page, perform one of the following tasks:
-
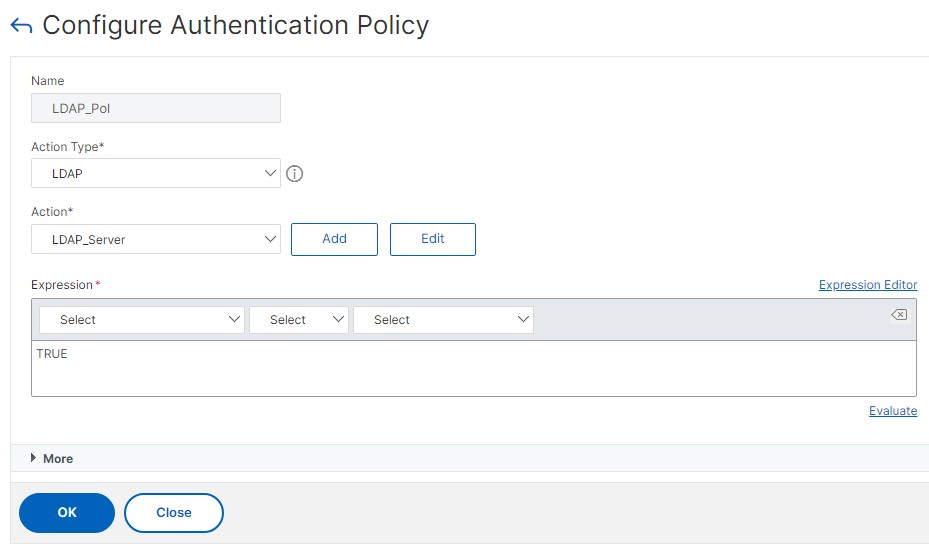
To create an authentication policy, click Add. The Create Authentication Policy page appears.
-
Update the required fields and click Create.
-
To modify an authentication policy, select the action, and then click Edit. The Configure Authentication Policy page is displayed. Modify the required fields and click OK.
-
Name: Name of the advanced authentication policy.
-
Action Type: The type of the authentication action for which the policy is being created.
-
Action: Name of the authentication action (LDAP, RADIUS, SAML) to be performed if the policy matches. If there is no authentication action in the drop-down list, click Add.
-
Expression: Name of the NetScaler named rule or expression that the policy uses to determine whether to attempt to authenticate the user with the authentication virtual server. For more information about advanced policy expressions, see Advanced policy expressions.
-
-
Remove an authentication policy
If you have changed or removed an authentication server from your network, remove the corresponding authentication policy from NetScaler.
-
Navigate to Security > AAA - Application Traffic > Policies > Authentication > Advanced Policies > Policy.
-
On the Authentication Policies page, select the policy that you want to remove and click Delete.
-
Click Yes to confirm your action.
Bind the authentication policy
You must bind advanced authentication policies to an authentication virtual server and link the authentication virtual server to a VPN virtual server by using an authentication profile.
-
Create an authentication virtual server.
-
Navigate to Security > AAA - Application Traffic > Virtual Servers.
-
On the Authentication Virtual Servers page, and click Add. Update the required fields and click OK.
-
If an authentication virtual server exists, select the relevant server on the Authentication Virtual Servers page.
-
In the Advanced Authentication Policies section, select the authentication policy.
-
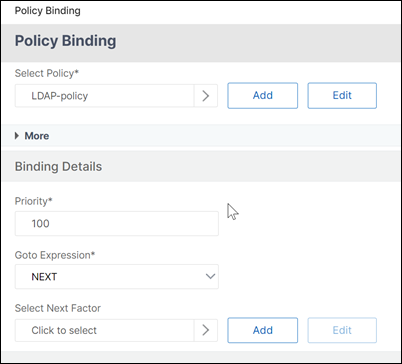
On the Policy Binding page, select the policy and click Add. Provide the binding details such as the priority, GoTo expression, and the next factor, and then click Bind.
-
-
Create a VPN virtual server.
-
Navigate to NetScaler Gateway > Virtual servers.
-
On the NetScaler Gateway Virtual Servers page, click Add.
-
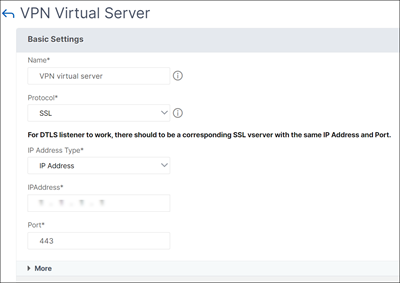
On the VPN Virtual Server page, update the required fields and click OK.
-
-
Create an authentication profile.
-
Navigate to Security > AAA - Application Traffic > Authentication Profile.
-
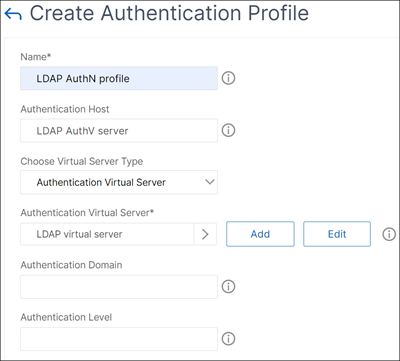
On the Authentication Profile page, click Add.
-
Update the required fields and click Create.
-
-
Link the authentication virtual server to the VPN virtual server by using the authentication profile.
-
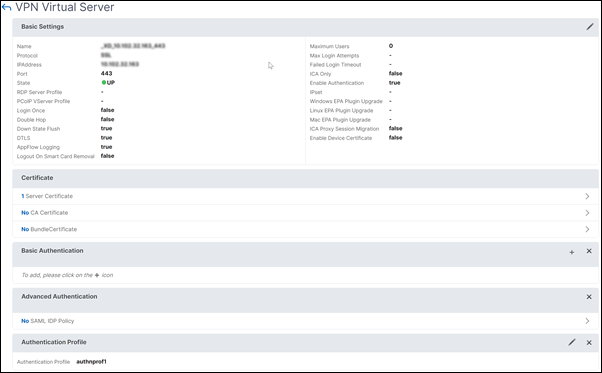
Navigate to NetScaler Gateway > NetScaler Gateway Virtual Servers and select the VPN virtual server. The VPN Virtual Server page appears.
-
In the Authentication profile section, select the authentication profile from the drop-down list and click OK.
-
Alternatively, you can navigate to the Advanced settings section on the VPN Virtual server page, click + Authentication Profile, select the authentication profile from the drop-down list, and click OK.
-
Click Done.
-
On the CLI
At the command prompt, type the following commands:
add authentication policy <name> -rule <expression> -action <string>

 show authentication policy <name>

 bind authentication vserver <name> -policy <policyname> [-priority <priority>][-secondary]

 show authentication vserver <name>
Example:
add authentication policy Authn-Pol-1 true


 show authentication policy Authn-Pol-1
 Name: Authn-Pol-1       Rule: true          Request action: LOCAL

 bind authentication vserver Auth-Vserver-2 -policy Authn-Pol-1

 show authentication vserver Auth-Vserver-2
 Auth-Vserver-2 (10.102.29.77:443) - SSL Type: CONTENT State: UP Client Idle
 Timeout: 180 sec Down state flush: DISABLED
 Disable Primary Vserver On Down : DISABLED
 Authentication : ON
 Current AAA Users: 0
 Authentication Domain: myCompany.employee.com
 Primary authentication policy name:  Authn-Pol-1 Priority: 0
Modify an authentication policy
At the command prompt, type the following commands to modify an existing authentication policy:
set authentication policy <name> [-rule <expression>] [-action <string>] [-undefAction <string>] [-comment <string>] [-logAction <string>]
Example
set authentication policy Authn-Pol-1 -rule true
Remove an authentication policy
At the command prompt, type the following command to remove an authentication policy:
rm authentication policy <name>
Example
rm authentication localPolicy Authn-Pol-1
Bind the authentication policy
For advanced policies, create an authentication profile and associate the profile to an authentication virtual server. Once the authentication profile is created, associate the authentication profile to a VPN virtual server.
Create an authentication profile and set an authentication virtual server to the profile:
add authentication authnProfile <name> {-authnVsName <string>} {-AuthenticationHost <string>}{-AuthenticationDomain <string>}[-AuthenticationLevel <positive_integer>]
Example
add authentication authnProfile Authn-Prof-1 -authnVsName Auth-Vserver-2 -AuthenticationDomain "myCompany.employee.com"
Create a VPN virtual server and add the corresponding authentication profile:
Example
add vpn vserver VPN-Vserver-2 ssl -authentication ON -authnprofile Authn-Prof-1
Add an authentication action
If you do not use LOCAL authentication, you need to add an explicit authentication action. At the command prompt, type the following command:
add authentication tacacsAction <name> -serverip <IP> [-serverPort <port>][-authTimeout <positive_integer>][ ... ]
Example
add authentication tacacsaction Authn-Act-1 -serverip 10.218.24.65 -serverport 1812 -authtimeout 15 -tacacsSecret "minotaur" -authorization OFF -accounting ON -auditFailedCmds OFF -defaultAuthenticationGroup "users"
Configure an authentication action
To configure an existing authentication action, at the command prompt, type the following command:
set authentication tacacsAction <name> -serverip <IP> [-serverPort <port>][-authTimeout <positive_integer>][ ... ]
Example
set authentication tacacsaction Authn-Act-1 -serverip 10.218.24.65 -serverport 1812 -authtimeout 15 -tacacsSecret "minotaur" -authorization OFF -accounting ON -auditFailedCmds OFF -defaultAuthenticationGroup "users"
Remove an authentication action
To remove an existing RADIUS action, at the command prompt, type the following command:
rm authentication radiusAction <name>
Example
rm authentication tacacsaction Authn-Act-1
The noAuth authentication
NetScaler supports noAuth authentication capability that enables the customer to configure a defaultAuthenticationGroup parameter in the
noAuthAction command, when a user performs this policy. The administrator can check for the presence of this group in the user's group to determine the user's navigation through the noAuth policy.
To configure a noAuth authentication
At the command prompt, type;
add authentication noAuthAction <name> [-defaultAuthenticationGroup <string>]
Example
add authentication noAuthAction noauthact –defaultAuthenticationGroup mynoauthgroup
Default global authentication types
When you installed NetScaler Gateway and ran the NetScaler Gateway wizard, you configured authentication within the wizard. This authentication policy is bound automatically to the NetScaler Gateway global level. The authentication type that you configure within the NetScaler Gateway wizard is the default authentication type. You can change the default authorization type by running the NetScaler Gateway wizard again or you can modify the global authentication settings in the configuration utility.
If you need to add other authentication types, you can configure authentication policies on NetScaler Gateway and bind the policies to NetScaler Gateway by using the configuration utility. When you configure authentication globally, you define the type of authentication, configure the settings, and set the maximum number of users that can be authenticated.
After configuring and binding the policy, you can set the priority to define which authentication type takes precedence. For example, you configure LDAP and RADIUS authentication policies. If the LDAP policy has a priority number of 10 and the RADIUS policy has a priority number of 15, the LDAP policy takes precedence, regardless of where you bind each policy. This is called cascading authentication.
You can select to deliver logon pages from the NetScaler Gateway in-memory cache or from the HTTP server running on NetScaler Gateway. If you choose to deliver the logon page from the in-memory cache, the delivery of the logon page from NetScaler Gateway is faster than from the HTTP server. Choosing to deliver the logon page from the in-memory cache reduces the wait time when many users log on at the same time. You can only configure the delivery of logon pages from the cache as part of a global authentication policy.
You can also configure the network address translation (NAT) IP address that is a specific IP address for authentication. This IP address is unique for authentication and is not the NetScaler Gateway subnet, mapped, or virtual IP addresses. This is an optional setting.
Note:
-
You cannot use the NetScaler Gateway wizard to configure SAML authentication.
-
You can use the Quick Configuration wizard to configure LDAP, RADIUS, and client certificate authentication. When you run the wizard, you can select from an existing LDAP or RADIUS server configured on NetScaler Gateway. You can also configure the settings for LDAP or RADIUS. If you use two-factor authentication, it is recommended that you use LDAP as the primary authentication type.
Configure default global authentication types
-
In the GUI, on the Configuration tab, in the navigation pane, expand NetScaler Gateway, and then click Global Settings.
-
In the details pane, under Settings, click Change authentication settings.
-
In Maximum Number of Users, type the number of users who can be authenticated by using this authentication type.
-
In NAT IP address, type the unique IP address for authentication.
-
Select Enable static caching to deliver logon pages faster.
-
Select Enable Enhanced Authentication Feedback to provide a message to users if authentication fails. The message users receive include the password errors, the account disabled or locked, or the user is not found, to name a few.
-
In Default Authentication Type, select the authentication type.
-
Configure the settings for your authentication type, and then click OK.
Support to retrieve current login attempts for a user
NetScaler provides an option to retrieve the value of current login attempts for a user by an expression
aaa.user.login_attempts. This expression takes either one argument (user name) or no argument. If there is no argument, the expression fetches the user name from the aaa_session or aaa_info.
You can use the
aaa.user.login_attempts expression with authentication policies for further processing.
To configure the number of login attempts per user
At the command prompt, type:
add expression er aaa.user.login_attempts
Note:
The
aaa.user.login_attempts expression does not work if the Persistent Login Attempts parameter is enabled. For details about the Persistent Login Attempts parameter, see System user account lockout.
The following CLI examples describe the login attempt configurations for different scenarios:
-
Authentication virtual server
set authentication vserver av_vs -maxLoginAttempts 5 -failedLoginTimeout 100For details about the authentication virtual server and its supported parameters, see Authentication virtual server. -
NetScaler Gateway virtual server
set vpn vserver vpn_vs -maxLoginAttempts 5 -failedLoginTimeout 100For details about a NetScaler Gateway virtual server, see the Virtual servers section. -
Lock out a system user account
set aaa parameter -maxloginAttempts 3 -failedLoginTimeout 10For details about the system user account lockout, see Lock system user account for management access.Parameter descriptions:-
maxLoginAttempts: Maximum number of login attempts allowed before a user is locked out. -
failedLoginTimeout: Number of seconds allowed before the login fails. The user must restart the login process.
-