-
Getting Started with NetScaler
-
Solutions for Telecom Service Providers
-
Load Balance Control-Plane Traffic that is based on Diameter, SIP, and SMPP Protocols
-
Provide Subscriber Load Distribution Using GSLB Across Core-Networks of a Telecom Service Provider
-
Authentication, authorization, and auditing application traffic
-
Basic components of authentication, authorization, and auditing configuration
-
-
Web proxy support for outbound calls to IDP or third party endpoints
-
Web Application Firewall protection for VPN virtual servers and authentication virtual servers
-
On-premises NetScaler Gateway as an identity provider to Citrix Cloud™
-
Authentication, authorization, and auditing configuration for commonly used protocols
-
Troubleshoot authentication and authorization related issues
-
-
Configuring the AppFlow Feature
-
Exporting Performance Data of Web Pages to AppFlow Collector
-
-
-
-
-
-
-
-
Configure DNS resource records
-
Configure NetScaler as a non-validating security aware stub-resolver
-
Jumbo frames support for DNS to handle responses of large sizes
-
Caching of EDNS0 client subnet data when the NetScaler appliance is in proxy mode
-
Use case - configure the automatic DNSSEC key management feature
-
Use Case - configure the automatic DNSSEC key management on GSLB deployment
-
-
-
Source IP address whitelisting for GSLB communication channels
-
Use case: Deployment of domain name based autoscale service group
-
Use case: Deployment of IP address based autoscale service group
-
-
Persistence and persistent connections
-
Advanced load balancing settings
-
Gradually stepping up the load on a new service with virtual server–level slow start
-
Protect applications on protected servers against traffic surges
-
Retrieve location details from user IP address using geolocation database
-
Use source IP address of the client when connecting to the server
-
Use client source IP address for backend communication in a v4-v6 load balancing configuration
-
Set a limit on number of requests per connection to the server
-
Configure automatic state transition based on percentage health of bound services
-
-
Use case 2: Configure rule based persistence based on a name-value pair in a TCP byte stream
-
Use case 3: Configure load balancing in direct server return mode
-
Use case 6: Configure load balancing in DSR mode for IPv6 networks by using the TOS field
-
Use case 7: Configure load balancing in DSR mode by using IP Over IP
-
Use case 10: Load balancing of intrusion detection system servers
-
Use case 11: Isolating network traffic using listen policies
-
Use case 12: Configure Citrix Virtual Desktops for load balancing
-
Use case 13: Configure Citrix Virtual Apps and Desktops for load balancing
-
Use case 14: ShareFile wizard for load balancing Citrix ShareFile
-
Use case 15: Configure layer 4 load balancing on the NetScaler appliance
-
-
-
-
Authentication and authorization for System Users
-
-
-
Configuring a CloudBridge Connector Tunnel between two Datacenters
-
Configuring CloudBridge Connector between Datacenter and AWS Cloud
-
Configuring a CloudBridge Connector Tunnel Between a Datacenter and Azure Cloud
-
Configuring CloudBridge Connector Tunnel between Datacenter and SoftLayer Enterprise Cloud
-
Configuring a CloudBridge Connector Tunnel Between a NetScaler Appliance and Cisco IOS Device
-
CloudBridge Connector Tunnel Diagnostics and Troubleshooting
This content has been machine translated dynamically.
Dieser Inhalt ist eine maschinelle Übersetzung, die dynamisch erstellt wurde. (Haftungsausschluss)
Cet article a été traduit automatiquement de manière dynamique. (Clause de non responsabilité)
Este artículo lo ha traducido una máquina de forma dinámica. (Aviso legal)
此内容已经过机器动态翻译。 放弃
このコンテンツは動的に機械翻訳されています。免責事項
이 콘텐츠는 동적으로 기계 번역되었습니다. 책임 부인
Este texto foi traduzido automaticamente. (Aviso legal)
Questo contenuto è stato tradotto dinamicamente con traduzione automatica.(Esclusione di responsabilità))
This article has been machine translated.
Dieser Artikel wurde maschinell übersetzt. (Haftungsausschluss)
Ce article a été traduit automatiquement. (Clause de non responsabilité)
Este artículo ha sido traducido automáticamente. (Aviso legal)
この記事は機械翻訳されています.免責事項
이 기사는 기계 번역되었습니다.책임 부인
Este artigo foi traduzido automaticamente.(Aviso legal)
这篇文章已经过机器翻译.放弃
Questo articolo è stato tradotto automaticamente.(Esclusione di responsabilità))
Translation failed!
Configuring the AppFlow® feature
You can configure AppFlow in the same manner as most other policy-based features. First, you enable the AppFlow feature. Then you specify the collectors to which the flow records are sent. After that, you define actions, which are sets of configured collectors. Then you configure one or more policies and associate an action to each policy. The policy instructs the NetScaler appliance to select requests the flow records of which are sent to the associated action. Finally, you bind each policy either globally or to the specific virtual server to put it into effect.
You can further set AppFlow parameters to specify the template refresh interval and to enable the exporting of httpURL, httpCookie, and httpReferer information. On each collector, you must specify the NetScaler IP address as the address of the exporter.
Note
For information about configuring the NetScaler as an exporter on the collector, see the documentation for the specific collector.
The configuration utility provides tools that help users define the policies and actions. It determines exactly how the NetScaler appliance export records for a particular flow to a set of collectors(action.) The command line interface provides a corresponding set of CLI-based commands for experienced users who prefer a command line.
Enabling AppFlow
To be able to use the AppFlow feature, you must first enable it.
Note
AppFlow can be enabled only on nCore NetScaler appliances.
Enable the AppFlow feature by using the command line interface
At the command prompt, type one of the following commands:
enable ns feature AppFlow

<!--NeedCopy-->
Enable the AppFlow feature by using the configuration utility
Navigate to System > Settings, click Configure Advanced Features, and select the AppFlow option.
Specifying a Collector
A collector receives AppFlow records generated by the NetScaler appliance. To send the AppFlow records, you must specify at least one collector. By default, the collector listens to IPFIX messages on UDP port 4739. You can change the default port, when configuring the collector. Similarly, by default, NSIP is used as the source IP for AppFlow traffic. You can change this default source IP to a SNIP address when configuring a collector. You can also remove unused collectors.
Specify a collector by using the command line interface
Important
Starting from NetScaler release 12.1 build 55.13, you can specify the type of collector that you want to use. A new parameter “Transport” is introduced in the
add appflow collectorcommand. By default, the collector listens to IPFIX messages. You can change the type of collector to eitherlogstreamoripfixby using “Transport” parameter. For more information on configuration, see the example.
At the command prompt, type the following commands to add a collector and verify the configuration:
-  add appflow collector <name> -IPAddress <ipaddress> -port <port_number> -netprofile <netprofile_name> -Transport <Transport>

-  show appflow collector <name>

<!--NeedCopy-->
Example
add appflow collector col1 -IPaddress 10.102.29.251 -port 8000 -netprofile n2 -Transport ipfix

<!--NeedCopy-->
Specify multiple collectors by using the command line interface
At the command prompt, type the following commands to add and send same data to multiple collectors:
add appflow collector <collector1> -IPAddress <IP>

add appflow collector <collector2> -IPAddress <IP>

add appflow action <action> -collectors <collector1> <collector2>

add appflow policy <policy> true <action>

bind lbvserver <lbvserver> -policy <policy> -priority <priority>
<!--NeedCopy-->
Specify one or more collectors by using the configuration utility
Navigate to System > AppFlow > Collectors, and create the AppFlow collector.
Configure an AppFlow Action
An AppFlow action is a set collector, to which the flow records are sent if the associated AppFlow policy matches.
Configure an AppFlow action by using the command line interface
At the command prompt, type the following commands to configure an AppFlow action and verify the configuration:
add appflow action <name> --collectors <string> ... [-clientSideMeasurements (Enabled|Disabled) ] [-comment <string>]

show appflow action

<!--NeedCopy-->
Example
add appflow action apfl-act-collector-1-and-3 -collectors collector-1 collecter-3

<!--NeedCopy-->
Configure an AppFlow action by using the configuration utility
Navigate to System > AppFlow > Actions, and create the AppFlow action.
Configure an AppFlow Policy
After you configure an AppFlow action, you must next configure an AppFlow policy. An AppFlow policy is based on a rule, which consists of one or more expressions.
Note
For creating and managing AppFlow policies, the configuration utility provides assistance that is not available at the command line interface.
Configure an AppFlow policy by using the command line interface
At the command prompt, type the following command to add an AppFlow policy and verify the configuration:
add appflow policy <name> <rule> <action>

show appflow policy <name>

<!--NeedCopy-->
Example
add appflow policy apfl-pol-tcp-dsprt client.TCP.DSTPORT.EQ(22) apfl-act-collector-1-and-3

<!--NeedCopy-->
Configure an AppFlow policy by using the configuration utility
Navigate to System > AppFlow > Policies, and create the AppFlow policy.
Add an expression by using the Add Expression dialog box
-
In the Add Expression dialog box, in the first list box choose the first term for your expression.
- HTTP The HTTP protocol. Choose the option if you want to examine some aspect of the request that pertains to the HTTP protocol. - SSL
The protected websites. Choose the option if you want to examine some aspect of the request that pertains to the recipient of the request. - CLIENT The computer that sent the request. Choose the option if you want to examine some aspect of the sender of the request. When you make your choice, the rightmost list box lists appropriate terms for the next part of your expression. - In the second list box, choose the second term for your expression. The choices depend upon which choice you made in the previous step, and are appropriate to the context. After you make your second choice, the Help window below the Construct Expression window (which was blank) displays help describing the purpose and use of the term you just chose.
- Continue choosing terms from the list boxes that appear to the right of the previous list box, or typing strings or numbers in the text boxes that appear to prompt you to enter a value, until your expression is finished.
Bind an AppFlow Policy
To put a policy into effect, you must bind it either globally, so that it applies to all traffic that flows through the NetScaler, or to a specific virtual server, so that the policy applies only to the traffic related to that virtual server.
When you bind a policy, you assign it a priority. The priority determines the order in which the policies you define are evaluated. You can set the priority to any positive integer.
In the NetScaler operating system, policy priorities work in reverse order—the higher the number, the lower the priority. For example, if you have three policies with priorities of 10, 100, and 1000, the policy assigned a priority of 10 is performed first. Later, the policy assigned with a priority of 100, and finally the policy assigned an order of 1000.
You can leave yourself plenty of a room to add other policies in any order, and still set them to evaluate in the order you want. You can achieve by setting priorities with intervals of 50 or 100 between each policy when you globally bind it. You can then add more policies at any time without having to change the priority of an existing policy.
Globally bind an AppFlow policy by using the command line interface
At the command prompt, type the following command to globally bind an AppFlow policy and verify the configuration:
bind appflow global <policyName> <priority> [<gotoPriorityExpression [-type <type>] [-invoke (<labelType> <labelName>)]

show appflow global

<!--NeedCopy-->
Example
bind appflow global af_policy_lb1_10.102.71.190 1 NEXT -type REQ_OVERRIDE -invoke vserver google

<!--NeedCopy-->
Bind an AppFlow policy to a specific virtual server by using the command line interface
At the command prompt, type the following command to bind an AppFlow policy to a specific virtual server and verify the configuration:
bind lb vserver <name> -policyname <policy_name> -priority <priority>

<!--NeedCopy-->
Example
bind lb vserver google -policyname af_policy_google_10.102.19.179 -priority 251

<!--NeedCopy-->
Globally bind an AppFlow policy by using the configuration utility
Navigate to System > AppFlow, click AppFlow policy Manager, and select the relevant Bind Point (Default Global) and Connection Type, and then bind the AppFlow policy.
Bind an AppFlow policy to a specific virtual server by using the configuration utility
Navigate to Traffic Management > Load Balancing > Virtual Servers, select the virtual server, and click Policies, and bind the AppFlow policy.
Enable AppFlow for Virtual Servers
If you want to monitor only the traffic through certain virtual servers, enable AppFlow specifically for those virtual servers. You can enable AppFlow for load balancing, content switching, cache redirection, SSL VPN, GSLB, and authentication virtual servers.
Enable AppFlow for a virtual server by using the command line interface
At the command prompt, type:
set cs vserver <name> <protocol> <IPAddress> <port> -appflowLog ENABLED

<!--NeedCopy-->
Example
set cs vserver Vserver-CS-1 HTTP 10.102.29.161 80 -appflowLog ENABLED

<!--NeedCopy-->
Enable AppFlow for a virtual server by using the configuration utility
Navigate to Traffic Management > Content Switching > Virtual Servers, select the virtual server, and enable AppFlow Logging option.
Enable AppFlow for a Service
You can enable AppFlow for services that are to be bound to the load balancing virtual servers.
Enable AppFlow for a service by using the command line interface
At the command prompt, type:
set service <name> -appflowLog ENABLED

<!--NeedCopy-->
Example
set service ser -appflowLog ENABLED

<!--NeedCopy-->
Enable AppFlow for a service by using the configuration utility
Navigate to Traffic Management > Load Balancing > Services, select the service, and enable AppFlow Logging option.
Set the AppFlow Parameters
You can set AppFlow parameters to customize the exporting of data to the collectors.
Set the AppFlow Parameters by using the command line interface
Important
Starting from NetScaler release 12.1 build 55.13, you can use the NSIP to send
Logstreamrecords instead of the SNIP. A new parameter “logstreamOverNSIP” is introduced in theset appflow paramcommand. By default, the “logstreamOverNSIP” parameter is DISABLED, you must “ENABLE” it. For more information on configuration, see the example.Starting from NetScaler release 13.0 build 58.x release, you can enable the Web SaaS application option in AppFlow feature. It can be enabled to receive the data usage of Web or SaaS applications from the Citrix Gateway service. For more information on configuration, see the example.
At the command prompt, type the following commands to set the AppFlow parameters and verify the settings:
-  set appflow param [-templateRefresh <secs>] [-appnameRefresh <secs>] [-flowRecordInterval <secs>] [-udpPmtu <positive_integer>] [-httpUrl ( **ENABLED** | **DISABLED** )] [-httpCookie ( **ENABLED** | **DISABLED** )] [-httpReferer ( **ENABLED** | **DISABLED** )] [-httpMethod ( **ENABLED** | **DISABLED** )] [-httpHost ( **ENABLED** | **DISABLED** )] [-httpUserAgent ( **ENABLED** | **DISABLED** )] [-httpXForwardedFor ( **ENABLED** | **DISABLED** )][-clientTrafficOnly ( **YES** | **NO**)] [-webSaaSAppUsageReporting ( **ENABLED** | **DISABLED** )] [-logstreamOverNSIP ( **ENABLED** | **DISABLED** )]

-  show appflow Param

<!--NeedCopy-->
Example
set appflow Param -templateRefresh 240 -udpPmtu 128 -httpUrl enabled -webSaaSAppUsageReporting ENABLED -logstreamOverNSIP ENABLED

<!--NeedCopy-->
Set the AppFlow parameters by using the configuration utility
Navigate to System > AppFlow, click Change AppFlow Settings, and specify relevant AppFlow parameters.
Support for subscriber ID obfuscation
Starting from NetScaler release 13.0 build 35.xx, the AppFlow configuration is enhanced to support “subscriberIdObfuscation” algorithm for obfuscating MSISDN in layer 4 or layer 7, AppFlow records. However, before configuring the algorithm as MD5 or SHA256, you must first enable it as an AppFlow parameter. The parameter is disabled by default.
Configure the subscriber ID obfuscation algorithm by using the CLI
At the command prompt, type:
set appflow param [-subscriberIdObfuscation ( ENABLED | DISABLED )  [-subscriberIdObfuscationAlgo ( MD5 | SHA256 )]]

<!--NeedCopy-->
Example
set appflow param –subscriberIdObfuscation ENABLED – subscriberIdObfuscationAlgo SHA256

<!--NeedCopy-->
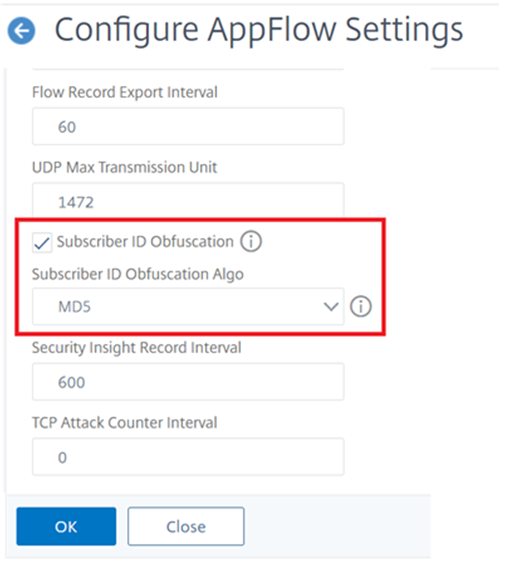
Configure the subscriber ID obfuscation algorithm by using the GUI
- Navigate to System > AppFlow.
- In the AppFlow detailed pane, click Change AppFlow Setting under Settings.
-
In Configure AppFlow Settings page, set the following parameters:
- Subscriber ID Obfuscation. Enable the option for obfuscation MSISDN in L4/L7 AppFlow records.
- Subscriber ID Obfuscation Algo. Select algorithm type as MD5 or SHA256.
-
Click OK and Close.
Example: Configure AppFlow for DataStream
The following example illustrates the procedure for configuring AppFlow for DataStream using the command line interface.
enable feature appflow

add db user sa password freebsd

add lbvserver lb0 MSSQL 10.102.147.97 1433 -appflowLog ENABLED

add service sv0 10.103.24.132 MSSQL 1433 -appflowLog ENABLED

bind lbvserver lb0 sv0

add appflow collector col0 -IPAddress 10.102.147.90

add appflow action act0 -collectors col0

add appflow policy pol0 "mssql.req.query.text.contains("select")" act0

bind lbvserver lb0 -policyName pol0 -priority 10

<!--NeedCopy-->
When the NetScaler appliance receives a database request, the appliance evaluates the request against a configured policy. If a match is found, the details are sent to the AppFlow collector configured in the policy.
Share
Share
In this article
This Preview product documentation is Cloud Software Group Confidential.
You agree to hold this documentation confidential pursuant to the terms of your Cloud Software Group Beta/Tech Preview Agreement.
The development, release and timing of any features or functionality described in the Preview documentation remains at our sole discretion and are subject to change without notice or consultation.
The documentation is for informational purposes only and is not a commitment, promise or legal obligation to deliver any material, code or functionality and should not be relied upon in making Cloud Software Group product purchase decisions.
If you do not agree, select I DO NOT AGREE to exit.